French Door Bottom Mount Dispensing and Storage Guide

Additional Features
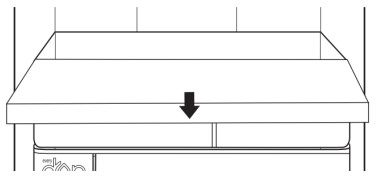
Additional FeaturesImportant information to know about glass shelves and covers:Do not clean glass shelves or covers with warm water when they are cold. Shelves and covers may break if exposed to sudden temperature changes or impact, such as bumping. Tempered glass is designed to shatter into many small, pebble-size pieces. This is normal. Glass shelves and covers are heavy. Use both hands when removing them to avoid dropping.PLATTER POCKET REMOVALTo remove and replace pull-out platter:NOTE: Refrigerator doors will need to be removed to remove the platter pocket. See the “Remove and Replace Refrigerator Doors” section for more information.
- Pull the pull-out platter to the fully open position or when it stops.
- Locate the pull-out platter retention clips on both sides. These are on the side under the pull-out platter.
- Push the clip up from the bottom with your finger
- After both clips have been disengaged, carefully remove the pull-out platter toward the front of the refrigerator.
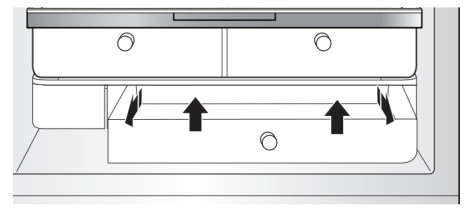
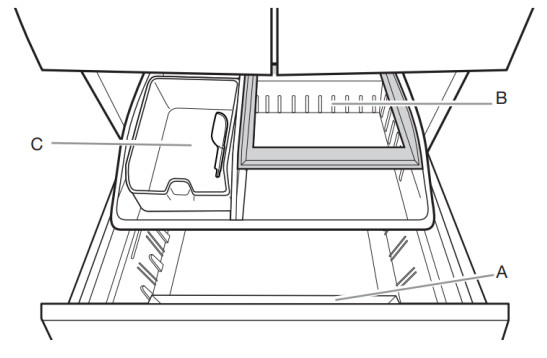
CRISPER DRAWERS
To remove and replace the drawers:
- Grasp the handle at the bottom of the drawer and slide the drawer straight out to the stop. Lift the drawer off the bottom guide.
- Replace the drawer by placing it on the bottom drawer guide and pushing it past the drawer stop into position.
To remove the crispers cover (can remove only if platter pocket is removed first):
- Remove the platter pocket first.
- Holding the glass insert firmly with one hand, press up in the center of the glass insert until it rises above the plastic frame. Gently slide the glass insert forward to remove.
To replace crisper(s) cover(s):
- Remove the crisper pan, platter pocket, and crisper glass before removing the crisper.
- Fit back of the cover frame into supports on sidewalls of the refrigerator and lower the front of the cover frame into place.
- Slide rear of glass insert into cover frame and lower front into place.
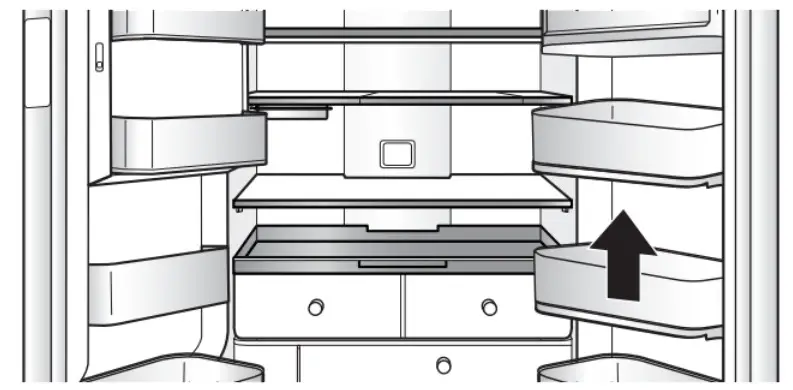
Refrigerator Drawers and Bins
DOOR BINSThe bins on your refrigerator door are adjustable to meet your individual storage needs. The gallon-size bins make it easy to customize door storage to hold gallon containers.DOOR BIN DIVIDER (on some models)This divider fits in the door bin to divide the bin and elevate smaller items at the back of the bin.
 Freezer Drawers and Bins
 Freezer Drawers and Bins
SMALL ITEMS BIN (on some models)This drawer divider is not removable and is for small, delicate items. For storage flexibility, the drawer bin can move forward and back, allowing you to store larger items in one section of the freezer.PIZZA POCKETSpace at the front of the drawer allows vertical storage of additional pizza boxes.THIRD-TIER This shelf is not removable. To allow access, the third tier is able to move backward, allowing access to items in the area below.
ICE BIN (on some models)Ice storage for the second icemaker.
Water and Ice Dispenser Controls
IMPORTANT:
- The display screen on the dispenser control panel will turn off automatically and enter “sleep” mode when the control buttons and dispenser paddles have not been used for 2 minutes or more. Touch any control button to reactivate the display screen.
- Allow 3 hours for the refrigerator to cool down and chill water.
- Allow 24 hours to produce the first batch of ice. Discard the first 3 batches of ice produced.
- The dispensing system will not operate if the left-hand refrigerator door is open.
The control is located above the external dispenser of the refrigerator.
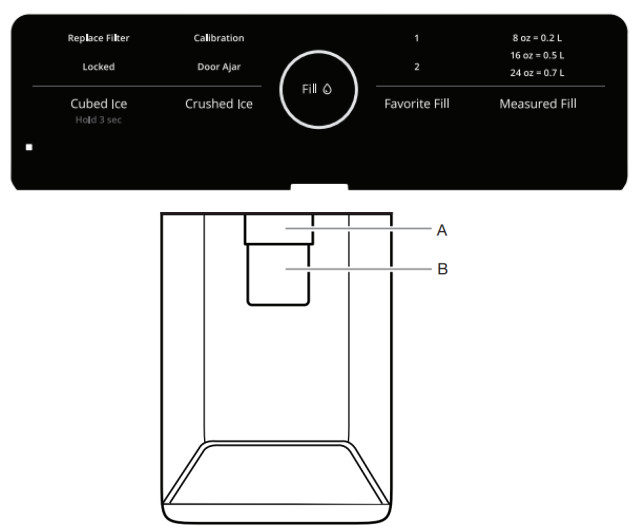 A. Water dispenser paddleB. Ice dispenser paddle
TO DISPENSE WATER (STANDARD)
- Press a sturdy glass against the water dispenser paddle.
- Remove the glass to stop dispensing.
NOTE: The Fill button does not enable standard dispensing. It only functions in Measured Fill or Favorite Fill mode.
TO DISPENSE WATER (MEASURED FILL)
Measured Fill allows you to dispense a specified amount of water with the touch of a few buttons.Household water pressure may affect the accuracy of the Measured Fill feature. For optimum performance of your water dispenser, you must first calibrate Measured Fill.How to calibrate Measured Fill:IMPORTANT: Flush the water system before calibrating the Measured Fill. See “Flush the Water System” in the Owner’s Manual. For best results, calibration should be performed when water is not being used in the house.
- Place a sturdy measuring cup (1-cup [237 mL] size) on the dispenser tray centered in front of the ice/water dispenser paddle. Ensure that you do not have any Measured Fill preset selected.NOTE: Depending on your model, a measuring cup may be provided.
- Touch and hold the Measured Fill button for 3 seconds to enter into Calibration mode. The Calibration and Measured Fill icons will illuminate and remain lit while the Measured Fill feature is being calibrated.NOTE: You may touch Measured Fill to exit at any time in Calibration mode. The Calibration and Measured Fill icons will disappear.
- Press and hold the water dispenser paddle, as needed, to dispense water to the 1-cup fill line in the measuring cup.NOTE: If overfilling or spilling occurs, discard the water and restart the calibration process.
- When 1 cup of water has been correctly dispensed into the measuring cup, touch Measured Fill to confirm the calibration.
When Measured Fill calibration has been confirmed, the calibration icon will disappear and the display will return to the home screen.
- Put a sturdy glass under the waterspout. Touch Measured Fill to activate.NOTE: The amount of water you select will be dispensed. Make sure the container can hold the entire volume. If ice is in the container, you may need to adjust your selection.
- Touch Measured Fill to turn on, then touch to select 8 oz (0.2 L), 16 oz (0.5 L), or 24 oz (0.7 L). Touch the fourth time to exit the Measured Fill display.
- Touch Fill (center button) or press paddle and the selected amount of water will be dispensed.• The Measured Fill dispenser will automatically time out after 1 minute of inactivity.• You can refill several glasses with the same measurement by continuing to touch Fill (center button) after each glass fill.Measured Fill options are listed in the following chart:
Units Ounces 8 16 24 Cups 1 2 3 Liters 0.2 0.5 0.7 NOTE: Most coffee cups (commonly 4 to 6 oz [118 to 177 mL] per cup) are not the same size as a measuring cup (8 oz [237 mL]). You may need to recalibrate Measured Fill to underfill or to avoid unintentionally overfilling coffee cups.
- Dispense water. While dispensing water, the flow of water will automatically stop once the desired volume has been dispensed.• Press a sturdy glass against the dispenser paddle below the waterspout.or• Place the glass below the waterspout and touch Fill for hands-free dispensing.
- To pause dispensing before the selected volume has been dispensed, touch Dispense Water a second time or touch the water dispenser paddle. Touch Fill or paddle again to resume dispensing the remaining amount.NOTE: If you stop dispensing before the desired volume has been dispensed, the display will turn off after 1 minute. If you have not resumed by then, it will reset back to the original amount.
- To select a new volume or start dispensing the same volume again, you must first finish dispensing the selected volume or turn off the Measured Fill feature (either by waiting 1 minute so it will automatically turn off or by touching Cubed Ice or Crushed Ice to manually turn it off), and then select Measured Fill again.
TO DISPENSE WATER (FAVORITE FILL)Favorite Fill allows you to dispense a preferred amount of water with the touch of a few buttons.Household water pressure may affect the accuracy of the Favorite Fill feature. So, for optimum performance of your water dispenser, you must first calibrate Measured Fill. (See Measured Fill section).IMPORTANT: Flush the water system before Favorite Fill. For best results, calibration should be performed when water is not being used in the house.
- Place a preferred-size cup on the dispenser tray centered in front of the ice/water dispenser paddle.
- Select either Favorite 1 or Favorite 2, and then touch and hold the Favorite Fill button for 3 seconds to enter into Saving mode.The Favorite Fill icon will illuminate and remain lit while the Favorite Fill feature is being saved.NOTE: You may touch Favorite Fill to exit at any time in Saving mode and the display will return to the Home screen.
- Press and hold the water dispenser paddle, as needed, to dispense water to the preferred-size cup.NOTE: If overfilling or spilling occurs, discard the water and restart the saving process.
- When the preferred amount of water has been correctly dispensed into the cup, touch the Favorite Fill button to confirm the favorite amount.
When Favorite Fill amount has been confirmed, the display will return to the home screen.
- Put a sturdy glass under waterspout. Touch Favorite Fill to activate.NOTE: The amount of water you select will be dispensed. Make sure the container can hold the entire volume. If ice is in the container, you may need to adjust your selection.
- Touch Favorite Fill to turn on, then touch to select Favorite 1 or Favorite 2. Touch the third time to exit Favorite Fill display.
- Touch Fill (center button) or press paddle and the selected amount of water will be dispensed.• The Favorite Fill dispenser will automatically time out after 1 minute of inactivity.• You can refill several glasses with the same measurement by continuing to touch Fill (center button) after each glass fill.
- Dispense water. While dispensing water, the flow of water will automatically stop once the desired volume has been dispensed.• Press a sturdy glass against the dispenser paddle below the waterspout.or• Place the glass below the waterspout and touch Fill for hands-free dispensing.
- To pause dispensing before the selected volume has been dispensed, touch Dispense Water a second time or touch the water dispenser paddle. Touch Fill or paddle again to resume dispensing the remaining amount.
- To select a new volume or start dispensing the same volume again, you must first finish dispensing the selected volume or turn off the Favorite Fill feature (either by waiting 1 minute so it will automatically turn off or by touching Cubed Ice or Crushed Ice to manually turn it off), and then select Favorite Fill again.
TO DISPENSE ICETouch Cubed Ice or Crushed Ice for your nice selection.IMPORTANT:
- If the ice cubes are hollow or have an irregular shape, it could be because of low water pressure. See the “Water Supply Requirements” section in the Owner’s Manual.
- Ice travels from the ice storage bin through the dispenser chute to the dispenser. To turn off the ice maker, see the “Ice Maker and Storage Bin” section in the Owner’s Manual.
- The dispenser may continue to make noise and ice may continue to dispense for several seconds after releasing the dispenser button or paddle.NOTE:
- For crushed ice, cubes are crushed before being dispensed. This may cause a slight delay when dispensing crushed ice. Noise from the ice crusher is normal and pieces of ice may vary in size.
- When changing from crushed to cubed, a few ounces of crushed ice will be dispensed along with the first cubes.
Additional Dispenser Features
DOOR AJAR ALARMThe Door Ajar Alarm feature sounds an alarm when the refrigerator door(s) or freezer drawer is open for 5 minutes and cooling is turned on. The alarm will repeat every 2 minutes. Close all doors and drawer to turn it off.NOTE: To mute the audible alarm while keeping the doors open, such as while cleaning the inside of the refrigerator, touch any button on the control panel. The alarm sound will be temporarily turned off, but the Door Ajar icon will still be displayed on the dispenser control panel.DISPENSER LIGHTWhen you use the dispenser, the light will automatically turn on. The dispenser light also serves as an automatic night light. Once the ambient light in the room is reduced, the auto sensor will cause the dispenser light to illuminate.DISPENSER LOCKThe dispenser can be locked for easy cleaning or to avoid unintentional dispensing by small children and pets.NOTE: The lock feature does not shut off power to the refrigerator or the dispenser light. It simply deactivates the controls and dispenser levers. To turn off the ice maker, see the “Ice Maker and Storage Bin” section in the Owner’s Manual.
- Touch and hold Cubed Ice for 3 seconds to lock the dispenser.
- Touch and hold Cubed Ice for 3 seconds to unlock the dispenser.
- The display screen indicates when the dispenser is locked.
DISPENSER DRIP TRAY
The drip tray can be removed to carry to the sink to empty or clean. Lift up on the front edge of the tray and pull forward to remove. The drip tray can also slide out to assist in Measured/Favorite Fill.
 Audio ReferenceThis table is for quick reference only. See corresponding sections for details. In case of inconsistency, section details will prevail.
| Tone Assignment | |
| POWER ON | Cooling system is turned on every time the product is powered on. |
| POWER OFF | Cooling system is turned off. |
| KEYPRESS | User presses a valid button. |
| INVALID (ERROR) | User presses 2 or more valid buttons at the same time. Count-down interruption for press-and-hold buttons. User presses pad when dispensing is not allowed. |
| ENGAGE | UI is locked. Max Ice is turned on. Measured Fill dispensing completely. Smart Grid is turned on when a Wi-Fi connection is initiated by the user. |
| DISENGAGE | UI is unlocked. Max Ice is turned off. Dispensing has timed out. |
| ALERT | Wi-Fi alert, Door Ajar alert, or Wi-Fi connection is lost for 12 hours. |
©2020 All rights reserved. Used under license in Canada.W11418807A
[xyz-ips snippet=”download-snippet”]