AJAX Street Siren User Manual
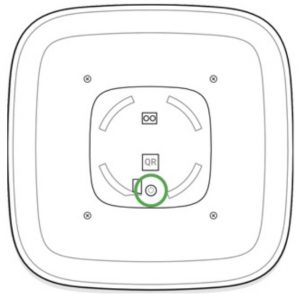
Functional Elements
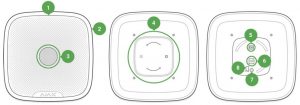
- LED frame
- Light indicator
- Siren buzzer behind the metal net
- Smart Bracket attachment panel
- External power supply connection terminals
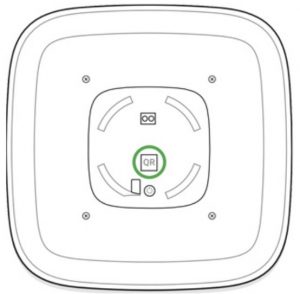
- QR code
- On/off button
- Place of Fixing the Smart Bracket panel with a screw
Operating Principle
Street Siren significantly improves the efficiency of the security system.With a high probability, its loud alarm signal and light indication is suffIcient to attract the attention of neighbors and deter intruders. The siren can be seen and heard from far away due to the powerful buzzer and bright LED. When installed properly, it is hard to dismount and switch off the actuated siren: its body is sturdy, the metal net protects the buzzer, the power supply is autonomous, and the on/off button is locked during the alarm. Street Siren is equipped with a tamper button and an accelerometer. The tamper button is triggered when the device body is opened, and the accelerometer is activated when someone’s try to move or dismount the device.
Connecting
Before starting the connection:
- Following the hub user guide, install the Ajax app. Create an account, add the hub, and create at least one room.
- Switch on the hub and check the internet connection (via Ethernet cable and/or GSM network).
- Make sure that the hub is disarmed and does not update by checking its status in the Ajax app.
![]() Only users with administrator rights can pair the device with the hub.
Only users with administrator rights can pair the device with the hub.
Pairing the device with the hub:
- Select Add Device in the Ajax app.
- Name the device, scan or type the QR Code (located on the detector body and packaging), and select the location room.

- Tap Add — the countdown will start.
- Switch on the device by holding the power button for 3 seconds.
![]() The on/off button is recessed into the body of the siren and quite tight, you can use a thin solid object to press it.
The on/off button is recessed into the body of the siren and quite tight, you can use a thin solid object to press it.
For detecting and pairing to occur, the device should be located within the coverage of the wireless network of the hub (at the same protected object). The connection request is transmitted brieay: at the moment of switching on the device. Street Siren switches off automatically after failing to connect to the hub. To retry the connection, you do not need to switch it off. If the device has already been assigned to another hub, switch it off and follow the standard pairing procedure. The device connected to the hub appears in the list of devices in the app. The update of the detector statuses in the list depends on the device ping interval set in the hub settings (the default value is 36 seconds).
![]() Please note that only 10 sirens can be connected to one hub
Please note that only 10 sirens can be connected to one hub
States
- Devices
- Street Siren
 |
|
|
|
|
|
|
|
|
|
|
|
|
|
|
 |
|
|
|
|
|
|
|
|
|
Alert If Moved |
|
|
|
|
|
|
|
|
 Temperature
 Jeweler Signal Strength
 Connection
 Battery Charge
 Lid
Lid
 Routed Through Rex
 External Power
 Routed Through Rex
 External Power
 Alarm Volume
 Alarm Duration


 Armed Mode Indication
 Beep when Arming/Disarming
 Beep on Delay
 Beep Volume
|
Parameter |
Value |
|
Temperature |
The temperature of the device which is measured on the processor and changes gradually |
|
Jeweller Signal Strength |
The signal strength between the hub and device |
|
Connection |
The connection status between the hub and device |
| Battery Charge | Battery level of the device |
|
Lid |
The tamper button state, which reacts to the opening of the device body |
|
Routed Through ReX |
Displays the status of using the ReX range extender |
| External Power | The external power supply state |
| Alarm Volume | Volume level in case of alarm |
| Alarm Duration | Duration of the alarm sound |
| Alert if moved | The state of the accelerometer alarm |
| Armed mode indication | The state of armed mode indication |
|
Beep when arming/disarming |
The state of indication of security mode changing |
|
Beep on delay |
The state of beeping arming/disarming delays |
| Beep Volume | The volume level of the beeper |
| Firmware | Siren firmware version |
| Device ID | Device identifier |
Settings
- Devices
- Street Siren
- Settings
 |
| Room: Office |
| Alarms in Group Mode All Groups |
| Alarm Volume Quite |
| Alarm Duration 3 |
Alert Moved |
| Armed Mode Indication |
| Beep When Arming/Disarming |
| Beep on Delay |
| Beep Volume |
Volume Test |
Jeweler Signal Strength Test |
 Street Siren Settings Street Siren Settings
|
| Alarm Duration 3 |
| Alert if Moved |
| Armed Mode Indication |
| Beep When Arming/Disarming |
| Beep on Delay |
| Beep Volume Loud |
| Volume Test |
| Jeweler Signal Strength Test |
| Attenuation Test |
| User Guide |
| Unfair Device |
|
Setting |
Value |
| First field | Device name, can be edited |
|
Room |
Selecting the virtual room to which the device is assigned |
| Alarms in group mode | Selecting the security group to which the siren is assigned. When assigned to a group, the siren and its indication are related to alarms and events of this group. Regardless of the group selected, the siren will respond to Night Mode activation and alarms. |
| Choosing one of the three volume* | |
|
Alarm Volume |
levels: from 85 dB — the lowest to 113 dB — the highest
*the volume level was measured at a distance of 1 m |
|
Alarm Duration (sec) |
Settling the time of the siren alarm (from 3 to 180 seconds per alarm) |
|
Alarm if moved |
If active, the accelerometer reacts to moving or tearing off from the surface |
|
Armed mode indication |
If activated, the siren LED blinks once every 2 seconds when the security system is armed |
|
Beep when arming/disarming |
If activated, the siren indicates arming and disarming by LED frame blink and a short sound signal |
|
Beep on delay |
If activated, the siren will beep delays (available from 3.50 FW version) |
|
Beep Volume |
Selecting the volume level of the siren beeper when notifying about arming/disarming or delays |
| Volume test | Starting the siren volume test |
|
Jeweller Signal Strength Test |
Switching the device to the signal strength test mode |
|
Attenuation Test |
Switching the siren to the signal fade test mode (available in devices with firmware version 3.50 and later) |
| User Guide | Opens the siren User Guide |
|
Unpair Device |
Disconnects the siren from the hub and deletes its settings |
Indication
|
Event |
Indication |
|
Alarm |
Emits an acoustic signal (the duration depends on the settings) and the LED frame blinks red |
| Switching on | The LED frame blinks once |
|
Switching off |
The LED frame lights up for 1 second, then blinks three times |
|
Registration failed |
The LED frame blinks 6 times in the corner then full frame blinks 3 times and the siren switches off |
| Security system is armed (if indication activated) | The LED frame blinks one time and the siren emits a short sound signal |
| Security system is disarmed (if the indication is activated) | The LED frame blinks two times and the siren emits two short sound signals |
|
Siren in the armed mode (if the indication is activated) |
The LED frame corner lights up every 2 seconds
When StreetSiren is powered externally, its LED frame glows permanently in the corner (for firmware version 3.41.0 and higher) |
|
Low battery |
The LED frame corner lights up and goes out when the system is armed/disarmed, the alarm goes off, in case of dismounting or unauthorized opening. |
Performance Testing
The Ajax security system allows conducting tests for checking the functionality of connected devices. The tests do not start straight away but within a period of 36 seconds when using the standard settings. The test time start depends on the settings of the detector polling period (the Jeweller menu settings in hub settings).
Volume Level TestJeweller Signal Strength TestAttenuation Test
Installing
The location of the siren depends on its remoteness from the hub, and obstacles hindering the radio signal transmission: walls, aoors, large objects.
![]() Check the Jeweller signal strength at the installation location
Check the Jeweller signal strength at the installation location
If the signal level is low (one bar), we cannot guarantee stable operation of the detector. Take all possible measures to improve the quality of the signal. At least, move the detector: even a 20 cm shift can signifIcantly improve the quality of signal reception.If the detector has low or unstable signal strength even after https://support.ajax.systems/en/manuals/streetsiren/
Street Siren is protected from dust/moisture (IP54 class), which means it can be placed outdoors. The recommended installation height is 2.5 meters and higher. Such a height hinders access to the device for intruders. When installing and using the device, follow the general electrical safety rules for electrical appliances, as well as the requirements of regulatory legal acts on electrical safety.
![]() It is strictly prohibited to disassemble the device under voltage! Do not use the device with a damaged power cord.
It is strictly prohibited to disassemble the device under voltage! Do not use the device with a damaged power cord.
Mounting
Before mounting StreetSiren, make sure that you have selected the optimal location and it is in compliance with the guidelines of this manual!
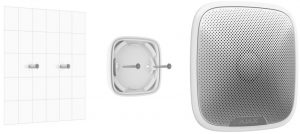
Installation process
- If you are going to use an external power supply (12 V), drill a hole for the wire in SmartBracket. Before installation, make sure that there the wire insulation is not damaged! You need to drill a hole in the mounting panel to lead out the external power supply wire.
- Fix SmartBracket to the surface with bundled screws. If using any other attaching hardware, make sure that they do not damage or deform the panel. Using the double-sided adhesive tape is not recommended either for a temporary nor permanent fixing.
- Put StreetSiren on the SmartBracket panel and turn it clockwise. Fix the device with a screw. Fixing the siren to the panel with a screw makes it difficult for intruders to remove the device quickly.
Do not install the siren:
- Near metal objects and mirrors (they can interfere with the RF signal and cause it to fade);
- In the places were its sound can be muffed;
- Closer than 1 m from the hub.
Maintenance
Check the operational capability of StreetSiren regularly. Clean the siren body from dust, spider web, and other contaminants as they appear. Use a soft dry napkin suitable for tech equipment. Do not use any substances containing alcohol, acetone, gasoline, and other active solvents to clean the detector. Street Siren can operate up to 5 years from pre-installed batteries (with the detector ping interval of 1 minute) or approximately 5 hours of constant signaling with buzzer. When the battery is low, the security system notiPes the user, and the LED frame corner smoothly lights up and goes out when arming/disarming or when the alarm goes off, including dismounting or unauthorized opening. Battery Replacement
Technical Specification
|
Type of notification |
Sound and light (LEDs) |
|
Sound notification volume |
85 dB to 113 dB at a distance of 1 m (adjustable) |
| Operating frequency of the piezo annunciator |
3.5 ± 0.5 kHz |
| Protection against dismounting | Accelerometer |
|
Frequency band |
868.0 – 868.6 MHz or 868.7 – 869.2
MHz depending on the region of sale |
|
Compatibility |
Operates only with Hub, Hub Plus, Hub 2 and ReX |
| Maximum RF output power | Up to 25 mW |
| Modulation of the signal | GFSK |
| Radio signal range | Up to 1,500 m (any obstacles absent) |
| Power supply | 4 × CR123A, 3 V |
| Battery life | Up to 5 years |
| External supply | 12 V, 1.5 A DC |
| Body protection level | IP54 |
| Operating temperature range | From -25°С to +50°С |
| Operating humidity | Up to 95% |
| Overall dimensions | 200 × 200 × 51 mm |
| Weight | 528 g |
|
Certification |
Security Grade 2, Environmental Class III in conformity with the requirements of EN 50131-1, EN 50131-4, EN 50131-5-3 |
Complete Set
- Street Siren
- Smart Bracket mounting panel
- Battery CR123A (pre-installed) 4 pcs
- Installation kit
- Quick Start Guide
Warranty
Warranty for the “AJAX SYSTEMS MANUFACTURING” LIMITED LIABILITY COMPANY products is valid for 2 years after the purchase and does not apply to the pre-installed battery. If the device does not work correctly, you should Prst contact the support service — in half of the cases, technical issues can be solved remotely!The full text of the warranty: User AgreementTechnical support:
Need help?In this section you’ll Pnd detailed manuals and educational videos about all features of Ajax. And in case you need help of a technical specialist, we’re available 24/7.
References
How to replace batteries in StreetSiren? | Ajax Systems Support
uartBridge — Module for Ajax devices integration with third-party wireless alarms systems
Warranty – Ajax Systems
What is Volume Level Test | Ajax Systems Support
What is Jeweller Signal Strength Test | Ajax Systems Support
ReX — Intelligent radio signal range extender | Ajax Systems
StreetSiren — Wireless outdoor siren | Ajax Systems
Hub 2 — Security control panel supporting detectors with photo verification
Hub Plus — Slim bedieningspaneel van het beveiligingssysteem met wifi, 3G en dual sim | Ajax Systems
End user agreement – Ajax Systems
Software | Ajax Systems
Support request
Hub — Intelligent security control panel | Ajax Systems
Jeweller radio technology | Ajax Systems
ocBridge Plus — Module for Ajax devices integration with wired systems
What is Attenuation Test | Ajax Systems Support
[xyz-ips snippet=”download-snippet”]