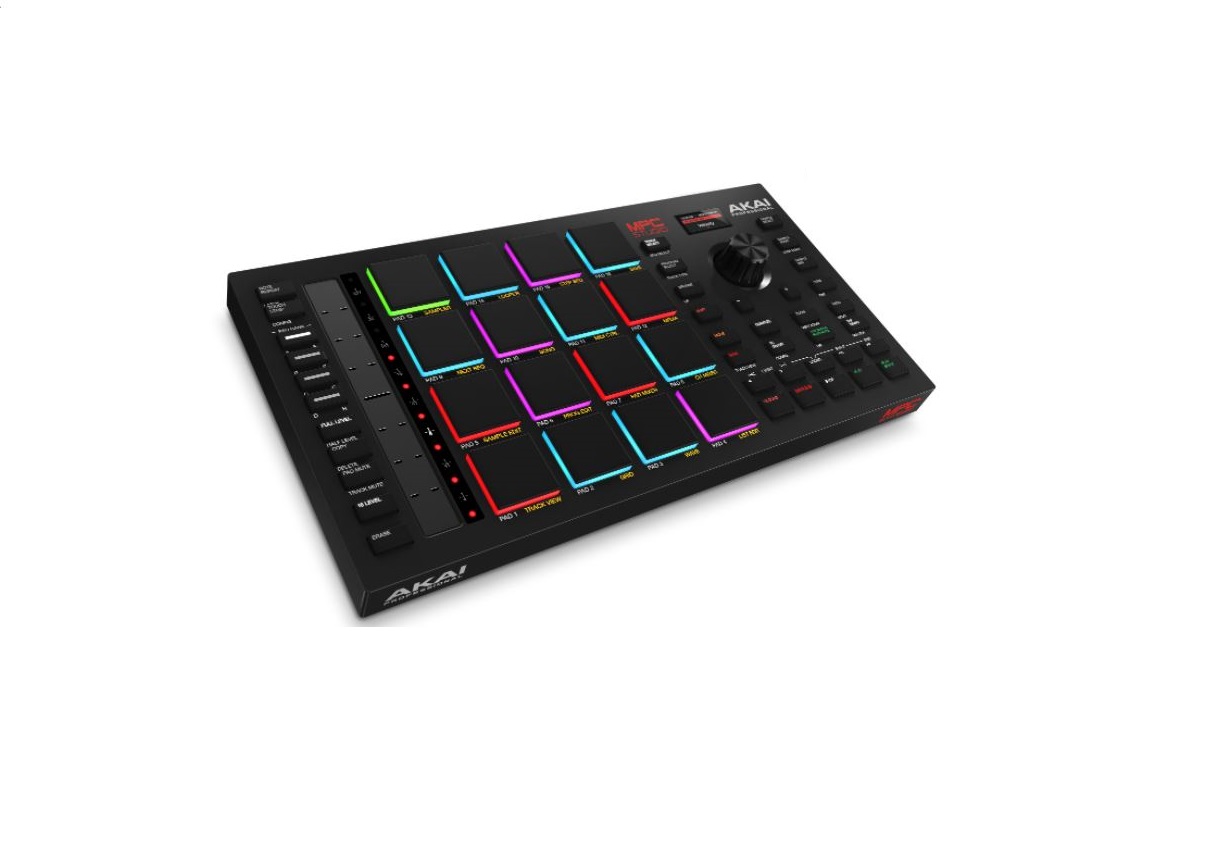
AKAI PROFESSIONAL MPC Studio Drum Pad Controller
with Assignable TouchStrip User Guide

Introduction
Features:
- 16 full size velocity sensitive RGB pads
- Color LCD
- Touch strip controller
- 1/8″ (3.5 mm) TRS MIDI I/O
- USB bus powered
- Includes MPC beat making software
Box Contents
MPC Studio mk2USB Cable(2) 1/8″ (3.5 mm) TRS to 5-Pin MIDI AdaptersSoftware Download CardQuackster GuideSafety & Warranty ManualImportant: Visit akaipro.com and find the webpage for MPC Studio mk2 to download the complete User Guide.
Support
For the latest information about this product (documentation, technical specifications, system requirements, compatibility information, etc.) and product registration, visit akaipro.com. For additional product support, visit akaipro.com/support.
MPC Software Installation
- Go to akaipro.com and register your product. If you don’t have an Akai Professional account yet, you will be prompted to create one.
- In your Akai Professional account, download the MPC software package.
- Open the file and double-click the installer application.
- Follow the on-screen instructions to complete the installation.Note: By default, the MPC software will be installed in [your hard drive]Program Files Akai Pro MPC (Windows®) or Applications (macOS®). You can also create a shortcut on your Desktop.
Getting Started
- First, connect MPC Studio to your computer using a USB cable.
- On your computer, open the MPC software.
- Next, set up your audio. In the MPC software, open the Preferences:Windows: Click the menu icon (), select Edit, and click Preferences.macOS: Click the MPC menu, and click Preferences.
- In the Preferences window, click the Audio tab and select the sound card you want to use. Click OK when you are done. Windows users only: We recommend using an external audio interface when possible. If you need to use your computer’s internal sound card, we recommend downloading the latest ASIO4ALL driver at asio4all.com.
- Access the complete User Guide by clicking the menu icon in the software, and selecting Help > MPC Help.
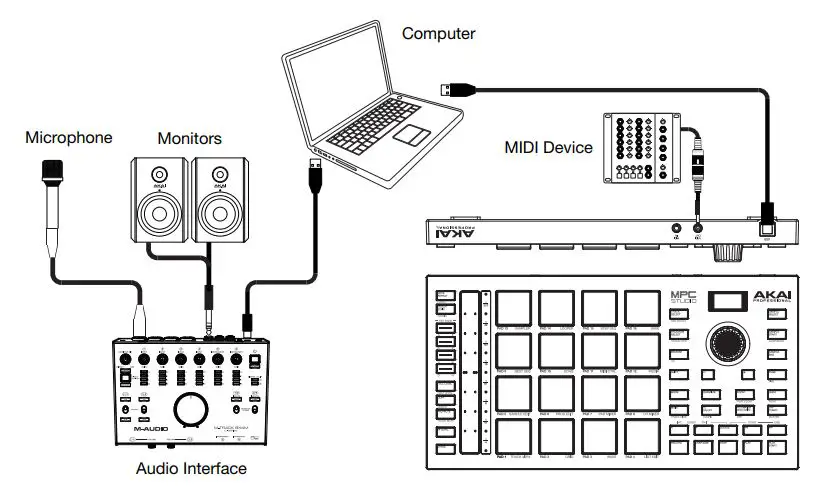
Connection Diagram
Items not listed under Introduction > Box Contents are sold separately.
Features
Top Panel
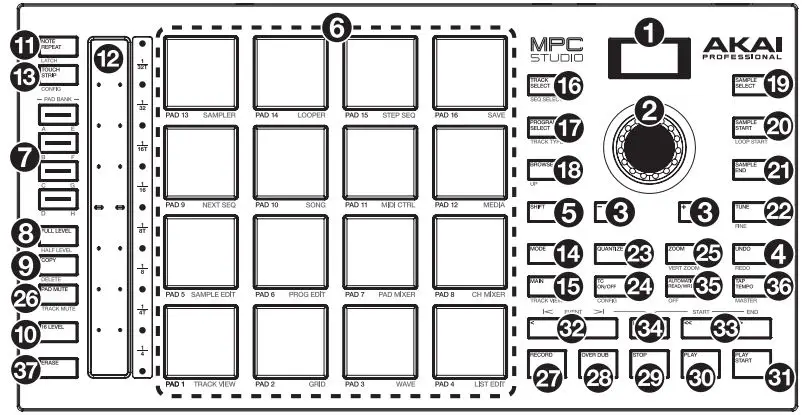
Navigation & Data Entry Controls
- Display: This RGB LCD display shows information relevant to MPC Studio’s current operation. Much of this information is also shown in the software. Use the Mode and Select buttons to change what is shown on the display, and use the data dial or -/+ buttons to adjust the currently selected setting/parameter.
- Data Dial: Use this dial to scroll through the available menu options or adjust the parameter values of the selected field in the display. Pressing the dial also functions as an Enter button.
- -/+: Press these buttons to increase or decrease the value of the selected field in the display.
- Undo / Redo: Press this button to undo your last action.Press and hold Shift and press this button to redo the last action you undid.
- Shift: Press and hold this button to access some buttons’ secondary functions (indicated by white writing).Pad & Touch Strip Controls
- Pads: Use these pads to trigger drum hits or other samples. The pads are velocity-sensitive and pressure-sensitive, which makes them very responsive and intuitive to play. The pads will light up different colors, depending on how hard you play them (ranging from yellow at a low velocity to red at the highest velocity). You can also customize their colors. Press and hold the Mode button and press each pad to quickly jump to the mode printed below the pad in orange.
- Pad Bank Buttons: Press any of these buttons to access Pad Banks AD. Press and hold Shift while pressing any of these buttons to access Pad Banks EH. Alternatively, double-press one of these buttons.
- Full Level / Half Level: Press this button to activate/deactivate Full Level. When activated, the pads will always trigger their samples at the maximum velocity (127), regardless of the amount of force you use. Press and hold Shift and then press this button to activate/deactivate Half Level. When activated, the pads will always trigger their samples at half-velocity (64).
- Copy / Delete: Press this button to copy one pad to another. Use the Copy from pad field to select the “source” pad (the pad you want to copy) and use the Copy to pad field to select the “destination” pad. You can select multiple destination pads, and you can select pads in different pad banks. Tap Do It to continue or Cancel to return to the previous screen. Press and hold Shift and press this button to view the Delete Pad window, where you can delete the contents of a selected pad.
- 16 Level: Press this button to activate/deactivate 16 Level. When activated, the last pad that was hit will be temporarily copied to all 16 pads. The pads will play the same sample as the original pad, but a selectable parameter will increase in value with each pad number, regardless of the amount of force you use. Use the data dial or -/+ buttons to select the 16 Level parameter.
- Note Repeat / Latch: Press and hold this button, and then press a pad to trigger that pad’s sample repeatedly. The rate is based on the current tempo and Time Correct settings. Press and hold Shift and then press this button to “latch” the Note Repeat feature. When latched, you do not have to hold the Note Repeat button for it to be activated. Press Note Repeat once more to unlatch it. You can also change the note repeat rate using the Touch Strip.
- Touch Strip: The touch strip can be used as an expressive control for playing and can be configured to control Note Repeat, Pitch Bend, Modulation, XYFX and more.
- Touch Strip / Config: Press this button to cycle between control modes for the Touch Strip. Press and hold the button to quickly select one of the control modes. Press and hold Shift and press this button to view the Touch Strip Configuration window.Mode & View Controls
- Mode: Press and hold this button and then press a pad to quickly jump to the mode printed below the pad in orange:· Pad 1: Track View Mode· Pad 2: Grid Editor· Pad 3: Wave Editor· Pad 4: List Editor· Pad 5: Sample Edit Mode· Pad 6: Program Edit Mode· Pad 7: Pad Mixer Mode· Pad 8: Channel Mixer Mode· Pad 9: Next Sequence Mode· Pad 10: Song Mode· Pad 11: MIDI Control Mode·Pad 12: Media / Browser Mode · Pad 13: Sampler · Pad 14: Looper · Pad 15: Step Sequence Mode· Pad 16: Save
- Main / Track View: Press this button to enter Main Mode. Press and hold Shift and then press this button to enter Track View Mode.
- Track Select / Sew Select: Press this button to toggle between viewing MIDI Tracks and Audio Tracks, and then use the data dial or -/+ buttons to change the selected track. Press and hold Shift, press this button and use the data dial or -/+ buttons to change the selected Sequence.
- Program Select / Track Type: Press this button and use the data dial or -/+ buttons to change the Program for the selected track. Press and hold Shift, press this button and use the data dial or -/+ buttons to change the track type for the selected track: Drum, Key group, Plugin, MIDI, Clip or CV.
- Browse / Up: Press this button to view the Browser. You can use the Browser to locate and select programs, samples, sequences, etc. Press and hold Shift and then press this button to move up to the previous folder while using the Browser.
- Sample Select: Press this button and use the data dial or -/+ buttons to change the selected sample for the current pad. Press the button again to cycle between Layers 14 of the pad.
- Sample Start / Loop Start: Press this button and use the data dial or -/+ buttons to change the sample start point for the sample on the selected pad. Press the button again to cycle through Layers 14 of the pad. Press and hold Shift, press this button, and use the data dial or -/+ buttons to change the Loop Start point for the sample on the selected pad. Press and hold Shift and press the button again to cycle through Layers 14 of the pad.
- Sample End: Press this button and use the data dial or -/+ buttons to change the sample end point for the sample on the selected pad. Press the button again to cycle through Layers 14 of the pad.
- Tune / Fine: Press this button and use the data dial or -/+ buttons to change the Tuning for the sample on the selected pad. Press the button again to cycle through Layers 14 of the pad. Press and hold Shift, press this button, and use the data dial or -/+ buttons to change the Fine Tuning for the sample on the selected pad. Press and hold Shift and press the button again to cycle through Layers 14 of the pad.
- Quantize: Press this button to quantize all note events so they fall on exact, even time intervals as determined by the Timing Correct settings. Press and hold Shift and press this button to quantize only the currently selected note events.
- TC On/Off / Config: Press this button to turn Timing Correct on and off. Press and hold Shift and press this button to open the Timing Correct configuration window, which contains various settings to help quantize the events in your sequence.
- Zoom / Vert Zoom: Press this button and use the data dial or -/+ buttons to change the horizontal zoom level. Press and hold Shift, press this button and use the data dial or -/+ buttons to change the vertical zoom level.
- Pad Mute / Track Mute: Press this button to view Pad Mute Mode where you can easily mute pads within a program or set mute groups for each pad within a program. Press and hold Shift and press this button to view Track Mute Mode where you can easily mute tracks within a sequence or set mute groups for each track.Transport & Recording Controls
- Record: Press this button to record-arm the sequence. Press Play or Play Start to start recording. Recording in this way (as opposed to using Overdub) erases the events of the current sequence. After the sequence plays through once while recording, Overdub will be enabled.
- Overdub: Press this button to enable Overdub. When enabled, you can record events in a Sequence without overwriting any previously recorded events. You can enable Overdub before or during recording.
- Stop: Press this button to stop playback. You can double-press this button to silence audio that is still sounding once a note stops playing. Press and hold Shift and press this button to return the plainhead to 1:1:0.
- Play: Press this button to play the sequence from the plainhead’s current position.
- Play Start: Press this button to play the sequence from its start point.
- Step </> (Event |</>|): Use these buttons to move the plainhead left or right, one step at a time. Press and hold Locate and press one of these buttons to move the plainhead to the previous/next event in the sequence grid.
- Bar <</>> (Start/End): Use these buttons to move the plainhead left or right, one bar at a time. Press and hold Locate and press one of these buttons to move the plainhead to the start or end of the sequence grid.
- Locate: Use this button and the pads to add and select locator markers in the timeline. You can press and hold this button to momentarily add and select locator markers and then release to return to the previous function, or press and release to toggle the locate function on and off. When on, tap Pads 9-14 to set up to six locators on the timeline, and tap Pads 1-6 to jump to each locator.
- Automation Read/Write: Press this button to toggle the Global Automation state between Read and Write. Press and hold Shift and press this button to disable or enable Global Automation.
- Tap Tempo / Master: Press this button in time with the desired tempo to enter a new tempo (in BPM). Press and hold Shift and press this button to set whether the currently selected sequence follows its own tempo (the button will be lit white) or a master tempo (the button will be lit red).
- Erase: As a Sequence is playing, press and hold this button and then press a pad to delete the note event for that pad at the current playback position. This is a quick way to delete note events from your sequence without having to stop playback. When playback is stopped, press this button to open the Erase window where notes, automation and other sequence data can be erased from the sequence.
Rear Panel

- USB-B Port: Use the included USB cable to connect this high-retention-force USB port to an available USB port on your computer. This connection allows MPC Studio to send/receive MIDI data to/from the MPC software on your computer.
- MIDI In: Use the included 1/8″-to-MIDI adapter and a standard 5-pin MIDI cable (not included) to connect this input to the MIDI output of an external MIDI device (synthesizer, drum machine, etc.).
- MIDI Out: Use the included 1/8″-to-MIDI adapter and a standard 5-pin MIDI cable (not included) to connect this output to the MIDI input of an external MIDI device (synthesizer, drum machine, etc.).
Appendix
Technical Specifications
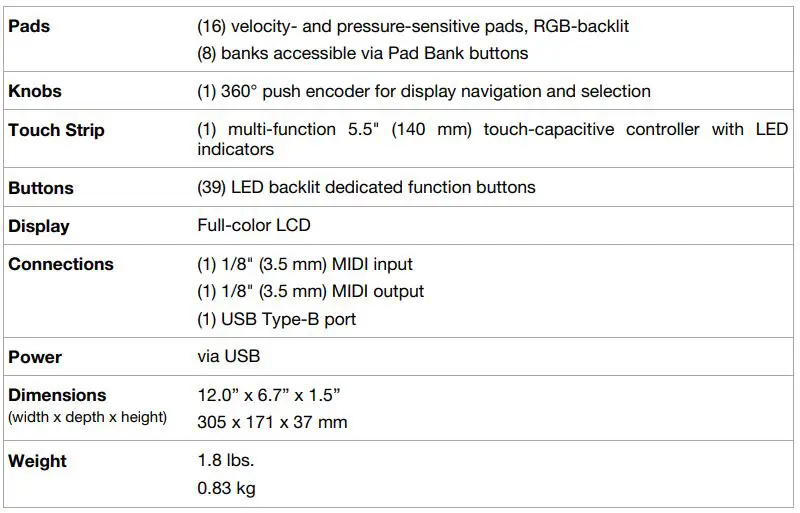
Specifications are subject to change without notice.
Trademarks & Licenses
Akai Professional and MPC are trademarks of in Music Brands, Inc., registered in the U.S. and other countries. All other product names, company names, trademarks, or trade names are those of their respective owners.

References
[xyz-ips snippet=”download-snippet”]

