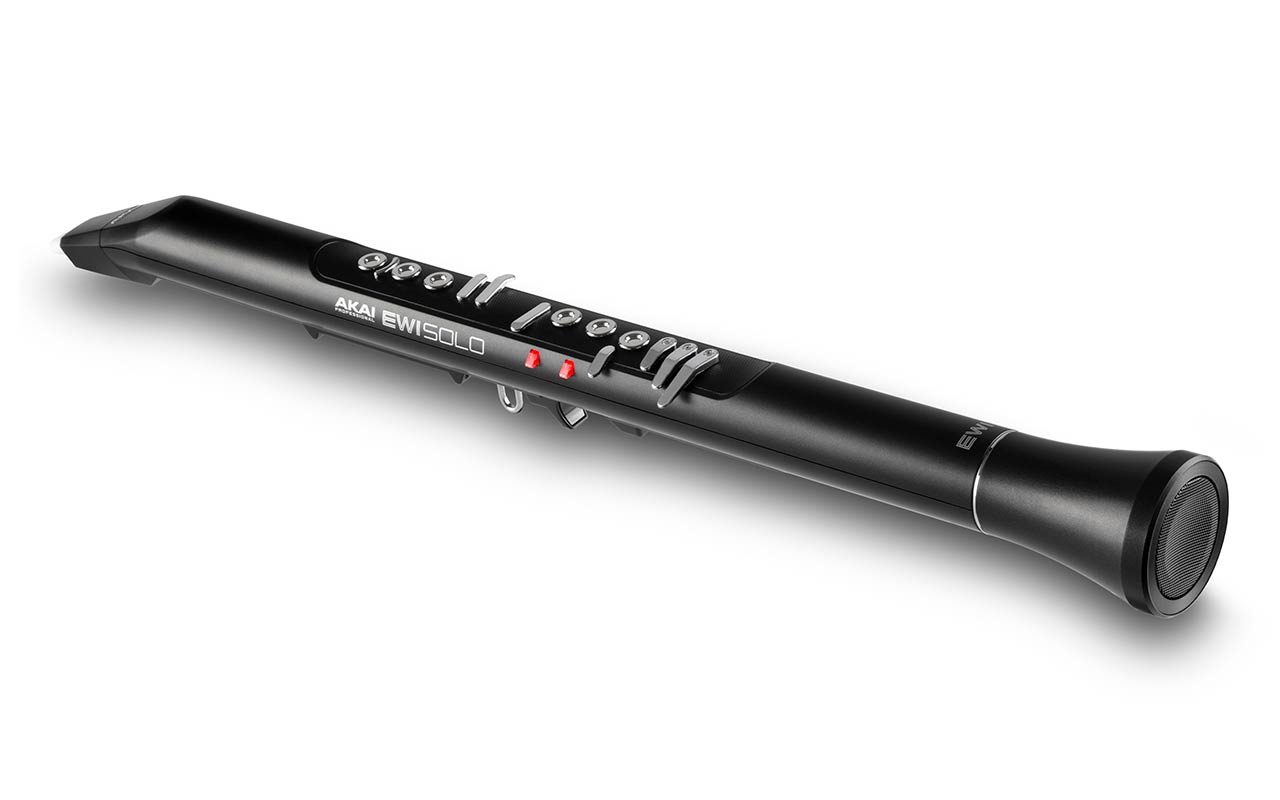
AKAI EWI Solo
Introduction
Box Contents
- EWI Solo EWI Solo Editor Software (download)
- USB Cable Quickstart Guide
- USB Power Adapter Safety and Warranty Manual
- Neck Strap
Important: Download the full EWI Solo User Guide and EWI Solo editor software from: akaipro.com
SupportFor the latest information about this product (documentation, technical specifications, system requirements, compatibility information, etc.) and product registration, visit akaipro.com. For additional product support, visit akaipro.com/support.
Getting Started
ImportantBefore operating the EWI Solo, please note the following:
- Do not bite the mouthpiece too hard—this can damage the vibrato sensor. Use the mouthpiece cover after using or while carrying the EWI Solo.
- Always touch the grounding plate and octave rollers when playing. These are sensors which use the performer’s body as the ground.
- Keep the mouthpiece clean before, during, and after using the EWI Solo. You can clean its outer surface with a slightly damp cloth.
Power the EWI SoloThe EWI Solo is powered by a rechargeable battery. Please note the following about using it:
- Charging: Use the included USB cable to connect the EWI Solo’s USB port to either (A) the included USB power adapter, connected to a power source or (B) an available USB port on your computer (powered on). You can charge the battery while using the EWI Solo. While charging, the Power LED will blink slowly.
- Power: EWI Solo will power on automatically when connected to USB. To power on EWI Solo when not connected to USB, press and hold the Power button for one second.
- Battery life: Check the battery life by viewing battery icon in the lower right corner of the display. Turn or press the encoder to activate the display, if necessary.
- Low-battery warning: When the battery power is low and EWI Solo is not connected to USB, the Power LED will flash quickly to indicate that you should charge the battery.
- Auto-power-off: If the EWI Solo detects no activity for approximately 30 minutes, it will power off automatically. You can disable this option in the Global Menu. In general, though, power off the EWI Solo to preserve its battery life when you are not using it.
Hold the EWI Solo
- Secure the neck strap to the EWI Solo’s neck strap mount.
- Place the strap around your neck and hold the EWI Solo with your left hand on the upper keys and your right hand on the lower keys, with the instrument vertically right in front of you and the bell (speaker) pointed down.
- When playing, place your left thumb on the octave rollers in the back, and place your right thumb between the thumb-hook and pitch-bend plate. This will ensure the best possible conductivity and performance of the instrument.
Connect
Important: The scenarios below are not mutually exclusive. The EWI Solo can send out audio from its Line Out, from its Phones jack, and through the built-in speaker all at the same time. Theexception is when the EWI Solo is connected to your computer and powered off (the third scenario in this section): it will send MIDI messages to your computer but not send any audio. To disable the built-in speaker, use the Global Menu.
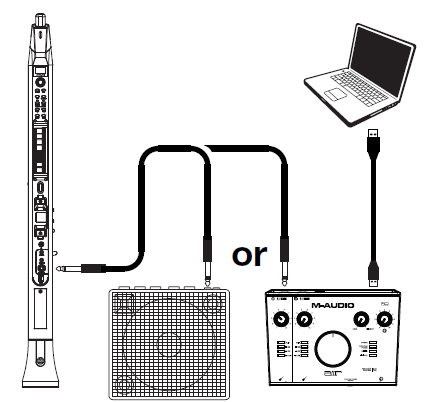
To play EWI Solo’s audio through an external amplifier, audio interface, etc.:
- Use a standard 1/4″ (6.35mm) cable to connect the EWI Solo’s Line Out to the line-level input of your keyboard amplifier, audio interface, etc.Important: The Line Out is a mono output. Use a TS or TRS cable to connect to a mono input (like those on most keyboard amplifiers, audio interfaces, etc.).
- Press the EWI Solo’s Power Button to power it on.

To play EWI Solo’s audio through headphones: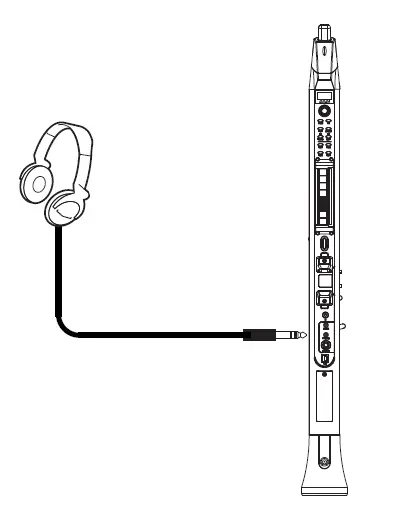
- Connect standard 1/8″ (3.5mm) stereo headphones to EWI Solo’s Phones jack.
- Press the EWI Solo’s Power Button to power it on.
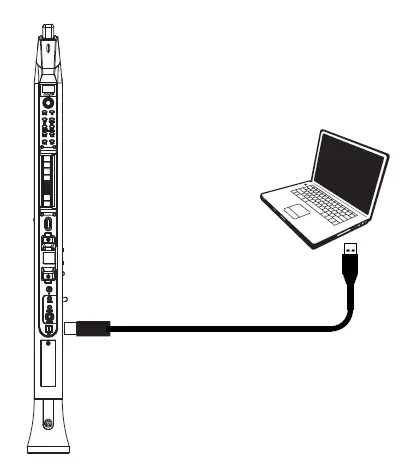
To play EWI Solo as a “wired” MIDI controller:
- Make sure EWI Solo is powered off. If it is not, press and hold the Power Button for a full second.
- Use the included USB cable to connect the EWI Solo’s USB port to your computer.
Play!
Hold the mouthpiece gently between your lips with your teeth, and exhale so your breath passes through both sides of your mouth. The EWI Solo detects this wind pressure with the breath sensor and expresses the change in sound volume and character, depending on how you blow. (It should not take much breath to activate the instrument.)
Tips:
- There is a bite sensor in the mouthpiece. You can produce a vibrato effect by gently biting the mouthpiece, which will bend the pitch up each time you bite, but do not bite too hard.
- You can articulate the notes you’re playing by tonguing the mouthpiece for even more expressive control.
- If the EWI Solo’s note keys, octave rollers, pitch-bend plate, or glide plates are not very responsive, it could be because you are playing with dry hands (the EWI Solo works by using the body’s capacitance). If this happens, you can use a very small amount of non-greasy hand lotion to improve the connection between your hands and the keys.
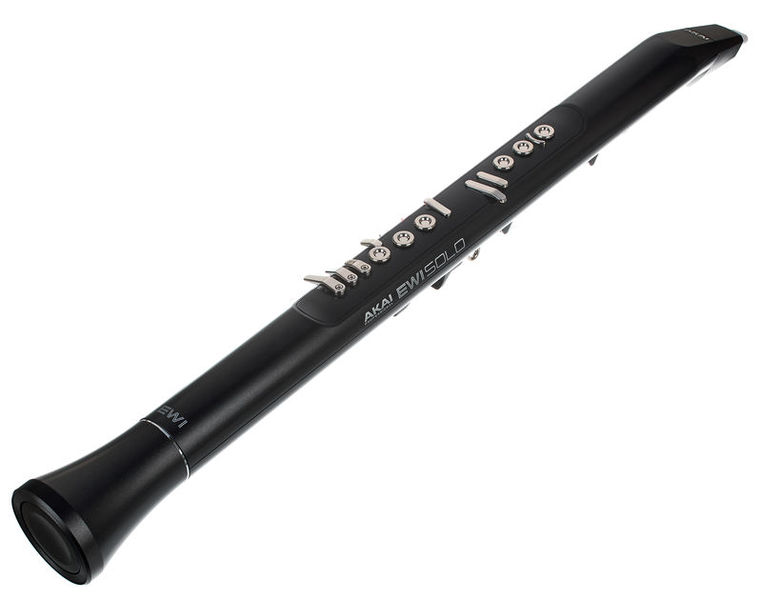
Note Keys: The note keys are sensors that let you produce sound with only a light touch. The EWI Solo has multiple fingering options, so itcan feel familiar to saxophonists, flutists, etc. You can adjust the position of the three lowest keys by loosening the screws that hold each of them in place.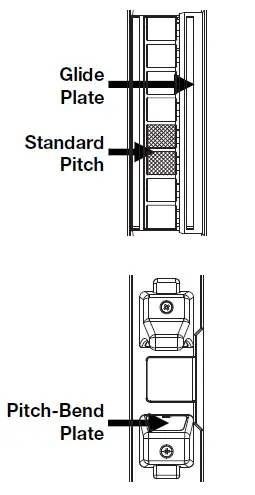
Octave Rollers: Place your left thumb between any two octave rollers (and over the grounding plate) on the EWI Solo’s back panel. Slide your thumb up or down across the octave rollers to shift its octave range up or down. While playing, keep your left thumb in contact with the octave rollers. The position between the two knurled octave rollers indicates the standard pitch.
Glide Plate: While playing a note, move your thumb across the octave rollers (without rolling them) while touching the glide plate on their right side to create a “glide” effect. This will smoothly and continuously slide the pitch up or down—a technique known as portamento.
Pitch-Bend Plate: Touch your thumb to this plate to move the pitch of the note you are playing up or down. You can adjust the pitch bend settings in the Global Menu. Before you get accustomed to using this plate, you may produce unexpected sounds by touching it accidentally. You can adjust the position of the plate by loosening its screw.
Features
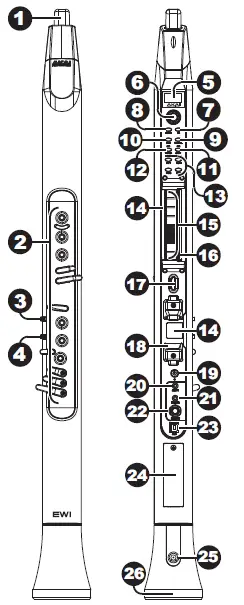
- Mouthpiece: Hold the mouthpiece gently in between your lips with your teeth and exhale into it (like a traditional wind instrument). You can produce a vibrato effect by gently biting the mouthpiece while blowing into it, but do not bite too hard.
- Note Keys: Press these keys in different combinations while blowing into the mouthpiece to determine the note. See Appendix > Fingering Charts for more information. You can adjust the position of the three lowest note keys by loosening their screws.
- Hold Button: Press this button to enter Hold Mode. By default, Hold Mode is set to Legato; the first note of a phrase will sustain while you play subsequent notes. Use the Global Menu to adjust this setting.
- Interval Button: Press this button to enter Interval Mode. By default, this is set to Fixed Interval; when you play a note, that note and the note at the assigned interval will sound (an octave below, by default). Use the Global Menu to adjust this setting.
- Display: This screen allows you to view programs, browse menus and edit parameters.
- Encoder: This encoder is used to navigate the display and select presets, depending on which mode is selected. When no mode is selected, turn the encoder to adjust the audio volume.
- FX (Effects) Button: Press this button to view available effects and set their level. Use the encoder to select Reverb, Chorus, or Delay, and adjust the available parameters. To return to the previous page or exit the FX menu, press the FX button again.
- Program Button: Press this button to view the Program list in the display. Turn the encoder to scroll through the programs and press it to load.
- Global Button: Press this button to enter the Global Menu, where you can adjust various hardware settings. See Advanced Functions > Global Menu for more information.
- Edit Button: Press this button to access the program editing controls, where you can adjust the Pitch Tuning, Filter and LFO 1/2 settings for the current program. See Advanced Functions > Edit Mode for more information. For Advanced Edit mode, download the EWI Solo Editor Software at akaipro.com.
- Save Button: Press this button to save the current program along with any changes to one of four Favorite lists, where you can quickly access your most-used programs. If changes have been made to the preset, the LED above this button will be lit. Selecting another preset before saving will discard any changes.
- Trans (Transpose) Button: Press this button to activate or deactivate the transposition function. Its LED will light up when transposition is activated. To adjust the transposition value, press and hold this button, turn the encoder to select the value, and then release this button.
- Favorites Buttons: Press these buttons to quickly access a list of saved programs. Programs can be added to a list by using the Save button.
- Grounding Plates: Always touch these plates while playing.
- Octave Rollers: Move your thumb up or down over these rollers to shift the note keys’ range. You can shift them up to four octaves higher or up to two octaves lower. Always touch these octave rollers while playing.
- Glide Plate: Touch this plate while playing a note to produce a “glide” effect, which smoothly and continuously slides the pitch up or down—a technique known as portamento. This can also be used to send custom MIDI CC messages.
- Neck Strap Clip: Connect the included neck strap here.
- Pitch-Bend Plate: Touch this plate while playing a note to raise or lower its pitch, depending on the Pitch Bend Plate setting in the Global Menu. You can adjust the position of this plate by loosening the screw.
- Power: Press and hold this button for a full second when EWI Solo is not connected to USB to power it on or off. A message will appear on the display to indicate the unit is powering off.
- Aux Input: Use an 1/8″ (3.5 mm) TRS cable to connect this input to the output of an audio device. The signal will be routed to the phones, line out, or speaker, depending on which output is being used.
- Phones: Connect headphones (optional, sold separately) here with a stereo 1/8″ (3.5 mm) cable.
- Line Output: Use a 1/4″ (6.35 mm) TS or TRS cable to connect this mono output to the input of a keyboard amplifier, audio interface, speaker system, etc.
- USB Port: Use a standard USB cable to connect this port to an available USB port on your computer. This connection will power the EWI Solo and charge its battery as well as send MIDI messages to your computer.
- Battery Compartment: Use a standard Phillips-head screwdriver (not included) to remove the battery compartment cover, replace the battery, and re-secure the cover.
- Drain Valve: This valve is used to drain built-up moisture from playing.
- Speaker: This built-in speaker will play the current audio from EWI Solo. Use the encoder while no mode is selected to adjust the volume. To turn the speaker off, use the Global Menu.
Advanced Functions
Edit ModeTo edit a program from EWI Solo:
- Press the Edit button to enter Edit Mode.
- Use the encoder to scroll through the available edit options: Pitch Tuning, Filter, LFO 1 and LFO 2.
- Push the encoder to view the selected option’s parameters.
- Turn the encoder to adjust the parameter, and then press the Edit button to return to the previous page.
- Press the Edit button again at any time to exit Edit mode.
If you like the adjustments you have made and want to save them to the program, press the Save Button and then use the encoder to select a Favorite list where the program will be saved.Important: When saving, only the settings that apply to the program will be saved. Settings that apply to the EWI Solo will affect all Programs because they affect the sensors and tuning of the EWI Solo hardware itself.Tip: To further customize your sound, use the EWI Solo sound editor software to adjust even more Program parameters and calibrate your unit. Go to akaipro.com to download the latest EWI Solo Editor and EWI Solo User Guide to learn more.
The EWI Solo’s various controls have been set to optimal values at the factory, but we recommend adjusting them to your preference to get the most out of your performance.To make adjustments in the Global Menu:
- Press the Global button to enter the Global Menu.
- Use the encoder to scroll through the list of Global Menu settings and push it to select the subtree:
Breath Sensor Glide Plate MIDI Channel Bite Sensor Pitch Bend Plate Speaker Key Response Hold Button 30min Idle Shutdown Fine Tuning Interval Button Acceleration Fingering LFO/Modulation - Turn the encoder to select the next subtree or adjust the selected setting or value.
- To return to the previous page or exit Global Mode, press the Global button.
To start, we recommend adjusting the Fingering. This tends to be the most “personal” setting that varies between different players, along with the Breath Sensor and Bite Sensor settings. For more in-depth editing, use the EWI Solo Editor Software.
Fingering
The EWI Solo’s different fingering modes accommodate different styles of playing. These are the available fingering modes:
Standard EWI This is the standard fingering for the EWI Solo, based on the fingering of conventional woodwind instruments.Saxophone: This fingering resembles that of a standard saxophone. In this mode, the EWI will ignore fingers that are two notes below the highest note.Flute: This fingering resembles that of a standard C flute, although flutists will have to familiarize themselves with a couple new fingerings to properly adapt their performance to the EWI Solo.Oboe: This fingering resembles that of a standard oboe.EVI: EVI stands for electric valve instrument. This fingering may be useful to players who wish to use fingerings closer to those of a brass instrument.Reverse EVI: This fingering most closely resembles the movement of the left wrist on an actual EVI (recommended mostly for experienced EVI players).
Restoring Default Settings
 report this ad
To return all of the EWI Solo’s settings to its factory defaults:
- Disconnect the EWI Solo from your computer.
- Power off the EWI Solo by pressing and holding the Power button for a full second and then releasing it.
- Press and hold the Program button, FX button, and Hold button.
- Power on the EWI Solo by pressing and holding the Power button for a full second.
- Release all buttons.
- When powered on, the display will show a menu with the following options. Use the encoder to select and option and then press it to select.
- Continue Normally: Select this option to power on EWI Solo normally.
- Reset GLOBAL Only: Select this option to reset only the Global settings to factory defaults.
- Reset Everything: Select this option to reset all settings to factory defaults. If no selection is made after a few seconds, EWI Solo will power on normally.Important: Restoring default settings cannot be undone.
References
[xyz-ips snippet=”download-snippet”]