
![]()
AKASO C200 Car Dash Camera User Manual
JOIN THE AKASO MOVEMENT


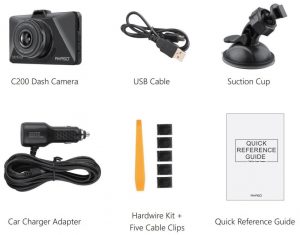
WHAT’S IN THE BOX?
CAMERA OVERVIEW

- TF Card Slot
- UP
- Menu
- Down
- Stand Base
- DC Power / USB Interface
- Video / OK
- Mode
- Emergency Save
- Power
- Lens
- Display
- MIC
- Reset Hole
Upon turning on the camera, press the “OK” button to stop recording.


CHARGING THE BATTERY
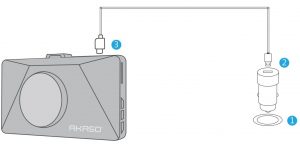
- Insert the USB car charger into your car’s cigarette lighter socket.
- Insert the USB end of the USB power cord into the USB car charger.
- Insert the Micro USB into the dash cam USB port(Charger Specification: In: DC 12-24V, Out: DC 5V 2A)
PLEASE NOTE:
- The battery takes about two hours to be charged fully.
- When the battery is charging, the indicator light on the top left of the screen will be stayed red; When it charged fully, the light goes off.
- To avoid damage to the device, please do not charge the battery via the USB data cable with other adapters.
RECORDING MODE SETTINGS
Press the menu button ![]() one time to enter to this mode, and press ▲ or ▼ to choose the option.
one time to enter to this mode, and press ▲ or ▼ to choose the option.
1. Resolution – 1080FHD / 720P / VGA three optional
- Default setting is 1080FHD.
2. Loop Recording – off / 1 minute / 3 minutes / 5 minutes four optional
- Default setting is 3 minutes.
3. WDR (Wide Dynamic Range)
- Default is on.
- Balance light and darkness in driving to get the best image automatically.
4. Motion Detection
- Default is off.
- The detection range is 5m, any motion will activate the camera to start recording, and it will stop after 20 seconds if there is no any motion at all.
5. Audio Recording
- Default is on.
- Allows you to enable or disable audio recording with your videos.
6. Date Stamp
- Default is on
- Stamp the date and time to the videos
7. G-sensor – off / low / medium / high four optional
- Default is medium
- Gravity Sensor means any collision will activate the camera to record, and the videos will be locked which will never be covered by new files.
- The video is stored as a file every three minutes. When driving, if the road is bumpy, please adjust it to low or turn off it directly to prevent the camera doesn’t work because of the memory card is full. When parking, recommend you to adjust it to medium.
8. Parking Monitor (default is off)
- Default is off
- When there is no power input and the camera has been turned off, the camera will be turned on automatically and start recording, the video will be saved and the camera automatic shutdown after 30 seconds
9. License Plate
- Default is off
- Press or to enter to your plate number, please note that numbers are behind the letters.
- Stamp the license plate to the videos, you will see it on computer not on camera.
SYSTEM SETTINGS
- Screen Timeout – off / 30 seconds / 1 minute / 2 minutes four optional• Default is off• Turn off the screen according to your option automatically
- Auto Power off – off / 3 minutes / 5 minutes / 10 minutes four optional• Default is off• Turn off the camera according to your option automatically
- Frequency – 50HZ / 60HZ two optional• Default is 60HZ
- Beep Sound• Turn on or off the button sound
- Language• Choose camera’s language
- Data / Time Setting• Press
 button twice to enter to setting interface, choose Data / time.• Press ▲ and ▼ to adjust the data and time, press “OK” to confirm the each option, press to end the setting.
 - Format• Every time you insert a SD card, please format it in the camera to ensure that the SD card is compatible with the camera.
- Default settings• Restore the original settings
- Version• Check the camera’s version
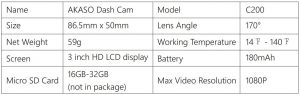
SPECIFICATIONS
PRECAUTIONS
- Please safekeeping, prevent the lens from scratching and dirty.
- Please pay attention to anti-fouling and moisture-proof.
- Do not exposure the machine to the sun directly, prevent the built-in battery from damage.
TROUBLESHOOTING
Q: The bracket is easy to fall off.A: Please tear off the film on the suction cup, and clean the windshield with a dry cloth.
Q: The image is blurry.A: The windshield will reflect the light, please adjust the camera.
Q: The camera lose power often.A: Due to different vehicle designs, please rotate the car charger to adjust it keep stable.
Q: The camera unable to be turned on.A: Please make sure that whether the charge indicator light is on or off, if off, pleasere-insert the car charger and reset the camera.
Q: All buttons are not responding.A: Please reset the camera to restart.
Q: The camera doesn’t record automatically after turning on.A: 1, Check whether the memory card is full or no.2, Reformat the card, if this problem exists, please change a new card.
Q: The video has no voice.A: Please confirm whether the recording indicator light is on. And in recording mode,short press will close to record the voice.
Q: Men button was no responding.A: Because when the camera is recording, you can not operate the menu button, pleasepress OK button to stop recording
Q: The camera keeps turning on and off automatically.A: please charge the camera via USB car charger, do not charge the battery via the USB data cable with other adapters
Contact US
For any inquiries, issues or comments concerning our products, please send E-mail tothe address below, and we will respond as soon as possible.E-mail: US customer service line: (301)670-7335
[xyz-ips snippet=”download-snippet”]