AKASO K1 Alarm Clock User Manual
FUNCTIONS
- 3.2″ backlit LCD
- Dual USB port charger(output 5V 1.1A+5V 2.1A)
- Dual alarm clock and choose to wake up to radio or default melody snooze function
- Digital FM radio
- 3.5mm stereo line-in cable for playing other audio devices
- Built-in thermometer(Celsius or Fahrenheit)
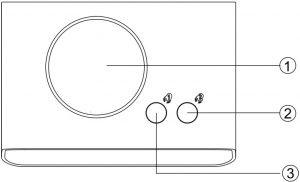
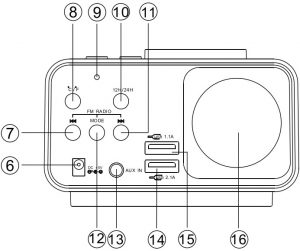
- Rotary Button
- Alarm Setting Button
- Alarm Setting Button
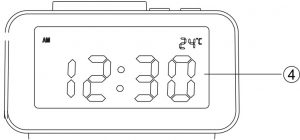
- LCD Screen
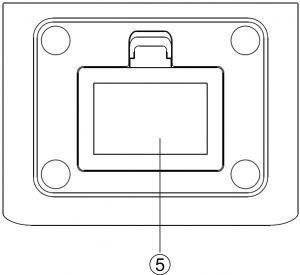
- Battery Compartment
- Power Input Jack
- Previous Button
- Temperature Switch(°C/°F)
- Temperature Sensor
- 12H / 24H Switch
- Next Button
- Mode Button
- Aux in Jack
- USB Port(1.1A / 2.1A)
- USB Port(1.1A / 2.1A)
- Speaker
WHAT’S INCLUDED
Open K1’s box, and you will find:
- K1 Alarm Clock x 1
- Aux-in Cable x 1
- Power Adapptor x 1
- User Manual x 1
INSTRUCTION
About Time – Time Setting, Alarm Setting, Snonze Setting
Time Setting
- In the energized state, long press the rotary button to enter time setting, when HOUR figure begins to flash, please revolve the rotary button o adjust HOUR. Then, short press the big button to confirm the HOUT setting and begin to set the MINUTES. WHen MINUTES figure begins to flash, please revolve the rotary button to adjust MINUTES. Then, short press the big button to confirm the MINUTE setting and exit time setting.
- Press 12H / 24H button can be switched time display mode for 12 hours(AM / PM) or 24 hours display.
Note: Time setting can not be adjusted in FM or AUX mode (There is a symbol of FM or AUX in the upper left part of LCD screen).
Alarm Setting
- In theenergized state, long pressing alarm 1 button to enter alarm setting, when HOUR figure begins to flash, please revolve the rotary button to adjust HOUR. Then, short press alarm 1 button to confirm the HOUR setting. When MINUTES figure begins to flash, please revolve the rotary button to adjust MINUTES. Next, short press alarm 1 button to confirm the MINUTE setting and begin to set ring tone. Please revolve the rotary button to choose FM radio or buzzer after confirming the Alarm setting. (If you choose FM radio as ring tone, there is a FM symbol in the middle-left part of screen. If you choose buzzer as ring tone, there is a Wi-Fi symbol in the middle-upper part of screen). Then, short press alarm 1 button to confirm ringtone and begin to choose alarm volume. Please revolve the rotary button to choose the alarm volume. Finally, short press alarm 1 button to confirm.
- When the alarm 1 goes on, press alarm 1 button to turn it off.
- There is a symbol alarm 1 in the middle-upper part of screen which means that you turn the alarm 1 on.
- The setting of alarm 2 is the same as alarm 1.
Note: This product provides dual alarm clock function, alarm 1 and alarm 2 for long-term alarm clock (Once clock set up , as long as the alarm is not manually closed, the alarm will work everyday).
Snooze Setting
- Press the rotary button when the alarm goes off to enter snooze setting. It will activate 3 times and with a 10 minutes interval.
- When the alarm goes off, without any action to turn it off the alarm clock, the alarm will persist to ring and turn off automatically after 60 minutes.
- Auto-scan radio station Long press rotary button to auto-scan radio station. In this mode, FM radio will scan and auto-store the scanned stations (freuency from 87.5MHz to 108MHz). If this device auto-scan a valid radio station, it automatically saves the station. When auto-scanning is finished, it goes back to play the 1st stored station. Pressing next of previous button can select the stored station.
- Manual-scan radio station Long pressing MODE button until the FM symbol begins to flash to enter manual-scan radio station mode. Once selected, then revolve rotary button to adjust frequencies. Short press rotary button to saved radio stations.
Tips: If you are in a bad signal environment, you can plug in the Aux – in cable and straighten the Aux-in cable. A straight Aux-in cable can be used as an external antenna.
- Connect your device with the alarm clock by 3.5mm stereo line cable.
- Press the rotary button to Play / Pause. Revolve rotary button to adjust volume.
Thermometer
- Press temperature button to switch between Celsius and Fahrenheit.
Display Brightness Adjustment
- Press ROtary button to adjust 5 levels brightness of the LCD display o turn of the LCD brightness. Noter: LCD brightness cannot be adjusted in FM and AUX mode.
USB Charging
- The unit is added with 2 USB output charging interface. Dual USB interface can charge for iPod, mobile Phone and iPad at the same time.
- USB 1 output 1.1A interface can only charge for mobile Phone.
- USB 2 output 2.1A interface can only charge for iPad.
Back-up Battery
The clock has a back-up power system which can be powered by 3 AAA batteries(not included) to ensure the memory of time during a power failure. The power source from AC to battery power is automatic.
Note: DC power is recommended. It is so humane and you will not worry about the sudden power outage.
Restore Factory Setting
If you want to reset factory settings, please disconnect the power supply and remove the battery (not included). Then, it will rest factory setting in next time.
CONTACT US
For any inquiries, issues or comments concerning our products, please send E-mail to the address below or call us. We will respond as soon as possible.E-mail: [email protected] US customer service line: (301)670-7335
[xyz-ips snippet=”download-snippet”]