

AKASO Mirror Dash Cam
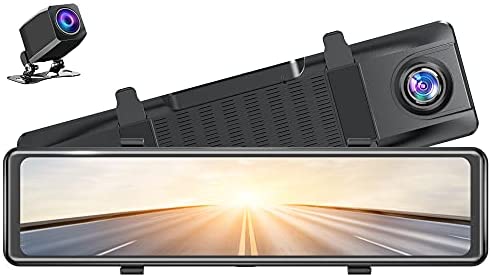
WHAT’S IN THE BOX

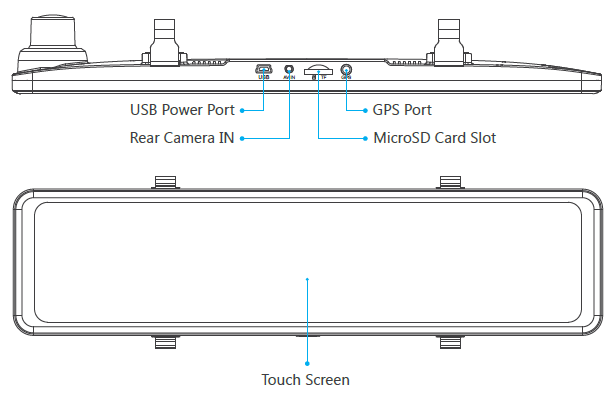
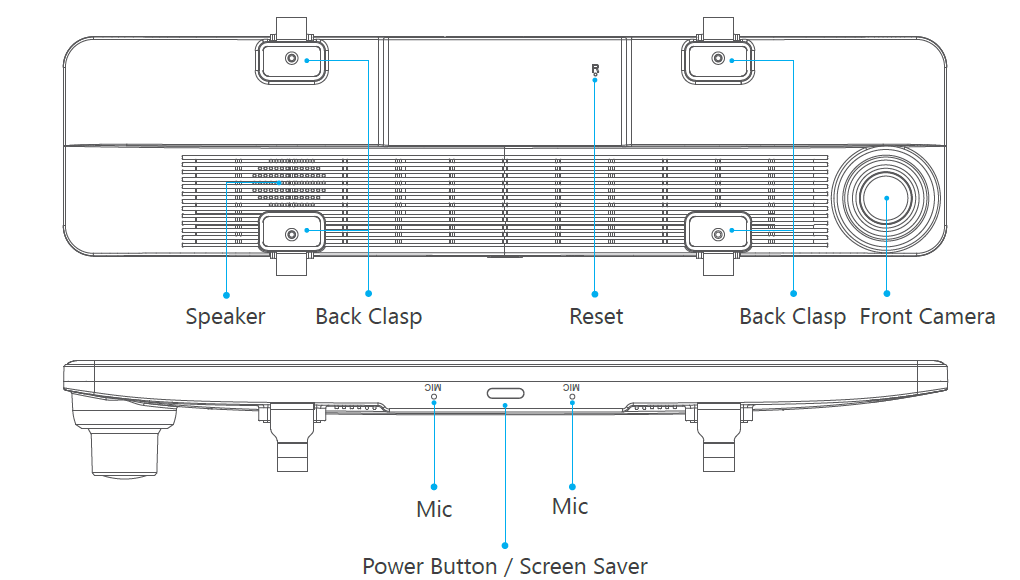
CAMERA OVERVIEW
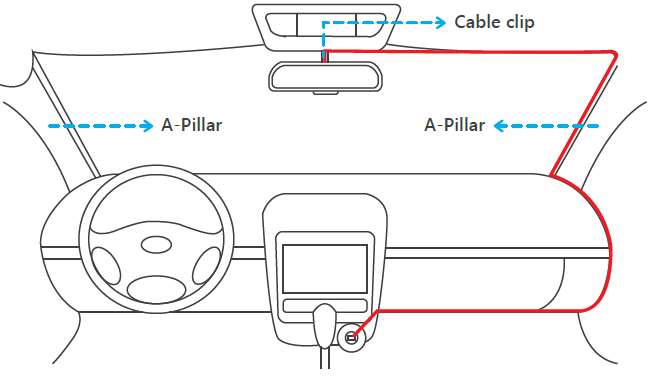
INSTALLATION
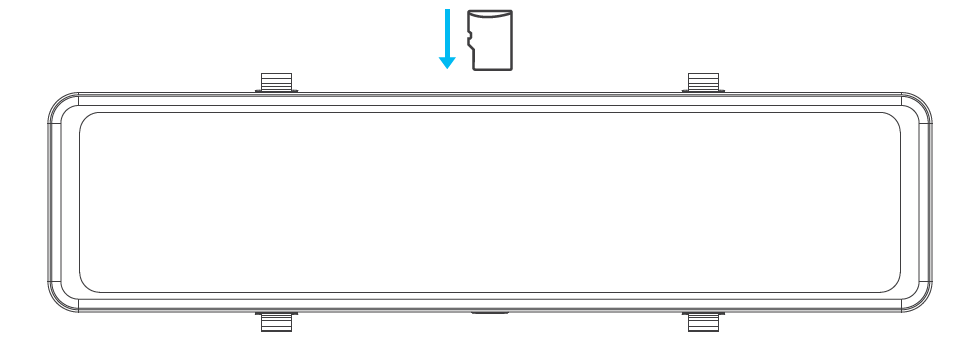
- Insert the microSD card into the mirror dash cam.Warm Tips: MicroSD Card U3 or above is Highly Recommended for DL12 mirror dash cam (Micro SD card is not included). Please format the card in the camera before using this mirror dash cam.
- Attach the mirror dash cam on the rear view mirror by straps.
- Connect the car charger to the car cigarette lighter port, then connect the USB connector to the USB power port of the mirror dash cam.
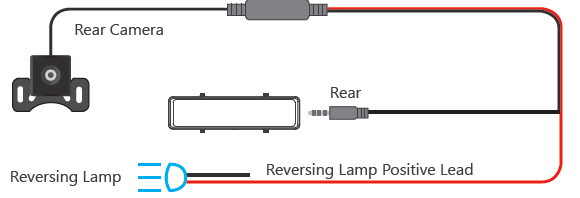
- Connect the rear camera and the extension cable to the dash cam to check whether the rear camera works well.
- Connect the GPS module to the dash cam, and attach it on the A-Pillar.
- Adjust the view angle of the front camera to get a good view.
- Use the crowbar to hide the cables, please refer to the following instructions.
- Install the rear camera.
- Installation position options.Position 1: Install the rear camera on the rear windshield. Position 1 is designed for live stream rear review only, not for reversing guide. The installation is easier.Position 2: Install the rear camera nearby the license plate. Position 2 is highly recommended. The rear image is crisp and clear for live stream rear view and reversing guide.
- For the reversing guide feature, install the rear camera in position 2, then connect the red trigger cable of rear camera extension cable to the positive lead of the car reversing lamp.
- Installation position options.Position 1: Install the rear camera on the rear windshield. Position 1 is designed for live stream rear review only, not for reversing guide. The installation is easier.
 Position 2: Install the rear camera nearby the license plate. Position 2 is highly recommended. The rear image is crisp and clear for live stream rear view and reversing guide.
Note:
- Pay attention to the connector position when connect the rear camera to the extension cable, please refer to the below details:
- Please clean the position to ensure the adhesive quality before install the rear camera.
- Please clean the rear windshield regularly to ensure the image quality if choose the position 1.
- If choose the position 2, you can install the rear camera with the included adhesive sticker or scews.

FORMATTING THE MICROSD CARD
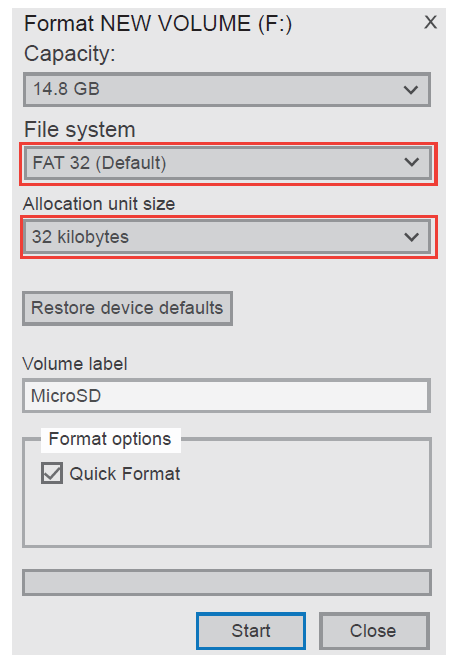
The microSD card needs to get formatted on computer firstly and then get formatted on the camera, to ensure the compatibility with the camera.This dash cam supports microSD card, up to 128GB with class 10 & above.
- Please format the card on computer firstly, see below picture:
- After inserting the card into the camera and turning on the camera, press the screen, then press button to stop recording.
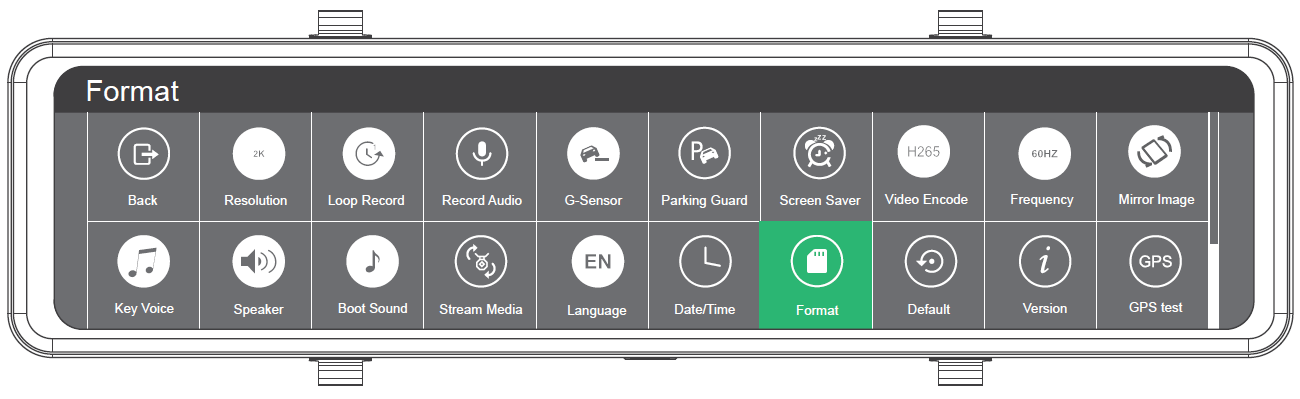
- Press “Setting” to enter setting interface, select “Format”, click ”Confirm” to format the microSD card.
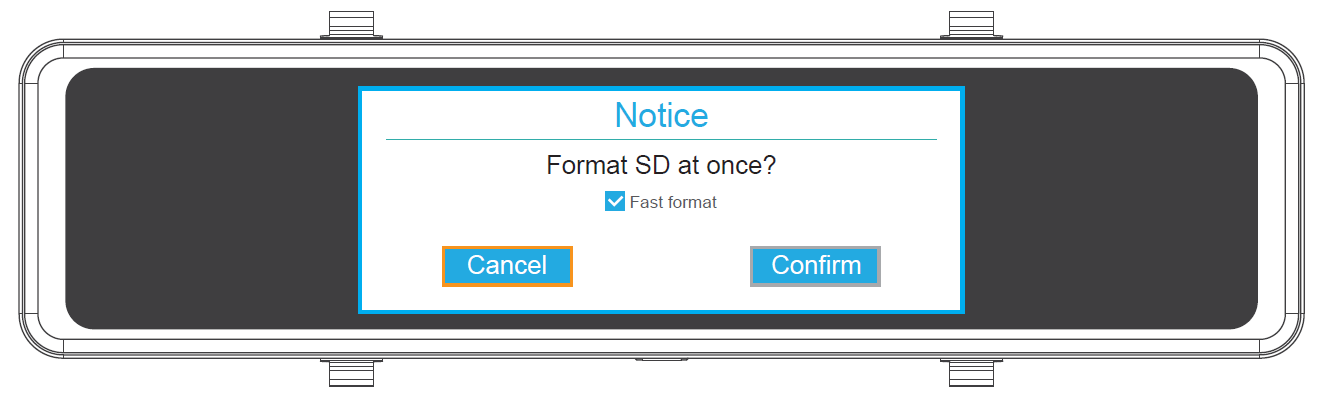
Note:
- All data will be deleted. Before formatting your microSD card, please remember to backup your important data on your other devices.
- Every time you insert a microSD card, please format it in the camera to ensure that the microSD card is compatible with the camera.
SETTING
After turning on the camera, click the screen and press to stop recording.
The time displayed in the top-left corner indicates how long has been recorded.when the time display “0:00:00”, that means the card is full. If turning on ”Loop Record”, you don’t need to change or format the card, it still records and the newest file will automatically overwrite the oldest file.
On the screen, slide from right to left to switch the view mode, among front view only, back view only, and both front and back views.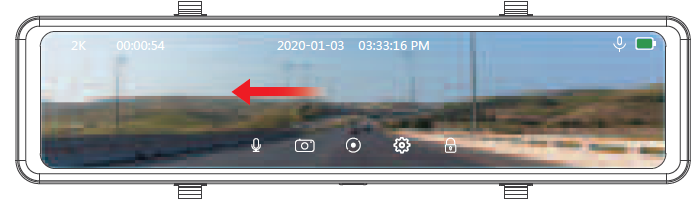
Slide from left to right to play the recorded videos on the screen.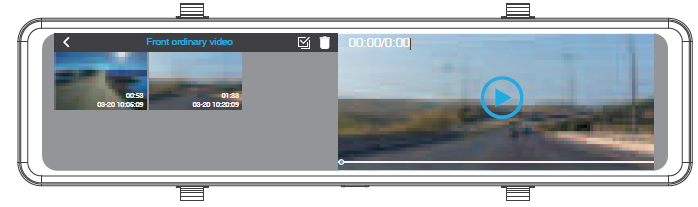
Drop down the menu to select the types of the recorded videos. Front ordinary video /Front urgent video / Rear ordinary video / Rear urgent video / Front photo / Rear photo is optional. The default list is front ordinary videos.
Click any of the videos on the left, it will be played on the right screen. Click the icon “ ” on the top-right corner to choose the videos in batches. Then click the icon “ ” to delete the chosen videos. On the left side of screen, slide up or down to adjust the view angle.Note: If you choose the view mode that displays the both views of front and rear cameras, the view angle adjustment feature is to be disabled.

On the right screen, slide up or down by finger to adjust the screen brightness. When sliding the right side of screen, The icon ” ” will appear, and you can adjust the brightness. Sliding up, the brightness lightens; sliding down, the brightness darkens.
Audio: Allows the recorded videos with sound or no sound. Turn on/off for optional, default is on. click to turn on/off the record Audio.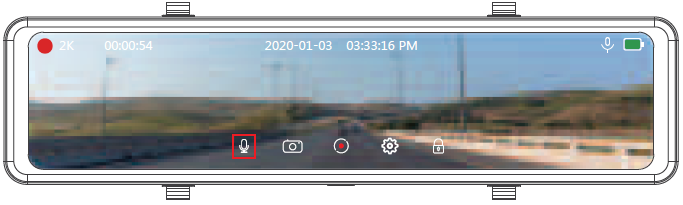
Resolution: 2K+1080P/1.5K+1080P for optional, default is 1080P.Set the video resolution for recording.
Loop Record: 1 Minute / 3 Minutes / 5 Minutes for optional, default is 3 Minutes.The files will be saved every 3 minutes if you choose 3 minutes. When the memory card is full, the new files will cover the old one if the loop recording is on; If it is off, the camera won’t record any more when the card is full, need to format the SD card or change a new one.Record Audio: ON/OFF for optional, default is ON. Recording Audio means when recording videos, the audio is being simultaneously recorded.
G-Sensor: Off / Low / Meddle / High for optional, default is Low.G-Sensor means any collision will activate the camera to record, and the videos will be locked which will never be covered by new files.The video will be stored as a file based on the time you set in the loop recording. When driving, if the road is bumpy, please adjust it to low or turn off it directly to prevent the camera doesn’t work because of the memory card is full. When parking, recommend you to adjust it to medium.
Parking Guard: Off / Low / Middle / High for optional, default is Low.The camera will be turned on automatically and start recording, if there is a hit of the car during parking. The video will be saved and the camera automatically shutdown after 30 seconds.
Screen Saver: Off / 1 minute /3 minutes for optional, default is off.The screen will be turned off automatically after the time you set.After turning off, the screen will reduce power consumption, the camera still work and record under the display off. Just click the screen, it will turn on.
Video Encode: H.265 / H.264 for optional, default is H.264.Video Encode is used to store and transmit videos, and supports two mainstream video encode standards-H.265 / H.264.
Frequency: 50Hz/60Hz for optional, default is 60Hz.Mirror Image: Off / On for optional, default is on.When Mirror Image turnes on, the principle is just like triditional rear view mirror, image displayed on the screen is opposite.
Key Voice: Off / On for optional, default is on.Turn On / Off the button sound.
Speaker: Mute / High / Medium / Low for optional, default is Medium.Adjust the volume in the playback video.
Boot Sound: on / off for optional, default is on.
Stream Media: on / off for optional, default is on.When starts recording, the camera will be comprehensive monitoring both the front and the rear traffic conditions in the real time, without delay.
Language: Chinese / English / French / German / Japanese / Spanish / Italian for optional. Default is English.
Date/Time: Year month day,Month day year,Day month year for optional, default is Month day year. Set the time format you prefer.
Format: Format the microSD card.
Note:
- All data will be deleted. Before formatting your microSD card, please remember to backup your important data on your other devices.
- Every time you insert a microSD card, please format it in the camera to ensure that the microSD card is compatible with the camera.
Default: Restore factory default settings.
Version: Check the camera’s version information.
GPS Test: Check the information of your driving, such as speed, azimuth, lan & lat, etc.
Time Zone: Set up the time zone.
Speed Calibration: Adjust the accuracy of driving speed.
PLAY VIDEOS ON COMPUTER
When having formatted the microSD Card, the player installation file will be included in microSD card. When the card is read by computer, please install the player first. Besides, you can also click the following link to download the dedicated player: https://www.akasotech.com/player
SPECIFICATIONS
| Name | AKASO Mirror Dash Cam | Model | DL12 |
| Size | 255*70*38mm | Viewing Angle | 320° (Front+Rear) |
| Net Weight | 373g | Working Temperature | -4°F – 140°F |
| Screen | 12 inch HD Touch Screen | Battery | 500mAh |
| MicroSD Card | 16GB-128GB | Max Video Resolution | 2.5K |
| MIC | Built-in | WDR | Support |
| GPS Module | Included |
Note:MicroSD Card U3 or above is Highly Recommended for DL12 mirror dash cam (MicroSD card is not included).Please format the card in the camera before using this mirror dash cam.
PRECAUTIONS
- Please safekeeping, prevent the lens from scratching and dirty.
- Please pay attention to anti-fouling and moisture-proof.
- Do not exposure the machine to the sun directly, prevent the built-in battery from damage.
TROUBLESHOOTING
Q: Why the camera always say “no card inserted”?A: 1. Please ensure that the memory card is U3 or above.2. Format the memory card on computer firstly. When you format it on computer, please choose “FAT32(Default)” on File system, and choose “32 kilobytes” on Allocation unit size.3. Format it in the camera.
Q: The camera don’t work any more.A: Please check whether the memory is full, if yes, please save the files and format the SD card.
Q: The image is blurry.A: The windshield will reflect the light, please adjust the camera.
Q: The camera lose power often.A: Due to different vehicle designs, please rotate the car charger to adjust it keep stable.
Q: The camera is unable to be turned on.A: Please make sure that whether the charge indicator light is on or off, if off, please re-insert the car charger and reset the camera.
Q: All buttons are not responding.A: Please reset the camera to restart.
Q: The camera doesn’t record automatically after turning on.A: Check whether the memory card is full or reformat the card, if this problem exists, please change a new card.
Q: The video has no voice.A: Please confirm whether recording mode is on, a icon is showing on the screen. If the icon is , please click to turn on the audio
Q: The camera keeps turning on and off automatically.A: Please charge the camera via USB car charger, do not charge the battery via the USB data cable with other adapters.
CONTACT US:
For any inquires with AKASO products, please feel free to contact us, we will respond within 24 hours.E-mail: [email protected]Tel: (888) 466-9222 (US) Mon-Fri (except holiday) 9am-5pm (EST)Official website: www.akasotech.com
References
[xyz-ips snippet=”download-snippet”]