
AKASO Smart Mini Projector
SAFETY INSTRUCTIONS
Read all instructions before you use this projector. Do not make any changes or create settings that are not described in this manual. If physical injury, loss of data or damage is caused by failure to follow instructions, the warranty does not apply.
SETUP
- To reduce the risk of fire and/or electric shock, do not expose the device to rain or moisture. Objects filled with liquids, such as vases, should not be placed on this device.
- Do not place this device on soft surfaces such as tablecloths or carpets, otherwise the device could be fire hazard.
- Do not place this device in areas susceptible to excessive dust and dirt or near any appliance generating a strong magnetic field.
- To prevent overheating do not block or clog the ventilation openings.
- Never place this device in a confined space. Always leave enough space around this device for ventilation.
- Protect this device from overexposure to direct sunlight, heat, large temperature fluctuations and moisture. Avoid extreme temperatures. The suitable operations and storage temperature for this device and its accessories is 0°C to 35°C/0°F to 95°F
- When this device is running for a long period of time, the surface may become hot. Shut it down immediately and unplug the charger. Resume operation after this device has cooled down.
- Always handle this device with care. Avoid touching the lens. And do not look directly into the lens to avoid the strong light hurt your eyes.
Note: When projector is working, please do not look directly into the lens, the strong light will flash your eyes and cause slight pain if your eyes are close to the lens. Children should use the projector under the supervision of adults.
CHARGING
- The output voltage/current of the adapter is DC 5V 3A and the input voltage/frequency is AC100-240V, 50/60Hz.
- When charging, place this device in an environment that has a normal room temperature (ranges from 5°C to 25°C/41°F to 77°F recommended) and good ventilation.
BATTERY
- Do not replace the built-in battery yourself. Contact an authorized service center to replace it.
- The remote control contains 2 x AAA batteries, keep the remote control out of reach children.
- Risk of explosion! Keep batteries away from heat, direct sunlight or fire. Never dispose of batteries by burning.
- When the remote control is not used for a long period of time, remove the battery.
- Replace the remote control battery only with the same or an equivalent type.
- Batteries contain chemical substances and should be disposed of properly.
- Charge this device regularly. Do not store this device with a completely discharged battery.
CLEANING
- Use a soft, lint-free cloth. Never use liquid, gaseous or easily flammable cleansers(sprays, abrasives, polishes, alcohol) to clean.
- Do not use any liquid cleaning agents to clean the lens to avoid damaging the coating film on the lens. Use lens cleaning paper to clean the lens.
REPAIRS
- Do not make any repairs to this device yourself. Only have your device repaired by an authorized service center.
- Improper maintenance can result in injuries or damage to this device.
- Refer all servicing to qualified service personnel.
CAUTION
- Possibly hazardous optical radiation emitted from this device.
- Do not stare at the operating beam. The bright light may damage your eyes.
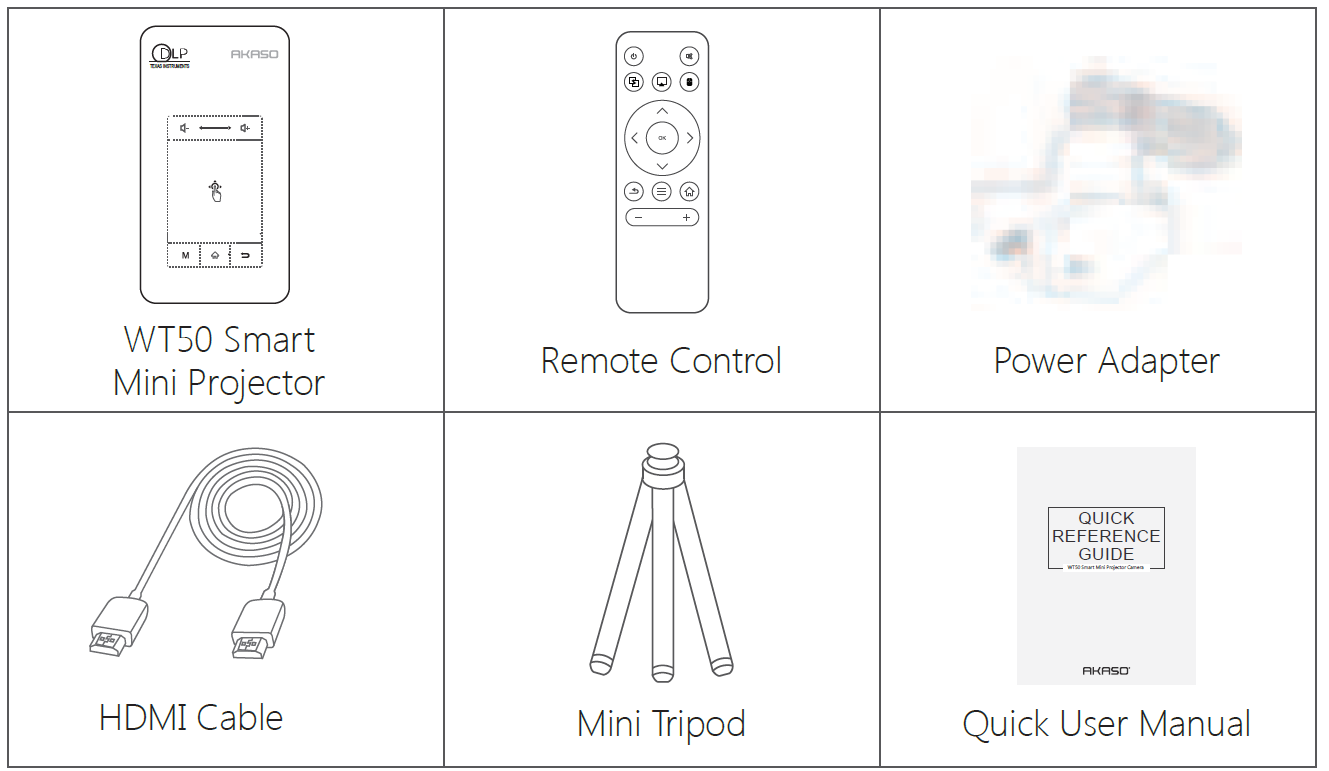
WHAT’S INCLUDED
OVERVIEW
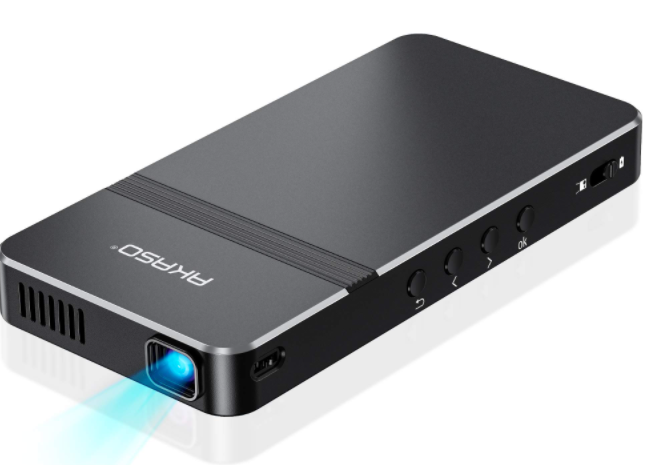
Front View
Rear View

Left View

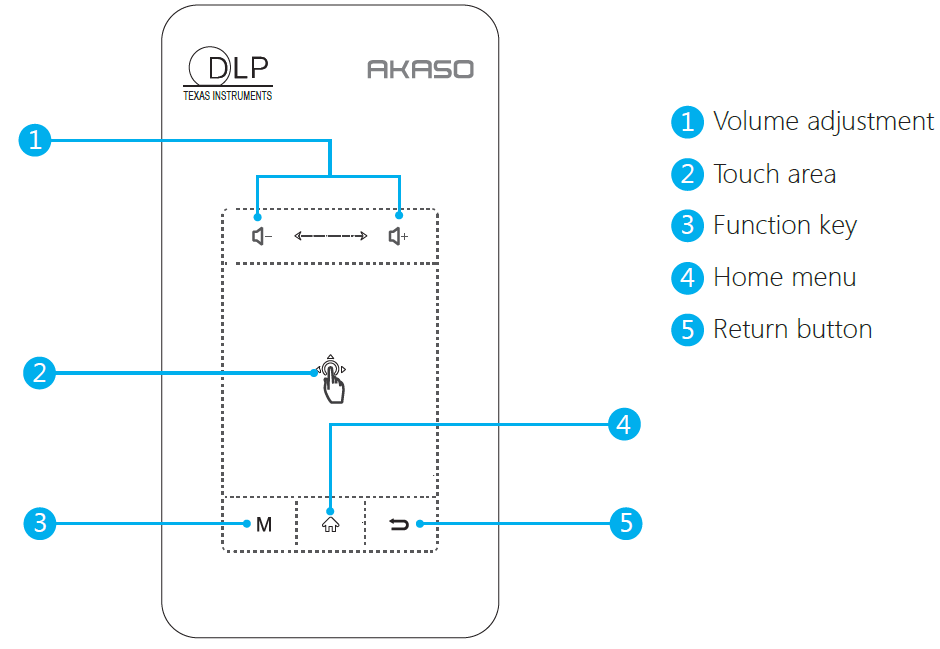
- Focus Adjusting Wheel(Adjusting the picture definition by rotating the focus adjusting wheel.)
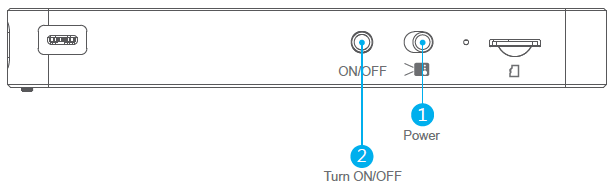
- Turn ON/OFF
- Power switch button
- Micro SD card
Right View
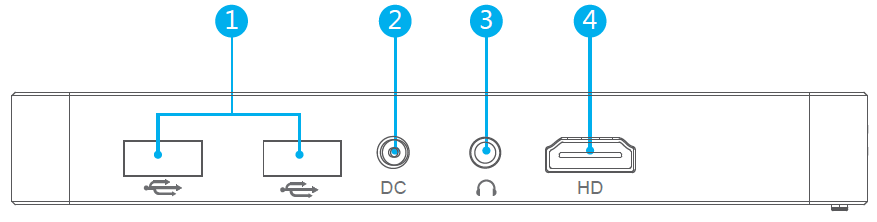
- USB: Support USB flash drive data read.
- DC: Connect to power supply.
- Earphone Aux-In Port: Connect to an external speakers/earphones
- HD: Connect to a playback device via HD output
Remote control
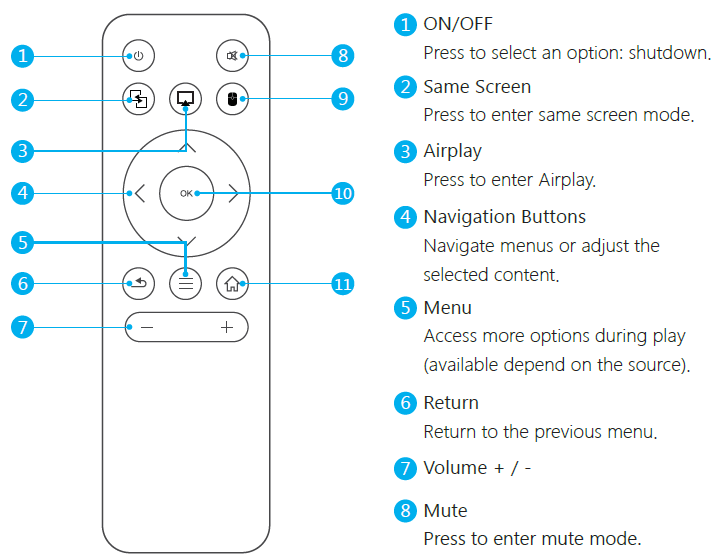
Note: When using the IR remote control, you should aim at the red light on the projector bottom rather than screen. And the on the remote control can only shutdown the projector(cannot turn on the projector) without charging.
GETTING STARTED
Placement
Place this device on a surface table or somewhere else, flat place in front of the projection surface. For best results, the projection surface should be white and flat. The best projection distance between this device and the projection surface is 1-1.5 m. Recommend for use in dimmer environments.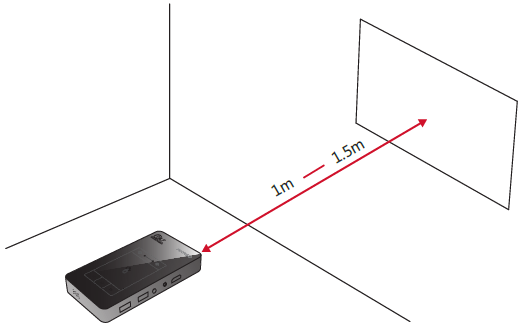
Note:
- It is unnecessary to tilt it towards the projection surface. You can correct the projection image with the built-in keystone correction.
- The distance between the device and the projection surface determines the projection image size.
Preparing the Remote Control
- For first time use, install new batteries(2 x AAA batteries, not included).
- To replace the batteries, unlock and open the battery compartment, insert two new batteries positioning the polarity(+/-) as indicated, and then close and lock the battery compartment.
Get Started
- Fully charge the built-in battery before using for the first time by using the provided charger.
- Slide to the left, and then press button on the projector to start the projection. After several minutes, the home menu will be displayed.
- Turn the device towards a suitable projection surface or wall.
- Rotate the focus adjusting wheel to get the best focus.
- For first time use, follow the on-screen instructions to complete the basic settings.
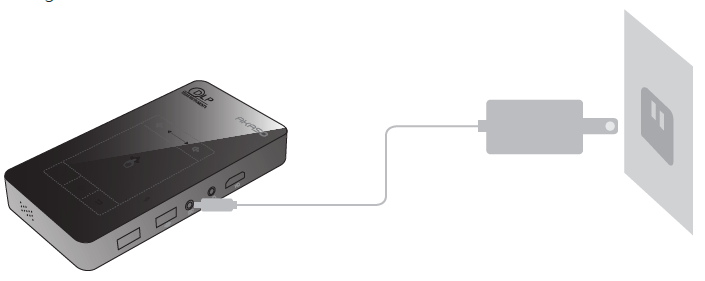
Note: Please use the supplied charger to charge AKASO mini projector.
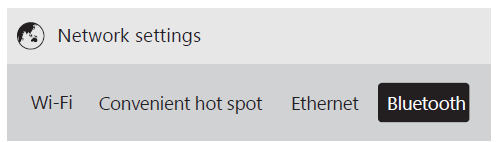
SETTING
Finish the main settings when you turn on the projector for the first time.
Network settingPress home to access the home menu, select [Settings] and enter into setting page.
Note: On the home menu, press Bluetooth/Wi-Fi/RJ45 icon to access the corresponding interface directly. Press Micro SD card/USB flash drive/Battery icon, you cannot access the corresponding interface.
Wi-Fi
This device can be connected to the network via a wireless(Wi-Fi) connection.
Select [Wi-Fi] and press OK on the remote(or click on the touch area of the projector) to access the Wi-Fi interface. Or you can select on the home menu to access the Network settings interface directly.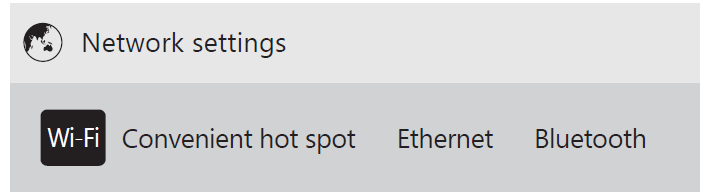
Press on your control remote or move the mouse to OFF/ON button on the projection screen to turn on the Wi-Fi.After turning on the Wi-Fi, please select wireless network and type the password to start to connect.(Follow the on-screen instructions to complete the network connection).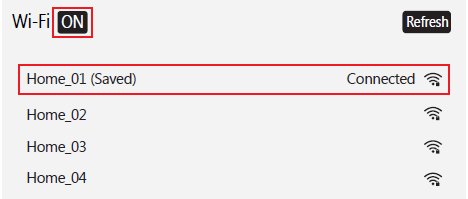
After connecting to Wi-Fi, you can download the app from Google play or browse YouTube, NETFLIX directly.
Portable Wi-Fi hot spot
Select [Convenient hot spot] and press OK on the remote(or click on the touch area of the projector) to access the hot spot interface.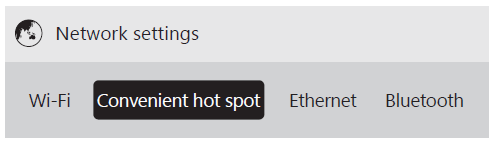
Press on your control remote or move the mouse to OFF/ON button on the projection screen to turn on the Easy Wi-Fi hot spot. On this interface, you can reset Network SSID, password, the way of security and AP band(you can select 2.4G or 5G signals, see the second screenshot below). Click “Save” to save the message.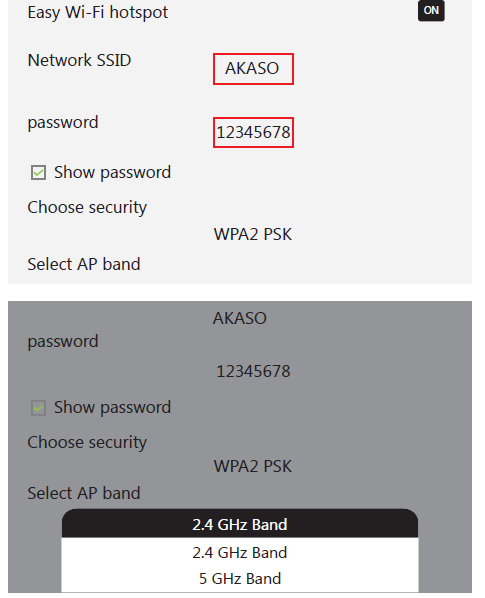
Use smart phone to select this hot spot, and enter password to connect.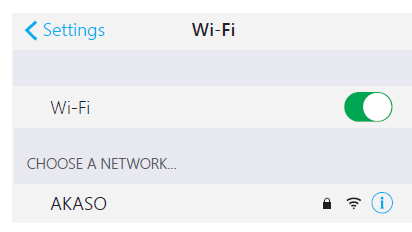
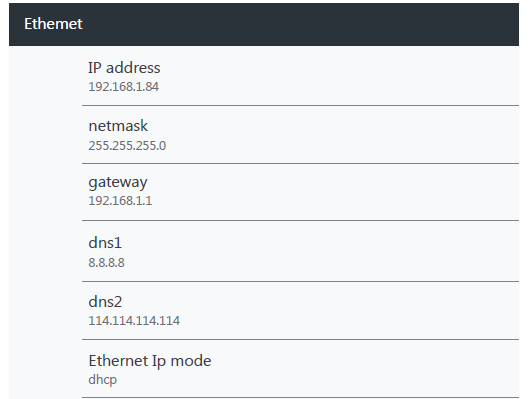
Ethernet
With Ethernet function, you can connect the network to your projector via RJ45 cable. Note: There is no RJ45 cable socket on the projector, it needs an external USB to RJ45 Console cable (IC drive RTL8152 or LAN9500 only).
- Select [Ethernet] and press OK on the remote(or click on the touch area of the projector) to access the Ethernet setting interface.
- You will see the details about your network indicating the connection is successful.

Bluetooth
You can connect external Bluetooth headphones or speakers to AKASO projector while in Bluetooth mode.
- Select [Bluetooth] and press OK on the remote(or click on the touch area of the projector) to access the Bluetooth setting interface. Then press on your remote control or move the mouse to OFF / ON button on the projection screen to turn on the Bluetooth.
- Click “AKASO” and press OK on the remote(or click on the touch area of the device) to rename the Bluetooth.Select “Available equipment” and choose available device to connect.
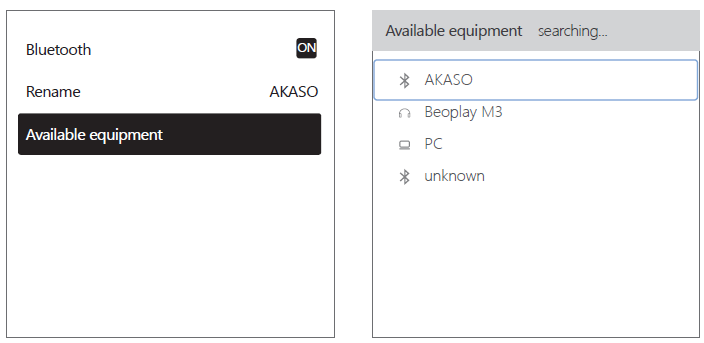
Note: In Bluetooth mode, you can transfer files to AKASO from an android device, but not an apple device.
Select [Settings] and enter into Network settings page, select[Projection mode] /[Keystone correction] to adjust the projection screen.
|
Keystone correction |
[Auto-rotate screen on]: The device is in an upside down or gravity change status, the image will be automatically corrected. |
| [Auto Keystone on]: The picture can be automatically corrected in the form of a vertical trapezoid. | |
| [Initial angle correction]: When you select an angle as a horizontal plane and place the device in this horizontal plane, the picture will be automatically corrected up and down. | |
| [Up-Down Correction]: The picture can be corrected up and down. | |
| [Left-Right Correction]: The picture can be corrected left and right. | |
|
Projector mode |
[Front]: The device is located in front of the projection surface. |
| [Rear]: The device is located behind the projection surface. | |
| [Front Ceiling]: The device is hanging from the ceiling in an upside down position. The image is rotated by 180 degrees. | |
| [Rear Ceiling]: The device is hanging from the ceiling in an upside down position. The image is rotated by 180 degrees and horizontal mirrored. |
Other Settings
Select [Settings] find more settings.
|
[General] |
|
| Sound | Increase/reduce the sound. |
| Brightness | Adjust picture brightness. |
| Keyboard & input methods | Android Keyboard/Google input method. |
| Language settings | Select an on-screen display language. |
| Date & time settings | Manually set date and time. |
| Develop Options | |
| {} Developer Options | Connect device with PC via USB (supports copy files from PC to projector). |
| [Upgrade] | |
| Local upgrade | If we have new software, you can copy it to the USB flash drive to upgrade. |
| [Reset] | |
| Factory data reset | Reset and delete all data |
ENJOY
Several different connections, you can choose any one to enjoy.
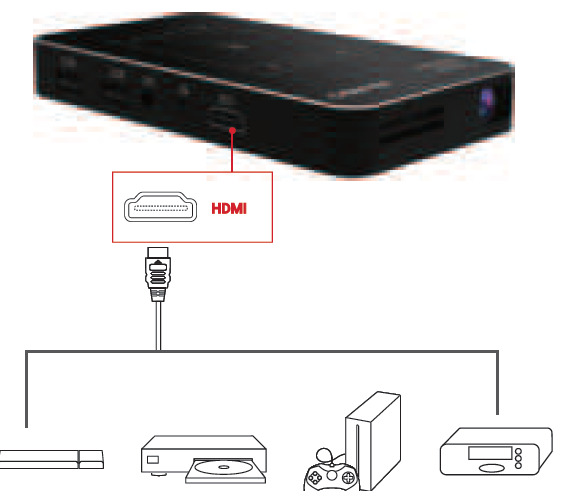
- Connect to HDMI Playback DevicesThe projector with HDMI input function is mainly used to input information of other device into the projector. It supports connections with various HDMI playback devices such as TV stick, TV box, DVD player, set-top box(STB), game machine or other devices.
- Connect this device to an HDMI playback device with an HDMI cable (Provided).
- Press HOME to access the home menu, select [HDMI] and press OK on the remote(or click on the touch area of the projector).Note: It will automatically start the HDMI playback when connected to an HDMI playback device for the first time).
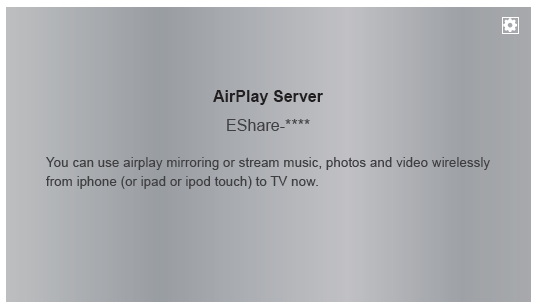
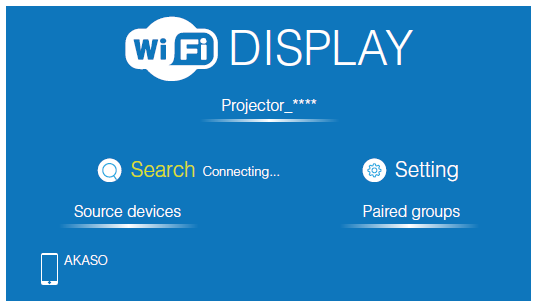
- Screen castPress HOME to access the home menu, select [Same screen] and enter into screen cast interface, and there are three ways(Airplay/WifiDisplay/EShare) to cast.
- AirplayIn the same network(iOS device and projector should be connected to the same network) or hot spot(provided by the projector) status, enable Airplay on your iOS device to wirelessly cast the content of your smart device onto the projection surface.For iOS devices:
- Wifi DisplayDownload Miracast app on your android device when first time use. In the same network (android device and projector should be connected to the same network) or hot spot(provided by the projector) status, enable Miracast on your android device and then click “Search” on the projection surface, it will search for your smart android devices, then find your device and click “agree” in the pop-up to connect.For Android devices:
- AirplayIn the same network(iOS device and projector should be connected to the same network) or hot spot(provided by the projector) status, enable Airplay on your iOS device to wirelessly cast the content of your smart device onto the projection surface.For iOS devices:
SPECIFICATIONS
Specifications and design are subject to change without notice.Projection parameters:
- Dimensions: (L*W*H)5.7*3.1*0.8 Inches
- Weight: 0.64lb / 10.26oz / 291g
- Projection Technology: DLP(0.3″DMD)
- Projection Light: RGB LED OSRAM Q6
- Light Life: Up to 30000 hours
- Light Luminance: 50 ANSI lumens
- Light Type: LED
- Standard Resolution: WVGA 854*480
- Projection Area: 30-120 inch
- Contrast: 1000:1
- Projection Ratio: 1.19:1
- Distortion: <1.0%
- Luminance Uniformity: >85%
- Projection Distance: 1-5m()
- Aspect Ratio: 16:9
- Focus mode: Manual focus
- Keystone Correction: Automatic, Vertical: ±40degree
- Projector Character: Interaction
- Projection Mode: Front Projection
- Offset function: NO
- 3D: NO
System Parameters
| Screen Mirror | Airplay/WifiDisplay/Eshare |
| OS | Android 7.1.2 |
| Bluetooth | 2.4G/5G Wi-Fi |
| Built-in Battery | 5000mA |
| Usage time | Work for about 2 hours |
| Usage time | MPEG-1, MPEG-2, MPEG-4 real-time video decoder, H.263, H.264, H.265, VC-1, RV, VP6/ VP8, Sorenson Spark, MVC |
| Audio Support | MP3,WMA,MP2,OGG,AAC,M4A,MA4,FLAC,APE,3GP,WAV |
| Image Support | Support browsing in multiple image formats( jpg,png,bmpetc.) |
| Extended Storage | Support Hard Disk and Micro SD card |
| Control method
Built-in speaker |
Support (IR)Infrared and 2.4G wireless control, Touch button
One speaker with 1W |
| Light machine Consumption | 3W |
| Whole Power Consumption | 5W |
| Power Performance | AC100-240V, 50/60Hz DC 5V 3A |
|
Interface |
1*Micro SD Card: Max 32G |
| 1 * HDMI: HDMI Input 1.4 | |
| 2 * USB: USB 2.0 | |
| 1 * Earphone: 3.5 mm Audio output | |
| 1 * DC input: DC 5V 3A |
NOTICE:
This production is designed and manufactured with high quality materials and components, which can be recycled and reused.This symbol means the product must not be discarded as household waste, and should be delivered to an appropriate collection facility for recycling. Follow local rules and never dispose of the product and rechargeable batteries helps prevent negative consequences for the environment and human health.
CONTACT US
 For any inquires, issue or comments concerning our products, please send E-mail to the address below,and we will respond as soon as possible.Email: [email protected]
[xyz-ips snippet=”download-snippet”]