
ALESIS® Prestige 88-Key Digital Piano User Guide
Introduction
Box Contents
PrestigePower AdapterMusic RestSoftware Download CardSustain PedalUser GuideSafety & Warranty Manual
Support
For the latest information about this product (system requirements, compatibility information, etc.) and product registration, visit alesis.com.
For additional product support, visit alesis.com/support.
Setup
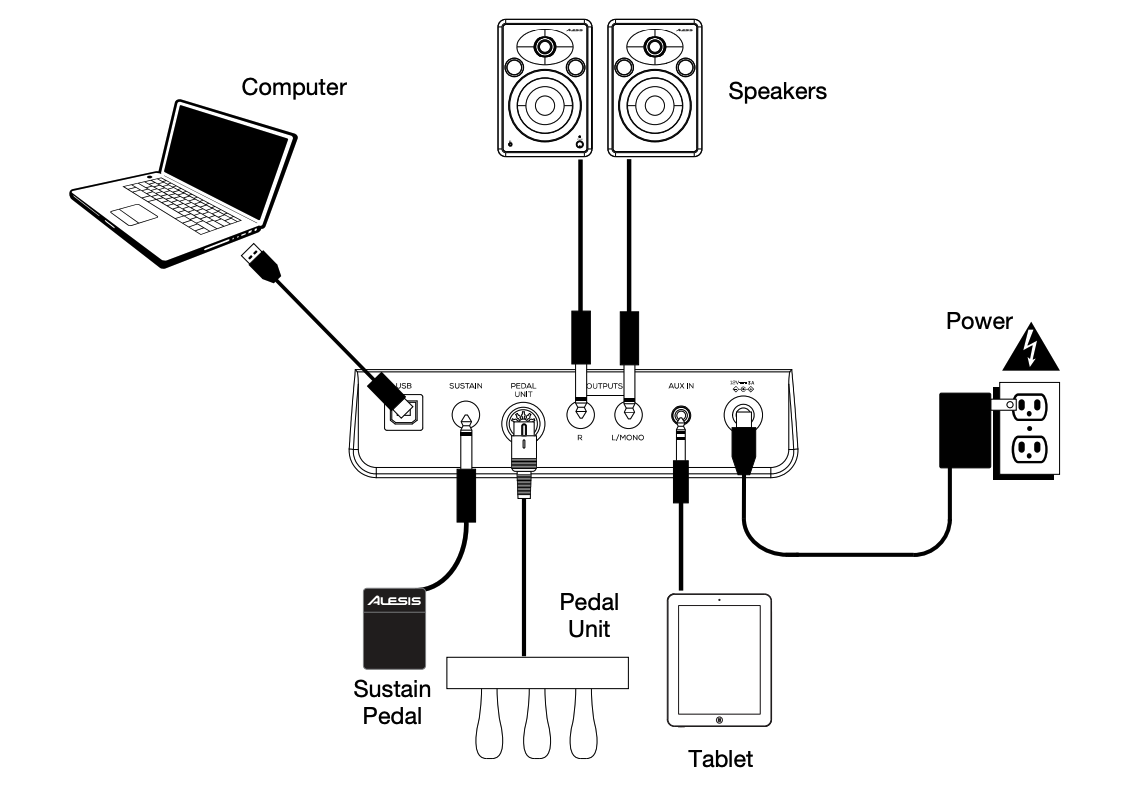
Connection Diagram
Items not listed in Introduction > Box Contents are sold separately.
Features
Top Panel

- Power Switch: Turns the piano’s power on or off.
- Volume Knob: Adjusts the volume for the Line Output and either Headphone Output.Note: If the internal speakers do not produce any sound, check that the Volume knob is not set too low or if headphones are plugged into either Headphone Output. The speakers will be muted if there are headphones plugged into either Headphone Output.
- Rec/Start/Stop Button: Press this button to arm recording or stop recording a user song, start or stop a user song, stop a demo song, or stop the metronome. Press and hold this button to erase an existing user song.
- Key Function Button: Press and hold this button while also pressing one of the 88 keys to edit various settings.
- Voice Select Buttons: Press one of these buttons to select a preset voice. See Operation > Voices to learn more.
- Layer Button: Press this button to enable/disable Layer Mode.
- Split Button: Press this button to enable/disable Split Mode.
Rear Panel
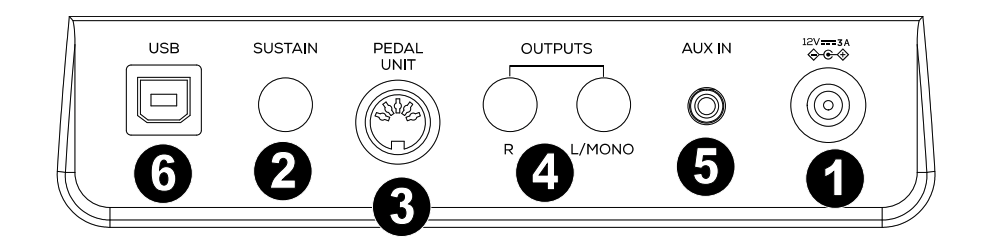
- Power Connector: Connect the included power adapter here.
- Sustain Pedal Input: Connect a standard 1/4” (6.35 mm) sustain pedal here.
- Pedal Unit Input: Connect a pedal unit to this input.
- Line Output: Connect external audio equipment such as an amplifier, mixer, or recorder. Use the R and L outputs for stereo output or just the L output for mono output.
- Aux Input: Connect a mobile device or other audio source to this input. You can adjust the volume of this device on your mobile device or other audio source itself.
- USB Port: Allows for transfer of MIDI data to a computer.
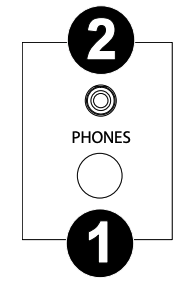
Front Panel
 1/4” Headphone Output: Connect stereo headphones with a 1/4” (6.35 mm) stereo (TRS) connector. When headphones are connected, the internal speakers will automatically turn off and sound will only be heard from the headphones.
- 1/8” Headphone Output: Connect stereo headphones with a 1/8” (3.5 mm) stereo (TRS) connector. When headphones are connected, the internal speakers will automatically turn off and sound will only be heard from the headphones.
 1/4” Headphone Output: Connect stereo headphones with a 1/4” (6.35 mm) stereo (TRS) connector. When headphones are connected, the internal speakers will automatically turn off and sound will only be heard from the headphones.
Operation
Quick Start
Playing Demo Songs
The Prestige digital piano features 10 demo songs:
- Fantaisie-Impromptu in C# Minor Opus 66
- Etude Opus 25 No. 1
- Polonaise No. 6 in A Flat Major Opus 53
- Sonata No. 16 in C Major
- Toccata and Fugue in D Minor
- Prelude and Fugue No. 30 in D Minor
- Prelude and Fugue No. 1 in C Major
- Suite of Minuets in F Major
- Danse des Mirlitons
- Wedding March
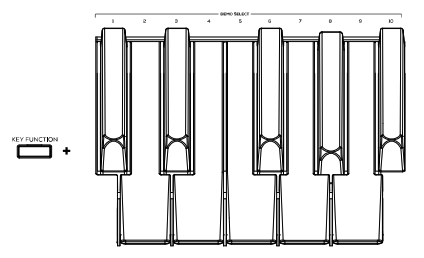
To play the demo songs:
- To play a song demo, press and hold the Key Function button, then press a key from C#2 through A#2.
- To stop a song demo, press the Rec/Start/Stop button.
 To play a song demo, press and hold the Key Function button, then press a key from C#2 through A#2.
Playing Voice Demos
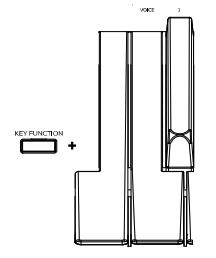 Each Voice button on the panel is preset with a voice demo. Press and hold the Key Function button, and then press C2. This will play the voice demo for the currently selected sound. If layer or split mode is active, the voice demo will play for the upper voice.
Voices
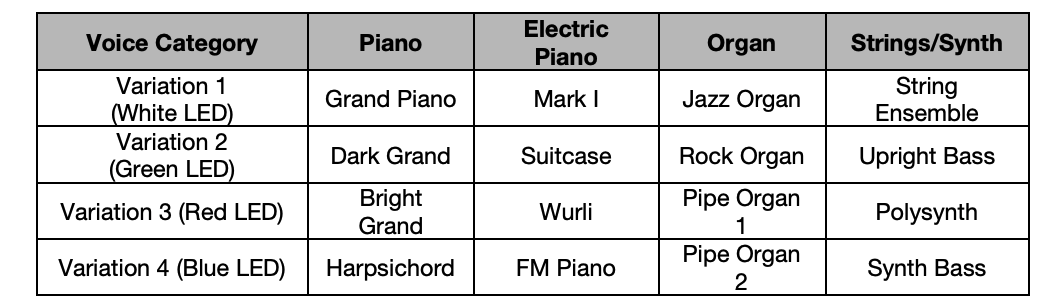
The Prestige digital piano features 4 voice categories with 4 voice variations each, for a total of 16 voices to choose from:
 To select and play a voice:
- Press one of the Voice Select buttons to select a voice category. The corresponding LED will be lit for that voice category.
- Press the same Voice Select button again to select one of the other voice variations in that category. The corresponding LED will change color to indicate which variation voice is selected.
- Play the keys to hear the voice.
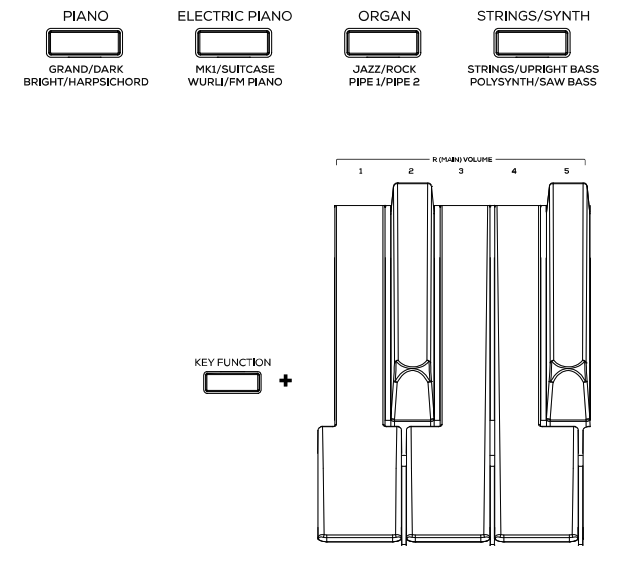
- To change the volume for the main voice, press and hold Key Function, and then press a key from D6 to F#6. The available selections for this function are 1 (D6), 2 (D#6), 3 (E6), 4 (F6), and 5 (F#6).
Layer Mode
 Layer Mode enables for two different voices to be layered together for a fuller and richer sound.
To enable Layer Mode:
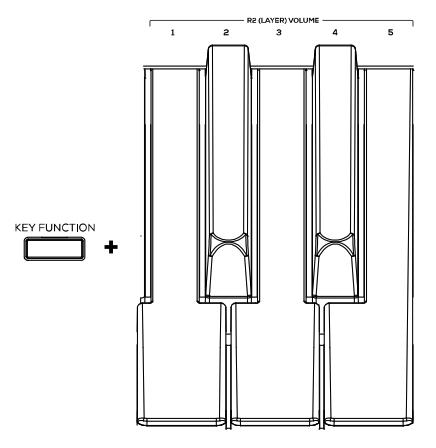
- Press and release the Layer button. The corresponding LED will turn on to indicate layer mode is enabled. When Layer Mode is enabled, the layered voice is referred to as the R2 voice.
- Press and hold the Layer button while using the Voice Select buttons to select a layer voice
- To change the volume of the layer voice (R2), press and hold Key Function, and then press a key from G6 to B6. The available selections for this function are 1 (G6), 2 (G#6), 3 (A6), 4 (A#6), and 5 (B6).
- To disable layer mode, press and release the Layer button again. The corresponding LED will turn off to indicate layer mode is disabled.Note: When you are selecting which voices will be layered, the first Voice button you press will be set as the “Upper” voice, and the second Voice button you press will be set as the “Lower” voice.Note: You cannot layer 2 voice variations from the same voice category when using Layer Mode.
Split Mode
 Split Mode enables you to split the 88 keys into two zones so that you can have two different voices for each of your hands. For example, you may want the Piano voice for your right hand, and the Bass voice for your left hand. When Split Mode is enabled, the left-hand voice is referred to as the L1 voice.
To enable Split Mode:
- Press and release the Split button. The corresponding LED will turn on to indicate split mode is enabled.
- Press and hold the Split button while pressing a Voice Select button to select a split voice.
- Press and hold the Split button while pressing a key to set the split point.
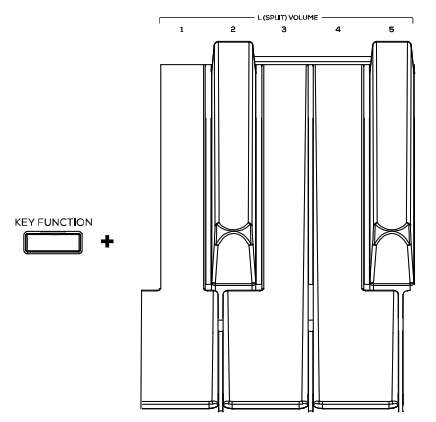
- To change the volume of the split voice, press and hold Key Function, then press a key from A6 to C#6. The available selections for this function are 1 (A6), 2 (A#6), 3 (B6), 4 (C6), and 5 (C#6).
- To disable split mode, press and release the Split button again. The corresponding LED will turn off to indicate split mode is disable.
Advanced Functions
Metronome
 The metronome feature provides a steady beat to aid in practicing at a consistent tempo. The tempo of the metronome can be freely adjusted from 30 to 280 beats per minute.
Note: The metronome cannot be used during Demo playback.
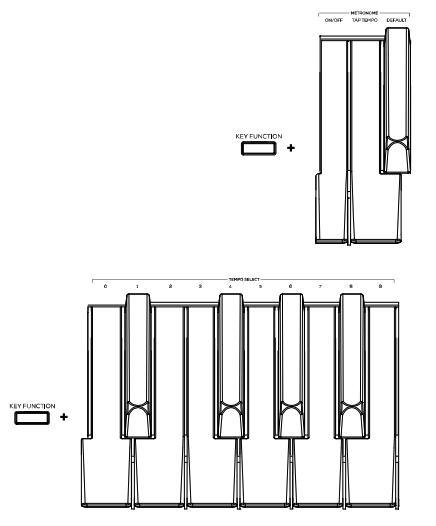
To enable or disable the metronome, press and hold the Key Function button, and then press the B3 key.
To set the tempo via tap, press and hold Key Function, then press the C3 key at least 2 times to get the desired tempo.
To set the tempo to default (120 BPM), press and hold Key Function, then press the C#3 key.
To manually change the metronome’s tempo, press and hold Key Function, then press 3 digits using D3 to B3.
To lower/raise the metronome’s volume, press and hold Key Function, and then press C4 or C#4 respectively. To increase or decrease this by multiple steps, press and hold Key Function, and then press C4 or C#4 repeatedly.
To set the metronome’s volume to default (4), press and hold Key Function, and then press D4.
To change the metronome’s time signature, press and hold Key Function, and then press D#4 or E4 respectively. To increase or decrease this by multiple steps, press and hold Key Function, and then press D#4 or E4 repeatedly.
To set the metronome’s time signature to the default value (4), press and hold Key Function, and then press F4.
User Song Mode
To record and/or playback a user song:
- Press the Rec/Start/Stop button to enter to the User Song Mode. The Rec/Start/Stop LED will quickly flash continuously.
- Press any of the 88 keys to start recording a song. The Rec/Start/Stop LED will slowly flash continuously. If the metronome is playing, the Rec/Start/Stop LED will flash at the current tempo.
- Press the Rec/Start/Stop button again to stop recording. The Rec/Start/Stop LED will be lit solid to confirm a song exists.
- Press the Rec/Start/Stop button again to playback the recording. The Rec/Start/Stop LED will slowly flash continuously. Press the Rec/Start/Stop button again to stop the user song. The Rec/Start/Stop LED will be lit solid when a song exists and is stopped.
- Press and hold the Rec/Start/Stop button for 3 seconds to erase the user song. The Rec/Start/Stop LED will quickly flash 3 times to confirm it has been erased.
Important User Song Mode Notes:
- The recorded user song will stay in memory until it is erased.
- If the internal memory becomes full during recording, the recording will automatically stop and be saved.
Reverb
 You can also add an adjustable reverb effect to your sound.
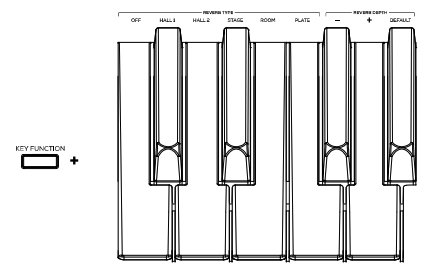
To select the reverb effect type, press and hold Key Function, and then press a key from C5 to F5. The available selections for this Key Function are Off, (C5), Hall 1 (C#5), Hall 2 (D5), Stage (D#5), Room (E5), and Plate (F5).
To change the depth of the reverb, press and hold Key Function, and then press F#5 or G5 respectively. To increase or decrease this by multiple steps, press and hold Key Function, and then press F#5 or G5 repeatedly.
To set the depth of the reverb to the factory default value (3), press and hold Key Function, and then press G#5.
Transpose
![]() This key function allows the overall pitch of the piano to be transposed up or down by a maximum of one octave in semitone increments in either direction.
This key function allows the overall pitch of the piano to be transposed up or down by a maximum of one octave in semitone increments in either direction.
To change the transposition, press and hold Key Function, and then press F#4 or G4 respectively. To increase or decrease this by multiple steps, press and hold Key Function, and then press F#4 or G4 repeatedly.
To set the transposition to the factory default value, press and hold Key Function, and then press G#4.
Tuning
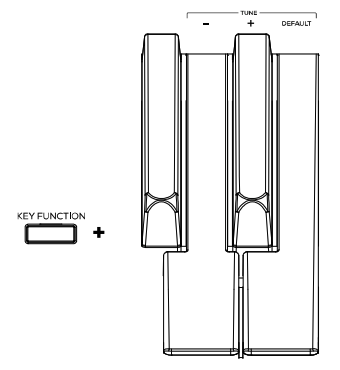 This key function allows the overall pitch of the piano to be fine-tuned up or down by a maximum of 25 increments in either direction.
To change the tuning, press and hold Key Function, and then press A4 or A#4 respectively. To increase or decrease this by multiple steps, press and hold Key Function, and then press A4 or A#4 repeatedly.
To set the tuning to the factory default value, press and hold Key Function, and then press B4.
Pedal Resonance
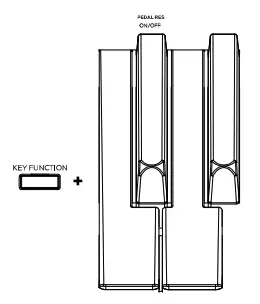 Pedal resonance is a function that simulates the reverberation of notes when pressing the sustain pedal on an actual piano. With Pedal Resonance enabled, Prestige reproduces the rich harmonics and unique sound characteristics of an actual piano when using a sustain pedal.
To turn Pedal Resonance On/Off, press and hold Key Function, and then press the F#7 key.
Lesson Mode
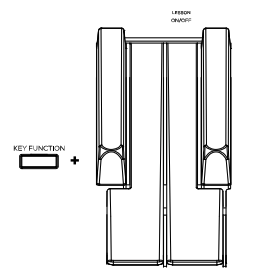 The Lesson Mode feature divides the keyboard into two zones with the same pitch and voice. This enables both the student and teacher to easily watch and/or play together during instruction without having to move away from the piano and take turns or having to reach over each other to play the same pitch.
Note: In Lesson Mode, the Layer and Split Modes will be automatically disabled.
Note: Lesson Mode cannot be selected during Demo playback.
To turn Lesson Mode On/Off, press and hold Key Function, and then press the F7 key.
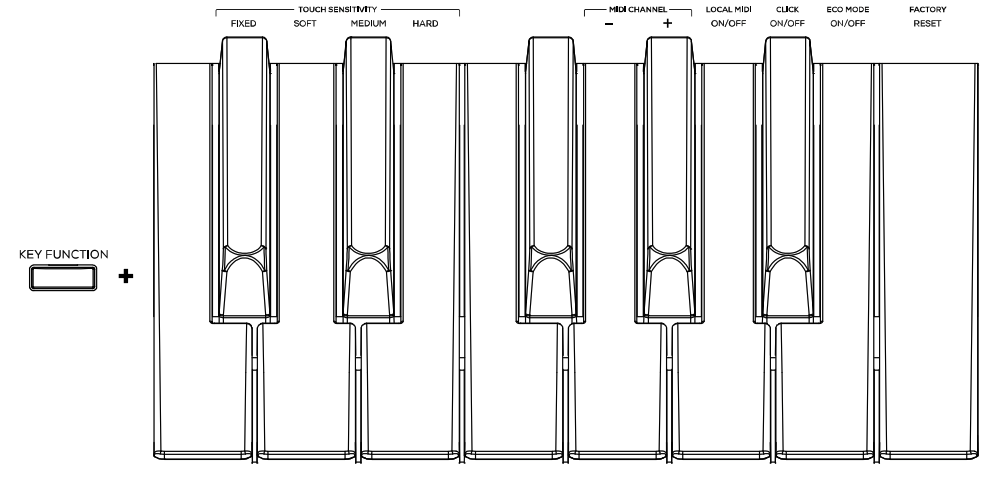
Settings
To change other settings of the digital piano:
To set the touch sensitivity of the keybed, press and hold Key Function, and then press one these available selections:
- Fixed (C#7): The volume level does not change at all regardless of how soft or hard you play the 88 keys.
- Soft (D7): The volume level does not change much when press you the 88 keys soft or hard.
- Medium (D#7): This is the standard piano touch response, and the default setting.
- Hard (E7): The volume level changes a lot when press the 88 keys soft or hard. You have to hit the keys hard to produce a loud sound.
To change the MIDI channel of the keybed, press and hold Key Function, and then press G7 or G#7 accordingly. To increase or decrease this by multiple steps, press and hold Key Function, and then press G7 or G#7 repeatedly. The available selections for this Key Function are 1-16. The default MIDI channel is 1.
To turn local MIDI on/off, press and hold Key Function, and then press A7. When local MIDI is on (default), sound will be generated and heard through the speaker, and MIDI messages will be sent to the USB-MIDI output when keys are played. When local MIDI is off, sound will not be generated, however MIDI messages will still be sent to the USB-MIDI output when keys are played.
To turn the click that plays when settings are changed on/off, press and hold Key Function, and then press A#7.
To turn eco mode (auto-power off) on/off, press and hold Key Function, and then press B7.
Note: The default auto-power off time is 30 minutes.
To reset the piano to its factory settings, press and hold Key Function, and then press C8.
Appendix
Technical Specifications
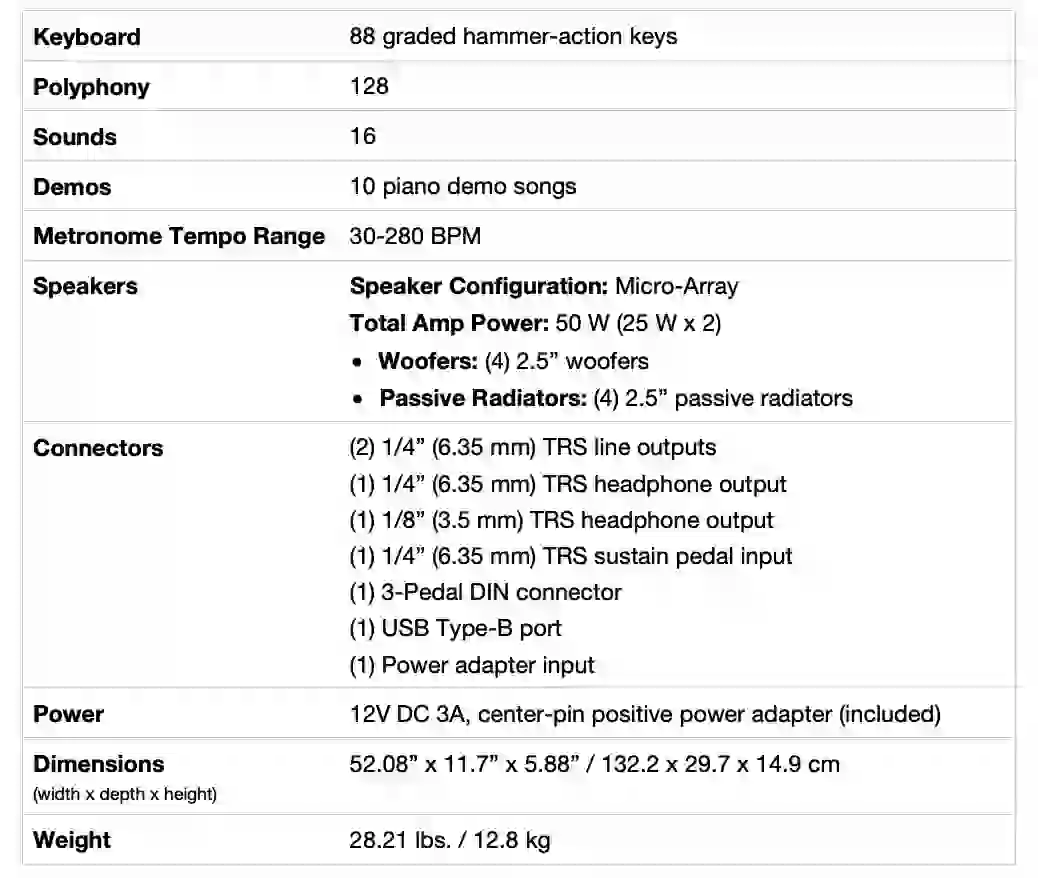
Specifications are subject to change without notice.
Trademarks & Licenses
Alesis is a trademark of inMusic Brands, Inc., registered in the U.S. and other countries.
All other product names, company names, trademarks, or trade names are those of their respective owners.
alesis.com
Manual Version 1.5
References
[xyz-ips snippet=”download-snippet”]