

Strike
Performance Drum Module
Introduction
Thanks for choosing the Alesis Strike Performance Drum Module! This guide contains some basic information so you can get started quickly. To get the most out of your experience, though, we recommend visiting alesis.com and downloading the complete user guide to learn more about all of its great features.
Box Contents
Strike Performance Drum Module16 GB SDHC Card (in module’s SD card slot)Power AdapterQuickstart GuideSafety & Warranty Manual
Important: Visit alesis.com and find the webpage for the Strike Kit, Strike Pro Kit or Strike Pro Kit Special Edition to download the complete User Guide for this Strike Performance Drum Module.
Support
For the latest information about this product (documentation, technical specifications, system requirements, compatibility information, etc.) and product registration, visit alesis.com.For additional product support, visit alesis.com/support.
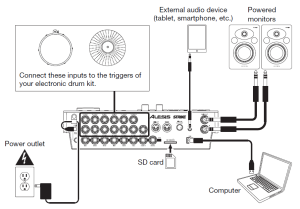
Setup
Items not listed in Introduction > Box Contents are sold separately. External audio device (tablet, smartphone, etc.)
Features
Top Panel
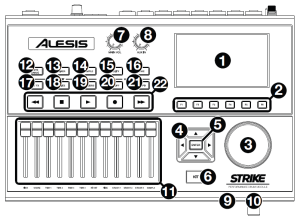
- Display: This full-color display shows the current kit, settings, and other information. Use the cursors to move through the menus and lists shown here. Use the Data Dial to scroll through available options. Use the Function Buttons (F1F6) to select tabs shown at the bottom edge of the display.
- Function Buttons (F1F6): Press one of these 6 buttons to select the corresponding tab shown above it (at the bottom edge of the display).
- Data Dial: Turn this dial to scroll through available options shown in the display.
- Cursors: Use these buttons to select different areas shown in the current page in the display.
- Enter: Press this button to confirm a selection shown in the display.
- Kit: Press this button to enter the Kit menu (the default view when you power on the drummodule).
- Main Vol: Turn this knob to adjust the volume level of the Main Out on the rear panel. Thislevel is independent from the volume level of each voice or the overall kit.
- Aux In: Turn this knob to adjust the volume level of the Aux In on the rear panel. This alsocontrols the input recording level of Sample Mode.
- Headphone Out (1/4″/6.35 mm): Connect your stereo headphones to this input. Adjust thevolume with the Headphone Vol knob.
- Headphone Vol: Turn this knob to adjust the volume level of the Headphone Out.
- Sliders: Use these sliders to adjust the independent volume level of each trigger in your current kit. The trigger’s name is shown under the slider.
- Note Chase: Press this button to activate or deactivate the Note Chase feature. When active, hitting a trigger will automatically select it in the drum module. Alternatively, press Kit to enter the Kit menu, and then use the cursors to select a trigger manually.
- Mixer: Press this button to enter Mixer Mode.
- Sample: Press this button to enter Sample Edit Mode.
- Utility: Press this button to show the Utility menu.
- Save: Press this button to save the current kit or other settings (depending on the current mode). Please see the user guide to learn about this.
- Edit > Kit FX: Press this button to enter Kit Effects Mode where you can set the reverb, EQ, compression, and 2 sets of effects for each kit.
- Edit > Voice: Press this button to enter Voice Mode where you can edit the sounds assigned to each drum or cymbal pad.
- Edit > Triggers: Press this button to enter Trigger Mode where you can adjust the sensitivity and overall feel of each drum or cymbal pad. The default settings should already be optimal for a wide range of playing styles, but if you need to change them, you can do so here.
- Metronome > On/Off: Press this button to turn the metronome on or off.
- Metronome > Tempo: Press this button 3 or more times in succession at the desired rate to change the tempo of the metronome (in BPM). Alternatively, if the tempo is shown in the display, press and hold this button and turn the data dial to change the BPM. The light above this button will flash at the current tempo.
- Transport Buttons: Use these buttons to control sample playback. These buttons work even when the drum module is not in Sample Mode.
- Rewind/Fast-Forward (): Press and hold one of these buttons to “scrub” backward or forward (respectively) through the sample.
- Play (▶): Press this button to start sample playback or recording.
- Stop (■): Press this button to stop sample playback or recording.
- Record (●): Press this button to show the Sample Record screen. Press it again tobegin recording the signal from the Aux In, and then press it once more to stop the recording. You will then be in Sample Edit Mode where you can edit and save your new sample.
Rear Panel
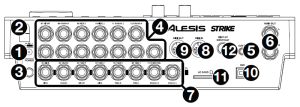
- Power Input: Connect the included power adapter (12 V, 2 A, center-positive) to this input.
- Cable Restraint: You can secure the cable of the power adapter to this restraint to help prevent disconnecting it accidentally.
- Power Switch: Press this button to power the drum module on or off. Power it on only after you have connected all of your input devices and before you power on any connected loudspeakers. Power off your loudspeakers before powering off the drum module.
- Trigger Inputs (1/4″/6.35 mm, TRS): Connect these inputs to the triggers of your electronic drum kit. When connected, hitting a trigger will send an electric signal to the drum module, which will trigger the corresponding sound.
- Aux In (1/8″/3.5 mm, TRS): Connect this input to an optional external audio device (computer, tablet, smartphone, etc.). You can then listen and play long to your favorite backing tracks or record the incoming audio signal in Sample Mode. Turn the Aux In knob on the top panel to adjust the volume level.
- Main Out (1/4″/6.35 mm, TRS): Connect these outputs to your loudspeakers, audio interface, etc. Turn the Main Vol knob on the top panel to adjust the volume level.
- Direct Audio Outs (1/4″/6.35 mm, TRS or TS): Connect these outputs to your external mixer, audio interface, etc. The independent audio signals of these triggers will be sent out of these outputs: kick, snare, hi-hat, ride, the left and right channels for all toms, and the left and right channels for the crash cymbals. The signal sent from these outputs is fixed at 0 dB and without any effects applied.
- MIDI In (5-pin DIN): Connect this input to the MIDI output of an external MIDI device (synthesizer, drum machine, etc.).
- MIDI Out (5-pin DIN): Connect this output to the MIDI input of an external MIDI device (synthesizer, drum machine, etc.).
- USB Port: Use a standard USB cable to connect this USB port to an available USB port on your computer. This connection sends and receives MIDI information to and from the computer.
- SD Card Slot: You can insert a standard SDHC card into this slot (a 16 GB card is already included). You can use samples on an SDHC card in your kits and save your kits to it. The SDHC card must be Class 10, use a FAT32 file system, and have a maximum capacity of 32 GB.
- Display Contrast: Turn this knob to adjust the contrast of the display.
Basic Operation
Below is some basic information so you can get started quickly using your Strike Performance Drum Module. Remember to download the complete user guide from alesis.com to learn about all of its great features.
Using the Display
The Strike module’s display shows information about its current mode and operations. You can navigate its different modes, pages, etc. by using the following controls:
- Data Dial: Use this dial to scroll through a menu or to change the selected parameter value, setting, etc. in the display.
- Cursors: Use these buttons to select different areas shown in the current page in the display.
- Enter: Press this button to confirm a selection shown in the display.
- Function Buttons (F1F6): Press one of these 6 buttons to select the corresponding tab shown above it (at the bottom edge of the display).
- Mode Buttons (not shown): Press one of these buttons to enter its mode: Kit, Mixer, Sample, Utility, Save, Kit FX, Voice, or Triggers. When you power on the drum module, it will always start in Kit Mode.
Kits
Selecting Kits
To select a kit:
- Press Kit to enter Kit Mode (the default view when you power on the drum module).
- Turn the data dial to scroll through the available kits. The name of each kit will appear inthe display.
- When you reach the desired kit, stop turning the data dial for a second to load the kit.Important: Your Strike module can load large amounts of high-quality samples–and you don’t have to wait until it’s done loading to start playing. You can start playing immediately as the drum module continues to load samples in the background.
Editing Kits
Whenever you edit an instrument, it changes the kit, which is essentially the same as editing the kit.
To edit a voice:
- Press Kit to enter the Kit menu (the default view when you power on the drum module).
- Select a kit (described above in Selecting Kits).
- Select an instrument by doing one of the following:• If the Note Chase button is off, press it so it turns on. With Note Chase on, strike the desired zone of the trigger (drum or cymbal pad) whose voice you want to edit.• Use the cursors to select the trigger (drum or cymbal pad) whose instrument you want to edit.The currently selected zone of the drum or cymbal pad will be highlighted orange.
- Press Enter. You will see the Instrument Browser menu where you can select one of over1,600 instruments as well as any custom instruments on your SD card that you’ve created with the Strike Editor.
Metronome
To turn the metronome on or off, press On/Off.To adjust the tempo of the metronome, do one of the following:
- Press Tempo at least 3 times at the desired rate.
- Press and hold Tempo, and then turn the data dial to select a new tempo.
Appendix (English)
Technical Specifications
Kits & Sounds136 kits 1,900 instruments Unlimited user kits, depending on SD card size (see requirements below)
Display4.4” / 111 mm (diagonal) 3.8” x 2.2” / 96 x 55 mm (width x height) Full-color LED-backlit display
ConnectionsInputs (13) 1/4” (6.35 mm) TRS inputs (triggers) (1) 1/8” (3.5 mm) stereo input (auxiliary audio device) (1) 5-pin MIDI input
Outputs(2) 1/4” (6.35 mm) TRS outputs (main outputs, left & right) (8) 1/4” (6.35 mm) TRS outputs (direct audio) (1) 5-pin MIDI output (1) 1/4” (6.35 mm) stereo output (headphones)
Other(1) USB Type-B port (1) SD card slot (see requirements below) (1) power adapter input
Mixer(12) 45 mm sliders; digital mixer
SD Card SpecificationsType SDHCFile System FAT32Class Class 10Size 32 GB (maximum) (16 GB card included)
Powervia power adapter (12 V, 2 A, center-positive, included)
Dimensions (width x depth x height)12.0” x 8.0” x 3.0”30.5 x 20.3 x 7.6 cm
Weight3.45 lbs.1.56 kg
Specifications are subject to change without notice.Notice Concerning FCC Regulations: You are cautioned that changes or modifications not expressly approved by the part responsible for compliance could void the user’s authority to operate the equipment. This equipment has been tested and found to comply with the limits for a Class B digital device, pursuant to Part 15 of the FCC rules. These limits are designed to provide reasonable protection against harmful interference in a residential installation. This equipment generates uses and can radiate radio frequency energy and, if not installed and used in accordance with the instructions, may cause harmful interference to radio communications. However, there is no guarantee that interference will not occur in a particular installation. If this equipment does cause harmful interference to radio or television reception, which can be determined by turning the equipment off and on, the user is encouraged to try to correct the interference by one or more of the following measures: (a) reorient or relocate the receiving antenna; (b) move this unit; (c) increase the separation between the equipment and receiver; (d) connect the equipment into an outlet on a circuit different from that to which the receiver is connected; (e) be sure that all cables are properly shielded, using a choke or ferrite where appropriate; or (f) consult the dealer or an experienced radio/television technician for help. Strike Performance Drum Module may be affected by static electricity. If this occurs, simply turn the module off and wait at least a few seconds before turning it on again. This device complies with Part 15 of the FCC rules. Operation is subject to the following two conditions: (1) this device may not cause harmful interference, and (2) this device must accept any interference received, including interference that may cause undesired operation.
Trademarks & Licenses
Alesis is a trademark of inMusic Brands, Inc., registered in the U.S. and other countries. SD and SDHC are registered trademarks of SD-3C, LLC. All other product names, company names, trademarks, or trade names are those of their respective owners.
 report this ad
alesis.comManual Version 1.6
References
[xyz-ips snippet=”download-snippet”]