![]()
www.alfatronelectronics.comALFATRON ELECTRONICS GmbH GERMANY
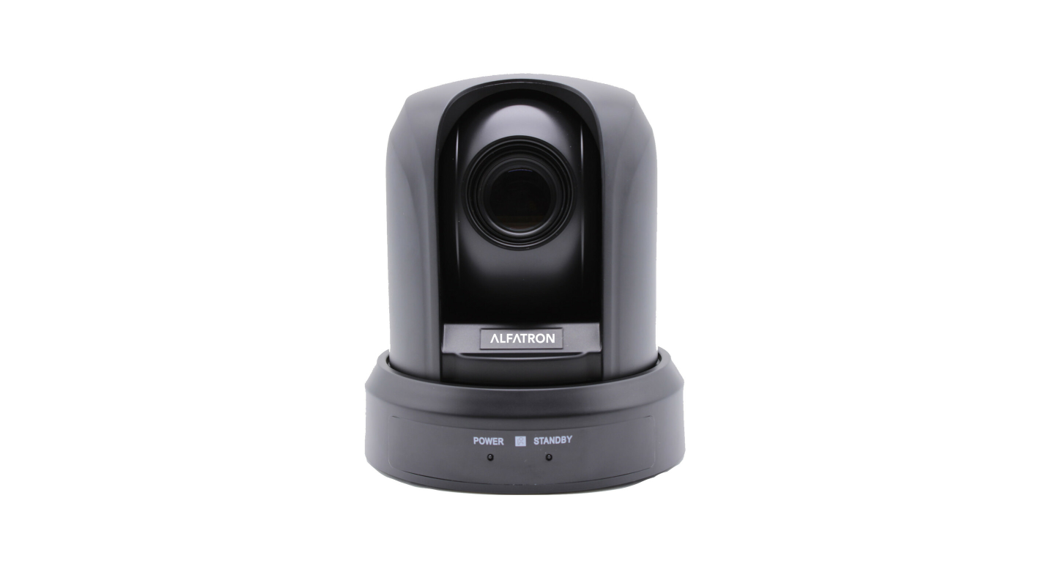
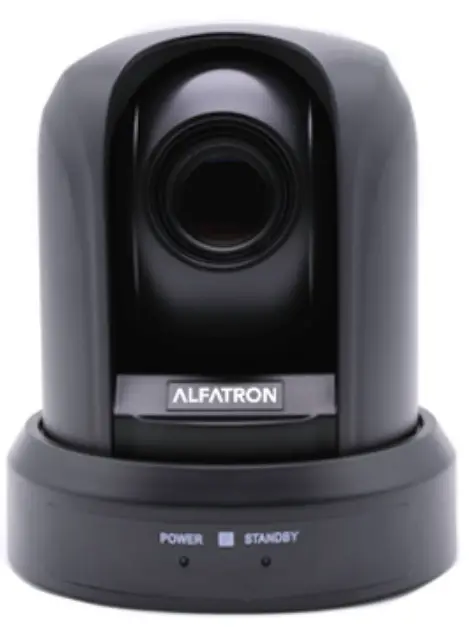
ALF-10XU2-CAMFull HD USB2.0 PTZ Camera
All Rights Reserved
Safety Precaution
To ensure the best from the product, please read all instructions carefully before using the device. Save this manual for further reference.
- This product must be installed by a professional technician and cannot be dismantled.
- Do not expose the unit to rain, moisture or install this product near liquid.
- Only use a soft and dry cloth for cleaning. Do not use any strong corrosive cleaning materials as it will damage the housing and lens.
Introduction
Alfatron ALF-10XU2-Cam is an HD PTZ camera equipped with 1080p with a 10x Zoom lens. This PTZ camera is suitable for medium to large size meeting rooms, boardrooms, and conference venues.
ALFAtron ALF-10XU2-Cam is compatible with video meeting software such as Skype and Zoom. The 1080P HD PTZ camera is equipped for a high-quality video stream and high definition real-time synchronization
Features
- Full HD (1920x1080p)
- Field of view 60.9° (Wide) – 6.43° (Tele)
- Pan 355° – Tilt 120°
- USB2.0
- RS232C and RS 422C Control
- PC Control with Sony VISCA or Pelco P/D commands
- Multi-function IR remote control
Package List
- 1 x PTZ Camera
- 1 x Remote Control
- 1 x USB Cable
- 1 x Power Adaptor and cable
- 1 x Bracket
- 1 x User Manual
Note: If you find any defective or missing parts, please contact your local dealer.
Camera Description
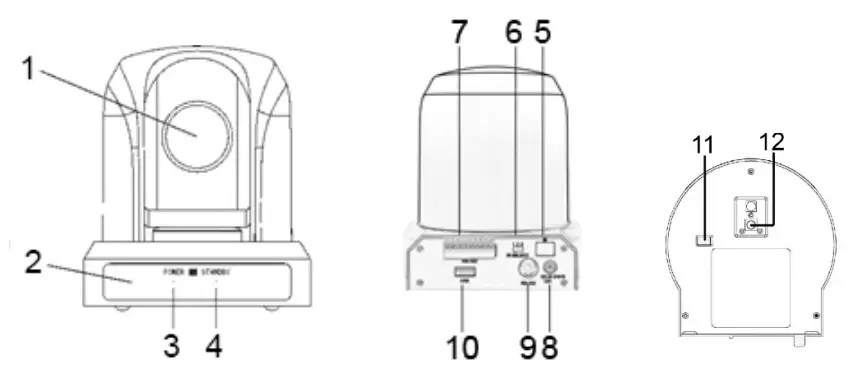
| Front Panel | 1. | Lens. |
| 2. | IR Sensor for the remote control. | |
| 3. | Power indicator. | |
| 4. | Standby indicator. | |
| Rear Panel | 5. | IR Sensor for the remote control. |
| 6. | IR Select Switch. | |
| 7. | RS-422C1485 VISCA / PELCO. | |
| 8. | 12V DC input. | |
| 9. | VISCA RS-232C IN Connector. | |
| 10. | USB 2.0. | |
| 11. | Screw hole. | |
| 12. | VISCA RS-4221RS-232C Bottom Switch. |
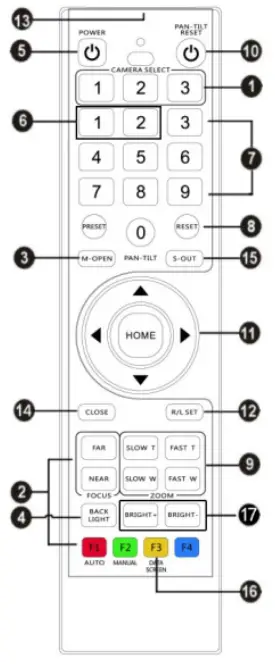
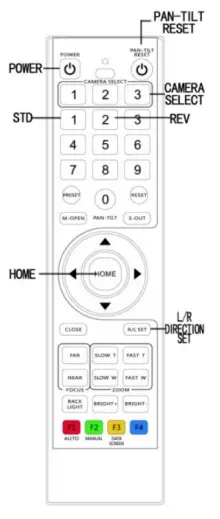
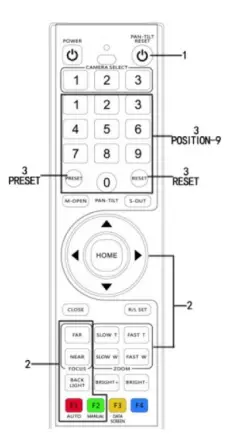
Remote Controller
| 1. Camera Select. |
| 2. Focus: Auto or Manual |
| 3. M-Open: open the menu. |
| 4. Back Light. |
| 5. Power. |
| 6. STD REV: (Press LJR Direction Set. and then Press 1 or 2) |
| 7. Position: Number Area: Preset: Press Preset then 1-9 for setup preset position |
| 8. Reset: Press Reset and then press 1-9 to reset preset position |
| 9. Zoom. |
| 10. Pan — Tilt Reset. |
| 11. Pan — lilt: Home — Middle position |
| 12. L / R Direction Set. |
| 13. IR Transmit. |
| 14. Close Menu. |
| 15. S- Out: Switch to 720P50. |
| 16. Data-Screen: Switching Color mode |
Control Port Diagram
VISCA-422
| Pin No. | Function |
| I | TXD IN+ |
| 2 | TXD IN- |
| 3 | RXD IN+ (RS485+4 |
| 4 | RXD IN- (RS485+) |
| 5 | GND |
| 6 | TXD OUT+ |
| 7 | TXD OUT- |
| 8 | RXD OUT+ |
| 9 | RXD OUT- |
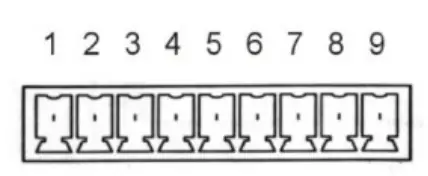
Attention: RS-422 and RS-232 can not be used at the same time
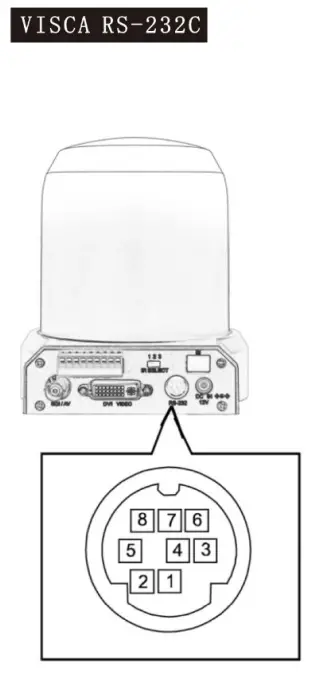
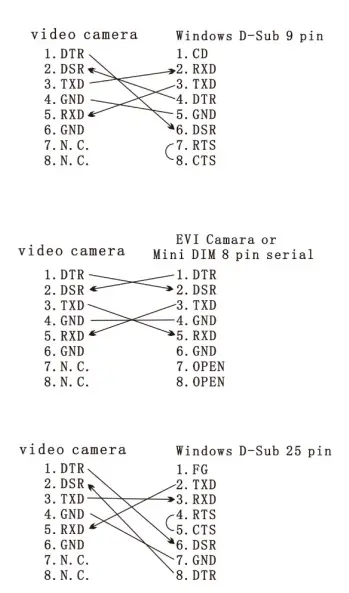
| NO | Pins | Signal |
| 1 | DTR | Data Transmission Ready(OUTPUT) |
| 2 | DSR | Data Set Ready(INPUT) |
| 3 | TXD | Transmit Data(OUTPUT) |
| 4 | GND | Ground |
| 5 | RXD | Receive Data(INPUT) |
| 6 | GND | Ground |
| 7 | N. C. | No Connection |
| 8 | N.C. | No Connection |
Remote Commander Operation
A: Pan / Tilt Control
- Power On, Pan /Tilt will be in initial position
- Press the arrow to adjust the position while watching the video image, you can move direction by using the arrow keys step by step. To set the position press (up or down) and arrow (Left or right) at the same time.
- Press Home to go back to the front-facing position.
- Press PAN-TILT RESET or turn off the power and then on again to reset the position of the camera.
- Press L/R Direction set and STD or REV at the same time, with the right or left arrow to turn the camera’s position.
B: Adjust the camera
1: Focus1.1: Auto: Press Auto for to automatically set the focus.1.2: Manual: Press MANUAL and then Far or Near to adjust.
2: Zoom – Press T or W for far or near zoom.
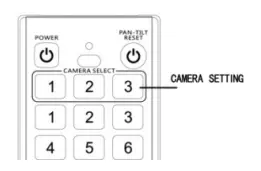
One remote to control multiple cameras
- A maximum of three cameras can be controlled by one remote control.
- Press CAMERA SELECT 1 or 2 or 3 to select the camera you want to control. The button will light up once selected.
Backlight Compensation
- If there is too much light behind the object, the object will appear black. You can adjust this by pressing the BACKLIGHT button.

Preset Camera Position
Store up to 200 Camera Presets (Position, zoom, focus, and back round lighting)– Using the remote – 9 Presets are available– 200 Presets can be set by using User Defined protocol
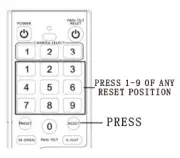
Set Preset using the remote control– Make sure the STANDBY LED is not blinking. If the STANDBY LED is blinking, please press PAN-TILT RESET to reset.– Adjust the camera’s position, zoom, focus, and back round light.– Press and hold the PRESET button, and then press one of the POSITION 1-9 buttons.
Use Preset PositionPress any of the 1-9 buttons to activate that preset.

To Cancel Preset PositionPress RESET, then Press the Preset number you want to cancel.
Bottom Switch
The bottom switch allows you to set the camera image the right way up or, mounted to the ceiling and the image flipped. RS-232 or RS422/485 selection.
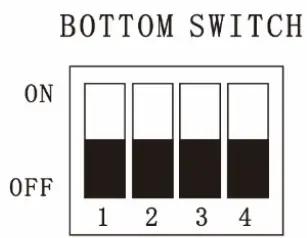
Note: The second bottom switch is for an upgrade, do not keep it on while using.
| USB SW ITCH | Control selection |
| 1 | CcntrolpittCCO1 |
| ON | PELCO D |
| OFF | VISCA |
| 2 | Upgrade mode |
| ON | ON |
| OFF | OFF |
| 3 | Install method |
| ON | Ceiling install |
| OFF | Normal install |
| 4 | Interface method |
| ON | RS422/485 |
| OFF | RS232 |
CAMERA IDThis setting allows you to set the camera ID. Press the right arrow button and enter. Press Up or Down to select the ID. Then click the right button to confirm. Left to exit.
PROTOCOLThis setting allows you to set the camera’s Baud Rate. Press the right arrow button and enter. pressure or Down to select the protocol. Then click the right button to confirm. Left to exit.
BAUD RATEThis setting allows you to set the camera control protocol. Press the right arrow button and enter. Press Up or Down to select the baud rate. Then click the right button to confirm. Left to exit.
IR SPEEDThis setting allows you to set the camera Pan / Tilt Speed. Press the right arrow button and enter. Press Up or Down to select the speed. Then click the right button to confirm left to exit. There are 18 levels.
CAMERA SETTING – VIDEO MODEThis setting allows you to set the video format. Press the right arrow button and enter. Press Up or Down to select. Then click the right button to confirm. Left to exit.
LOAD DEFAULTSThis setting allows you to set the camera control protocol. Press the right arrow button and enter. Press Up or Down to select. Then click the right button to confirm. Left to exit.
| CAMERA ID: | 1 |
| PROTOCOL: | VISCA |
| BAUD RATE | 9600 |
| IR SPEED: | 7 |
| CAMERA SETTING | |
| VIDEO MODE: | 1080p25 |
| LOAD DEFAULTS | |
| SAVE ADN EXIT |
Main Menu
SAVE AND EXITThis setting allows you to set the camera control protocol. Press the right arrow button enter. Press Up or Down to select. Then click the right button to confirm. Left to exit.
DIGITAL ZOOMThis setting allows you to turn digital zoom on or off. Press the right arrow button and enter. Press Up or Down to select. Then click the right button toconfirm. Left to exit.
SHARPER LEVELThis setting allows you to set the sharpness level. Press the right arrow button and enter. Press Up or Down to select. Then click the right button to confirm. Left to exit. There are 15 levels
DNR LEVELThis setting allows you to turn on / off the DNR Level. Press the right arrow button and enter. Press Up or Down to select. Then click the right button to confirm. Left to exit.
BRIGHT COMPThis setting allows you to set the brightness. Press the right arrow button and enter. Press Up or Down to select. Then click the right button to confirm. Left to exit. There are 200 levels.
WB SETTING (White Balance)This setting allows you to set the white balance. Press the right arrow button and enter. Press Up or Down to select. Then click the right button to confirm. Left to exit. There are 7 modes: WBS AUTO, SODIUM, AUTO, MANUAL, ATW, ONE PUSH, OUTDOOR, and INDOOR When the option is set to MANUAL: you can adjust the R/BGAIN. There are 15 Levels.
| DIGITAL ZOOM | : OFF |
| SHARPER LEVEL | :000 |
| DNR LEVEL | : MIDDLE |
| BRIGHT COMP | :085 |
| WB SETTING | : WBC AUTO |
| COLOR GAIN | :115 |
| COLOR HUE | :128 |
| CONTRAST | :125 |
Submenu
COLOR GAINThis setting allows you to set the color gain. Press the right arrow button and enter. Press Up or Down to select. Then click the right button to confirm. Left to exit. There are 200 Levels.
COLOR HUEThis setting allows you to set the color hue. Press the right arrow button and enter. Press Up or Down to select. Then click the right button to confirm. Left to exit. There are 200 Levels.
CONTRASTThis setting allows you to set the contrast. Press the right arrow button and enter. Press Up or Down to select. Then click the right button to confirm. Left to exit.
Technical Specifications
| Image Sensor | 1/2.8″ Progressive CMOS |
| Effective Pixels | 2.07 Megapixels |
| Resolution HD | MJPG:320×240,640×480,1280×720,1920×1080 |
| YUY2:320×240,640×480,1280×720,1920x 1080 | |
| Signal | PAUNTSC |
| Lens | 10X optical zoom |
| Foci | f=4.7mm(VV)∼47.0mm(T) |
| Horizontal ViewAngle | 60.9°(W) ∼ 6.43°(T) |
| Focus System | Auto/Manual |
| MinimumIllumination | 0.1Lux |
| Shutter | 1/30∼ 1/10,000s |
| Gain | Auto/Manual |
| White Balance | Auto/Indoor/Outdoor/Manual |
| Image Effect | Full color/black and white/image flip |
| S/N Ratio | ≥50db |
| Pan | 270°(max.speed:80°/s) |
| Tilt | -30° ∼30°(max.speed:60°/s) |
| Video Output HD | USB 2.0 |
| Protocol | SONY VISCA, PELCO P/D |
| Control Mode | RS-232C, RS-422/485 |
| Power | 12V/1.5A DC |
| Accessories | DC 12V power adapter, IR Remote, Operationmanual, USB cable, Ceiling bracket |
Limited warranty in respect of Alfatron Products Only
1.1 This limited warranty covers defects in materials and workmanship in this product.1.2 Should warranty service be required, proof of purchase must be presented to the Company. The serial number on the product must be clearly visible and not have been tampered with in any way whatsoever.
1.3 This limited warranty does not cover any damage, deterioration, or malfunction resulting from any alteration, modification, improper or unreasonable use ormaintenance, misuse, abuse, accident, neglect, exposure to excess moisture, fire, improper packing, and shipping (such claims must be presented to the carrier),lightning, power surges, or other acts of nature. This limited warranty does not cover any damage, deterioration, or malfunction resulting from the installation or removal of this product from any installation, any unauthorized tampering with this product, any repairs attempted by anyone unauthorized by the Company to make such repairs or any other cause which does not relate directly to a defect in materials and/or workmanship of this product. This limited warranty does not cover equipment enclosures, cables, or accessories used in conjunction with this product. This limited warranty does not cover the cost of normal maintenance. Failure of the product due to insufficient or improper maintenance is not covered.
1.4 The Company does not warrant that the product covered hereby, including, without limitation, the technology and/or integrated circuit(s) included in the product, will not become obsolete or that such items are or will remain compatible with any other product or technology with which the product may be used.
1.5 Only the original purchaser of this product is covered under this limited warranty. This limited warranty is not transferable to subsequent purchasers or owners of this product.
 report this ad
1.6 Unless otherwise specified, the goods are warranted in accordance with the manufacturer’s product specific warranties against any defect attributable to faultyworkmanship or materials, fair wear, and tear are excluded.1.7 This limited warranty only covers the cost of faulty goods and does not include the cost of labor and travel to return the goods to the Company’s premises.1.8 In the event of any improper maintenance, repair, or service being carried out by any third persons during the warranty period without the Company’s writtenauthorization, the limited warranty shall be void.1.9 A 7 (seven) year limited warranty is given on the aforesaid product where used correctly according to the Company’s instructions, and only with the use of theCompany’s components.
1.10 The Company will, at its sole option, provide one of the following three remedies to whatever extent it shall deem necessary to satisfy a proper claim under this limited warranty:
1.10.1 Elect to repair or facilitate the repair of any defective parts within a reasonable period of time, free of any charge for the necessary parts and labor to complete the repair and restore this product to its proper operating condition.; or
1.10.2 Replace this product with a direct replacement or with a similar product deemed by the Company to perform substantially the same function as the original product; or1.10.3 Issue a refund of the original purchase price less depreciation to be determined based on the age of the product at the time remedy is sought under this limited warranty.1.11 The Company is not obligated to provide the Customer with a substitute unit during the limited warranty period or at any time thereafter.1.12 If this product is returned to the Company this product must be insured during shipment, with the insurance and shipping charges prepaid by the Customer. If this product is returned uninsured, the Customer assumes all risks of loss or damage during shipment. The Company will not be responsible for any costs related to the removal or re-installation of this product from or into any installation. The Company will not be responsible for any costs related to any setting up this product, any adjustment of user controls, or any programming required for a specific installation of this product.
1.13 Please be aware that the Company’s products and components have not been tested with competitor’s products and therefore the Company cannot warrant products and/or components used in conjunction with competitor’s products.1.14 The appropriateness of the goods for the purpose intended is only warranted to the extent that the goods are used in accordance with the Company’s installation, classification, and usage instructions.1.15 Any claim by the Customer which is based on any defect in the quality or condition of the goods or their failure to correspond with specification shall be notified in writing to the Company within 7 days of delivery or (where the defect or failure was not apparent on reasonable inspection by the Customer) within a reasonable time after discovery of the defect or failure, but, in any event, within 6 months of delivery.1.16 If delivery is not refused, and the Customer does not notify the Company accordingly, the Customer may not reject the goods and the Company shall have no liability and the Customer shall pay the price as if the goods had been delivered in accordance with the Agreement.1.17 THE MAXIMUM LIABILITY OF THE COMPANY UNDER THIS LIMITED WARRANTY SHALL NOT EXCEED THE ACTUAL PURCHASE PRICE PAID FOR THE PRODUCT
Alfatron ALF-10XU2-CAM
![]()
References
[xyz-ips snippet=”download-snippet”]