
ALGO 2507 Ring Detector Installation Guide
About the Algo 2507 Ring Detector
The Algo 2507 module detects the low-level audio from the headset jack and provides an isolated signal to activate an Algo SIP endpoint.Only one compatible Algo SIP Endpoint can be connected directly to the 2507 Ring Detector at a time, however, any of the endpoint devices can send a signal to additional devices via the relay output connections on the back, or via multicast
What is Included
- 2507 Ring Detector
- Handset Cord
- Cable for Connection to Algo IP Endpoint
What is not Included
- Algo SIP Endpoint (see list below for compatible devices).
Compatible Algo SIP Endpoints
- 8128 SIP Strobe Light (G2)
- 8138 IP Color Visual Alerter
- 8180 SIP Audio Alerter (G2)
- 8186 SIP Horn Speaker
- 8188 SIP Ceiling Speaker
- 8189 SIP Surface Mount Speaker
- 8190 SIP Speaker – Clock
- 8190S SIP Speaker – Clock & Visual Alerter
- 8198 SIP PoE+ Ceiling Speaker
- 8301 Paging Adapter & Scheduler
Note:Devices must be on firmware 3.4.2 or above.
Getting Started – Configure & Test
![]() Only connect the 2507 to the Relay Input port on compatible Algo SIP Endpoints.
Only connect the 2507 to the Relay Input port on compatible Algo SIP Endpoints.
- Connect the Algo SIP Endpoint to the network via an Ethernet cable. Ensure that a PoE port is used for power.
- Enter the IP address (e.g. 192.168.1.111) into a browser such as Google Chrome, Firefox, or Microsoft Edge and log in. Full product user guides are available by visiting the Algo Website.
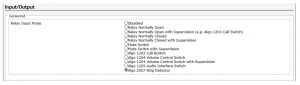
- Configure the Algo SIP Endpoint device via the web interface by navigating to Additional Features > Input/Output and set the Relay Input Mode to “Algo 2507 Ring Detector”.Note 1: Devices must be on firmware 3.4.2 or aboveNote 2: If working with an 8180 SIP Audio Alerter, set the Relay Terminal Function to “Input” in order to show the Relay Input Mode setting.

- Configure the desired tone and volume or strobe pattern to play when the relay input is activated. Click “Save” in the bottom right corner of the page.
- (Optional) Test the configuration is correct by shorting a pair of wires across the relay input terminal of the device. The configured tone will play or the strobe will flash, indicating the configuration is correct.
- Once the Algo SIP Endpoint has been confirmed to be working correctly, connect one end of the supplied cable (maximum length of 20 feet) to the relay input terminal on this device, and the other end to the terminal block on the 2507. This connection is not polarity dependant.
- Plug one end of the handset cord into the RJ jack on the 2507 and the other end into the HEADSET jack on the phone.
- Ensure that the phone’s ring signal is sent to the headset jack, in the configuration settings on the phone. Consult your particular phone vendor’s documentation for details on how this can be done. Configuration for certain phones is available below.
- Set the phone ringing volume to maximum. (Ensure that the headset is set up before the ring volume is configured.
- Set the sensitivity on the 2507 to maximum, by gently rotating the adjustment knob all the way clockwise. If a continuous alert is triggered or the alerting device is activated when the phone isn’t, lower the sensitivity.
- Test by calling the phone. If the Algo Speaker or Visual Alerter does not activate, read the Troubleshooting section below.
Poly CCX Series
Follow the steps below to configure the CCX phone for loud ringing with the Algo 2507
- In the phone menu, go to Settings > Device Settings > Admin Only > Debug > enable “Web User Interface”, save the settings and the phone will automatically reboot. Please note the admin password (default is 456) is required to access these settings. If you don’t know the password, contact your system administrator.
- In same menu, go to Settings > Device Settings > About to find the IP address.
- Type the IP address in the web browser of your preference and log in as Admin. The password will be the same one used in step 1.
- Navigate to Utilities > Import & Export Configuration tab. Export all configuration and save the file locally.
- Open the file with a text editor and add the two following lines. Make sure to add it between <ALL/> inside <PHONE CONFIG> </PHONE_CONFIG> See example below:</PHONE_CONFIG><ALLnp.normal.ringing.toneVolume.headset=”0″ se.destination=”headset”/></PHONE_CONFIG>Note: do not delete any settings, just add the two lines above.
- Save the text file and use the Poly import feature available in the same tab to import the edited configuration file. The following message will confirm the settings have been applied correctly: “Configuration file imported successfully”.
Yealink T55A, T56A, T58A
- Make sure the phone is running firmware 58.15.0.122 or higher.
- In the phone menu, go to Settings > Network and enter the admin password (default is admin). If you don’t know the password, contact your system administrator. In the Web Server section, enable “HTTP Status” and/or “HTTPS Status” and reboot when prompted. This enables access to the web configuration page.
- After the reboot, in the phone menu go to Settings > Device Settings > About. Write down the IP address.
- Type the IP address in the web browser of your preference and log in as Admin. Default username and password is admin.
- Navigate to Settings > Tones and set the Ringer Device to “Headset” or “Headset & Speaker”. Save the settings.
Troubleshooting
Wiring ConnectionsTo verify that the Algo SIP Endpoint is powered and configured correctly, short the wire pair on the input of the alerting device and see if an audio/visual alert is triggered. If not, verify the PoE connection and web configuration options as described in the Algo SIP Endpoint Web Interface Configuration of this guide.If the Algo SIP endpoint functions correctly, next verify the wiring connection between the alerting device and the 2507.If a continuous alert is triggered or the alerting device is activated when the phone isn’t, lower the sensitivity dial on the 2507.
Headset JackEnsure that the ring signal is sent to the headset jack on the phone. Consult your phone’s documentation for more details.To verify this, a headset or handset can be temporarily connected to the headset jack on the phone (in place of the 2507). Confirm that an audible signal is heard on this headset/handset when the phone rings.
Phone VolumeEnsure that the phone ringer volume is set to a max. The volume should be configured after theheadset is set up.
Contact usAlgo Communication Products Ltd4500 Beedie St Burnaby BC Canada V5J 5L2[email protected]
Tell;(604) 454-3792www.algosolutions.com

References
[xyz-ips snippet=”download-snippet”]