
AliExpress MT-9108UP 8-port IP remote control
computer KVM switch OSD menu rack
9108UP User Manual

Description
Thank you for purchasing this IP-KVM switch. The IP KVM that means a KVM switch with remote management function. A set of keyboard, mouse, and monitor control multiple computers and can remotely control multiple computer servers. IP KVM transmits each computer’s signal to the IP data packet through the Internet or private network. At the remote control side, the IP signal will be compiled again into keyboard, mouse, and monitor signals. In order to ensure data security, data packets are usually encrypted. And IP KVM can provide remote management without distance restrictions.
Features
- USB2.0 port, with USB hub, support any USB2.0 devices.
- System supported: DOS, Win95/ 98/ 98SE/ 2000/ ME/ XP, WinNT, Netware, Unix, Linux.
- Plug and play, can plug in or unplug the connected computer without turning off the KVM switch and computer. Hot plugging is not recommended.
- Excellent picture quality, resolution up to 1920*1440, bandwidth 350MHz.
- No software needed control the host computer that need operate for network control via buttons, hotkey, OSD menu.
- With buzzer.
- With LED light.
- Support auto-scanning, default 5s.
Interface instruction
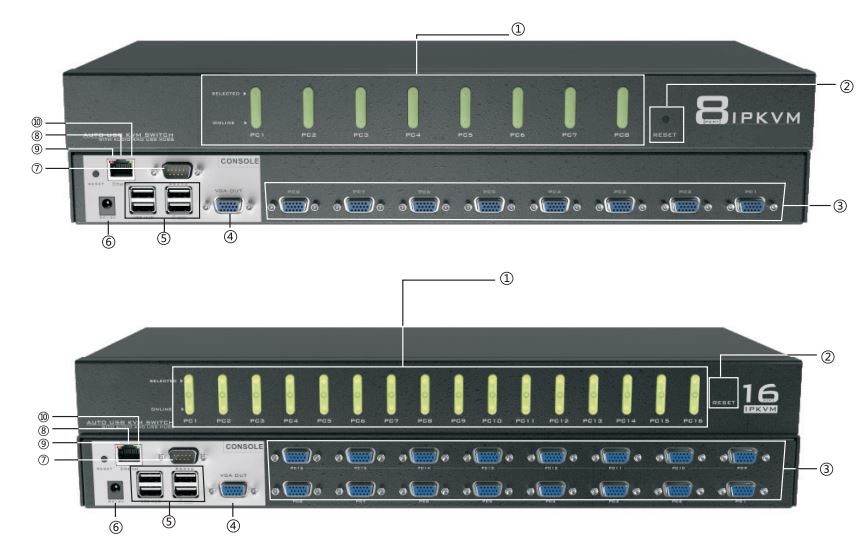
- CD 1 ~8/ 1 ~16 panel switch button
- reset button
- input port
- Output port
- USB Hub LED flash fast that means data interaction
- power port
- serial ports are vendor-specific interfaces that users cannot use
- LAN port: Ethernet interface
- Red LED: OM Ethernet connected
- Green LED: 1 OOM Ethernet connected
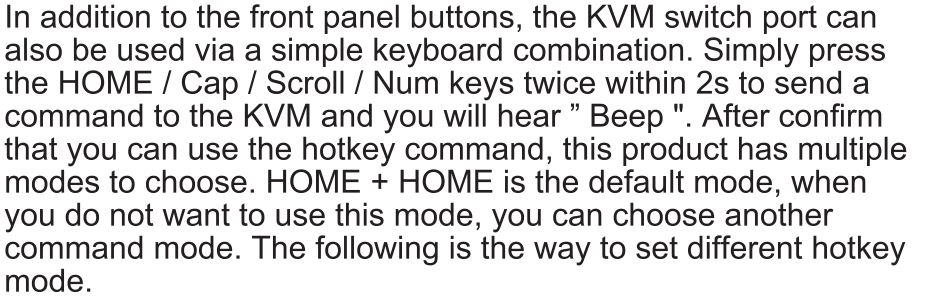
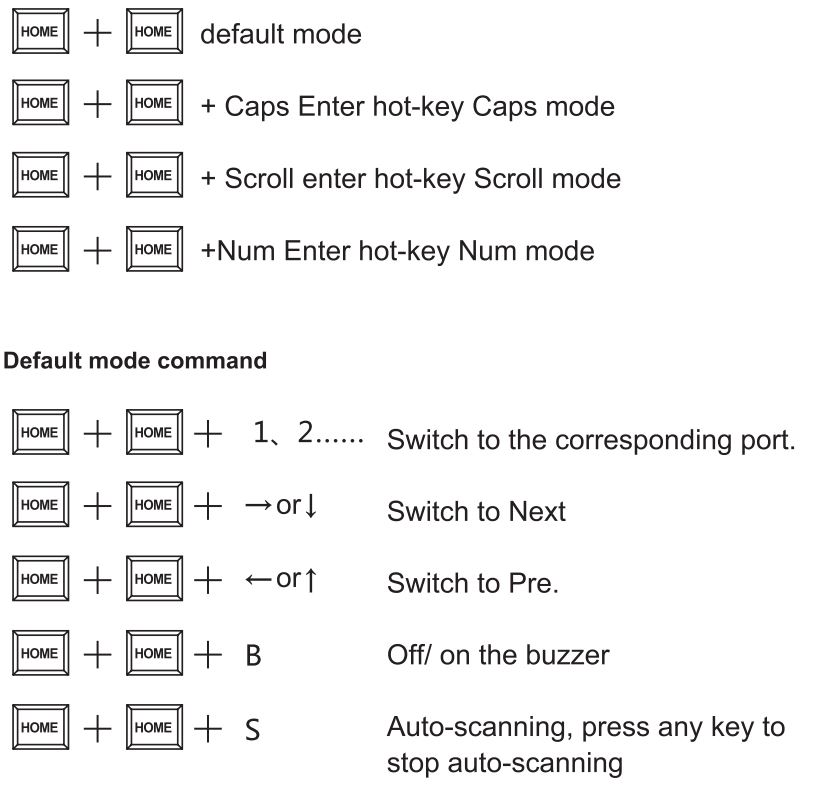
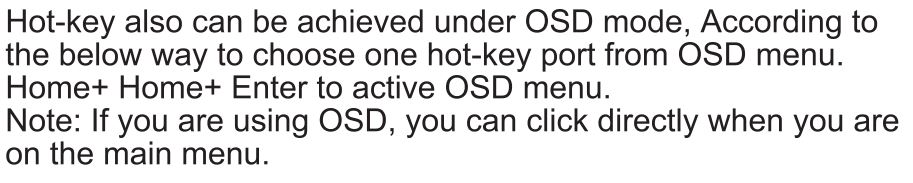
Hotkey command introduction

Caps Mode Command

Main menu
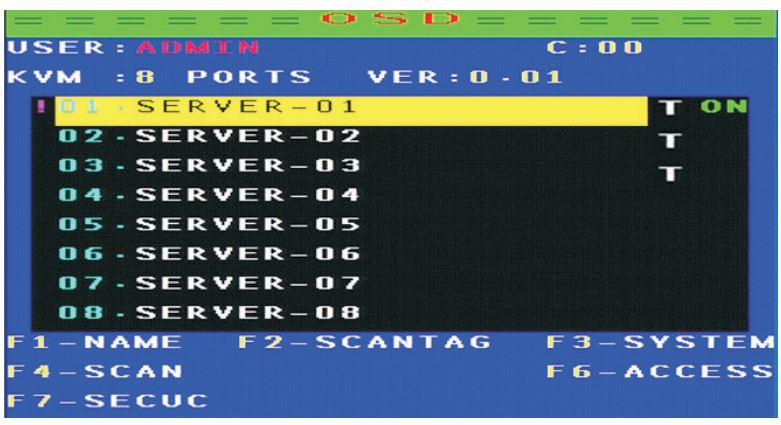
Menu settingF1: Revise port nameF2:Set the port to be scanned, used with auto-scanning mode 2 TAG (press F2 to open or close the scan, identify” T”, as shown in Figure 2 below)F3:Set systemF4:Scan portF6:Set the host to be assigned non-administrator users (which hosts User 1-7 can operate)F7:Set user login
Note: F1, F2, F3, F4, F6, F7 need to press on keyboard.
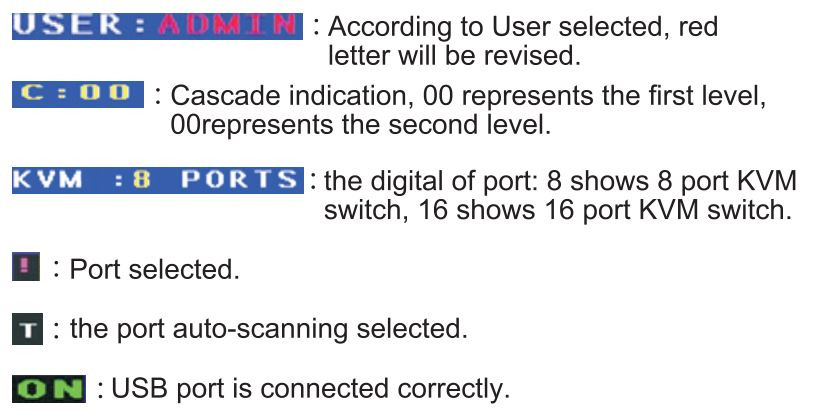
▷ F1 :Modify the host name
Note: You can change the name of the host as you like, use the keyboard up and down key to control, when you need to change the host name, press the enter on keyboard can be changed
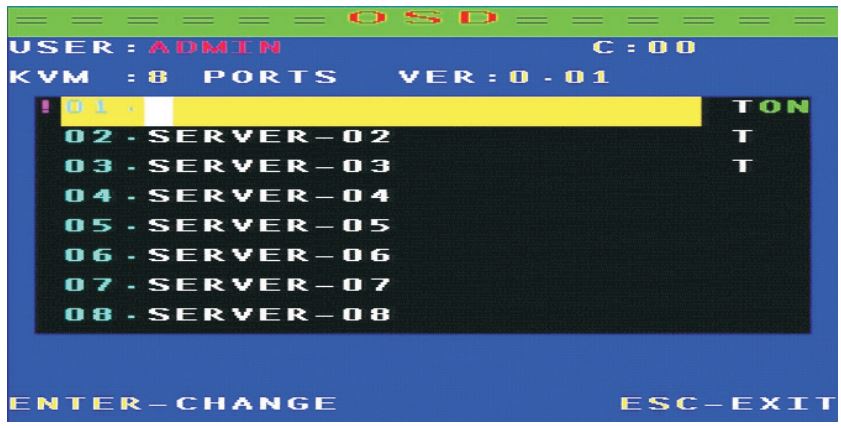
▷ F3: System setting
Setting method: Under the current option, press enter to enter the setting:01 : Buzzer on/ off02: Autos can Mode0: All of ports
- The option ID only scans the PC port connected to the USB
- only scans the port that mark by “T”(as figure 3)
- Autos can interval, default 5s
- After switching, the OSD shows the Banner interval
- After switching, OSD shows banner position, after entering, press Alt+ “↑↓+←→/’ key to adjust position
- Plugin Jump Mode
0: The device will be automatically switched to the port just inserted into the USB device when all the ports are free1 :Plug in a USB device (When USB port has a 5V devices input), it automatically switches to the one you plugged in, giving priority.
Note: The PLUGING JUMP MODE setting is only useful if JUMP CHECK is set to 1.07:JUMP CHECK0:NONE: Does not detect, Port switching could via panel keys or hotkey
1 :POWER: Detects the USB is correctly plugged in and can only be switched on the port where the USB device is plugged in
Note: If set to 1, you can not switch to the port that has no USB plug, regardless of the hotkey or keypad operation08:Check the software version information
▷ F7 : Enter the user settings
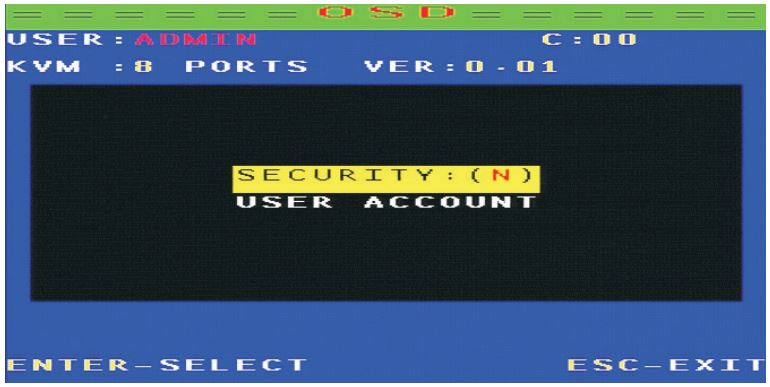
When you press F? into the user settings, the screen shown in Figure 4, SECURIY: Y represents that need the password to enter, N on behalf of don’t need the password to enter, press the “↓” into the user account, Press “enter” to into, enter the screen as Figure 5
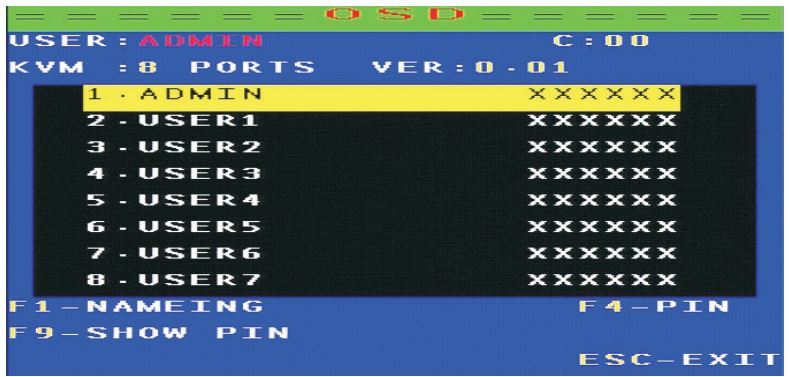
F1: modify the user name (user name: ADMIN, USER1, USER2, USER ….. behind 6 X is hidden password, you need to press F9 to view)F9: View the current password (the figure above by F9 shows the first user’s default password is 000000)F4: Change the password However, when set to Y, the OSD adds F5: LOGOUT options. Each time you login will be prompted, as shown inFigure 6:
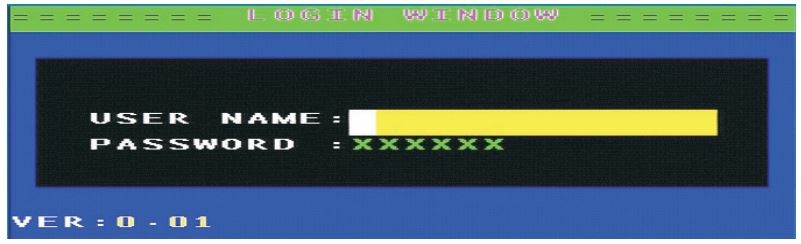
Figure 6 USER Name: the user name above Figure 5,Password: the password behind the user name, then you need to submit the user name and password to enterWhen you want to set the administrator to enter the OSD menu operation, you need to press F5, then OSD menu will restore picture like Figure 6 .
▷ F6 : Set and assign the administrator user host (which hosts User 1-7 can operate)

When you press the “F6” into Figure 7 picture, then press F1, F2, F3, F4, F5, F6, F7, the light green in the OSD menu will appear 1, 2, 3, 4, 5, 6, 7. These numbers represent USER1-7 users, press F12 to assign all users: DEL DELETE ALL USER’S PERMISSIONS.
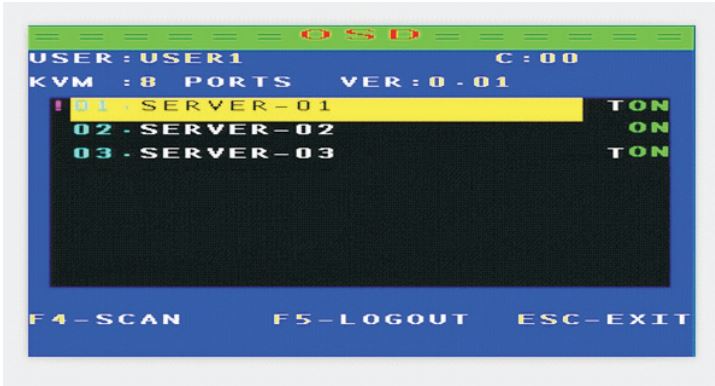
For example: in Figure 7, SERVER-01 ~ SERVER-03, each of these hosts have eight users, when you enter any one user can enter to control these three hosts: At this time when you press F5 to enter the user login picture( Figure 6) write User name: USER1, password: 111111 interface as Figure 8, you can see that 1,2,3,4,5,6 computers you can operate.

input the user name: user-03, password: 333333, you can see that only 1,2,3 computers can operate, and so on
The default administrator user name: Admin, password: 000000, when you use this account, you can operate any host Noted: When you forgot passwords, please set user name: Admin, passwords: MTVIKI.
Press the keyboard HOME + HOME + F + L + A + S + H + Enter to enter the initial settings
Cascade installation steps
Precautions before installation:
- Connect output source, input source, cascade cable and keyboard, mouse.
- Connect the power adapter after output source, input source, cascade cable connected to prevent the keyboard stuck phenomenon.
- Please start PCs after all done.
- After cascade, switch method: Panel button, OSD switching: press HOME+ HOME+ enter to activate OSD menu. You will see the picture on screen like figure 10:
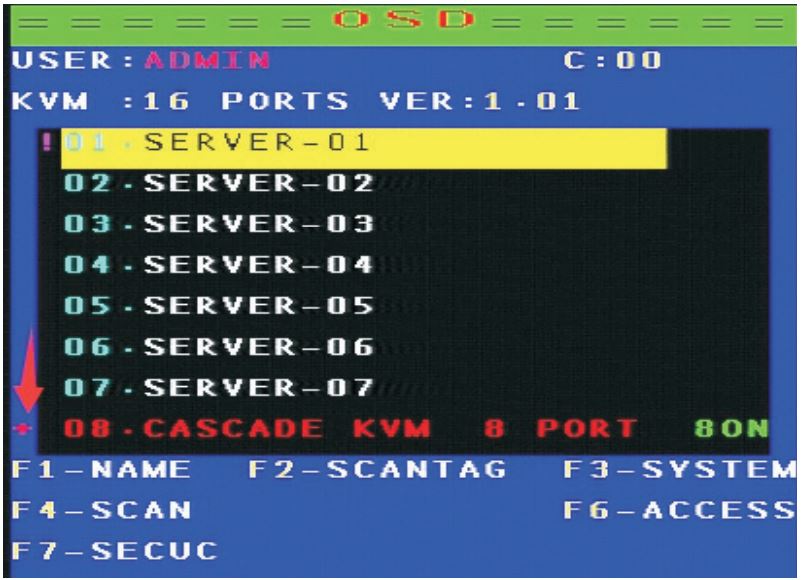
Press “↓” to control next PCs until 8th/16th port. Press “+” to control! second level PCs. If you would like to back the first level PCs, please press”-” when OSD show “0.1 SERVER-01”
Note: Each products need to connect power when cascade, the product of each input port can be used as a cascade port, cascaded up to two level. (Cascade will account for an input port)
8 port cascade diagram
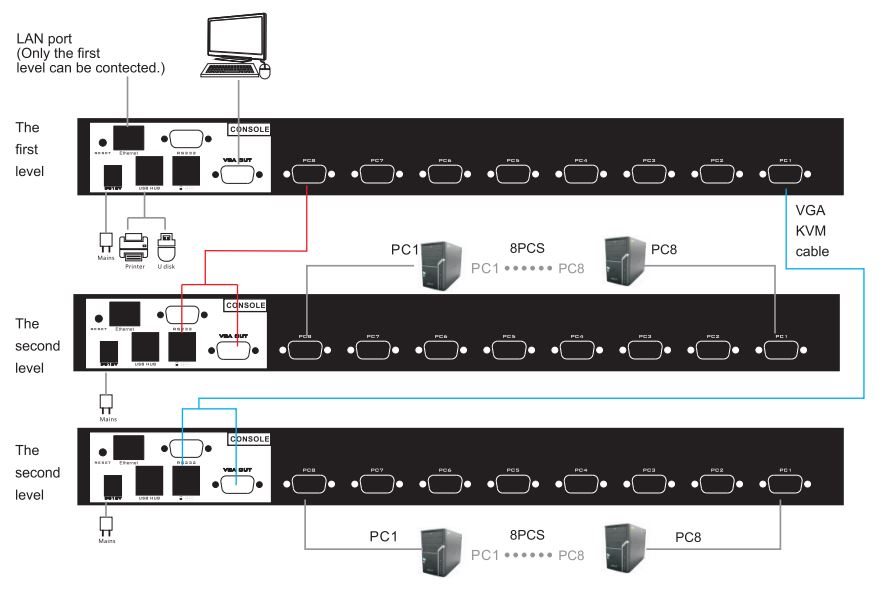
Note: 8 port KVM switch connect up to 56PCs
16 port cascade diagram
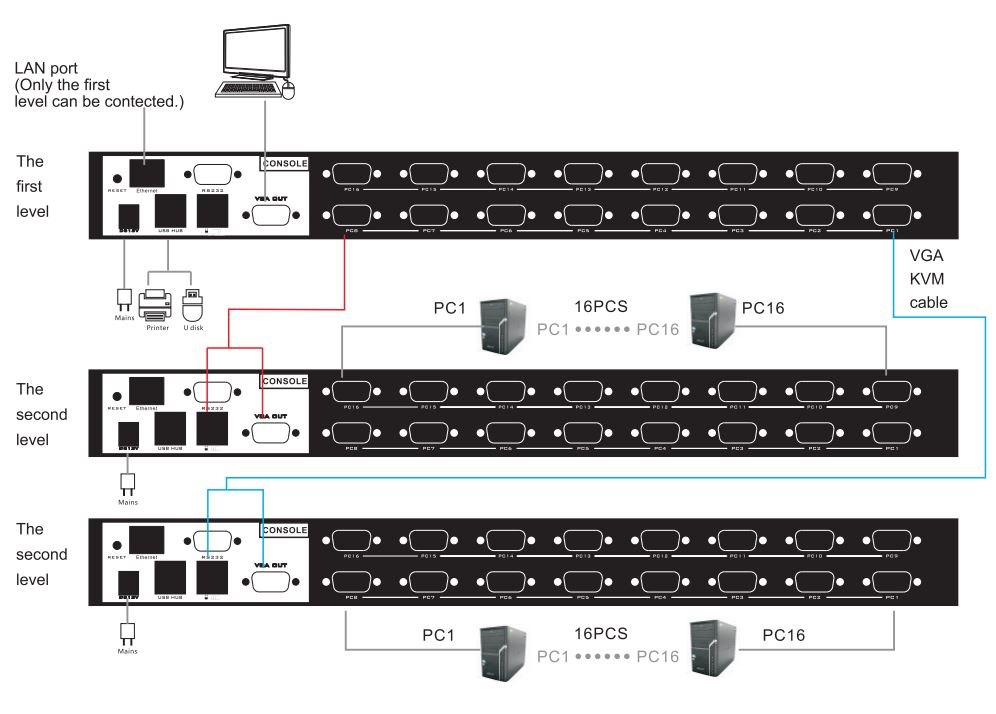
Note: 16 port KVM switch connect up to 240 Pcs.
Please note that the wiring connecting sequence, if reverse, may result in product burnout, the consequences.
IP Control Steps

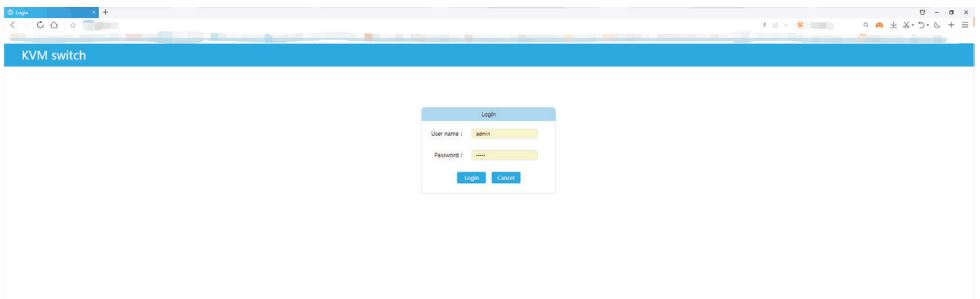
Login equipment
When the KVM switch starts, the local console appears the login picture. The device has a built-in administrator account, the user name is ad min, initial password is 12345. After the first successful login to the device, you canmodify the password or create account. After the device leaves the factory, the default IP address is 192.168.1.101. You can configure the network through the local console. Input the IP address in the browser. And then enter the correct user name and password, and click Login to access the device.
The current supported browse: IE7.0 and above version, Firefox, Opera, Maxton, chrome, QQ browser, Safari, etc. After a successful login, the “Target device page” opens by default. It lists all the ends port information, including target machine name (CIM naming), CIM type, on line State and access hyperlinks.
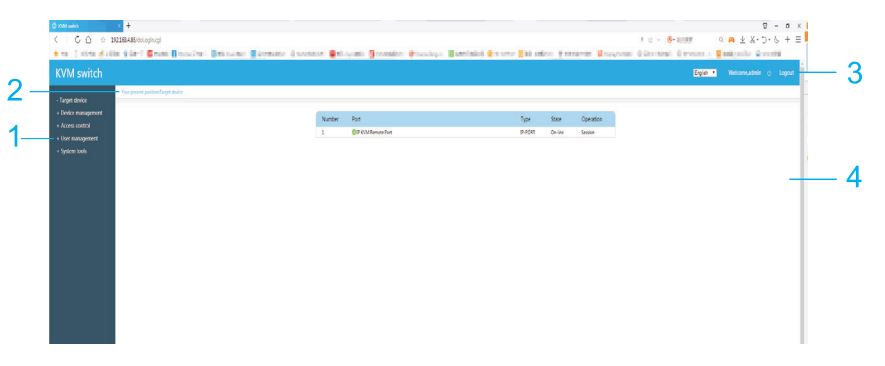
Browser interface page composition

Remote session
When you successfully login to the remote console, the “Target device page” opens. This page lists all the target servers connected to the device port, their status and availability, provide access to the target server. When the CIM module of the target server is on line and the physical connection is correct, click on the “session” hyperlink of this port will pop up the remote clientinterface of the target machine. The remote session interface and use will be described in detail in the following.
1. SummaryWhen you click on a remote session, the client interface of the target machine that want to access will open. The window can be maximized, minimized, and moved on the desktop.
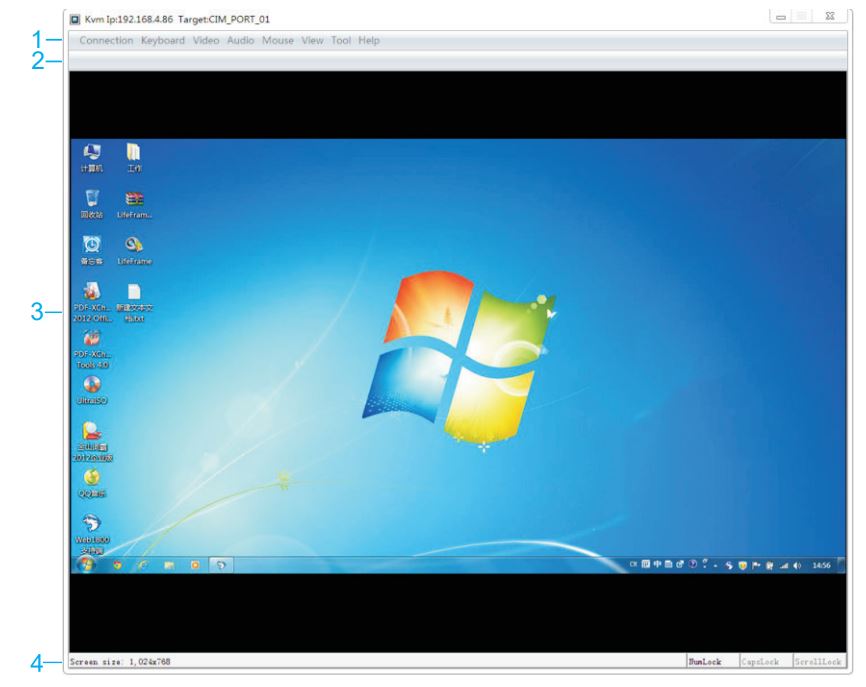
Client interface composition
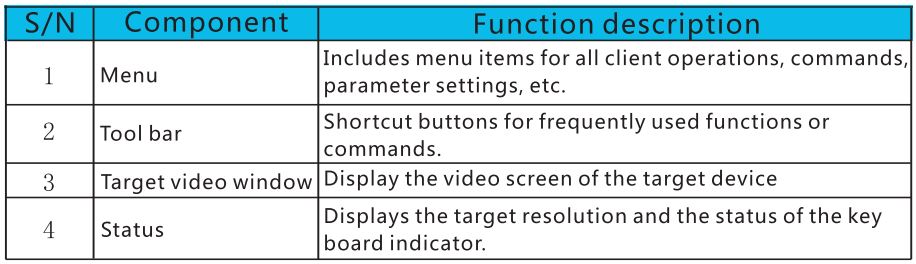
Menu tree

Tool bar shortcut icon
![]()
2. Connection menu
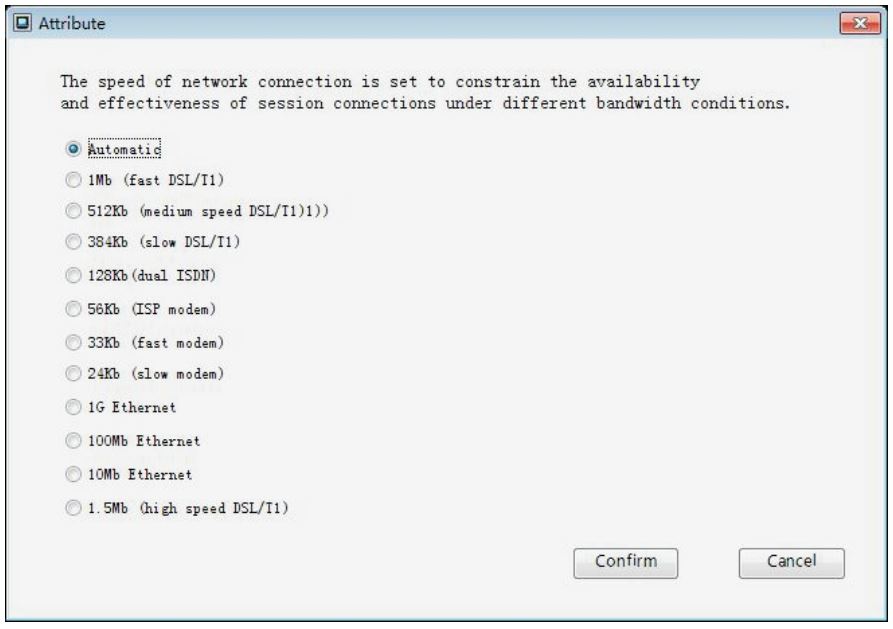
Properties dialog box
Property dialog box to constrain the network bandwidth used by the KVM remote client to reach the best conversation effect. Typically, you don’t have to set this, KVM built-in the compression algorithm automatically adjusts the compression parameters.
Information
Displays the following information for the current session:
- The name of the KVM device; the name of the KVM switch device which the current session connected.
- KVM device IP address: the IP address of the KVM switch of the current session connected.
- Connection time; the duration of the current session opening.
- CIM module type; CIM module model of session connection, such as USB, PS2, etc.
- Frame rate; video dynamic frame rate for the current session.
- Horizontal resolution: the pixels in the horizontal direction of the current session video.
- Vertical resolution: the pixels in the vertical direction of the current session video.
- Refresh rate: refresh rate of the target server that current session connected Copy to system Shearing clipboard is used to copy the contents of the information dialog box to the system clipboard for other purposes.

Exit programThis operation will close the current client.
3. Keyboard menuThis menu contains all the actions and commands related to the keyboard, mainly keyboard macros.
Import keyboard macrosImport the XML file that defines the keyboard macro. The client port parses the xml file into keyboard macros.
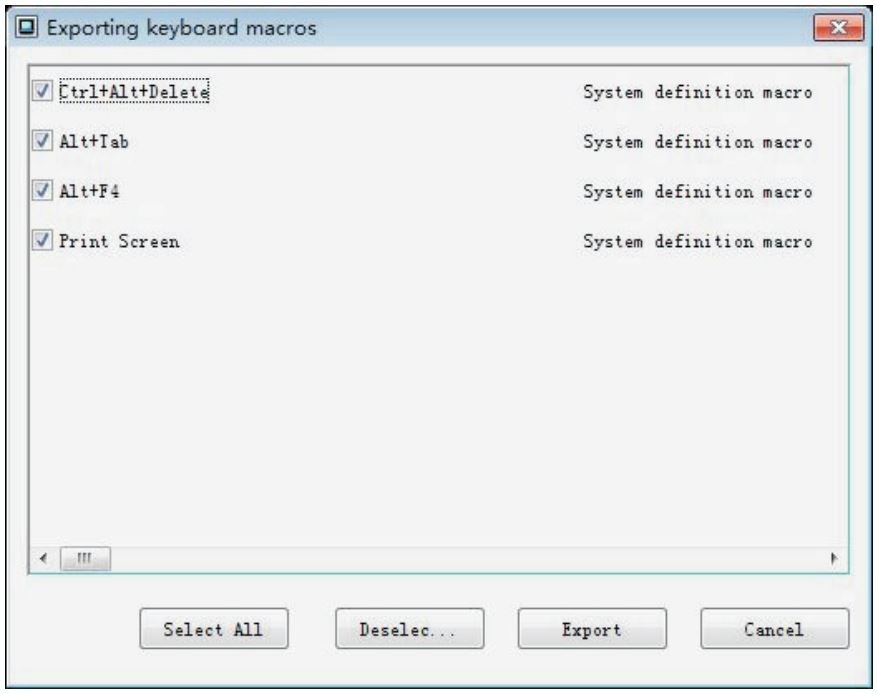
Export keyboard macrosUsed to export and save the defined keyboard macro as a file.
Manage keyboard macrosThe main functions are to add, delete, define keyboard macros, etc.
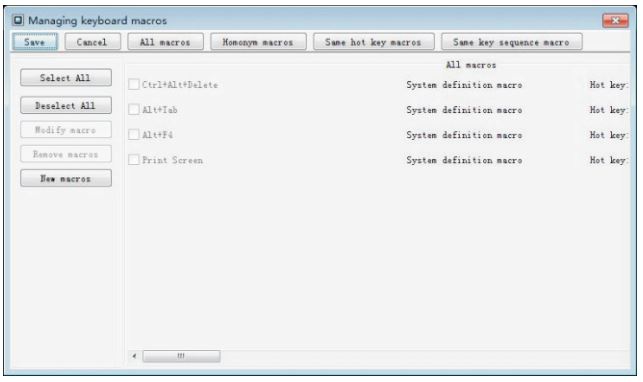
In addition, the Keyboard menu contains some commonly used keyboard macro shortcut menu. For example, “Ctrl+ Alt+ Delete”, “Print Screen”, etc.
4. Video menu
The menu mainly includes refresh screen, reset parameters, and set parameters etc.
Refresh screenThis command forces the video encoder to encode frames and redraw the picture to get better image effect.
Reset parameterThis command reverts the video-related parameters to the default values of the system and refreshes the screen.
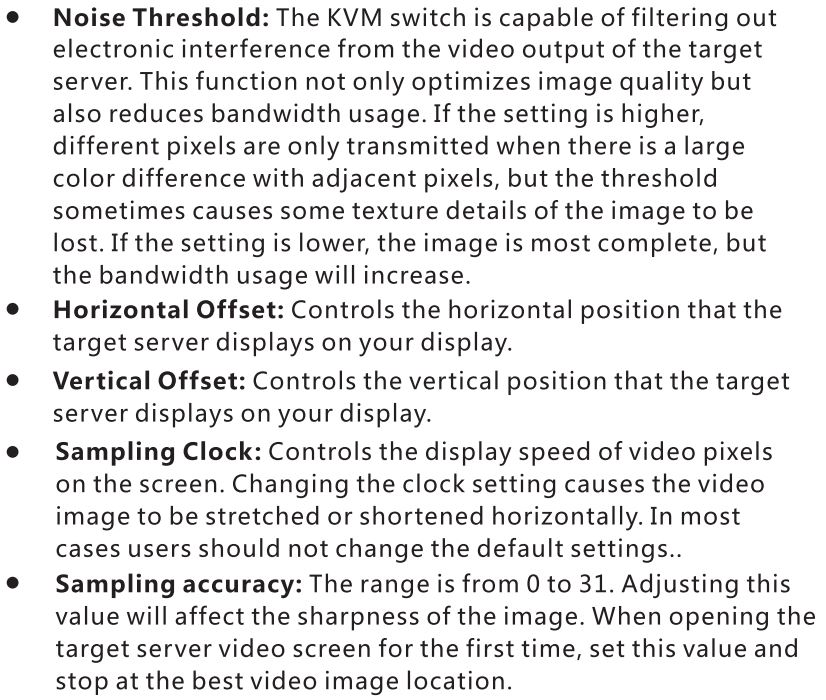
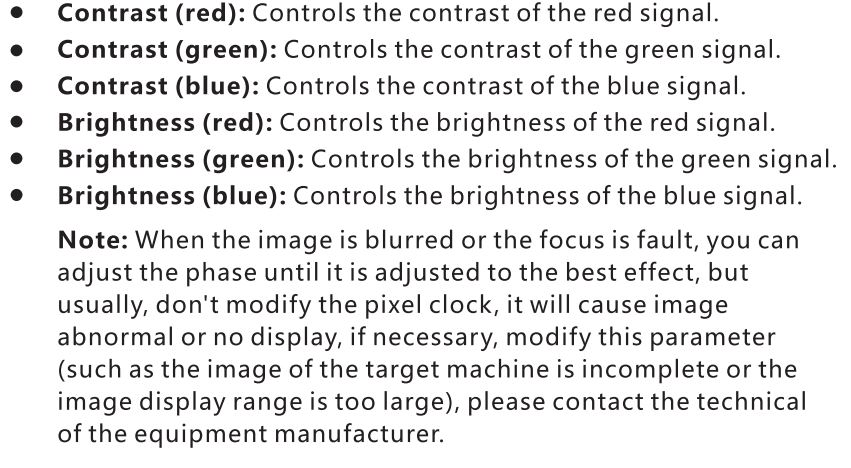
Parameter settingThe video ADC and coding parameters are mainly set.


7. “Tools” menu
Virtual media
Use virtual media, user needs port access and must also set virtual media access to the port. Please refer the “Account Management”. With the Virtual Media feature, you can map a local disk or ISO image to a remote target. The virtual media session open state will remain until the end of the KVM session.
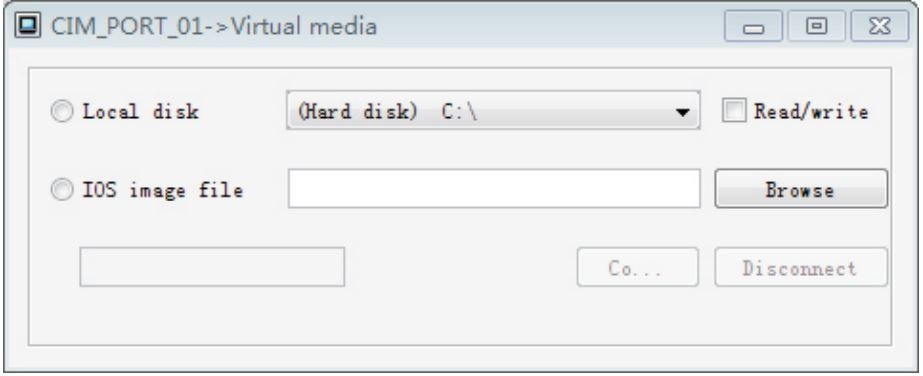
The virtual media feature supports mapping of the following media:(1) Local hard drive(2) Removable disk(3) CD/DVD drive(4) ISO image file
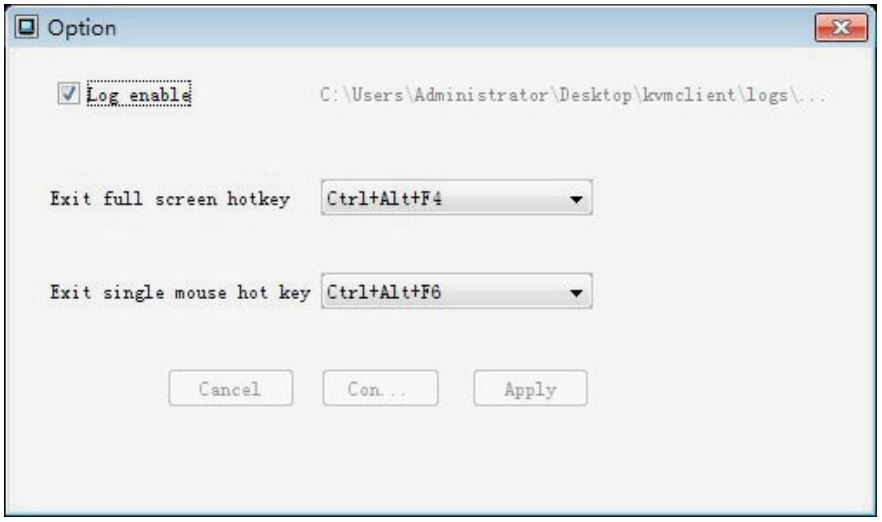
Option
The main configuration whether to use client logging, exit full mode, and exit the single mouse mode hot-key.
8: Help menuIt mainly displays the environment information and software version information of the client running.
 report this ad
[xyz-ips snippet=”download-snippet”]