
Alliance DR7003WE Front Load Dryers User Guide

![]() WARNING
WARNING
![]() WARNING
WARNING
 Risk of fire. Highly flammable material.W881
![]() Hazardous voltage inside. Disconnect power before servicing.
Hazardous voltage inside. Disconnect power before servicing.
![]() Read all instructions before using unit.
Read all instructions before using unit.
![]() WARNINGFOR YOUR SAFETY, the information in this manual must be followed to minimize the risk of fire or explosion or to prevent property damage, personal injury or death.W033
WARNINGFOR YOUR SAFETY, the information in this manual must be followed to minimize the risk of fire or explosion or to prevent property damage, personal injury or death.W033
![]() WARNING
WARNING
- Do not store or use gasoline or other flammable vapors and liquids in the vicinity of this or any other appliance.
- WHAT TO DO IF YOU SMELL GAS:
- Do not try to light any appliance.
- Do not touch any electrical switch; do not use any phone in your building.
- Clear the room, building or area of all occupants.
- Immediately call your gas supplier from a neighbor’s phone. Follow the gas supplier’s instructions.
- If you cannot reach your gas supplier, call the fire department.
- Installation and service must be performed by a qualified installer, service agency or the gas supplier.W052
IMPORTANT: Purchaser must consult the local gas supplier for suggested instructions to be followed if the dryer user smells gas. The gas utility instructions plus the SAFETY and WARNING note directly above must be posted in a prominent location near the dryer for customer use.
![]() WARNING
WARNING
- Installation of unit must be performed by a qualified installer.
- Install clothes dryer according to manufacturer’s instructions and local codes.
- DO NOT install a clothes dryer with flexible plastic venting materials. If flexible metal (foil type) duct is installed, it must be of a specific type identified by the appliance manufacturer as suitable for use with clothes dryers. Refer to section on connecting exhaust system. Flexible venting materials are known to collapse, be easily crushed, and trap lint. These conditions will obstruct clothes dryer airflow and increase the risk of fire.W729R1
![]() WARNING To reduce the risk of severe injury or death, follow all installation instructions. Save these instructions.W894
WARNING To reduce the risk of severe injury or death, follow all installation instructions. Save these instructions.W894
![]() WARNING FOR YOUR SAFETY
WARNING FOR YOUR SAFETY
Do not store or use gasoline or other flammable vapors and liquids in the vicinity of this or any other appliance.W053This product uses FreeRTOS V7.2.0 (www.freertos.org). The following information applies to the state of Massachusetts, USA.
- This appliance can only be installed by a Massachusetts licensed plumber or gas fitter.
- This appliance must be installed with a 36 inch [910 mm] long flexible gas connector.
- A “T-Handle” type gas shut-off valve must be installed in the gas supply line to this appliance.
- This appliance must not be installed in a bedroom or bathroom.
Product Registration
New owners of Alliance Laundry Systems equipment are encouraged to register their appliance to insure proper limited warranty coverage. Register online at https://speedqueen.com/support/register-your-products/ or contact your dealer to register your appliance. All information will be kept confidential and will not be distributed to other parties.
© Copyright 2021, Alliance Laundry Systems LLC All rights reserved. No part of the contents of this book may be reproduced or transmitted in any form or by any means without the expressed written consent of the publisher.
Safety Information
Explanation of Safety Messages
Precautionary statements (“DANGER,” “WARNING,” and “CAUTION”), followed by specific instructions, are found in this manual and on machine decals. These precautions are intended for the personal safety of the operator, user, servicer, and those maintaining the machine.
![]() DANGERIndicates an imminently hazardous situation that, if not avoided, will cause severe personal injury or death.
DANGERIndicates an imminently hazardous situation that, if not avoided, will cause severe personal injury or death.
![]() WARNINGIndicates a hazardous situation that, if not avoided, could cause severe personal injury or death.
WARNINGIndicates a hazardous situation that, if not avoided, could cause severe personal injury or death.
![]() CAUTIONIndicates a hazardous situation that, if not avoided, may cause minor or moderate personal injury or property damage.
CAUTIONIndicates a hazardous situation that, if not avoided, may cause minor or moderate personal injury or property damage.
Additional precautionary statements (“IMPORTANT” and “NOTE”) are followed by specific instructions.
IMPORTANT: The word “IMPORTANT” is used to inform the reader of specific procedures where minor machine damage will occur if the procedure is not followed.
NOTE: The word “NOTE” is used to communicate installation, operation, maintenance or servicing information that is important but not hazard related.
Important Safety Instructions
Save These Instructions
![]() WARNINGTo reduce the risk of fire, electric shock, serious injury or death to persons when using your dryer, follow these basic precautions:W130
WARNINGTo reduce the risk of fire, electric shock, serious injury or death to persons when using your dryer, follow these basic precautions:W130
- Read all instructions before using the dryer.
- Install this dryer according to the INSTALLATION INSTRUCTIONS. Refer to the EARTH/GROUND INSTRUCTIONS in the INSTALLATION manual for the proper earth/ground connection of the dryer. All connections for electrical power, earth/ ground and gas supply must comply with local codes and be made by licensed personnel when required. Do not do it yourself.
- Do not install or store the dryer where it will be exposed to water and/or weather.
- Do not dry articles that have been previously cleaned in, washed in, soaked in, or spotted with gasoline or machine oils, vegetable or cooking oils, cleaning waxes or chemicals, dry-cleaning solvents, thinner, anything containing chemicals such as in mops and cleaning cloths, or other flammable or explosive substances as they give off vapors that could ignite, explode or cause fabric to catch on fire by itself.
- Do not place items exposed to cooking oils in your dryer. Items contaminated with cooking oils may contribute to a chemical reaction that could cause a load to catch fire. To reduce the risk of fire due to contaminated loads, the final part of a tumble dryer cycle occurs without heat (cool down period). Avoid stopping a tumble dryer before the end of the drying cycle unless all items are quickly removed and spread out so that the heat is dissipated.
- Items that have been soiled with substances such as cooking oil, acetone, alcohol, petrol, kerosene, spot removers, turpentine, waxes and wax removers, should be washed in hot water with an extra amount of detergent before being dried in the tumble dryer.
- To reduce the risk of fire, DO NOT DRY plastics or articles containing foam or latex rubber or similarly textured rubberlike materials, such as shower caps, water proof textiles, rubber-backed articles, and clothes or pillows filled with foam rubber pads.
- Do not tumble fiberglass curtains and draperies unless the label says it can be done. If they are dried, wipe out the cylinder with a damp cloth to remove particles of fiberglass.
- Do not allow children to play on or in the dryer. Close supervision of children is necessary when the dryer is used near children. This appliance is not intended for use by persons (including children) with reduced physical, sensory or mental capabilities, or lack of experience and knowledge, unless they have been given supervision or instruction concerning the use of the appliance by a person responsible for their safety. This is a safety rule for all appliances.
- Cleaning and user maintenance shall not be made by children without supervision.
- Children less than three years should be kept away unless continuously supervised.
- Do not reach into the dryer if the cylinder is revolving.
- Use the dryer only for its intended purpose, drying clothes. ALWAYS follow the fabric care instructions supplied by the garment manufacturer and only use the dryer drum to dry textiles that have been washed in water.
- Always read and follow manufacturer’s instructions on packages of laundry and cleaning aids. Heed all warnings or precautions. To reduce the risk of poisoning or chemical burns, keep them out of reach of children at all times (preferably in a locked cabinet).
- Do not use fabric softeners or products to eliminate static unless recommended by the manufacturer of the fabric softener or product.
- Remove laundry immediately after the dryer stops.
- DO NOT operate the dryer if it is smoking, grinding or has missing or broken parts or removed guards and/or panels. DO NOT tamper with the controls or bypass any safety devices.
- DO NOT operate individual units if they have been separated from a stack unit.
- Dryer will not operate with the loading door open. DO NOT bypass the door safety switch by permitting the dryer to operate with the door open. The dryer will stop tumbling when the door is opened. Do not use the dryer if it does not stop tumbling when the door is opened or starts tumbling without pressing the START mechanism. Remove the dryer from use and call the service person.
- ALWAYS clean the lint filter after every load. A layer of lint in the filter reduces drying efficiency and prolongs drying time. Keep area around the exhaust opening and adjacent surrounding area free from the accumulation of lint, dust and dirt. The interior of the dryer and the exhaust duct should be cleaned periodically by qualified service personnel.
- Do not repair or replace any part of the dryer, or attempt any servicing unless specifically recommended in the user maintenance instructions or in published user-repair instructions that you understand and have the skills to carry out. ALWAYS disconnect the electrical power to the dryer before attempting service. Disconnect the power cord by grasping the plug, not the cord.
- Electric Models: If supply cord is damaged, it must be replaced by a special cord or assembly available from the manufacturer or its service agent.
- Gas Models: If supply cord is damaged, it must be replaced by the manufacturer, its service agent or similarly qualified persons in order to avoid a hazard.
- Before the dryer is removed from service or discarded, remove the door to the drying compartment.
- Failure to install, maintain, and/or operate this machine according to the manufacturer’s instructions may result in conditions which can produce bodily injury and/or property damage.
NOTE: The WARNING and IMPORTANT SAFETY INSTRUCTIONS appearing in this manual are not meant to cover all possible conditions and situations that may occur. Observe and be aware of other labels and precautions that are located on the machine. They are intended to provide instruction for safe use of the machine. Common sense, caution and care must be exercised when installing, maintaining, or operating the dryer.
Always contact your dealer, distributor, service agent or the manufacturer about any problems or conditions you do not understand.
Before Drying
Energy Saving Tips
- Make sure the lint filter is always clean.
- Do not overload the dryer.
- Do not overtry items.
- Remove items to be ironed while still damp.
- Large loads of similar fabrics dry the most efficiently. However, dry permanent press in smaller loads to prevent wrinkling.
- Use the correct cycle for the type of fabric being dried.
- Locate your dryer so the exhaust duct is as short and straight as possible.
- Do not open the door during the drying cycle.
- Plan to do your laundry on low humidity days; your clothes will dry faster.
- Dry multiple loads of clothes one right after another so dryer interior does not have to be reheated for each load.
Helps and Hints
![]() WARNING
WARNING
To reduce the risk of fire, explosion, serious injury or death, clothes which have traces of any flammable substances such as cooking oil, machine oil, flammable chemicals, thinner, etc. must not be put into the dryer.W131
- The directions for installation and proper exhausting are given in the Installation Instructions which are included with the dryer.
- Static electricity may cause garments of synthetic fibers (as in lingerie) to cling together, especially if they are overdried. The use of a liquid fabric softener in the rinse water of the washer, or a fabric softener sheet in the dryer, will soften clothes and reduce static electricity.
- Do not wash or dry clothes that shed lint in the same load with permanent press or knit garments.
- Remove permanent press loads immediately after dryer stops.
- Follow the care labels on FLAME RETARDANT, SCOTCHGUARDTM, etc., garments for proper washing and drying.
- If loads should be damp for ironing, use the Damp Dryness setting, in an Automatic cycle.
Sort
If you have correctly sorted the items for washing, they should be properly sorted for drying too.
- Sort by color.
- Separate lint shedding fabrics and lint receiving fabrics. Towels, flannels, chenille, cottons, rugs, etc., shed lint. Corduroys, knits (including socks), permanent press, and synthetics attract lint.
- Separate no heat, low heat and high heat items.
In any kind of drying, lightweight fabrics will dry faster than heavyweight fabrics. If mixed loads are dried together (such as sheets and towels), remove the lighter weight fabrics when they are dry to prevent overtrying and wrinkling. The best method is to dry clothes which require the same time, temperature or dryness level in the same load.
Load
![]() WARNINGDo not wash or dry items soiled with vegetable or cooking oils. Some oils may remain after washing and may cause the fabric to catch on fire by itself.W527
WARNINGDo not wash or dry items soiled with vegetable or cooking oils. Some oils may remain after washing and may cause the fabric to catch on fire by itself.W527
- Do not overload your dryer. Bulk, not weight, determines the load size. If the dryer is overloaded, it could cause discoloration or permanent heat damage to the load.
- There should be space in the dryer for the clothes to tumble freely and help to reduce wrinkles.
- Large and small pieces together make up loads which will tumble well. Permanent press loads should be smaller to provide room for tumbling. Proper tumbling allows for fewer wrinkles.
- A load can be too small. Just a few small pieces will not tumble properly. They will take longer to dry and they may be wrinkled. For small loads, add a couple of large towels or non lint shedding items to aid in tumbling.
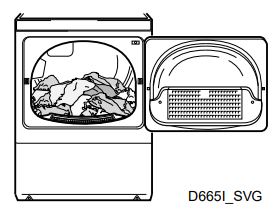
- The following illustrations show the ideal load sizes for fabrics. The average load will fill the cylinder one third to half full when wet.Cylinder with wet linens and cottons
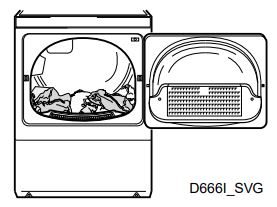
Cylinder with wet permanent press items
Operating Your Dryer
![]() WARNINGTo reduce the risk of fire, electric shock, serious injury or death to persons, read the Safety Information section before operating the dryer. W520
WARNINGTo reduce the risk of fire, electric shock, serious injury or death to persons, read the Safety Information section before operating the dryer. W520
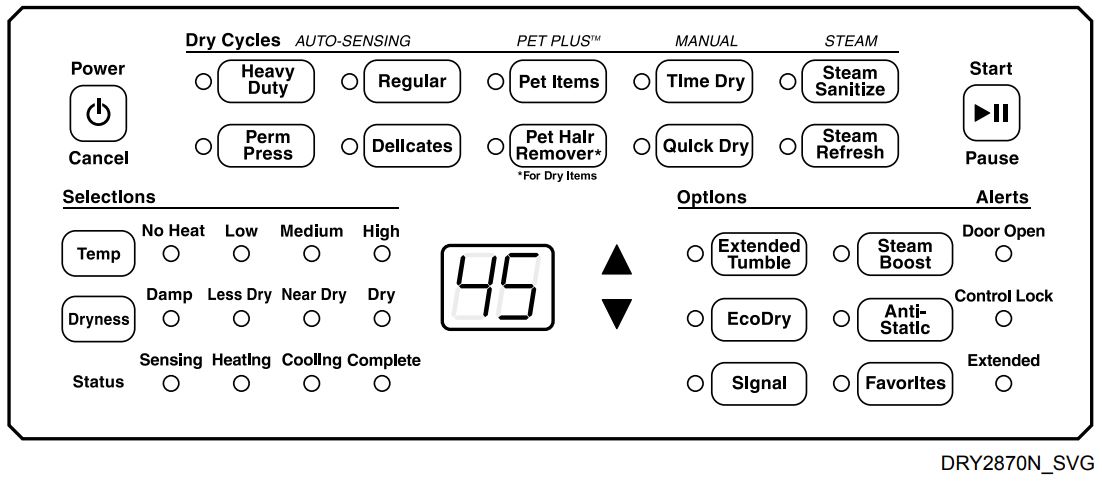
Cycle Selection
The following cycle descriptions will help determine which cycle to choose depending on the type of laundry being dried.NOTE: Always check fabric care label for proper care instructions.
Auto-Sensing
The Auto-Sensing drying cycle operation is determined by the type of cycle selected as well as the moisture sensing system, which can be set by changing the Dryness setting. Auto-Sensing cycles are Energy Saver cycles that help prevent over-drying.
When a wet load is put into the dryer it takes a certain amount of time to reach the desired dryness level. The time will vary with load size, type of fabric, amount of moisture in the load, air flow and the laundry room environment. The estimated time will be shown in the digital display.
NOTE: The time shown before starting the cycle is estimated by averaging the last 5 cycles run on the selected cycle/dryness combination.Use Heavy Duty for heavy items such as blankets.Use Regular for sturdy items like play or work clothes.Use Perm Press for permanent press items and synthetics.Use Delicate to dry delicate items.
NOTE: This is an ENERGY STAR® certified dryer. To use the energy saving setting, select the Auto-Sensing Regular cycle, set the Dryness Selection to Near Dry, and turn on Eco Dry.
NOTE: Use the Time Dry Cycle for No Heat tumble. Using Automatic cycles with No Heat will result in very short cycle times. Automatic cycles are designed to dry loads using heat to the dryness level selected.
Pet Plus™
The Pet Items cycle dries and refreshes bulky pet items. The default cycle is a 55-minute, high-temperature heat cycle with Anti-Static and Steam Boost on. This cycle can be fully customized to the pet item being dried. Temperature, Time, and Options can be adjusted as needed. You can save these cycles using the Favorites option to quickly use again.
The Pet Hair Remover cycle is used to remove pet hair from dry items. It is a set 10-minute cycle and can be used as a standalone refresh, or as pre-wash cycle before putting items in the washer. Anti-Static is on by default and can be turned off.
NOTE: Clean lint filter before each use. Excessive hair build-up may impact results. A second cycle may be necessary if there is a large amount of hair in the lint filter.NOTE: Clean out dryer cylinder after using Pet Plus cycles. Pet items may cause stains or odors on subsequent loads.
Manual
There are two manual cycles: Time Dry and Quick Dry. These cycles will run for the set number of minutes shown on the digital display. The cycle time can be increased or decreased using the up and down arrow keypads. Select the temperature based on the fabric care label. The time and temperature selection may be adjusted manually at any time before or during the cycle. The time may need to be adjusted up if the items are still damp or down if the items are overtry.
Steam
The Steam Sanitize cycle sanitizes your laundry by killing 99.9% of common household bacteria*. It is a 75-minute cycle that applies high-temperature heat to sanitize the load, as well as steam to help keep your laundry soft and wrinkle free. It is recommended for medium size loads and is not recommended for all fabric types. Be sure to follow fabric care labels. To use Steam Sanitize, press the Steam Sanitize keypad and allow the cycle to complete uninterrupted. Time can be extended higher than 75 minutes by using the up and down arrow keypads.
NOTE: The Sanitize setting uses high heat. Check the fabric label for proper care instructions.
The Steam Refresh cycle releases wrinkles and refreshes your items. It is recommended for 1-4 items. There are two preset cycles. The default cycle applies a medium-temperature heat for 30 minutes to the load. The alternate cycle applies a high temperature heat for 20 minutes. To use Steam Refresh, press the Steam Refresh keypad and the default cycle for 30 minutes at medium heat will be initiated. To initiate the 20-minute, high-heat cycle, toggle the Temp selection to High. Select the 30-minute medium heat or 20-minute high heat temperature based on fabric type.
*Bacteria tested by an independent lab were Staphylococcus aureus, Pseudomonas aeruginosa, Klebsiella pneumoniae. Individual results may vary.
IMPORTANT: Do not use dryer sheets when using steam cycles.IMPORTANT: Do not run steam with no load to help prevent water from staining the cylinder.NOTE: Do not overload machine for steam cycles. Overloading during a steam cycle may cause the load to have wet spots at the end of the cycle.NOTE: Using steam on overly damp items may result inload not completely drying.
Selections
The following selections can be used to modify the currently chosen cycle. The default selections will be lit after choosing a cycle.
Temp
Press the Temp keypad to change the cycle’s temperature on Manual Cycles, Pet Items, and Steam Refresh. Choose from No Heat, Low, Medium, or High depending on fabric type.NOTE: The No Heat cycle will take longer to dry items.
Dryness
Press the Dryness keypad to change the dryness level in an Auto-Sensing cycle. Choose from Damp, Less Dry, Near Dry or Dry.
Use Damp to leave load slightly damp for easier ironing.Use Less Dry for lightweight items such as sheets and shirts.Use Near Dry for normal loads.Use Dry for heavy items such as blue jeans and blankets.
Over-drying can cause wrinkling, shrinking, excessive lint conditions, and will use more energy than necessary. To increase energy savings and to make sure loads are dried without overtrying, set your Auto-Sensing loads on Near Dry or Less Dry. If items are damp or over-dry at the end of a cycle, increase or decrease the Dryness setting the next time these loads are dried. Remember the settings that work best to get ideal drying results. To finish drying damp items, use Quick Dry and adjust the time as needed.
Options
The following options can be used to modify the currently chosen cycle, adjust the signal volume, and save favorite cycles.
Extended Tumble
The Extended Tumble option prevents wrinkling by tumbling the clothes load after the end of the cycle every two minutes for up to 60 minutes. The display will show the time remaining. The Extended Tumble LED light will be lit during the Extended Tumble portion of a cycle. The option will end if the door is opened.
Extended Tumble can be used along with the Steam Boost and Anti-Static options. Steam Boost runs first, followed by Antistatic and then Extended Tumble. NOTE: The Steam Boost option is not available with the ENERGY STAR® setting.
NOTE: Using steam on overly damp items may result in load not completely drying.
Steam Boost
Use to release wrinkles and soften fabrics. Available with Autosensing Heavy Duty, Regular, and Perm Press cycles as well as Pet Items (Medium or High heat only). Dryness/Auto-Dryness must be set to Near Dry or Dry. Cannot be used with Eco Dry. Steam Boost can be used along with the Anti-Static option. Steam Boost runs before Anti-Static.
Anti-Static
The Anti-Static option reduces static build-up by adding a small amount of steam toward the end of the cycle. To use, press the Anti-Static keypad. It is available with Heavy Duty, Regular, Perm Press, Delicates, Pet Items, and Pet Hair Remover cycles only. Dryness must be set to Near Dry or Dry on Operating Your Dryer Auto-Sensing cycles. Anti-Static can be used along with the Steam Boost option. Steam Boost runs before Anti-Static. It cannot be used with EcoDry.
Eco Dry
The EcoDry option will reduce total energy consumption by decreasing the temperature of the cycle setting by 10% after the initial temperature setting has been reached.
Signal
Pressing the Signal keypad will change the end of cycle signal volume. There are four settings: Off, Low, Medium, High.
If the Extended Tumble option is selected the signal will soundeach time the dryer tumbles.
Favorites
Use the Favorites option to save different cycles, selections and options for later use. Nine favorite cycles can be saved.
- Press the Favorites keypad. The control will display the cycle and modifier settings for the first Favorites cycle. The 2digit display will switch between F1 and the cycle time for the selected cycle.
- Press the keypads for the desired cycle, selection and option settings.
- Press the Favorites keypad to save the settings. The next Favorites cycle, F2, will be displayed. It can be programmed now.
- Press the Start/Pause keypad to save the settings and start the cycle.
- Press the Power/Cancel keypad to discard the current settings and exit Favorites mode.
Status
The Status lights are lit during the cycle to show what part of the cycle is running. The Sensing status light is lit when the dryer is detecting moisture levels. The Heating status light is lit to indicate that a heat portion of the cycle is currently operating. The Cooling status light is lit during the cool-down portion of the cycle. The Complete status light is lit when the cycle is finished.
Alerts
The Door Open alert is lit any time that the dryer door is open. The Control Lock alert will be lit when the Control Lock is turned on. To turn on the Control Lock press and hold the Signal keypad for three seconds. While Control Lock is on, no other keypad presses are allowed. Press and hold the Signal keypad again to turn the option off.The Extended alert is lit during the Extended Tumble option.
Digital Display
The two-digit display is used to show the time remaining in a cycle. When the control is powered off, the right-most decimal in the display will flash every one to five minutes to indicate that the machine is in Idle Mode. The display also shows diagnostic codes.
Idle ModeIf no keypads have been pressed for five minutes after a cycle is finished, the control will enter Idle Mode. A light in the lower right corner of the digital display will flash every one to five minutes. Press the Power/Cancel keypad to exit this mode and power the display for cycle/option selection. This light will flash again after five minutes when it re-enters Idle Mode.
To Dry Clothes
This appliance shall not be used to dry off solvents or dry cleaning fluids. Fabric softeners, or similar products, should be used as specified by the fabric softener instructions.
IMPORTANT: Refer to the INSTALLATION INSTRUCTIONS before using dryer.IMPORTANT: Before using dryer for the first time, use an all-purpose cleaner or a detergent and water solution and a damp cloth to remove shipping dust from inside of dryer drum.
NOTE: This appliance is designed for repeated normal operation according to operating instructions.
1. Sort items into separate loads.NOTE: Remove all objects from pockets such as lighters and matches.IMPORTANT: Oil affected items can ignite spontaneously, especially when exposed to heat sources such as in a tumble dryer. The items become warm, causing an oxidation reaction in the oil. Oxidation creates heat. If the heat cannot escape, the items can become hot enough to catch fire. Piling, stacking or storing oil affected items can prevent heat from escaping and so create a fire hazard.
NOTE: Remove all sharp objects from laundry to avoid tears and rips to items during normal machine operation.2. Clean lint filter (if using lint filter guard, remove first).
- Lint Filter Guard (optional)
- Lint Filter
Figure 1![]() WARNINGTo reduce the risk of fire and risk of lint collecting in exhaust duct, do not operate dryer without lint filter in place.W771
WARNINGTo reduce the risk of fire and risk of lint collecting in exhaust duct, do not operate dryer without lint filter in place.W771
NOTE: The Lint Filter Guard is an optional accessory to help prevent items from falling in the lint filter.
3. Load dryer half full with laundry (18 pounds [8.2 kg] maximum dry clothes load). Add fabric softener sheet, if desired, except with steam cycles.
![]() WARNINGTo reduce the risk of fire, explosion, serious injury or death, clothes which have traces of any flammable substances such as cooking oil, machine oil, flammable chemicals, thinner, etc. must not be put into the dryer.W131
WARNINGTo reduce the risk of fire, explosion, serious injury or death, clothes which have traces of any flammable substances such as cooking oil, machine oil, flammable chemicals, thinner, etc. must not be put into the dryer.W131
NOTE: To avoid damage to dryer, do not use more than one fabric softener sheet per load.
4. Close loading door. Dryer will not operate with the door open.
5. If not already on (control lights will be lit), turn on the dryer by pressing the Power/Cancel button.NOTE: You will not be able to press the Start/Pause button to Pause the cycle until the motor is running. If the Start/Pause button is pressed while attempting to run the motor (during the warm-up period), an invalid keypress tone will sound.6. Select the Cycle and, if desired, change the Selections and Options settings. Follow garment manufacturer’s care labels for recommended temperature settings.7. Press the Start/Pause button to begin the cycle.
![]() WARNINGTo prevent the risk of fire, never stop a dryer before the end of the drying cycle unless all items are quickly removed and spread out so that the heat is dissipated.W756
WARNINGTo prevent the risk of fire, never stop a dryer before the end of the drying cycle unless all items are quickly removed and spread out so that the heat is dissipated.W756
IMPORTANT: The final part of dryer cycle occurs without heat (cool down cycle) to ensure that items in dryer are left at a temperature that ensures that the items will not be damaged.
NOTE: To stop dryer at any time, open the door or press the Start/Pause button. To restart dryer, close door and press the Start/Pause button again.8. Remove laundry immediately after dryer stops at end of cycle.

Optional Drying Rack
A drying rack, Part No. D512082, is available at extra cost through your Factory Authorized Service Center. The drying rack can be used in Manual cycles (Time Dry or Quick Dry) only for no-tumble drying of articles such as tennis shoes, sweaters, stuffed toys or other delicate items.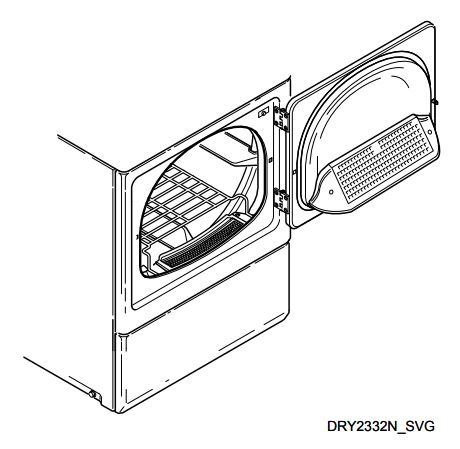
Maintenance
Lubrication
All moving parts are sealed in a permanent supply of lubricant or are equipped with soilless bearings. Additional lubrication will not be necessary.
Care of Your Dryer
![]() WARNINGTo reduce the risk of an electric shock, serious injury or death, disconnect the electrical service to the dryer before cleaning the interior. W132
WARNINGTo reduce the risk of an electric shock, serious injury or death, disconnect the electrical service to the dryer before cleaning the interior. W132
Dryer InteriorWipe the surfaces using a soft cloth and household cleaner or a non-abrasive paste of powdered laundry detergent and hot water, followed by a short heat cycle with a load of rags.
To remove crayon or ball point ink off the dryer drum, put the heat on high and use old rags in the dryer to absorb the crayon or ink. If unsuccessful, contact the appliance dealer. DO NOT use any chemicals in the dryer.
IMPORTANT: The use of chlorine bleach for removing any discolorations should be avoided because bleach could damage the finish.
CabinetWipe the dryer cabinet as needed. If detergent, bleach or other washing products have been spilled on the dryer, wipe immediately. Some products will cause permanent damage if spilled on the cabinet.
Control PanelUse only a damp or sudsy cloth for cleaning the control panel. Some spray pretreat products may harm the finish on the control panel. DO NOT use products that contain alcohol on the control panel.
Exhaust System![]() WARNINGTo reduce the risk of electric shock, disconnect the electrical service to the dryer before cleaning.
WARNINGTo reduce the risk of electric shock, disconnect the electrical service to the dryer before cleaning.
![]() WARNINGAny disassembly requiring the use of tools must be performed by a suitably qualified service person.W299
WARNINGAny disassembly requiring the use of tools must be performed by a suitably qualified service person.W299
The exhaust duct should be inspected after one year of use and cleaned if necessary by a qualified service person to remove any lint build-up. Inspect and clean exhaust duct every one to two years as required thereafter. Every two years a qualified service person should remove all front panels and vacuum the inside of the dryer
NOTE: This recommended maintenance is not covered under the terms of the warranty.
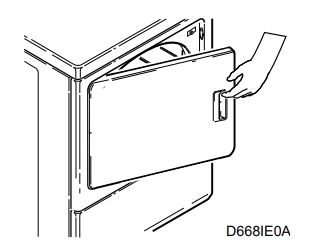
The weather hood should be checked frequently to make sure the dampers move freely, dampers are not pushed in and that nothing has been set against them. Keep dryer area clear and free from combustible materials, gasoline and other flammable vapors and liquids. Do not obstruct the flow of combustion and ventilation air.NOTE: Verify proper operation after servicing.
Motor Overload Protector
The dryer’s motor overload protector stops the motor automatically in the event of an overload. The control’s digital display will show “Er”, “or” alternately. After cooling, the overload protector will reset itself. The control can be cleared by pressing START and the dryer can be restarted by pressing START again. If overload protector cycles again, remove the dryer from use and call the service person to correct the problem.
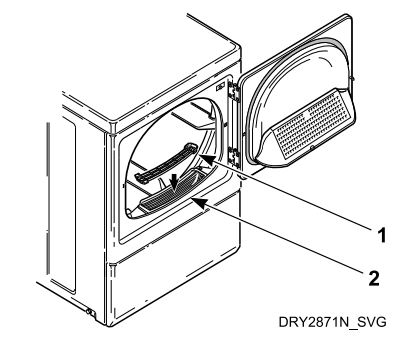
Lint Filter
The lint filter is located at the front of the dryer in the lower part of the door opening. CLEAN THE LINT FILTER BEFORE DRYING EACH LOAD. (If using optional lint filter guard, remove first).
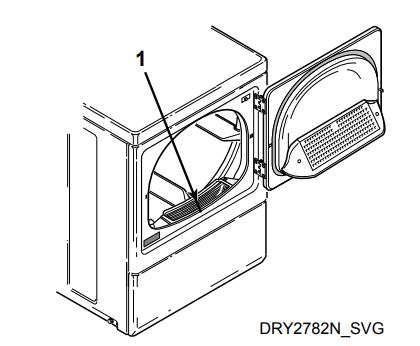
- Lint Filter
Figure 2
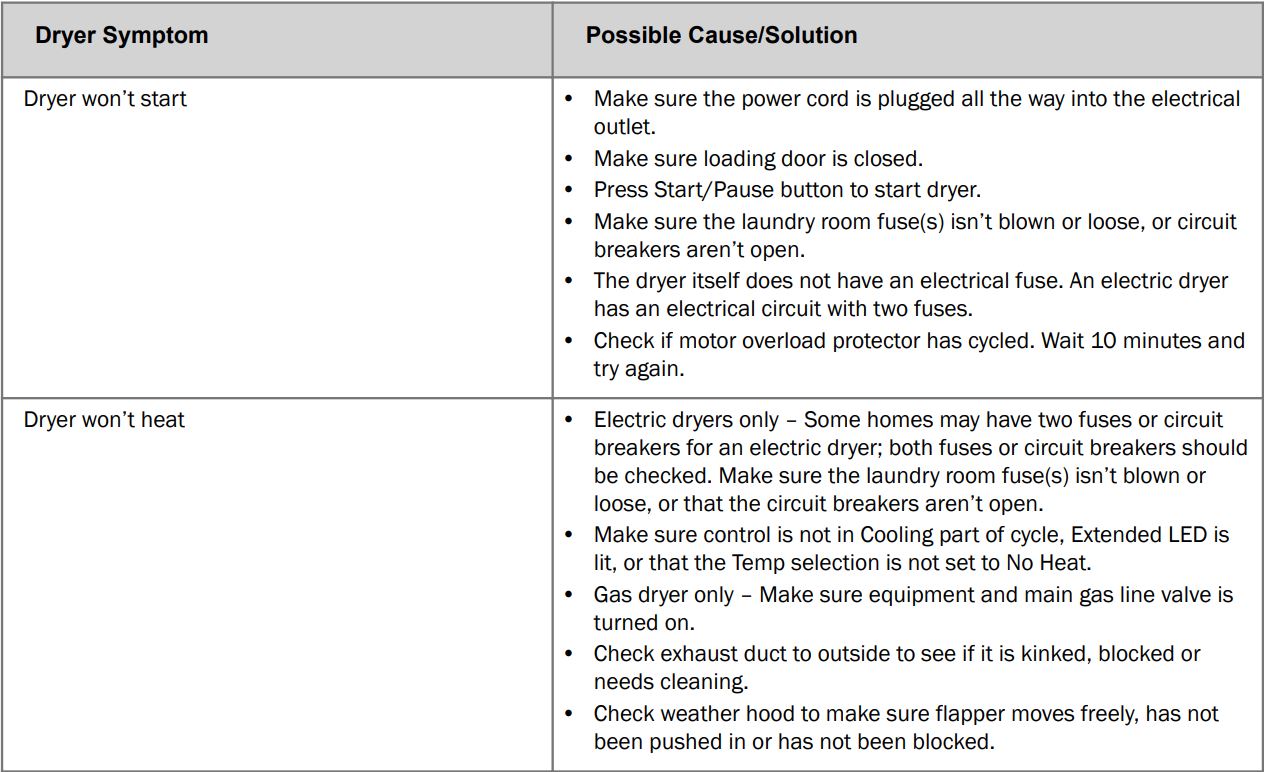
Troubleshooting
Try these troubleshooting tips before making a service call. They may save you time and money.

Warranty Repairs
If something should occur with your washer or dryer that requires service please use the service locator at www.speedqueen.com.We would like to point out items that would not be considered a product failure and are not covered under warranty. If a service technician is called for the items listed below you will be responsible for payment of the service call.
- Plugged or restricted venting
- Kinked venting
- Cleaning lint from within the dryer
- Home electrical issues
- Home gas issues
- Foreign objects found inside the dryer
Contact Information
If service is required, contact the nearest Factory Authorized Service Center. To find the nearest service center, visit us online at www.speedqueen.com. If you are unable to locate an authorized service center or are unsatisfied with the service performed on your unit, contact:
Shepard Street P.O. Box 990 Ripon, Wisconsin 54971-0990 www.speedqueen.com – select “Find Service” and enter your zip code to find a local service companyPhone: 800-552-5475
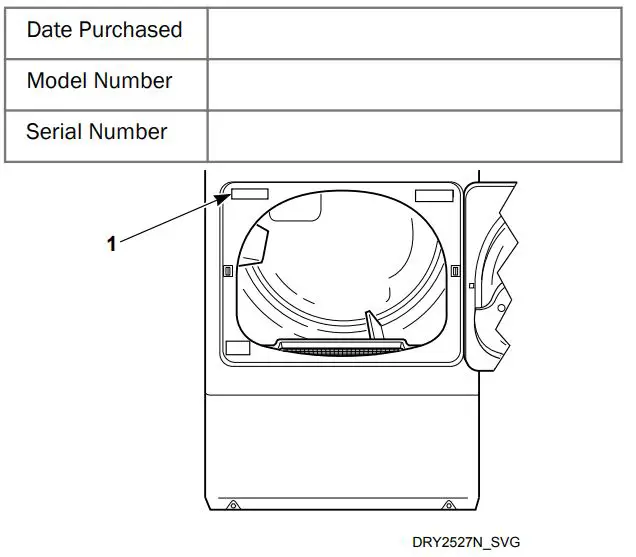
- Serial Plate
When contacting us about your washer, PLEASE GIVE THE MODEL AND SERIAL NUMBERS. The model and serial numbers are located on the serial plate. The serial plate will be in the location shown. Please include a copy of your bill of sale and any service receipts you have.
If replacement parts are required, contact the source from where you purchased your washer or visit us online at www.speedqueen.com.
![]() WARNING
WARNING
To reduce the risk of serious injury or death, DO NOT repair or replace any part of the unit or attempt any servicing unless specifically recommended in the user-maintenance instructions or in published user repair instructions that you understand and have the skills to carry out. W329
© Copyright, Alliance Laundry Systems LLC -DO NOT COPY or TRANSMIT
References
Speed Queen
FreeRTOS – Market leading RTOS (Real Time Operating System) for embedded systems with Internet of Things extensions
Queen.com Hijacking by Frands Jepsen of Knud Jepsen, Denmark, Foiled by WIPO | The Rick Schwartz Domain Name and Traffic Blog: RicksBlog.com – Home of The Domain King®
Register Your Products Redux – Speed Queen
queen.com
Home – Alliance Laundry Systems
Product Registration – Huebsch Home Products
Huebsch Home Products
Product Registration – Huebsch Home Products
Huebsch Home Products
FreeRTOS – Market leading RTOS (Real Time Operating System) for embedded systems with Internet of Things extensions
[xyz-ips snippet=”download-snippet”]