
ALORAIR Clean HEPA 550 Owner's Manual
READ AND SAVE THESE INSTRUCTIONSAlorAir Solutions INC.Add: 2048 E. Francis St Ontario CA91761Tel: 888-990- 7 469E-mail: [email protected]
WARNING!
Please note that the CleanShield 550 should only be used with parts approved by AlorAir. The use of unauthorized parts or alterations to the machine could void your warranty. Contact an approved distributor for further assistance.
To Avoid the Risk of Fire or Electric Shock:
- Unit must be electrically grounded.
- Insert 3-prong plug directly into outlet with Ground Fault Circuit Interrupting device.
- Do not use an adapter with this unit.
- Do not use the unit in standing water.
- If electrical parts get wet, they must be dried prior to use.
INTRODUCTION
The CleanShield HEPA 550 is a convenient filtration system that cleans the air. The 550 uses an effective blend of air flow and advanced filtration to expel airborne particles like mold spores, dust, pollen, and pet dander. The CleanShield is ideal for for restoration jobs, including water, sewage, and fire.
IDENTIFICATION
Congratulations on purchasing a CleanShield 550 air scrubber. In order to take advantage of the warranty plan, be sure to note the serial number and date of purchase.Serial Number: _______________Date of Purchase: _____________
HOW IT WORKS
- When set to maxiumum airflow, the 550 draws air through two types of filters- a pre-filter and the HEPA/Activated Carbon Filter.
- The first phase of filtration, the prefilter, catches the large particles, while the second phase of filtration, the HEPA/Activated Carbon Filter, catches smaller particles, down to 0.3 microns.
SPECIAL FEATURES
Daisy-Chain CapabilityUsing the auxiliary outlet on the control panel, you can link up to 3 units together, creating a maximum airfow 550 CFM. You can also daisy-chain the machines when they are stacked vertically (limit of 2 units).
Multi-PositionalThe CleanShield HEPA 550 can be operated in the vertical postion, as well as, when stacked vertically (up to 2 units). When storing, the machines can be stacked horizontally to save space.
Removable Intake PanelThe CleanShield 550 is equipped with a removable panel on the intake side of the machine. The removable panel is quite useful in remediation applications, so you can draw air out the room and create more negative pressure (use a manometer to monitor air pressure). To use panel:
- Remove the panel.
- Install the machine outside the containment area to draw air out.
- Cut a hole in the containment plastic that is the size of the unit’s inlet.
- Insert the inlet into plastic and seal the circumference tightly with duct tape.
KEY FEATURES

INSTRUCTIONS
SETUP
- Place the CleanShield HEPA 550 so that it is in the upright, vertical position.
- Plug the machine into a standard 115 volt outlet. Note: Each unit needs 3 amps to operate.
- Power the unit on and adjust the speed by turning the variable speed control. The maximum speed is 550 CFM and the minimum speed is 270 CFM.
- The CleanShield 550 can be operated in the vertical or horizontal postion, depending on the exact situation. At this point, adjust the machine to the optimal position.
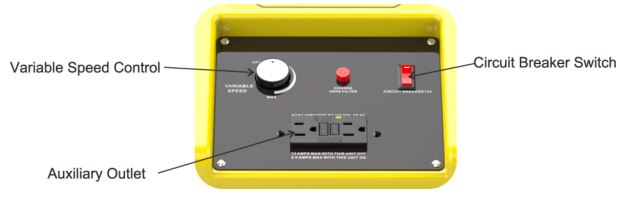
THE CONTROL PANEL
Variable Speed ControlThe Variable Speed Control is used to adjust the power of the machine. Turn the knob in a clockwise direction, to increase the speed from maximum to minimum .The minimum speed setting is located immediately under the OFF button. You can switch to minimum speed by turning the knob counterclockwise.
Auxiliary OutletIf more air filtration is necessary for a space, you can “daisy chain” or link up to 3 CleanShield 550’s to the same outlet. There is a maximum amperage of 12 when the units are turned off, a maxium of 9 amps when the units are turned on. Other equipment can be plugged into the same outlet as the CleanShield as long as it doesn’t go above the max amperage.
Circuit Breaker SwitchThe Circuit Breaker Switch protects the unit if there are more than 12 amps of electricity passing the circuit. If this occurs, the switch will cut off the power to the unit.
CHANGING THE FILTERS
- Loosen the 4 locks that hold the filter board in place.
- Slide out the filter panel board.
- Remove the used filters and replace with new filters.
WARNING
- Always wear approved protective gear when changing the filters.
- Filters should be changed after each remediation job
- If the indicator light is on, always change the HEPA/Activated Carbon Filter
APPLICATIONS
Water DamageIn this application, the CleanShield should be placed in the center of the affected area. The air scrubber will draw in the air, filter it, then blow out the newly cleaned air. To begin the process, simply turn on the scrubber and it will start cleaning the air. Keep in mind that if you are working in a large area or one divided by walls, you may need several air scrubbers to effectively clean the air.
Odor ControlThe CleanShield 550, when used with the HEPA/Activated Carbon Filter, is excellent at odor control, as well. Simply place the carbon filter in the pre-filter slot and it will capture a wide variety of odor-causing gas molecules, such as volatile organic compounds (VOC’s), smoke, soot, and paint fumes.
Other UsesThe CleanShield is also useful in many other applications including mold remediation, fire damage, dust control, and sewage remediation.
WARNING!
Breathing Hazard
- When using the CleanShield HEPA 550 in a containment area, always turn off power to open combustion appliances, such as firelaces, furnaces, water heaters, and HVAC systems, to avoid the risk of backdrafting carbon monoxide fumes.
- If the Filter Change Light illuminates during the remediation process, immediately change the HEPA/Activated Carbon Filter,
Tipping Hazard
- Use caution when stacking units,
- Do not stack more than 2 units on top of each other.
- Falling equipment could cause bodily harm.
SAFETY NOTES
- Always unplug the unit prior to performing any maintenance.
- Check the power cord for damage (fraying, cuts, etc.) before use.
- Verify that the GFCI outlet is working by powering on the machine and pressing the red GFCI test button. If the outlet is working, the “reset” button will pop up. To operate, press the reset button again.
- To avoid electric shock, never use a water hose or pressure washer to clean the electrical components.
- Check the pre-filter prior to operating the machine to ensure it is not clogged. If there is any sign of air flow restriction change the filter.
- Make sure the unit is dry prior to installing clean filters.
- When using the CleanShield for remediation purposes, replace both filters at the same time and always clean machine in between jobs. This will help prevent cross contamination.
LIMITED WARRANTY
10 YEARS (FROM DATE OF PURCHASE): AlorAir warrants the air scrubber be free of defects in the polyethylene body. At its discretion, AlorAir will repair or replace the unit body, free of charge. (excluding transportation costs).
1 YEAR (FROM DATE OF PURCHASE): AlorAir warrants the unit’s parts will operate free of defects in material or workmanship. This includes factory laborers. At its discretion, AlorAir will replace defective parts, including factory labor. This does not include transportation costs.The limited warranty is applicable to the original purchaser only, since the date of purchase.It should subject to the terms and conditions listed in this limited warranty file.
Customers Responsibility:
- Customer must provide normal care and maintenance.
- Removal and re-installation of the unit is the sole responsibility of the owner.
- If the customer cannot return the unit to the certified repair center, all costs associated with freight shipment are borne by the customer. In addition, all duties related to freight shipments, including but not limited to palletizing, wrapping, labeling. and pickup is associated with the customer.
- If shipped, the customer is responsible for all risk of loss or damage.
AlorAir Warranty Steps:
- Once goods are received , customers must log in www.alorair.com to fill out the warranty registration form and submit to AlorAir company. We will receive your purchasing and installation information and save it. If no warranty registration is sent to us, warranty period will begin the day the shipment left the warehouse. Please be sure to record serial# and date of installation. You will need this information to receive the RA number.
- If warranty service is necessary, customers must contact AlorAir Tech Support by or local technicalservice phone to receive a Return Authorization (RA number). Once an RA has been issued, customers should bring theunit to a certified repair center. AlorAir will arrange the shipping to bring the unit back to the AlorAir warehouse (at theexpense of the customers) if customers are not available.
- After the unit has been received by AlorAir (whether at a repair center or the warehouse), AlorAir will have an initial inspection. If it is determined to be invalid warranty claim (see exclusions below), customers have to pay for all associated repair costs and shipping costs for units repair.
- Customers can pick up the unit after repair at their own expense for shipping. Units will have a rigorous testing before sending it back to customers
- If the unit can no longer be fixed , and it is in the warranty period and determined to be valid claim, we will ship the customer a new unit within the same year warranty from the date of replacement.
- After parts are repaired or replaced by AlorAir, the original warranty period continues to apply until it meets its deadline. No extensions to the original warranty period.
Warranty Exclusions:
DAMAGE DUE TO THE FOLLOWING IS NOT covered under warranty
- Acts of Nature- including but not limited to:FloodingFireWater damageHurricane/storm damage
- IMPROPER USAGE- Including but not limited to:Misuse, abuse, or tampering whether intentional or accidentalImproper installation or designImproper voltageLack of normal careFailure to follow instructions
- Corrosion
- Freezing
- Any additional costs due to changes in laws or building codes
- Freight charges
- Any costs due to lost profit or delay
- Damage to property
- cause beyond control
- Consumable parts, including but not limited to:FiltersBatteriesPower cordsValvesswitchesRubber parts
- Direct, indirect, collateral or inconsequential damages of any kind
THE WARRANTIES AND LIABILITIES SET FORTH ARE IN LIEU OF ALL OTHER WARRANTIES EXPRESSED OR IMPLIED, IN LAW OR IN FACT, INCLUDING IMPLIED WARRANTIES OF MERCHANTABILITY AND FITNESS FOR PARTICULAR PURPOSE. AlorAir’s total Ii- ability, regardless of nature of claim shall not exceed original purchase price of the product. If a product or component is replaced while under warranty, the applicable warranty period shall not be extended beyond the original warranty time period.
The foregoing shall constitute the total liability of seller in the case of defective performance of all or any of the equipment or services provided to Buyer. Buyer agrees to accept and hereby accepts the foregoing as the sole and exclusive remedy for any breach or alleged breach of warranty by Seller.
Any dishonesty or fraud in connection with AlorAir warranty thoroughly voids all warranty policies. AlorAir expressly reserves the right to pursue legal action in the event of dishonesty, fraud, or attempted fraud.
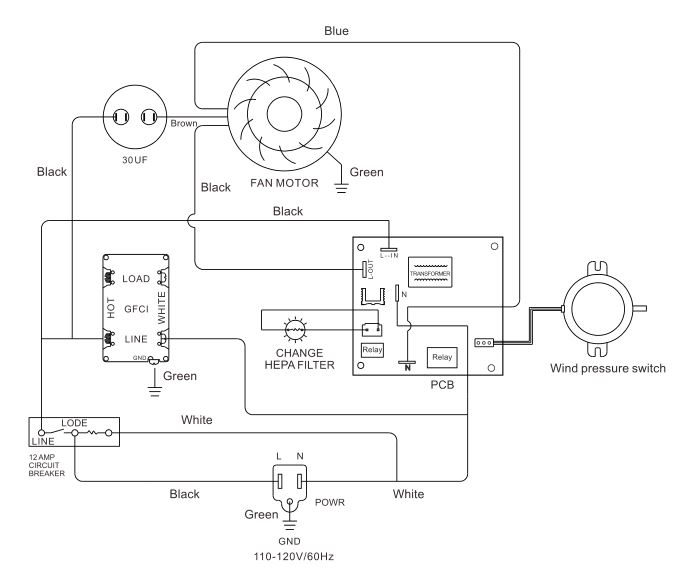
Wiring Diagram
[xyz-ips snippet=”download-snippet”]