
Altronix TM400 Access & Power Integration Installation Guide
TM400– Compact enclosure for Altronix power distribution and Mercury/LenelS2 boards
Overview:
Altronix TM400 enclosure lets you easily integrate Altronix power distribution with Mercury/LenelS2 access controllers and accessories. TM400 simplifies board layout and wire management, reduces installation time and labor costs.
Specifications:
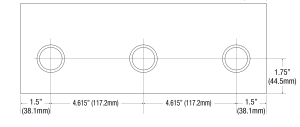
- 16 Gauge black enclosure with ample knockouts for convenient access.– Twelve (12) double knockouts 1.125” (3/4” Conduit) / 1.375” (1” Conduit).
- Enclosure Dimensions (H x W x D): 15.5” x 12.0” x 4.5” (393.7mm x 304.8mm x 114.3mm).
- Includes: tamper switch, cam lock and mounting hardware.
Enclosure accommodates a combination of the following:
Altronix:
One AL400ULXB2, AL400ULXB2V, AL600ULXB, AL600XB220, AL1012ULXB, AL1012XB220, eFlow4NB, eFlow4NBV, eFlow6NB, eFlow6NBV, eFlow102NB, eFlow102NBV.
Mercury (LenelS2):
- Up to three (3) MR50 (LNL-1300).
- One (1) LP1501 (LNL-2210) or MR62e (LNL-1300e).
- One (1) LP1502 (LNL-2220), LP4502 (LNL-4420), MR52 (LNL 1320), MR16IN (LNL-1100) or MR16OUT (LNL-1200).
Installation Instructions:
Wiring methods shall be in accordance with the National Electrical Code/NFPA 70/ANSI, and with all local codes and authorities having jurisdiction. Product is intended for indoor use only.
- Mark and predrill holes on the wall to line up with the top two keyholes in the enclosure. Install two upper fasteners and screws in the wall with the screw heads protruding. Place the enclosure’s upper keyholes over the two upper screws; level and secure.Mark the position of the lower two holes. Remove the enclosure. Drill the lower holes and install the two fasteners.Place the enclosure’s upper keyholes over the two upper screws.Install the two lower screws and make sure to tighten all screws.
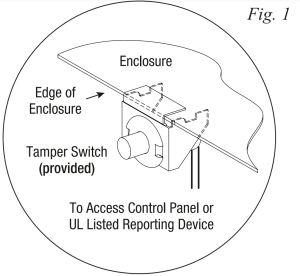
- Mount included UL Listed tamper switch (Altronix Model TS112 or equivalent) in desired location, opposite hinge. Slide the tamper switch bracket onto the edge of the enclosure approximately 2” from the right side (Fig. 1). Connect tamper switch wiring to the Access Control Panel input or the appropriate UL Listed reporting device.To activate alarm signal open the door of the enclosure.

- Mount Altronix and Mercury (LenelS2) boards to enclosure.
Hardware:
 Snap On Spacer
 Spacer
 5/16” Pan Head Screw
TM400: Installation Instructions for Altronix Power Supply and Sub-Assemblies
Altronix Power Supplies/Chargers and/or Sub-Assemblies:
- Fasten 5/8” spacers (provided) to pems that match the hole pattern for Altronix Power Supply/Charger or Altronix Sub-Assembly boards (Fig. 2). Fasten metal spacers in the correct locations to provide proper grounding (Fig. 2).
- Mount boards to spacers utilizing 5/16” pan head screws (provided) (Fig. 2, 2a).LenelS2 Sub-Assemblies:
- Fasten spacers onto metal pems configuration (C), (D) or (E) of enclosure depending on the sub-assembly module (Fig. 2, pg. 2).
- Position access controller module over corresponding spacers and depress onto snap on spacers (Fig. 2a, pg. 2).
- Fasten backplane to Trove1 enclosure utilizing lock nuts (provided).
Access Controller Position Chart for the Following Models:
 Fig. 2 – Altronix and Mercury configurations
A: AL400ULXB2, AL400ULXB2V, AL600ULXB, AL600XB220, AL1012ULXB, AL1012XB220, eFlow4NB, eFlow4NBV, eFlow6NB, eFlow6NBV, eFlow102NB, eFlow102NBVB: ACM4, ACM4CB, LINQ8PD, LINQ8PDCB, MOM5, PD4UL, PD4ULCB, PD8UL, PD8ULCB, PDS8, PDS8CB, VR6C: MR50 (LNL-1300)D: LP1501 (LNL-2210), MR62e (LNL-1300e)E: LP1502 (LNL-2220), LP4502 (LNL-4420), MR52 (LNL-1320), MR16IN (LNL-1100), MR16OUT (LNL-1200)
Our Trove™ access and power integration solution lets you easily combine Altronix power with access controllers and accessories available from the industry’s leading manufacturers. A variety of backplanes offer a wide range of scalable access and power configurations. This solution simplifies board layout and wire management, while reducing installation and labor costs. Customize your access control with Trove™.
- Easily combine Altronix power with access controllers and accessories available from the industry’s leading manufacturers.
- Simplifies board layout and wire management.
- Reduces installation time and labor costs.
- Enclosures and backplanes sold separately.
- Optional door backplane (TMV2) accommodates Mercury and HID VertX.
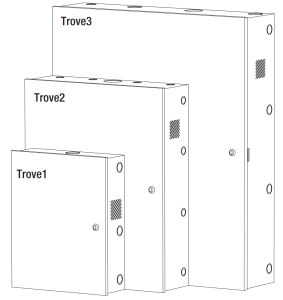
Trove1:Enclosure Dimensions: 18”H x 14.5”W x 4.625”DAccommodates up to two (2) 12VDC/7AH batteriesBackplane Dimensions: 16.625”H x 12.5”W x 0.3125”D
Trove2:Enclosure Dimensions: 27.25”H x 21.5”W x 6.5”DAccommodates up to two (2) 12VDC/12AH batteriesBackplane Dimensions: 25.375”H x 19.375”W x 0.3125”D
Trove3:Enclosure Dimensions: 36.12”H x 30.125”W x 7.06”DAccommodates up to four (4) 12VDC/12AH batteriesBackplane Dimensions: 34”H x 28”W x 0.3125”D
Enclosure Dimensions (H x W x D):15.5” x 12.0” x 4.5” (393.7mm x 304.8mm x 114.3mm)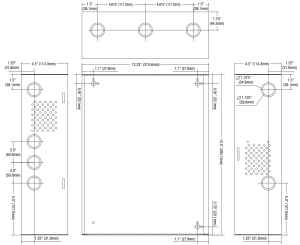
Visit www.altronix.com for the list of Trove supported manufacturers
References
[xyz-ips snippet=”download-snippet”]