
Aluratek ABPM02F Home Health Digital
Pulse Oximeter User Manual
Product Description
Pulse Oximeter is an important and common device to check oxygen saturation (SpO2) and pulse rate. It’s a small, compact, simple, reliable and durable physiological monitoring device. It contains the mainboard, OLED display and dry batteries.
Intended Use
The pulse oximeter is a reusable device and it’s intended for intermittent checks of oxygen saturation and pulse rate for adults in a clinical environment. This medical device is not intended for continuous monitoring.
Applicable People and Scope
The pulse oximeter is intended for monitoring adults. It is used in clinic settings, outpatient department and sickrooms. It can also be used in the recovery and health care organizations, and the community medical treatments.
Contraindications
The pulse oximeter only applies to adults. It is not suitable for injured skin tissue.
Measurement Principle
Arterial oxygen saturation is measured via a method which is called oximetry. It is a continuous, non-invasive method based on the different spectra absorption of hemoglobin and oxyhemoglobin (called spectrophotometer principle).
An experience formula of data process is established betaking use of Lambert Beer Law, and according to Spectrum Absorption Characteristics of hemoglobin (Hob) and Oxyhemoglobin (HbO2) in glow and near-infrared zones. The operation principle of the instrument is Photoelectric Oxyhemoglobin Inspection Technology. Two beams of different wavelength of lights (666nm visible red light and 905nm near infrared light) can be focused on human nail tip via emitters by adopting the Capacity Pulse Scanning and Recording Technology. Then measured signal will be obtained via a photosensitive element. The amount of light absorbed is related to the amount of oxygen in the blood during these pulses. The ratio of the two absorbed spectrums can be calculated via the microprocessor and the results are compared with the saturation valuing the memory, so the blood oxygen saturation value is obtained.

Safety Information
- Anyone who uses the pulse oximeter must receive adequate training before use.
- The pulse oximeter is only meant to assess patients’ physiological conditions. It must be used in conjunction with clinical symptoms. It is not intended for treatment.
- When using the pulse oximetric conjunction with the electrical surgery equipment, the user should ensure safety of the patient.
- EXPLOSION HAZARD: Do not use the pulse oximeter in the presence of flammable anesthetics, explosive substances, vapors or liquids.
- It is forbidden to use the pulse oximeter in MRI (magnetic resonance imaging) scanning or CT (Computed Tomography) because the induced current could cause potential burning.
- The pulse oximeter does not include an alarm function. Therefore, continuous monitoring for long periods of time is not suitable.
- Modification of the pulse oximeter is not allowed. Any product maintenance should be done by manufacturer-approved, professional maintenance personnel.
- Please shut off the power before cleaning the pulse oximeter. Disinfecting the pulse oximeter via high-pressure and high-temperature methods is prohibited. Any cleaning agents/disinfectants other than recommended ones listed in the operation manual are not allowed for use.
- The pulse oximeter is not waterproof. Keep its surface dry and clean and prevent any liquid from infiltrating the product.
- The pulse oximeter is fragile and requires precision to function properly. Avoid any pressure, jostling, strong vibrations, or other potential mechanical damage. Hold it carefully and lightly. If it is not in use, the pulse oximeter should be appropriately stored.
- Do not dispose the pulse oximeter randomly. Disposal procedure should follow local regulations or hospital policy regarding disposal of the pulse oximeter and accessories.
- Use AAA alkaline batteries. Do not use carbon or poor quality batteries. Remove the batteries if the pulse oximeter hasn’t been used for a long time.
- A functional tester can’t be used to assess the accuracy.
- If the patient is the intended operator, the patient must read the operation manual carefully or consult with a doctor and/or manufacturer before usage. If there’s any discomfort while using the pulse oximeter, stop usage immediately and go to the hospital.
- To avoid any static electricity damage to the pulse oximeter, direct or indirect static electricity should be discharged before usage.
- Try to keep the pulse oximeter away from any radio receivers when it’s in use.
- If the pulse oximeter uses with configuration which does not pass EMC test, it can enhance electromagnetic radiation or reduce anti-electromagnet interference performance. Please use the specified configuration.
- The pulse oximeter should not be in close proximity (or stacked) with other devices. If that’s not possible, it should be observed and verified that the oximeter can run normally with the close proximity/stacked configuration.
- There should be no dirt or wound on the tested surface (i.e. finger).
- Federal law restricts this device to sale by the order of a physician.
Product Features
- Simple and convenient operation with one button.
- Compact, lightweight, and convenient to carry.
- Long battery life of 15 hours continuous use.
- Battery indicator on screen.
- Will automatically turn off after 10 seconds when there’s no signal.
- Record data between smartphone and Oximeter via Bluetooth.
Display Introduction

Battery Installation
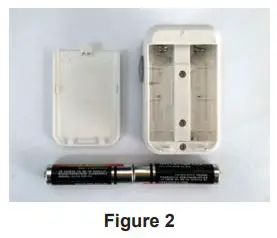
- Hold the product in one hand with the display panel facing the palm. Press down and slide in the direction of the arrow. The battery compartment is opened. (Figure 2).

- Install batteries into the slots according to the “+” and “-” symbols as shown. (Figure 3). Replace the lid onto the battery compartment and push upwards to close it.
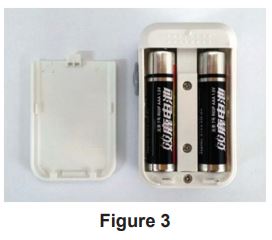
- The positive and negative ends of batteries must be installed correctly, otherwise the device may be damaged.
- When installing or removing batteries, please follow the correct operation procedure, otherwise the battery compartment may be damaged.
Lanyard Installation
- Thread the thinner end of the lanyard through the lanyard hole. The position of the lanyard hole is shown in (Figure 4). (Notice: the lanyard hole is on both sides.)
- Thread the thicker end of the lanyard through the thinner end of the lanyard. Then, pull the thicker end of the lanyard until it’s tight.

Directions for Use
- After properly installing two AAA batteries, “Press to Open Device” as shown in (Figure 5), and open the clip. Insert the teste’s finger. Put finger into the rubber cushions of the clip. Make sure the finger is in the right position as shown in (Figure 5), then release the clip.
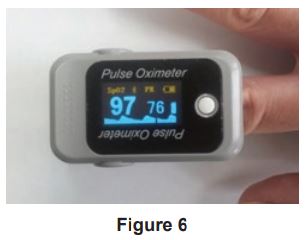
- Wait for a few moments, the SpO2 value and PR value will be displayed on the LED screen after plethysmography wave and measured values are stable, as shown in (Figure 6).

- Be sure to place the teste’s finger inside the product in the correct orientation. The LED part of the sensor should be at the backside of the teste’s hand. Be sure to insert the finger deep enough into the sensor so that the fingernail is opposite to the light emitted from the sensor.
- Don’t move the finger and remain motionless during the process.
- Data will appear in less than 30 seconds.
NOTE
- Check the pulse oximeter for damage before use. If it’s damaged, don’t use it.
- Don’t put the pulse oximeter on extremities with arterial catheter or venous syringe.
- Don’t perform SpO2 and NIBP measurements on the same arm simultaneously. Obstruction of blood flow during NIBP measurements may adversely affect the reading of the SpO2 value.
- Don’t use the pulse oximeter to measure patients whose pulse rates are lower than 30bpm (this may cause incorrect results).
- The well perfusion of measuring instrument should fully cover the test window of the sensor. Clean and dry the measurement part before storing the pulse oximeter.
- Cover the sensor with opaque material under strong light. Otherwise, the light can cause inaccurate measurements.
- Make sure that there is no contamination or scarring on the tested finger. Otherwise, the results may be incorrect.
- The product is prone to cross-contamination when used on different patients. Disinfection is recommended before using the product on other patients.
- Incorrect placement of the sensor may affect the accuracy of the measurements. The same horizontal position with heart should be chosen to achieve the best measurements.
- The highest temperature of usage should not exceed 41°C.
- Change sensor location and check skin integrity and circulatory status at least every 2 hours.
Factors Affecting Measurement Accuracy
- The measurements depend on absorption of special wavelength ray by oxidized hemoglobin and deoxyhemoglobin. The concentration of non-functional hemoglobin may affect the accuracy of the measurement.
- Shock, anemia, hypothermia, and vasoconstrictive drugs may decrease arterial blood flow to an unmeasurable level.
- Pigments or deep colors (i.e. nail polish, artificial nails, dyes, or pigmented cream) may cause inaccurate measurements.
Setup Information
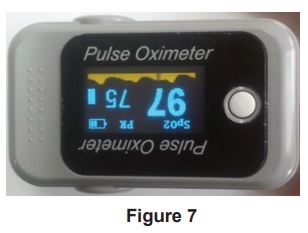
- Rotate Display: Once the data has been displayed on the screen, press the “POWER/FUNCTION” button once to rotate the display orientation (Figure 7).
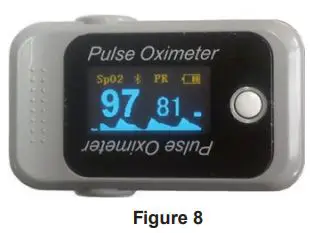
- Bluetooth Pairing: After the product is powered on, long press the “POWER/FUNCTION” button to turn on Bluetooth. The Bluetooth indicator light on the top of display will flash (Figure 8).
- The Oximeter will automatically turn off when a finger isn’t in the device for more than 10 seconds (Figure 9).
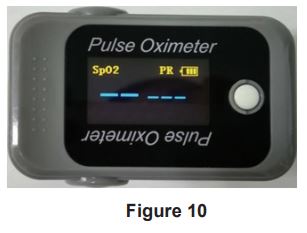
- In the event of a poor or failed finger scan, will be displayed on the screen (Figure 10).
- Heartbeat Tone: With data displayed on the screen, pressing the “POWER/FUNCTION” button twice will prompt the heartbeat tone to be switched on/off.

Bluetooth Communication Function
The ABPM02F Pulse Oximeter is Bluetooth enabled and can send data to the Oxy Care app on your smartphone.
NOTEThe usage of Bluetooth communication software (which is installed in the smartphone) is written in the “Bluetooth APP operation guide”.
Cleaning and Disinfection
- Do not immerse the oximeter or any relevant accessories in water or disinfectant.
- We recommend that the product be disinfected only when necessary to avoid long-term damage to the product.
- Do not use cleaning agents/disinfectants other than the recommended methods below.
- Do not disinfect the device via high-pressure and high-temperature.
- Turn off the power and take out the batteries before cleaning and disinfecting.
Cleaning
- Clean the product with a cotton or soft cloth moistened with water.
- After cleaning, wipe off the water with a soft cloth.
- Let the device air dry only.
DisinfectionThe recommended disinfectants include: ethanol 70%, isopropanol 70%, or glutaraldehyde (2%)
- Clean the product as instructed above.
- Disinfect the product with cotton or soft cloth moistened with one of the recommended disinfectants.
- After disinfection, be sure to wipe off the disinfectant left on the product with a soft cloth moistened with water.
- Let the device air dry only.
Technical Specifications
- Display Mode: OLED
- SpO2:Measurement range: 0~100% Accuracy: ± 3%70%~100%
- Pulse Rate:Measurement range: 25~250bpm Accuracy: ± 2bpm• Pulse Rate accuracy has passed the verification and comparison withSpO2 simulator.
- Low Perfusion:Range: 0.5%~20% SpO2 accuracy: ± 3% (70%~100%) PR accuracy: 25~250bpm ± 2bpm
- Electrical specifications:Working voltage: D.C.2.2 V~D.C.3.4V Battery Type: Two 1.5V AAA alkaline batteries Power consumption: less than 50mA
- Product specifications:Size: 58 (H) × 34 (W) × 30 (D)mm Weight: 50g (including two AAA batteries)
- Environment requirements:Temperature: Operation: +5~+40^ Transport and storage: -10 ~ +50^ Humidity: Operation: 15%~80%noncondensing Transport and storage: 10%~90%noncondensing Atmospheric Pressure: Operation: 860hPa~1060hPa Transport and storage: 700hPa~1060hPaNOTE:• A functional tester can’t be used to assess this product’s accuracy.• The purpose of confirming the blood oxygen measurement’s accuracy is to compare the oximeter measurement value with the value of blood gas analyzer.
- LED:Wavelength: 666nm/905nm Output power: <0.1mW
- Bluetooth:Frequency range: 2402.0~2480.0MHz Transmission distance: 10m Transmission rate: 4k Bytes/s Modulation system: GFSK Bluetooth protocol version: Bluetooth specification V4.1
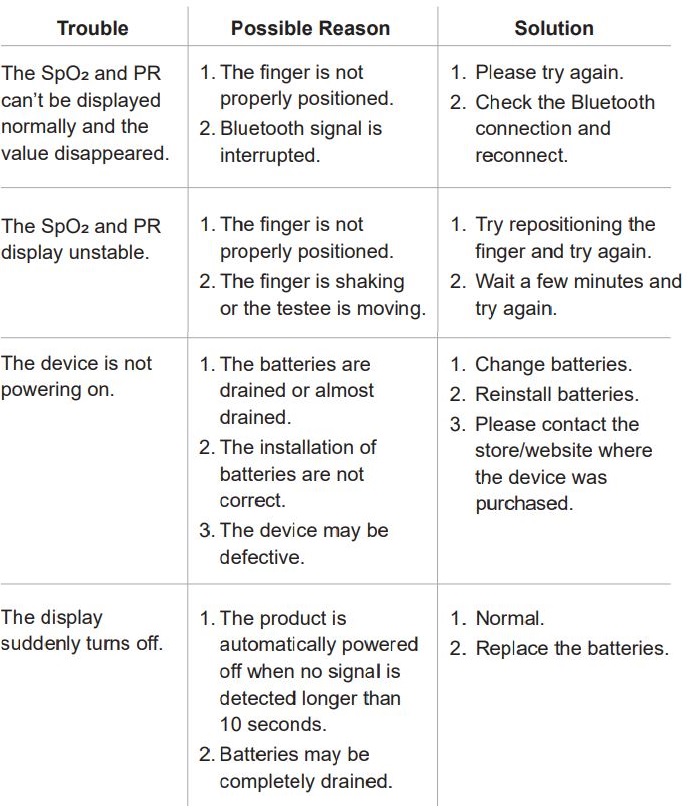
Troubleshooting
Radio and TV Interference Statement
WARNING!!! This equipment has been tested and found to comply with the limits of a Class B digital device, pursuant to part 15 of the FCC rules. These limits are designed to provide reasonable protection against harmful interference in a residential installation.
This equipment generates, uses and can radiate radio frequency energy and, if not installed and used in accordance with the instruction, may cause harmful interference to radio communications. However, there is no guarantee that interference will not occur in a particular installation. If this equipment does cause harmful interference to radio or television reception, which can be determined by turning the equipment off and on, the user is encouraged to try to correct the interference by whatever measures may be required to correct the interference.
Technical Support and Warranty
If you need further assistance, please contact the Aluratek support department for troubleshooting prior to returning this device.E-mail: [email protected]Web: www.aluratek.com/helpdeskLocal (Irvine, CA): 714-586-8730Toll free: 1-866-580-1978
Aluratek warrants this product against defect in material or workmanship for 1 YEAR from the date of purchase.
For more information, please visit: https://aluratek.com/warranty-return-policy
 report this ad
You can register your product online at: https://aluratek.com/product-registration
References
[xyz-ips snippet=”download-snippet”]