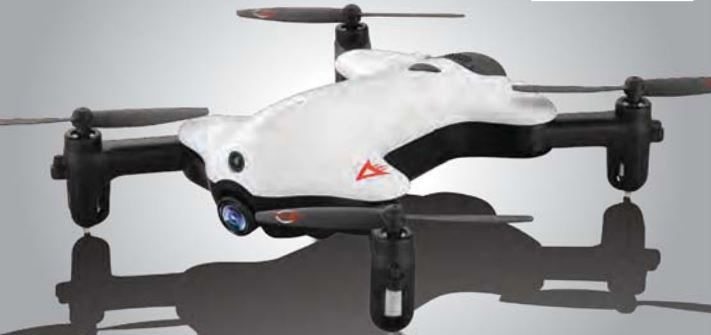
amaxbrands Hd Streaming Video
Drone Instruction Manual
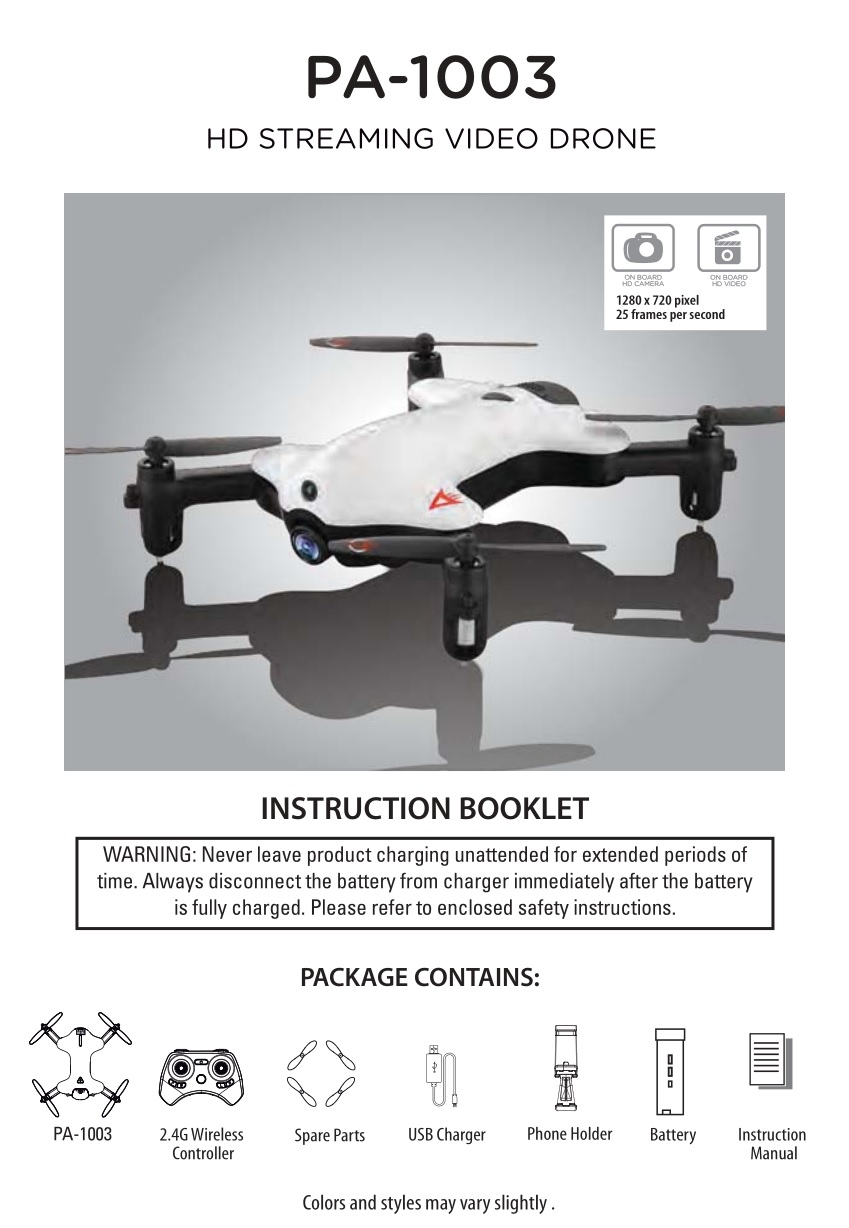 Thank you for purchasing the PA-1003 HD Streaming Video Drone. Please read this instruction booklet as it contains valuable information on how to properly fly and care your PA-1003.
FEATURES
- COMPACT FOLD IN DESIGN ALLOWS FOR EASY PORTABILITY.
- NEW OBSTACLE AVOIDANCE TRAINING FEATURE WILL CAUSE THE DRONE TO AUTOMATICALLY CIRCUMVENT WALLS AND other obstructions so new pilots can get the hang of flying
- AIR PRESSURE SENSOR LOCKS FLIGHT ALTITUDE FOR STABLE VIDEO FOOTAGE
- TAKES VIDEO AND STILL SHOTS WITH ON BOARD HD CAMERA
- 6 AXIS GYRO FOR EXTREMELY STABLE FLIGHT AND MANEUVERABILITY
REMOTE CONTROL BATTERY INSTALLATION
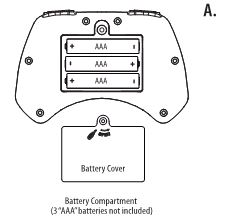
- Unscrew and remove the battery cover from the back of the controller.
- Install 3 fresh “AAA” alkaline batteries into the controller as shown in diagram A. Replace the battery cover and secure it.
- Turn over the controller and press the power button. If the power indicator turns on you have installed your batteries properly.
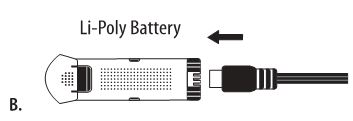
CHARGING THE PA-1003 LI-POLY BATTERY
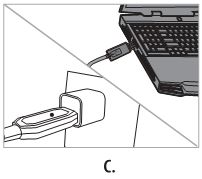
- Connect the USB charger to the battery charging socket (see diagram B).CAUTION: The USB plug fits the charging socket only in one way. Do not force it. Improper connection will damage the PA-1003’s battery.
- Connect the USB end of the cable to your computers USB port or a USB wall charger (see diagram C).
- The indicator light on the USB charger will turn to solid red to indicate that the battery is charging. The red LED indicator will turn off when charging is completed.
- Average charging time is approximately 50-60 minutes ( via 5.0V 2A USB wall charger). A fully charged PA-1003 can fly for 5-6 minutes depending on environment and user input.
IMPORTANT: ALWAYS REMEMBER TO UNPLUG YOUR CHARGING CORD WHEN NOT IN USE!
INSTALL THE PA-1003 BATTERY
Push the fully charged battery into the battery compartment then lock the end with the battery locks.(see diagram D) The battery only fits one way to the battery compartment, do not force it.

HOW TO EXPAND AND FOLD YOUR PA-1003
Before flying your PA-1003, you need to expand the foldable arms out. Turn your PA-1003 over, bottom side facing you, pull and expand the 4 arms as shown in the diagram below carefully. Make sure the arms are fully expanded to the position. After flying your PA-1003,it is recommended to fold all 4 arms back in. When expanding or folding your PA-1003, make sure to be gentle.(see diagram E)

PA-1003 DIAGRAM

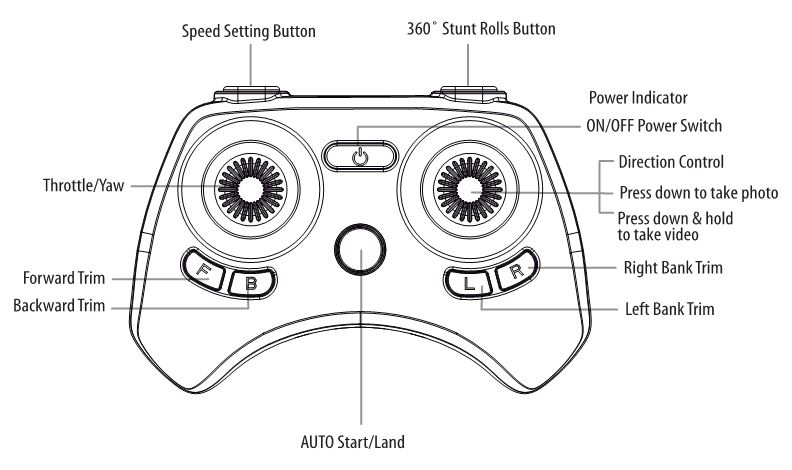
CONTROLLER DIAGRAM
WARNINGDO NOT FLY YOUR PA-1003 IN FOUL WEATHER!

FLIGHT PREPARATION

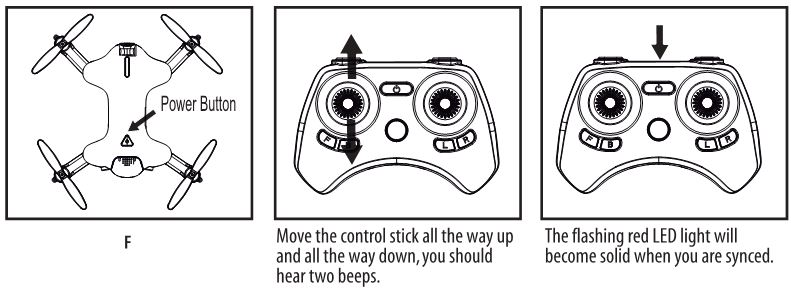
SYNCING YOUR PA-1003
Important! When syncing your PA-1003 with the controller always make sure that the drone is on a flat level surface and that your digital trim settings are in the center position.
- Before starting, make sure that the power on your controller is off and the battery is removed from the PA-1003. Make sure that there are no other 2.4G devices in the area.
- Insert the battery into the PA-1003 and set it down on a flat level surface. Press down the power buttonand hold for a few seconds (see diagram F).The LED lights on the drone should begin to flash.
- Quickly turn ON the remote and you will notice that the top red LED light on the face of the controller
- Push the throttle stick all the way up until it stops and then pull it back all the way down to the bottom(see diagram below).When pushing the stick up or pulling the stick down you should hear a high-pitched beep both ways. The indicating lights on the drone and controller will stop flashing and stay solid on. You have successfully synced your PA-1003 and are ready to fly. If this doesn’t happen, repeat steps 1-4 again.
TIP 1: Try not to leave too much time between putting your battery into the drone and turning on the controller or your syncing window will time-out.
Tip 2: SYNCING YOUR DRONE INDOORS OR IN THE SHADE WILL MAKE IT EASIER TO SEE THE LED light indicators on both the controller and the drone.
NOW YOU ARE READY TO FLY!
If you have successfully synced your PA-1003 to your controller as explained on page 4 you are now ready to fly.Before beginning to fly your drone you should familiarize yourself with how to start and stop the rotors, how to use your auto land feature and how the controls work so please carefully read and familiarize yourself with various control features explained in the next. Once again as a beginner pilot you should learn how to control your drone in a large open field or park on a day with zero or very light wind.Do not try to fly your PA-1003 too high until you become a more experience pilot.
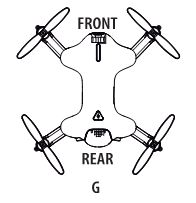
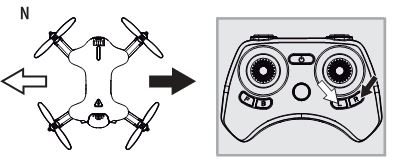
RECOGNIZING THE FRONT & REAR OF THE PA-1003
Even though the PA-1003 has four rotors there is still a front or “forward” facing direction and “rear” or backwards facing direction. The front and forward facing direction of the PA-1003 is the side with a camera (see diagram G).The rear and backward facing direction of the drone is the side with a red light (see diagram G).
STARTING/STOPPING THE ROTORS
Note: You can start/stop your PA-1003 manually or automatically. Please follow one of the steps below to operate accordingly. Make sure you have properly synced the PA-1003 and the power stays on.
MANUAL START/STOP
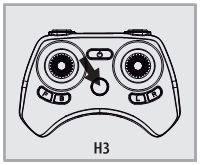
- TO START THE ROTORS SIMPLY MOVE THE TWO CONTROL STICKS BOTH DOWN AND OUT (see diagram H1), hold until the rotors start spinning. Now release both sticks to the neutral position and push the throttle up to take off.
- TO STOP THE ROTORS, AFTER STARTING the rotor you can simply wait about 15 seconds, and it will stop automatically. Or move both sticks down and in to stop immediately (see diagram H2). After take off, you can simply pull the throttle all the way down and land.

AUTO START/LAND
THE PA-1003 HAS AN AUTO START LAND FEATURE WHICH ALLOWS YOU TO START LAND automatically. Simply press the AUTO START / LAND button on the top of the
NOTE: : YOU CAN STILL CONTROL THE DIRECTION WHILE AUTO STARTING LANDING to avoid obstacles.
The PA-1003 has 4 speed settings; T(Training),1 (SLOW),2 (MEDIUM) and 3 (HIGH).The Default setting when you first turn on your PA-1003 is the 1 (SLOW) speed mode. To increase the speed simply trigger the speed setting button (see remote diagram on pg 3) you will hear beeping sounds of the controller will show you what speed setting you are on. Speed settings can be set before flight or during the flight.
T (Training)MODE & OBSTACLE AVOIDANCE TRAINING FEATURE
Simply press and hold the Speed Button 2 seconds, you will hear a long beep indicating you are in T Mode now. T mode allows you to learn how to operate your PA-1003 at a very slow speed. Also there are maximum and minim height limits set to avoid crashing to ceiling or floor in T mode. New obstacle avoidance training feature will cause the drone to automatically circumvent walls and other obstructions so new pilots can get the hang of flying. Set the PA-1003 speed in the T(Training) speed mode the obstacle avoidance feature will start working.Note: the obstacle avoidance feature only works for T(Training) mode.
FLIGHT CONTROL
Below is a list of basic flight functions for your long-range remote to control the PA-1003.While learning to fly your PA-1003 it is best to start in a large space with the drone facing away from you until you get used to the basic controls. As you master flying your PA-1003 you can move to more advanced maneuvering techniques. Practice makes perfect!
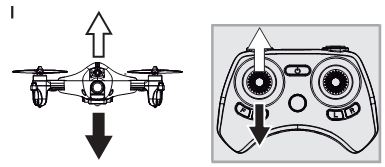
Move the left Throttle stick up to increase the propeller speed and the PA-1003 will accelerate and ascend.Move the left Throttle stick down to decrease the propeller speed and the PA-1003 will decelerate and descend (see diagram I).
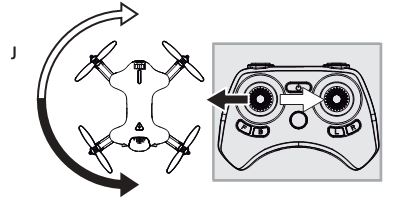
While in the air, move the left Throttle stick left and the PA-1003 will rotate left.Move the left Throttle stick right and the PA-1003 will rotate right (see diagram J).
While in the air, move the right Direction Stick up K and the PA-1003 will move forward.Move the right Direction Control down and the PA-1003 will move backward (see diagram K).

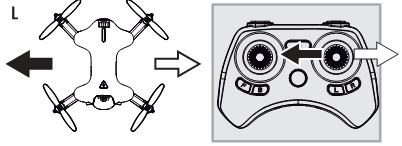
While in the air, move the right Direction Control left L and the PA-1003 will bank to the left.Move the right Direction Control right and the PA-1003 will bank to the right (see diagram L).
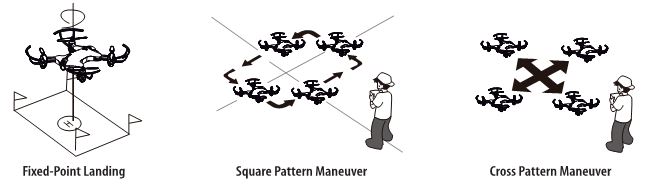
FLIGHT PRACTICE
To master flying your aircraft try practicing the exercises shown below, start with simple vertical takeoffs, LANDINGS, AND LEFT/RIGHT TURNING AND ROTATING. ONCE THOSE ARE MASTERED MOVE ON TO SQUARE AND CROSS maneuvers. Good luck and have fun!
ADJUSTING THE TRIM
NOTE: The PA-1003 is already properly trimmed and calibrated right out of the box and should not require any trim adjustments before flying. Some more experienced pilots may want to adjust trim settings for their style of flying. After several crashes you may need to adjust trim settings for the PA-1003 to be more balanced.
Forward/Backward Trim
- If your PA-1003 is moving forwards or backwards automatically, you may need to adjust the FORWARD/BACKWARD Trim Button.
- If your PA-1003 drifts forward, push and release the BACKWARD TRIM button repeatedly until the moving stops and proper flight is maintained.
- If your PA-1003 drifts backwards, push and release the FORWARD TRIM button in the same manner until the problem is resolved (see diagram M).
- From time to time you may have to adjust the FORWARD or BACKWARD TRIM buttons to ensure the PA-1003 will hover in mid-air and respond accurately to your commands.

Banking Left/Right Trim
- If your PA-1003 is not steadily hovering and is banking to the left or right automatically, you may need to adjust the LEFT BANK or RIGHT BANK Trim N buttons.
- If your PA-1003 banks to the left, push and release the RIGHT BANK TRIM button repeatedly until the banking stops and proper flight is maintained.
- If your PA-1003 banks to the right, push and release the LEFT BANK TRIM button in the same manner until the problem is resolved (see diagram N).
- From time to time you may have to adjust the LEFT and RIGHT BANK TRIM to ensure the PA-1003 will steadily hover in mid-air and respond accurately to your commands.
NOTE: The use of the Trim buttons utilizes sounds. A single long Beep indicates the product is center trimmed. When there’s no sound when press the trim means the product is trimmed to the maximum on a particular side.
CALIBRATING THE PA-1003
NOTE: Your PA-1003 comes per-calibrated out of the box so you are ready to fly. After several crashes and shocks to your gyro sensors, you may notice that your drone is drifting and can not hold its center position as well as it used to. This most likely means that you need to recalibrate your PA-1003. Please follow the simple instructions below.
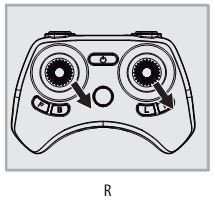
- Place the PA-1003 on a flat level surface
- Make sure the PA-1003 is on and that the controller is synced (refer to syncing pg 4).Do not start theblades. Instead move both the throttles and control stick down and to the right corner (see diagram R). You will see the lights on the drone rapidly flash and stop. Once the lights stop flashing you have completed your calibration and are ready to fly!
TROUBLE SHOOTING: If you do not see the lights flash, first remove the battery from the drone then turn off your controller and start again. Always make sure to put your battery in first, then turn on your controller. Push the left throttle stick up all the way and then pull back down again. When you hear the beep the PA-1003 is synced to the controller and you are ready to calibrate.
HOW TO PERFORM 360º STUNT ROLLS
Performing 360º stunt rolls with the PA-1003 is as easy as 1-2-3:
- Hover the PA-1003 in still position making sure that you have at least 5 feet of clearance above and below the quadrocopter. Set the speed settings to mode 2 or 3,the PA-1003 can not do the stunt in T(Training) mode and speed 1(SLOW).
- Press the 360 stunt button down and you will enter the stunt roll mode which is indicated by rapid beeping sounds(see diagram S).
- Determine which direction you want it to flip and quickly push the right control stick in the direction you want to flip your PA-1003 (see diagram T).
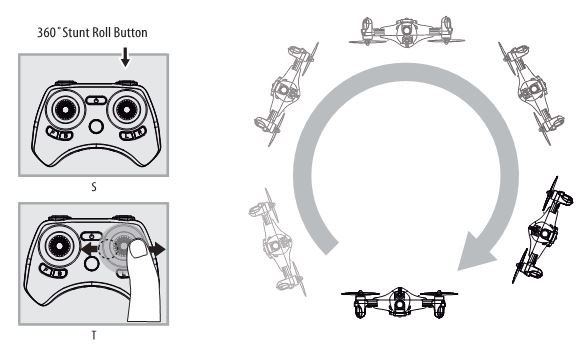
NOTE: To exit the stunt roll mode without flip, you can press the button again. The beeping sound will stop.
PA-1003 WIFI APP INSTALLATION
- Make sure you are using a compatible Android™ or Apple® iOS device.
- Make sure your device has access to the Internet.
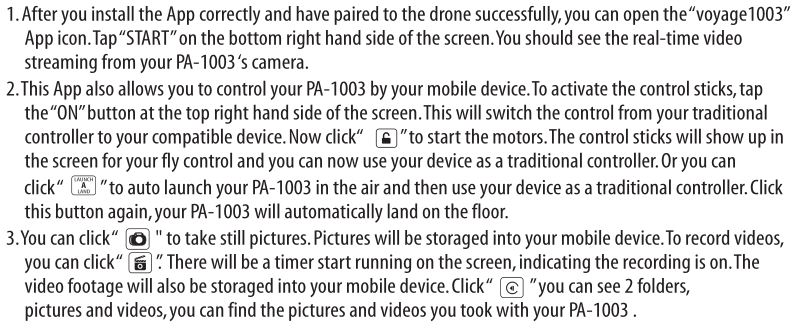
- For Apple® iOS devices, within the App Store, search and select” voyage1003 “. Hit the Install button and the”voyage1003″App should download and install automatically.
- For Android™ OS devices, visit the Google Play store and search for”voyage1003″.Selecting the”voyage1003 “App will download the App and automatically install it on your device.
- After the”voyage1003″App is installed, it should create an icon on your screen. Click the”voyage1003″icon to run the App to make sure that it has installed correctly on your device. If not, please delete and repeat the process again.
PAIRING PA-1003 TO YOUR COMPATIBLE DEVICE
- After completely charging your PA-1003 battery, install the battery to your PA-1003 (Refer to the user manual).
- In the Settings menu of your device, locate the Wi-Fi option.
- Turn ON the Wi-Fi option.
- Select the voyage Wi-Fi network. You will be asked for a password. The password is the 8 numbers that are attached to the Voyage WIFI network. Enter the numbers to activate your account. Return to the Main Menu.
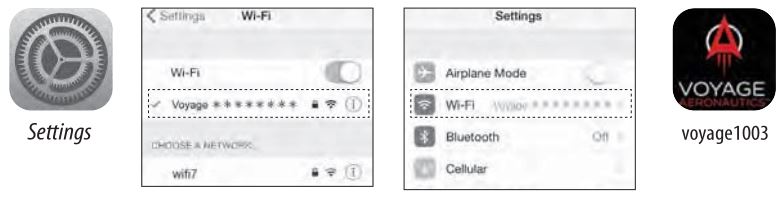
Note: Apple® devices require the use of iOS 7.0 or higher. ANDROIDTM devices require the use of OS 4.2.2 or higher.
QUICK START
DETAILED APP OVERVIEW
Please see images below for a detailed App overview. This overview is also available under the”HELP” icon in the home screen of the App.
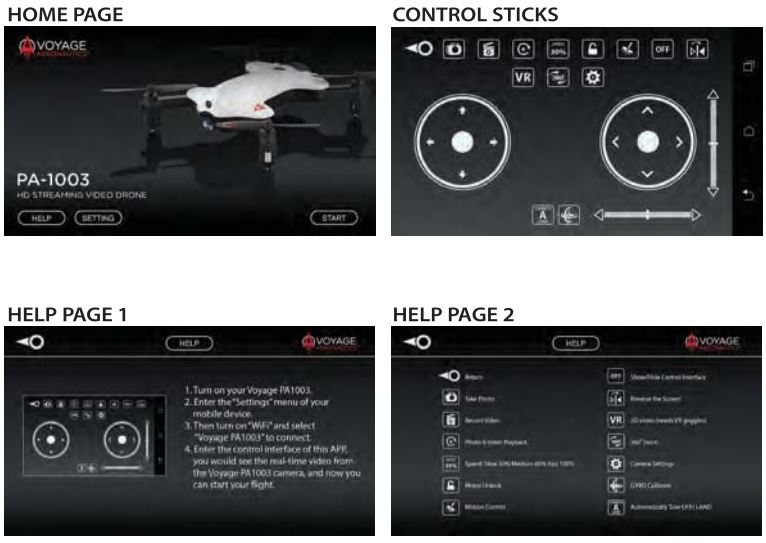
If you’re still encountering difficulties please contact our customer service department at [email protected]
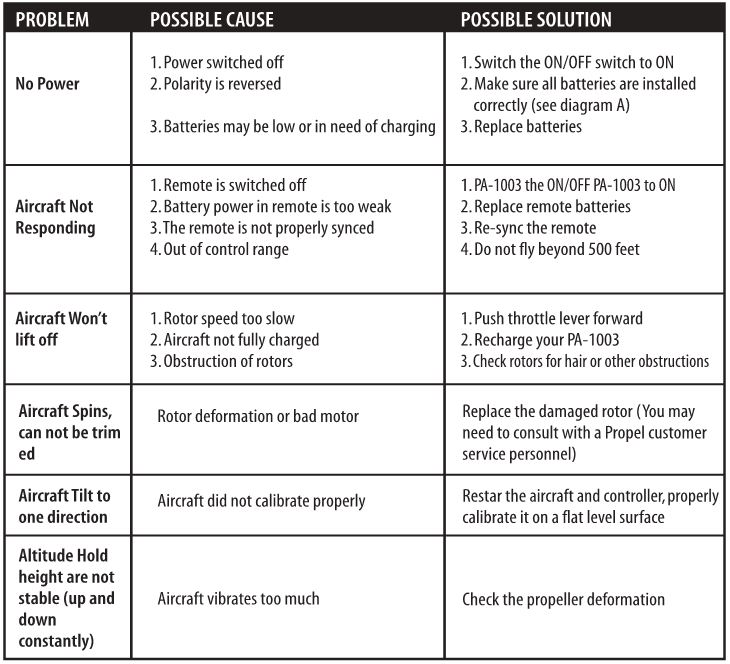
TROUBLESHOOTING YOUR PA-1003
REPLACING THE PROPELLER BLADES
Your PA-1003’s propeller system is a precision instrument that may need repair or replacement from time to time for optimal flight function. Crash landing at high-speed may cause damage to your PA-1003’s propellers.
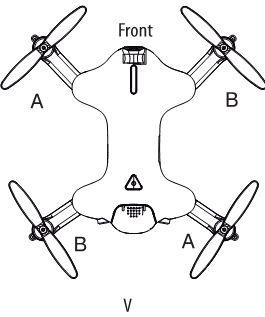
- The PA-1003 has four sets blades, two sets blades with indication number A & B on front, and two sets blades with indication number B & A on the rear (see the diagram V).
- When replacing the propeller blades, make sure to match the indication markings on the blades.
- Unscrew and take off the damaged blade.
- Replace with new correct blade.
Blade Front Left = ABlade Front Right = B—————————Blade Back Left = BBlade Back Right = A
BLADES GUARD INSTALLATION
Your PA-1003 come with the blade guard for safety flight, it is recommended for beginners. Simply attached the 4 blade guards to each of landing gear (see the diagram W).

PA-1003 WARNING:

CARE AND MAINTENANCE

Limited 90-Day Warranty
NORTH AMERICA
AMAX Group USA warrants to the original consumer that this product is free from any electrical or mechanical defects for a period of 90 DAYS from the date of purchase. If any such defect is discovered within the warranty period, AMAX Group USA will repair or replace the unit free of charge upon receipt of the unit, shipped postage prepaid and insured to our warranty center ALONG WITH THE ORIGINAL RECEIPT evidencing that the product was purchased from an approved AMAX retail partner and that the product is still within the 90 day warranty period. The warranty covers normal consumer use and does not cover damage that occurs in shipment or failure that results from alterations, accident, misuse, abuse, neglect, wear and tear, inadequate maintenance, commercial use or unreasonable use of the unit. Removal of any parts/components voids all warranties. This warranty does not cover cost of repairs made or attempted outside by third-party individuals or companies. Any applicable implied warranties, including warranties of merchantability and fitness, are hereby limited to 90 DAYS from the date of purchase. Consequential or incidental damages resulting from a breach of any applicable express or implied warranties are hereby excluded. Some states do not allow limitations on the duration of implied warranties and do not allow exclusion of incidental or consequential damages, so the above limitations and exclusions in these instances may not apply.
REPAIR/REPLACE PRODUCTIf your product begins to malfunction or stop working, immediately contact our warranty center (contact details listed below). If it is determined that a return is necessary, our warranty department will issue you an RMA number/form and an address to the nearest return center for shipping the product to us. When honoring the warranty, AMAX reserves the right to either repair, replace or refund the product.
IMPORTANT NOTICE:We will reject and return to sender returns that are not accompanied by an AMAX issued RMA form and RMA number so make sure to contact our warranty center before attempting to return your product!
PREPARATION FOR SHIPPING YOUR PRODUCT:Please repack your product in a durable box, preferably in the original carton, and send it prepaid, and adequately insured. Include the RMA form that was issued by our warranty department along with your daytime telephone number and email address inside the shipping carton. If your warranty has expired and you still require service please contact our customer care team For further information please send all inquiries to: [email protected]
IMPORTANT NOTICE!DO NOT ATTEMPT TO SHIP YOUR PRODUCT BACK WITHOUT FIRST CONTACTING OUR WARRANTY DEPARTMENT AT:www.amaxbrands.comEmail: [email protected]
USING YOUR ON-BOARD CAMERA AND VIDEO RECORDER
Your PA-1003 comes equipped with an onboard digital camera(1280×720 pixel, 30 frames per second) that takes both video and still photographs. Now you can have hours of fun creating aerial photography and videos for family and friends.
WHAT YOU WILL NEED TO GET STARTED USING YOUR CAMERA
- One microSD card(not included).
- One microSD card reader(included).
- A Computer with a USB port and Windows Media Player or other Media player that can play AVI files(not included).
FORMATTING YOUR microSD CARDBefore you can begin to take videos or digital photographs you must first format your microSD card. To format your microSD card simply place the microSD card into the included USB SD card reader and plug it into your computers USB port (see diagram U1 and U2 below).After a few moments an icon will appear on your Desktop. Right click on the Icon and follow instructions to format your microSD card.
INSTALLING THE microSD CARD IN YOUR PA-1003
- Place the formatted microSD card into the PA-1003 SD card port (see diagram U3 below).Push gently until you hear and feel the microSD card “click” into the SD card slot.
- TURN THE PA-1003 ON AND MAKE SURE THAT IT IS BOTH FULLY CHARGED AND PROPERLY SYNCED TO THE CONTROLLER ( SEE HOW TO SYNC YOUR QUADROCOPTER on page 4 ).
TAKING DIGITAL PHOTOSTo take photographs short press the CAMERA button of the controller (refer to CONTROLLER DIAGRAM on pg. 3), when you push the button you will hear a “beep” and the red and white led lights on the will flash one time indicating that a picture has been taken.
RECORDING VIDEOSTo begin recording a video long press CAMERA button for 2 seconds. You will hear 2 “beeps” and the red and white LED lights on the camera start flashing to indicate that you are in video mode and the camera is recording. To stop the video recording, long press the CAMERA button a second time, you will hear a “beep” indicating that the video recording has stopped and the Camera is in ready mode again.

IMPORTANT NOTICE: It’s recommend to test your camera functions before flying.
REMOVING YOUR microSD CARDTo remove your microSD Card push in gently on the back of the SD card with your thumb or forefinger until you hear and feel a”clicking sound”. The microSD card will “pop-out” slightly and is ready for removal. Simply grab and pull gently away from the PA-1003’s camera port to remove the card. Always store your microSD card in a clean, safe and cool environment.
DOWNLOADING AND CLEARING SPACE ON YOUR microSD CARDPlug your microSD card into the microSD card reader and connect to your computer. It is best to always download all your videos and pictures on to your computer and not store this data on your microSD card. After downloading your photos and videos ,follow your computers instructions to “delete” files on your microSD card.
LIVE VIDEO STREAMING SETUP
Your PA-1003 comes equipped with an on board digital camera that takes both video and still photographs to your mobile devices.
WHAT YOU WILL NEED TO GET STARTED USING YOUR CAMERA
- One Apple or Android phone* (not included)
- Voyage1003 APP installed (app store or Android market available)
PHONE HOLDER AND PHONE INSTALLATION
Insert the included phone holder hook (a) to the slots on the top of the controller properly, see the illustration below, When you install the phone holder correctly you can use it to hold your phone (see diagram U4)

FCC Part 15 C Notice
CAUTION: Changes or modifications not expressly approved by the party responsible for compliance could void the user’s authority to operate the equipment.
NOTE: This equipment has been tested and found to comply with the limits for a Class B digital device, pursuant to Part 15 of the FCC Rules. These limits are designed to provide reasonable protection against harmful interference in a residential installation. This equipment generates, uses and can radiate radio frequency energy and, if not installed and used in accordance with the instructions, may cause harmful interference to radio communications. However, there is no guarantee that interference will not occur in a particular installation. If this equipment does cause harmful interference to radio or television reception, which can be determined by turning the equipment off and on, the user is encouraged to try to correct the interference by one or more of the following measures:
- REORIENT OR RELOCATE THE RECEIVING ANTENNA.
- INCREASE THE SEPARATION BETWEEN THE EQUIPMENT AND RECEIVER.
- CONNECT THE EQUIPMENT INTO AN OUTLET ON A CIRCUIT DIFFERENT FROM THAT TO WHICH THE RECEIVER IS CONNECTED.
- CONSULT THE DEALER OR EXPERIENCED RADIO / TV TECHNICIAN FOR HELP.
This device complies with Part 15 of the FCC Rules. Operation is subject to the following two conditions :
- This device may not cause harmful interference, and
- this device must accept any interference received, including interference that may cause undesired operation.
![]() WARNING!CHOKING HAZARD – Small parts. Not suitable for children under 3 years.
WARNING!CHOKING HAZARD – Small parts. Not suitable for children under 3 years.
![]() Requires Speed Class 6 or higher microSD or microSDHC card(not included)microSDHC Logo is a trademark of SD-3C, LLC.
Requires Speed Class 6 or higher microSD or microSDHC card(not included)microSDHC Logo is a trademark of SD-3C, LLC.
Conforms to safety requirements of FCC.
Voyage AeronuaticsTM is the registered trademark of AMAX Industrial Group LTD. AMAX Group USA Address: 12645 Memorial Dr Suite F1 #388 Houston, TX 77024 © 2020 All Rights Reserved. Visit us at www.amaxbrands.com
Made in China
References
[xyz-ips snippet=”download-snippet”]