STYLE GUIDE
WELCOME TOHANDMADE AT AMAZON!

Our team is so excited to offer a shopping experience made especially for handcrafted products, and we couldn’t be happier to add artisans like you to our community. We know our customers will be thrilled with your unique products and we’re looking forward to helping you grow your business.
This guide includes all the tips and things you need to know to sell successfully on Handmade at Amazon. We show you how to set up your Artisan Profile (which will be your Amazon storefront), take great product photos, list your products and learn the best ways to help customers find you. We want to help get you ready to sell so you can spend more time creating products customers will love!
If you have questions along the way, visit our Handmade help articles in your Seller Central account. You can access these at any time by clicking Help in your Seller Central toolbar or you can contact our Seller Support team by clicking on the Contact Us link in your Seller Central account.
Thanks again for choosing to sell with Handmade.The Handmade at Amazon Team
CREATE YOUR ARTISAN PROFILE

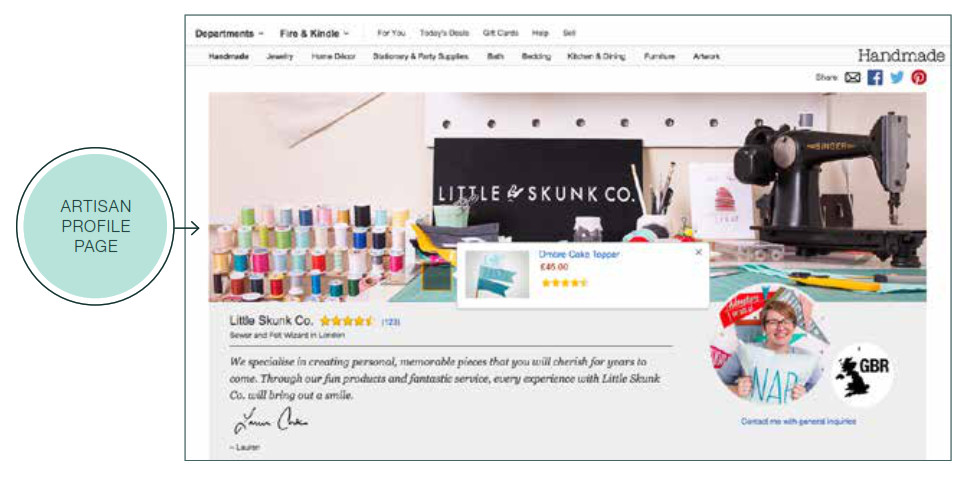
SETTING UPSHOPNow that you’re registered as a Handmade at Amazon artisan, it’s time to set up shop! Your store on Amazon is called your Artisan Profile – this is something we’ve designed just for you. Your profile tells customers your story and inspires them to buy your products, so you’ll want to spend time to make it great. Customers can get to your page from all of your Handmade listings on Amazon.co.uk, and you can also set up a short URL to your profile to share with your existing customers.
Upload images of your studio or workspace and, once you create listings, “tag” them with products you would like to highlight to customers. You can explain your style, what inspires you, and describe your craft. All of your Handmade listings will be viewable to customers from your profile page.
You will need to complete all of the required Artisan Profile information before listing your first product – but you can always come back later to add more information and create featured product tags. This is your store on Amazon – make it a reflection of you!
GETTING STARTED
To get started, first log in to your Seller Central account. Next, you can start creating your Artisan Profile in one of two ways:• Click the link in the Welcome to Handmade at Amazon banner on your Seller Central homepage• Select Settings and then click Artisan Profile
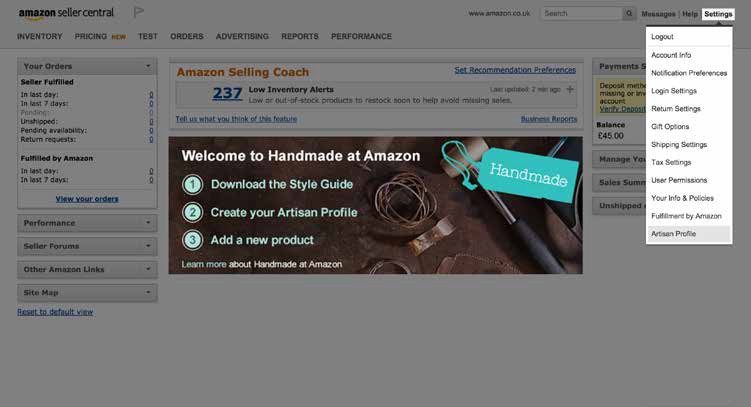
You are the face and voice of your products on Amazon. To help customers connect with you, upload a picture of yourself or of something that reflects you or your brand. This photo should be at least 200 pixels on the shortest side and will be displayed on your product pages and your Artisan Profile.
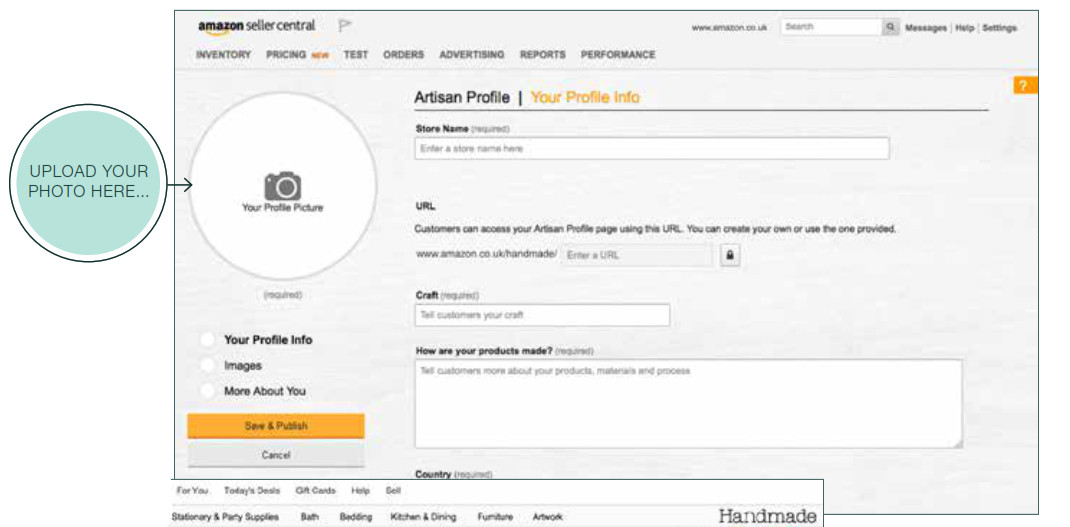

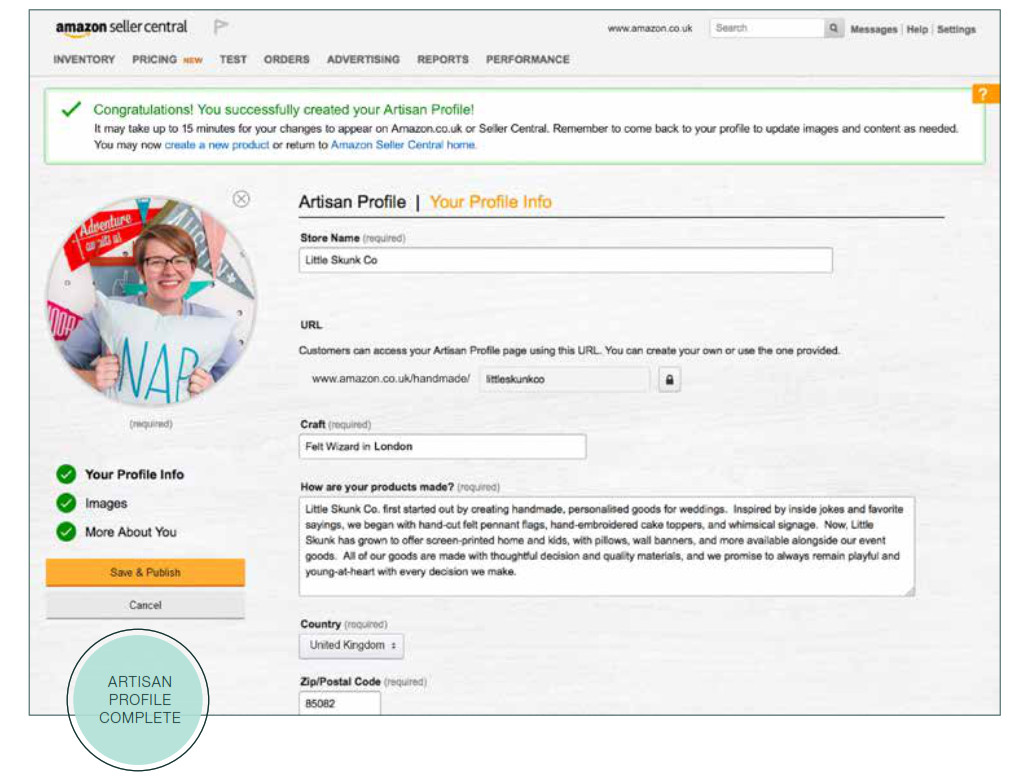
YOUR PROFILE INFO
Your store name should be unique and distinctly representative of you and your products. It should match the Display Name you entered during Registration and mirror the name of your current website or the name that you use at events and shows.Use your Amazon short URL to encourage customers to visit your profile and drive traffic to your store. You can view your Artisan Profile at any time by entering this URL into your browser.Are you an expert potter? Knitter? Furniture maker? Tell customers your craft or area of expertise. You can also go into more detail about your creative process, including how you make your products and the materials you use. Customers often like to shop by location.Once you’ve completed all of the required information, click Save & Publish to save your work. It will take about 15 minutes for your profile to publish on Amazon.co.uk, but you can continue to add Images and additional content after publishing. Just click Save & Publish anytime you would like to make an update to your page!
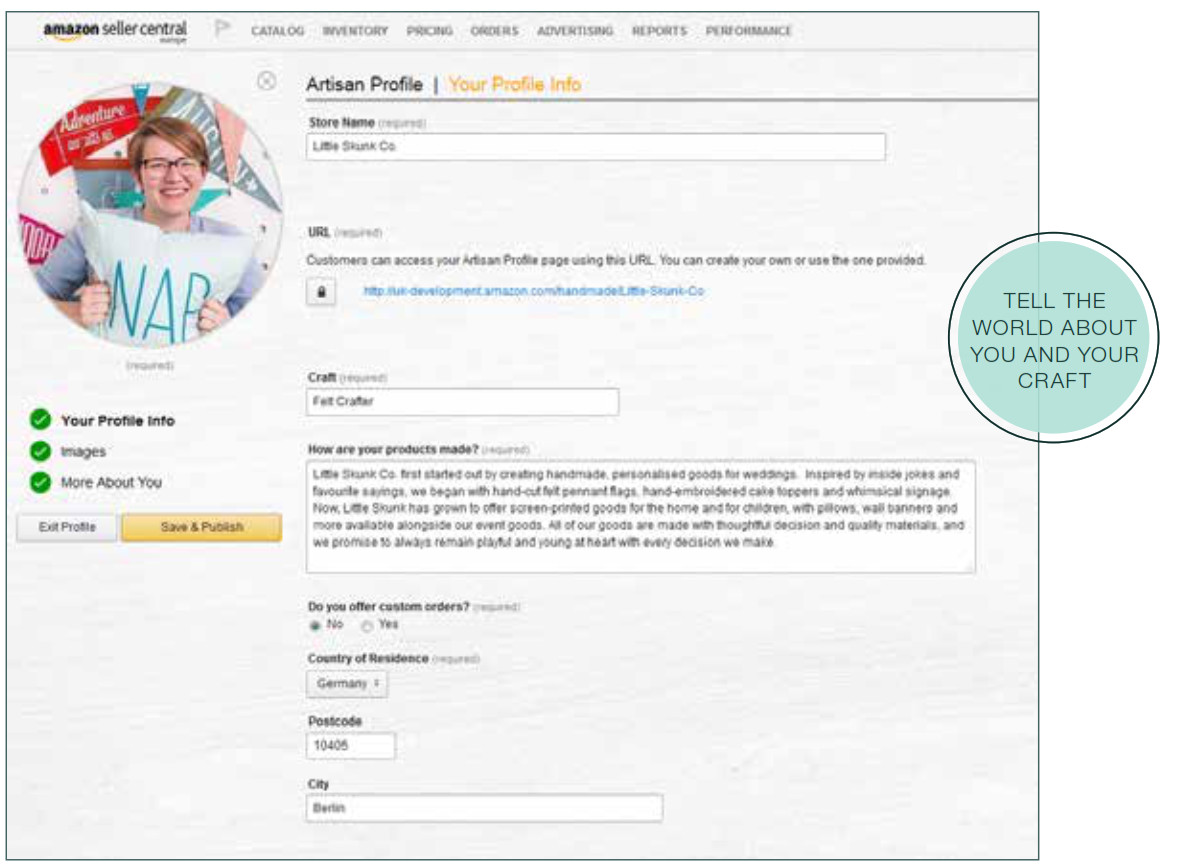
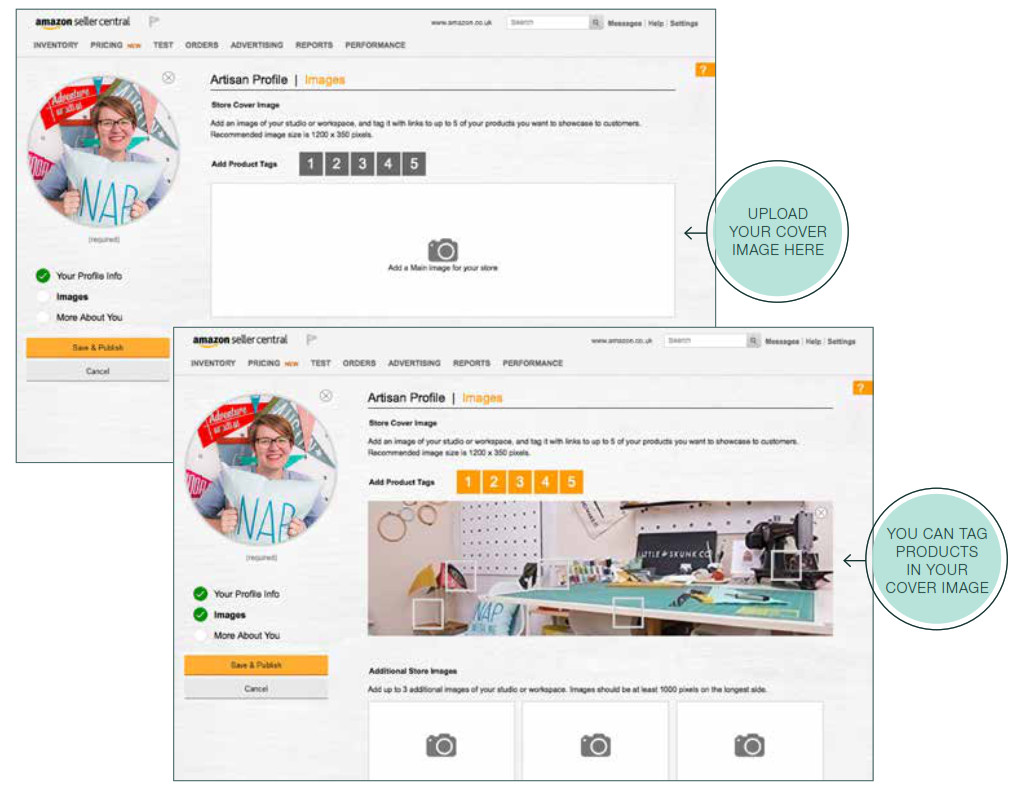
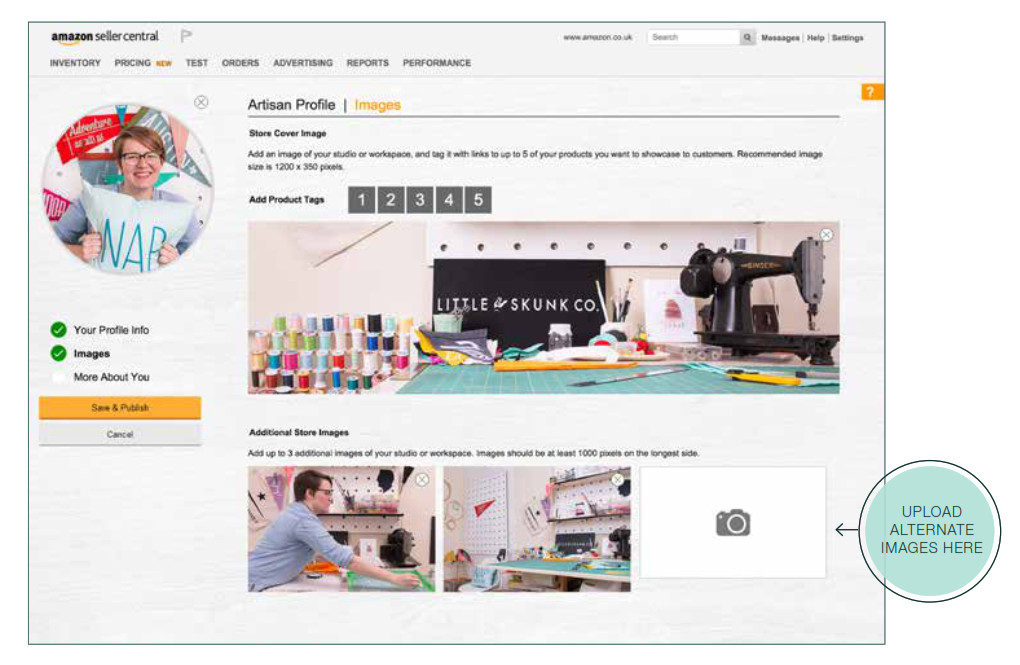
STORE COVER IMAGE
Customers love to get a peek inside your world and see where you make things. The Store Cover Image will appear at the top of your Artisan Profile to show customers your workspace or studio. Don’t feel like your workspace is ready to be seen? Feel free to upload an image of your products merchandised on a shelf or a table instead. Remember, this is your store so put your best foot forward! This image should be 1200 x 350 pixels in size and should not contain a watermark.
After you list your handmade products, come back and tag the items you would like to highlight to customers in the Store Cover Image. Make sure you select products that have broad customer appeal and will be consistently available for purchase. You can update your tagged products at any time.
ADDITIONAL STORE IMAGES
Continue sharing your story with Additional Store Images. You can add images of your workspace, of you hard at work or images that have inspired your creations.These images can vary in size but should be at least 500 pixels on the shortest side. Within the upload tool, you can crop an image to include some or all of it. After uploading your Additional Store Images, you can drag and drop to re-order how they will appear on your Artisan Profile.
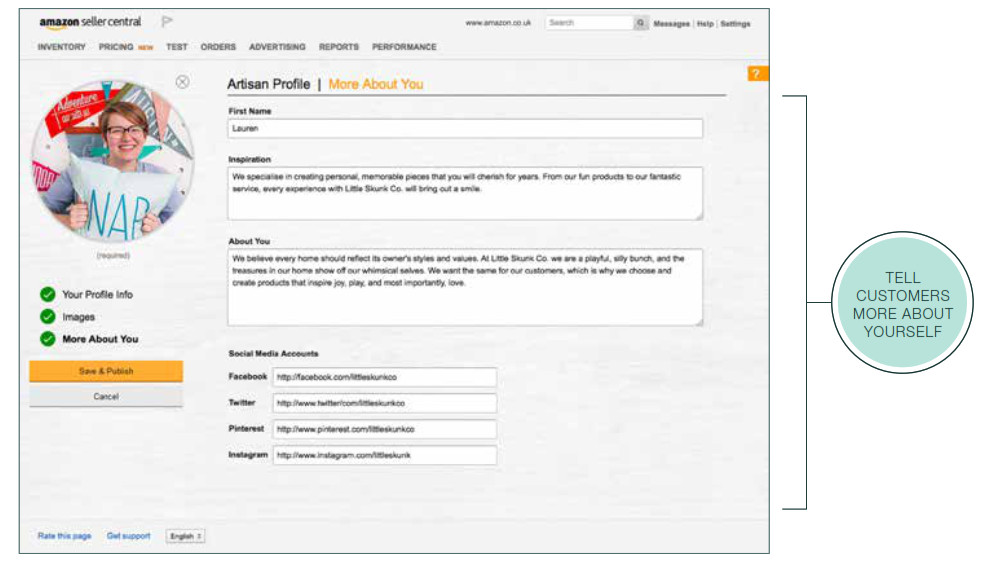
MORE ABOUT YOU
Use this section to tell customers about yourself in your own words. Start by providing a name that reflects how you prefer to be addressed – customers really love this personal connection.Add a headline inspiration statement for your store to let customers know what inspires you as an artisan. This will appear in large text directly underneath your Store Cover Image.Next, help customers understand the meaning behind your products by describing your creative process. And don’t be shy! Tell customers how you got started, what your areas of expertise are and highlight your unique skills.
CONGRATULATIONS!Once you click Save & Publish, your Artisan Profile will be published to Amazon.co.uk. This could take up to 15 minutes. You can come back and edit any of this information at any time.
LISTING PRODUCTS
LISTING PRODUCTS INTRO
Now that your store is set up, it’s time to list your products! We designed a new product page on Amazon.co.uk, especially for handcrafted items.
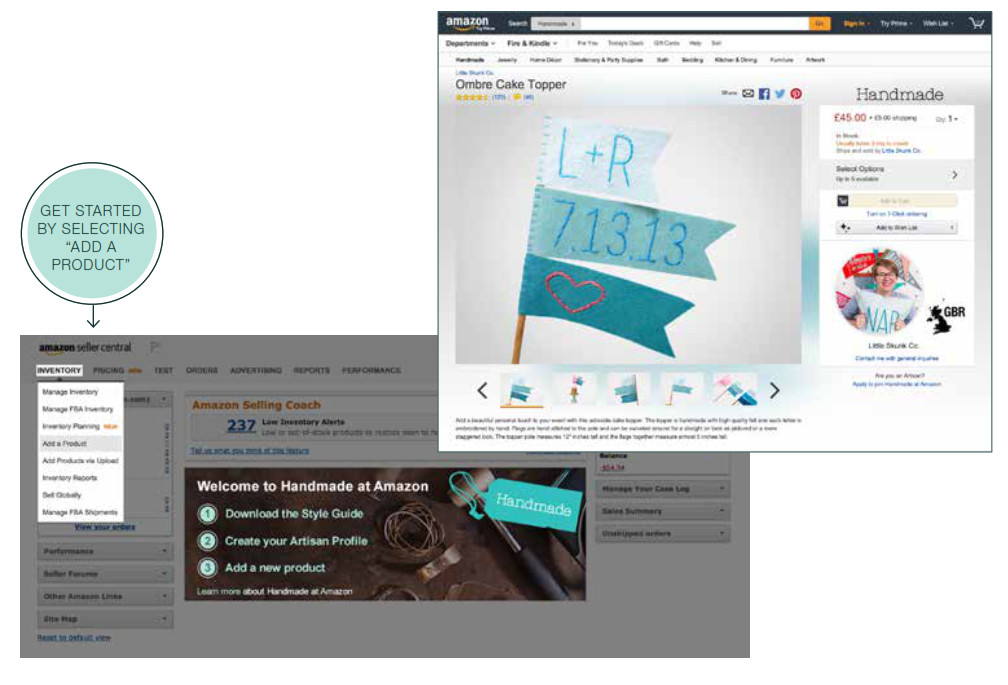
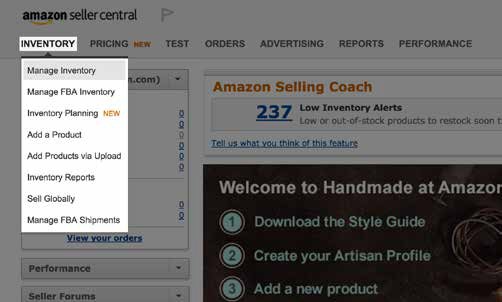
Read this section for tips on how to create great listings so customers can find and purchase your products. We’ll guide you through the important basics – title, product images, descriptions, product attributes, and keywords. Do you offer customizations or extra options for an item? You can add up to 10 customizations after you set up the basic information for each product.Also, don’t forget that there are no listing fees and your listings will never expire. So dedicate time to list all of your products and make those pages look great!To get started, go to Seller Central, click Inventory and select “Add a Product”.
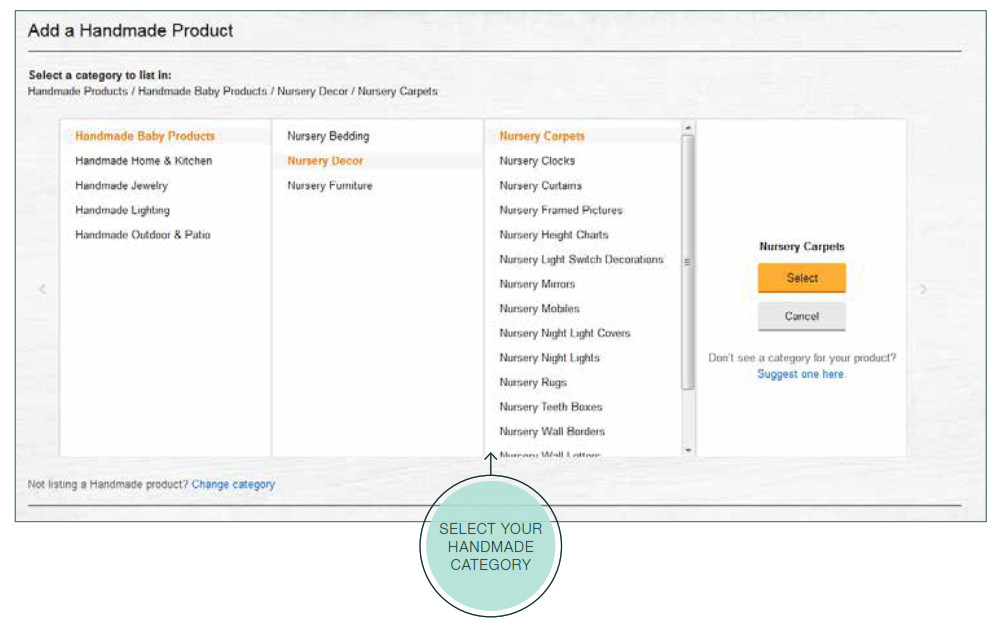
SELECTING A CATEGORY
To help customers find your products while browsing Amazon.co.uk, select the handmade category and subcategory that best fit your product. Be specific – this helps our powerful search algorithm do its work!
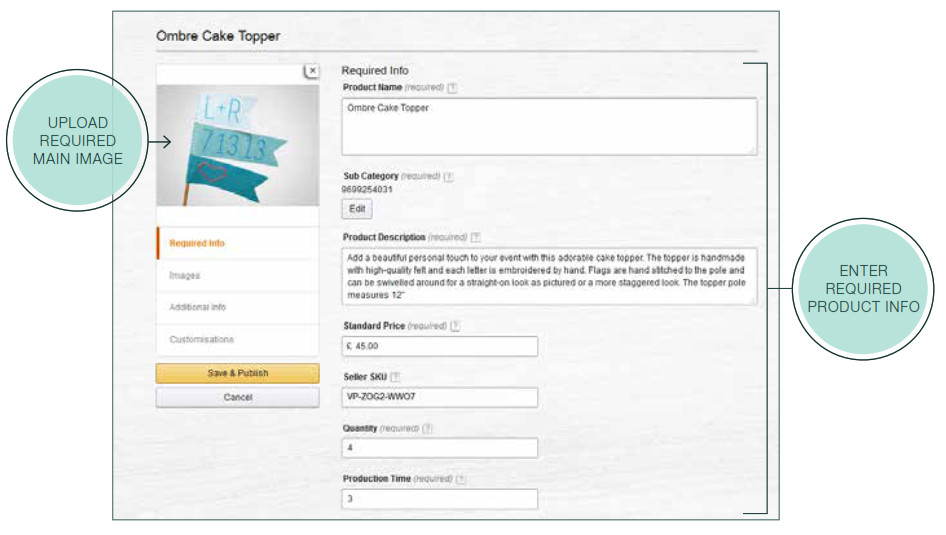
REQUIRED INFO
Once you’ve completed all of the info on this page, including a main product image, you can publish your listing or you can add more images and information in the other sections of the tool to help customers find your products.
- Titles should be less than 50 characters and represent only the main product, not specific customizations or options. You can add keywords later that will help your products appear in search, so you don’t need to add them to your product title.
- Give customers an overview of the key features of your product in the Product Description. Use this space to talk about the details of your product and what makes it unique.
- Enter the Standard Price customers will pay for the product. The Quantity should represent the number of units you are able to produce within your Production Time.
- When setting your Production Time, remember to include the amount of time required for you to create the product, including customizations, from when the order is received to when it is ready to send (up to 30 days).
- Enter a unique Identifier for the product, if you don’t enter a SKU we’ll create one for you. Listing the same product in multiple marketplaces? To share your item’s inventory across multiple Amazon Europe marketplaces for the same product, the same SKU must be used. After you publish this listing, you cannot change the SKU.
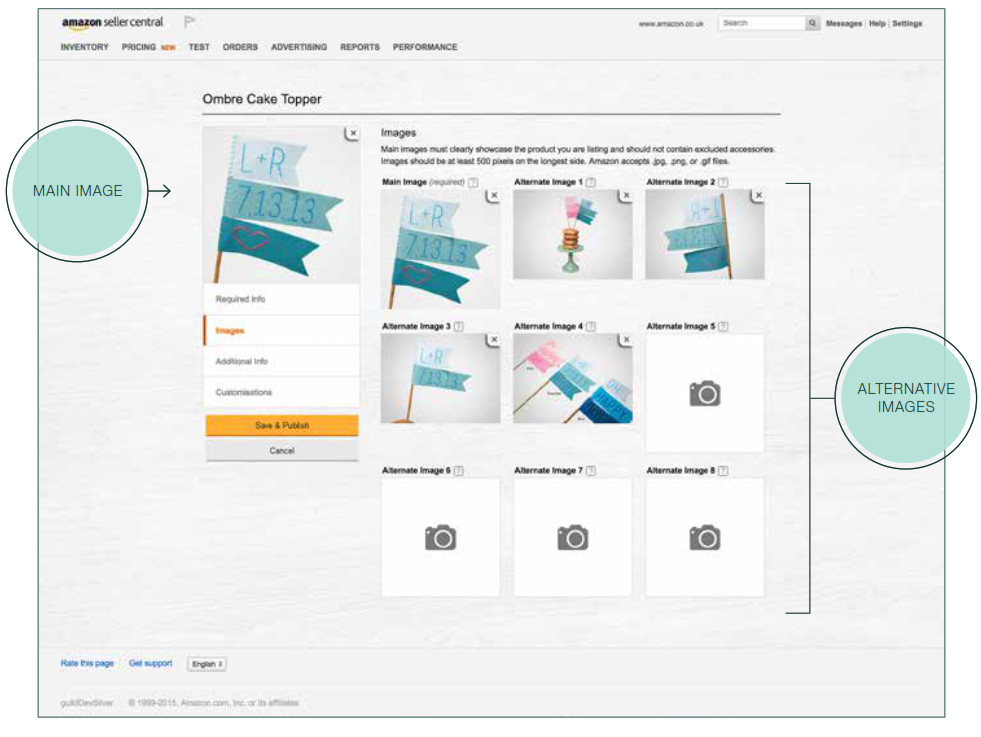
IMAGES
Images are the first step to attract customers. The more clearly your images show your product and convey your aesthetic as an artisan, the more customers you will attract.
The Main Image should clearly show the product without props, distractions, or watermarks and also be consistent with the Product Title and Description. Use a neutral background that doesn’t detract from the product. The Alternative Images should show more of the product’s details, the scale of the product or what the available customizations look like. Find out more about images starting on page 26.
ADDITIONAL INFO
Customers want to know all about the products that you make. Adding as much product information as possible will not only help customers feel confident that they know exactly what they are purchasing, but will make your products easier to discover.
- How your products are made – Use this field to highlight materials and processes used to hand make this product. This will be displayed on the product page.
- Product Attributes – Use the drop-down menus, when available, to enter product attributes. These will appear on the product page and will help your products be discovered on Amazon.co.uk.
- Adult Products – If the images, Product Title or Product Description appear to be designed for use in a sexual or adult activity, indicate this by using the Adult field. More info about this field can be found in the Handmade Policies article in Seller Central.

- Keywords – Enter specific search terms or keywords to help customers find your products on Amazon.co.uk. Keywords should be focused on features of the product and should never include anything that misrepresents the product.
- Delivery Weight – Complete the Delivery Weight and Unit of Measurement fields if you choose weight-based delivery for your products.

CUSTOMISATIONS
When listing your handmade products on Amazon, you can set up to 10 product customizations for customers to choose from. Use customizations instead of creating a separate product when the customization does not dramatically impact the item’s look or price. These can be existing attributes like size or color, or something entirely different like “monogrammed letters” or “city” for a set of customized map coasters.
 A-List of OptionsAdd customization options for customers to choose from. Tip: Use for sizes, colours, etc.

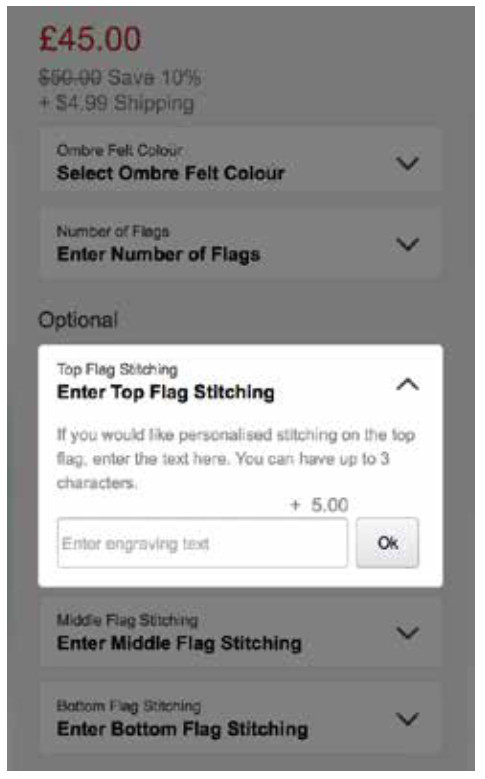
Text EntryProvide customers with a text entry box to customize this product.Tip: Use for engravings, monograms, etc

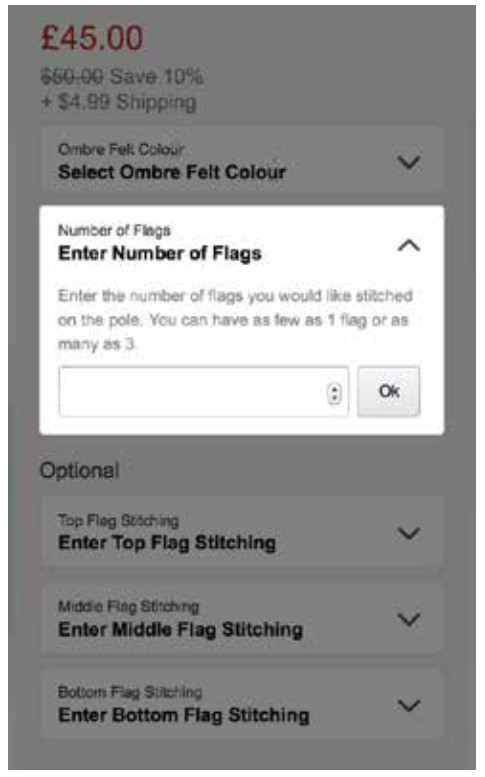
Number EntryProvide customers with a number entry box to customise this product.Tip: Use for custom widths, heights, etc.
TIPS FOR SETTING UP A CUSTOMISATION
To start creating customization, select Customisations from the navigation panel to go to the main customizations screen, click the plus sign to add new customization, and choose which type you want to create.Anytime you create a customization option for one of your products, you’ll need to complete the following information first:
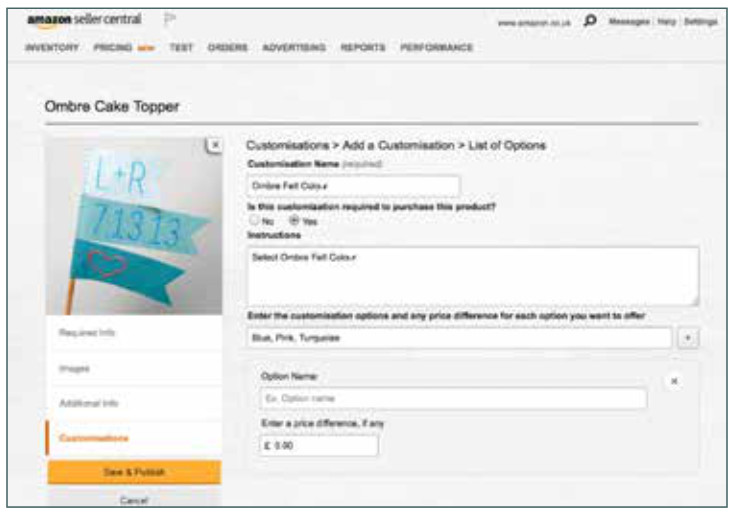
- Customization Name: Give your customization a name that describes what you are creating. It should be capitalized, short and clearly reflect the available options.
- Required vs Optional: Specify if the customization is required for customers to purchase the item. If it’s required, customers will not be able to add the item to their basket and check out until they have selected an option.
- Instructions: Provide a short set of instructions to customers to accompany the customization.
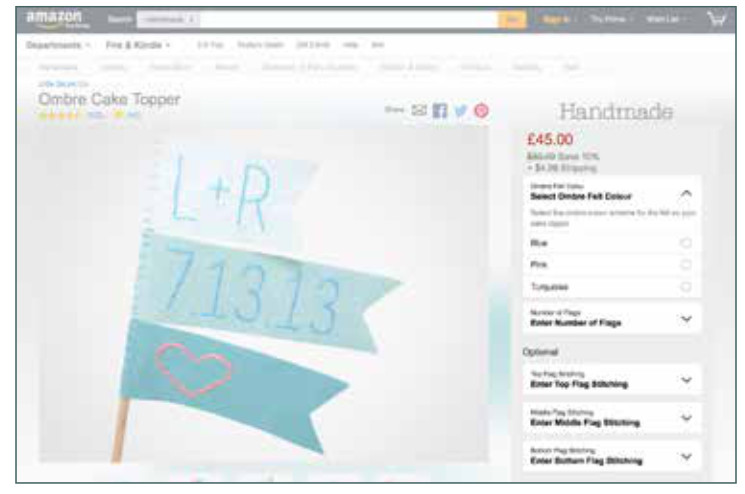
Creating a CustomisationThis is what the Add a Product tool will look like when you create a customization.
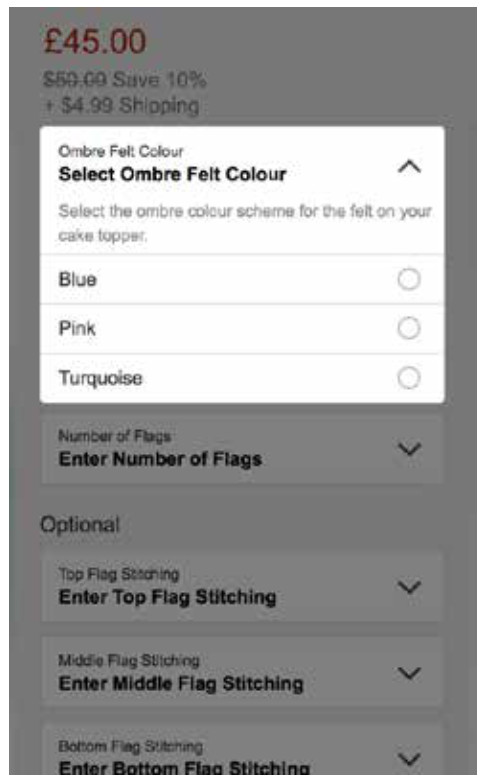
Viewing Customisations on Amazon.co.ukAnd this is what customers will see on Amazon.co.uk on the product page when they click “Select Options.”
Tips for creating a List of Options for customisation: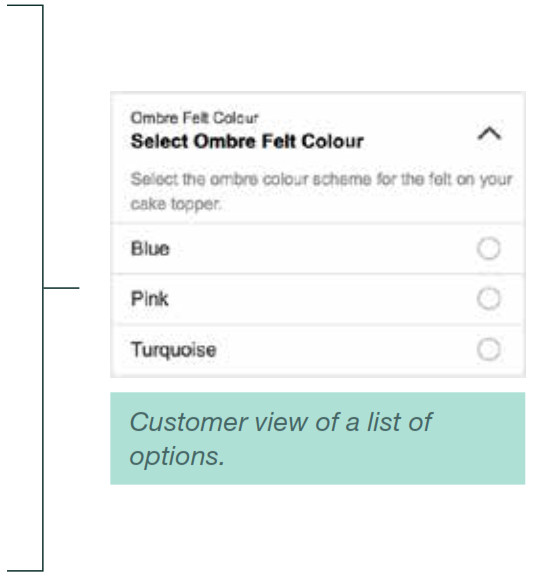
Enter up to 20 options for customers to select from. You can enter options in bulk, using a comma to separate them (e.g.Blue, Pink, Turquoise) or enter them one at a time.
Each option can have a price difference. If the customisation is required for purchase, one of the options must be £0.
When a customisation is required, make sure you include the product shown in the Main Image as an option. In this example, if your Main Image shows blue felt, include Blue, Pink and Turquoise as options.

Tips for creating a Text or Number Entry customization:You can enter a price difference for both customization types if the customization is optional and not required for purchase.(e.g. +£5.00)Make sure you specify the minimum and maximum number of characters or numbers you will accept.Provide customers with Alternative Images showing the placement of the text or number customisation.
MULTIPLE CUSTOMISATIONS
If you offer multiple customisations on the same product, you can change the order they will appear on the product page by dragging and dropping them into a new order on the main customisations screen.The Main Image should be the product you want to feature, but make sure you include images that visually represent the other customisation options you offer. You’re able to upload up to 8 AlternativeImages and these should highlight the differences.Remember, if the customizations you offer dramatically impact the product’s look or price, create separate listings to avoid customer confusion.

In the Images section of the Add a Product tool, upload Alternative Images to accompany your Main Image. Here the artisan has included example images of customization options for coluors, text entry, and the number of flags.
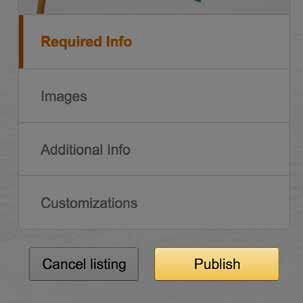
PUBLISH
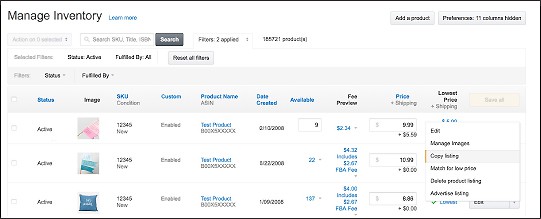
To complete your listing, simply click Save & Publish. After 15 minutes, you’ll be able to review the listing in the Manage Inventory section of Seller Central. You can come back and make changes to your listings at any time. Each time you publish a listing, you will receive an email notification. You can disable these by going to Settings in Seller Central and clicking Notification Preferences.
Once your listing has been published you can view it in the Manage Inventory page. To preview your product page, click the title of the product you would like to view and you’ll be taken directly to that product page. Clicking Edit allows you to make changes to the listing.
COPY A LISTING
Once you’ve listed a product, you can copy that listing to create a new, similar product in the same category. Doing so will transfer most of the product information so you can easily list more products.There are a few things to keep in mind when you copy a listing:
- The listing must be in the same category as the original product you’re copying and the categorycannot be edited.
- Product images aren’t transferred from the original product you’re copying, but all of your customizations and additional info attributes are transferred.
To copy a listing:
- From the Inventory menu, click Manage Inventory.
- On the Manage Inventory page, scroll through your products or use the search box to find the listing you would like to copy.
- On the right side of the product, you want to copy, select Copy Listing from the drop-down menu.This will open the Add a Product tool, where much of the information from the original product, including customizations, is copied for you.

- To complete your new listing, upload a Main Image and update the Title of your product on the Required Info page. If you would like to assign a SKU to your new product, you can do so in the Additional Info section. If you don’t enter a SKU, Amazon will assign one for you.
- Click Save & Publish for your new listing now or continue updating the other information.
PRODUCT IMAGE GUIDELINES

PRODUCT IMAGES INTRODUCTION
High-quality product images display your work in the best manner and help drive discoverability. Customers shop visually, based on images that target their individual taste. Quality images are one of the most important factors when shopping for handmade products.
This section is intended to help guide imaging decisions that represent your artistic craftsmanship, but also utilise Amazon’s proven image guidelines to help grow your business.A typical Amazon product page has 1-4 images. Keep the following tips in mind as you prepare your product images:
- The Main Image should always show the product clearly, without props or distractions.
- The Main Image should ideally be on a white, light or neutral background that doesn’t detract from the edges of the product.
- Alternative Images should show environment, lifestyle, product detail or scale of product.

GETTING STARTED
What makes an attractive product image to an Amazon customer? Here are some product styling tips to help you get started.
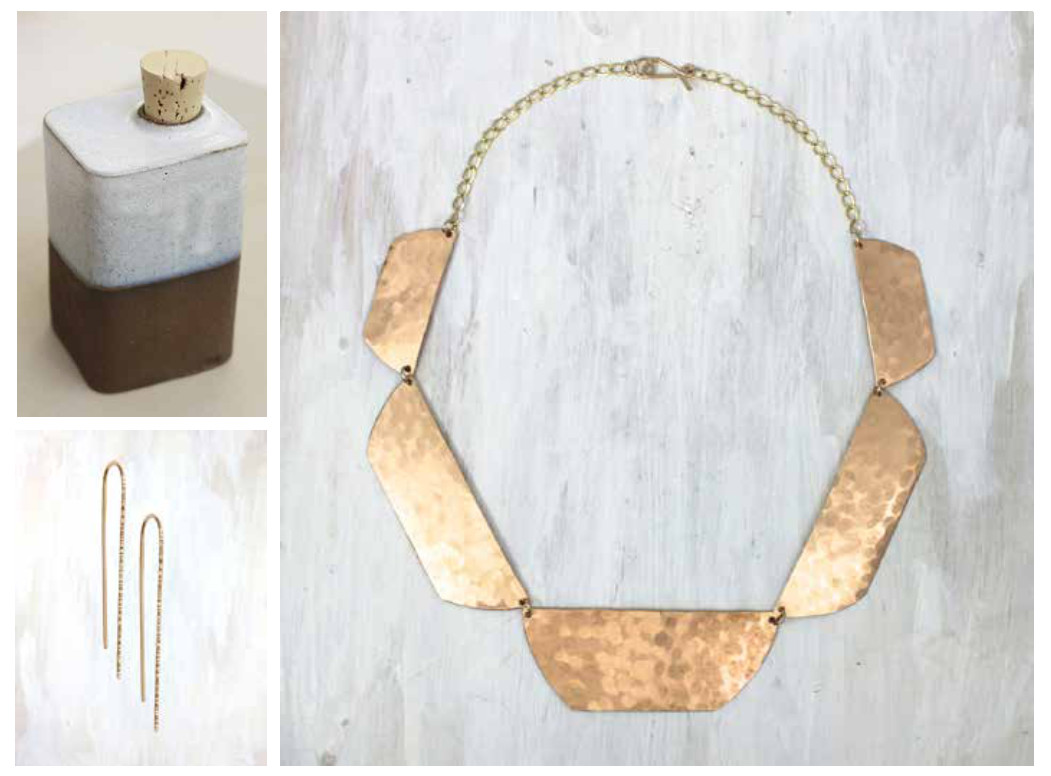
- The Main Image should show the entire product unless the focal point is disproportionate to the entire piece. For example, showing the whole necklace when the focal point is a small pendant might not give your customer all the information they need to make a purchase.
- The product should typically fill at least 85% of the frame. If the product is shown in an environment, it should fill at least 50%.
- The product should be thoughtfully laid out. For example, pay attention to chain detail or the placement within the image space.
- The product should have sharp focus and ideally not a shallow depth of field.
- Avoid props in the Main Image (customers could think they’ll receive the additional items with their purchase). However, use props in Alternative Images to show scale or an item’s intended purpose.
- Avoid showing multiple products in the Main Image (customers might think they are getting more than one item).Here are our best practices for photography settings and image sizes.
- All images need the camera facing straight into the product, level with the lowest point of the product.
- All Main Images should be free of distractions in the background and be photographed on neutral backgrounds that don’t interfere with the product.
- Photographs should be sharply focused, with a larger depth of field for the Main Image.
- For alternate images, a shallower depth of field can be used to highlight a specific characteristic of the product.
- All images must be either a. JPG, PNG or. GIF file.
- All images must be at least 500 pixels on the shortest side (height or width).
- To support zooming, images must be at least 500 pixels on the shortest side and 1000 pixels on the longest side. This will allow for image quality to be retained when customers zoom in to see details.
 Here are our best practices for photography settings and image sizes.
![]()

Here’s an example of the zoom feature, enabled here for customers because the artisan’s source image met the requirements of having the longest side be at least 1000 pixels wide.
PRODUCT IMAGES BACKGROUNDS
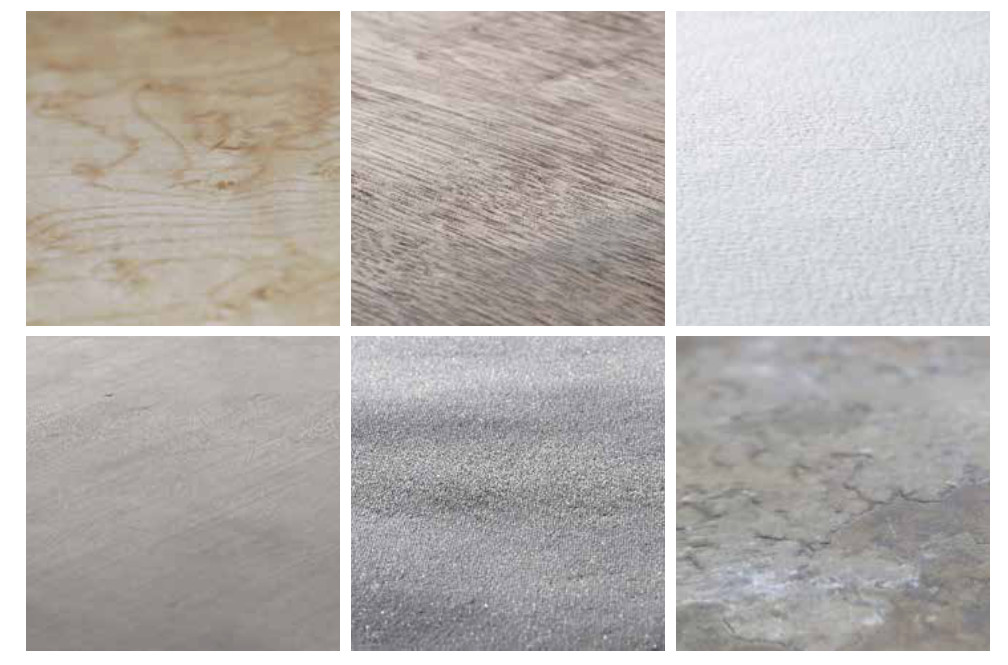
A background free of distractions for Main Images presents the best experience for customers. Use a white background to ensure that colour is not reflected in the product.
Most Main Images on Amazon use a white background. However, using a neutral background is acceptable. Examples of neutral backgrounds include subdued colors like grey and beige or attractive surfaces like wood, metal, or watercolor paper.
WHAT MAKES A GOOD PRODUCT IMAGE?
Remember these three key points:
- The Main Image should always show the product clearly, without props and distractions.
- The Main Image should ideally be on a white, light or neutral background that does not detract from the edges of the product.
- Alternative Images should be used to show environment, lifestyle, product detail, packaging or scale of product. They should also be used to show available customisation options.
WHAT SHOULD I AVOID?
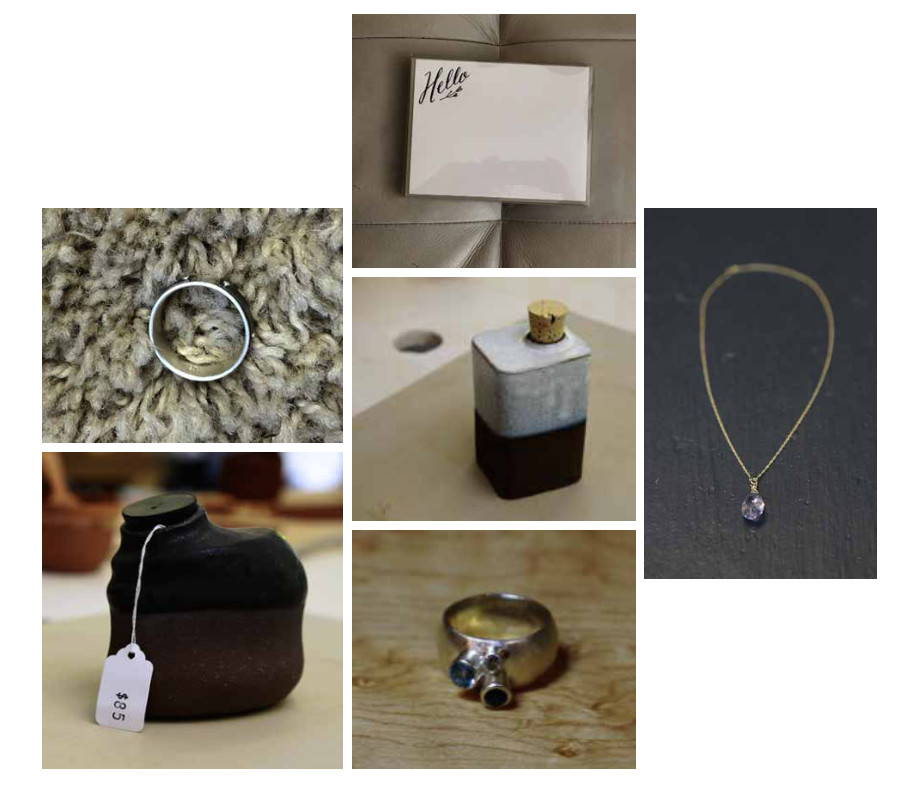
- Watch out for backgrounds that are too similar to the product colour, blend in, or hide the product.
- Be careful of backgrounds that are too dark or alter product details. This is especially important for jewelry, reflective or translucent products
- Crop distracting shapes that appear in the background. These can detract from your product.
- Look for reflections of the photographer in your images, since this can distract from the product.
- Make sure the product is well lit and in focus. When the product isn’t well lit, customers could miss out on the craftsmanship and detail of the product.
- Don’t include price tags in the images.
GLOSSARY
HANDMADE AT AMAZON GLOSSARY
AAdd a ProductAn online tool in Seller Central that you can use to list your products on Amazon.co.uk by entering basic product information, pricing and images. You can also use this tool to add customisations to your products.Artisan ProfileYour Artisan Profile page is your shop and it tells potential customers all about your style, inspiration and craftsmanship through images and text you upload through the Artisan Profile Editor. You need to complete all of the required information for your Artisan Profile page before you can list products, but you can come back and edit that information at any time.Artisan Profile EditorThe tool used to collect information for your Artisan Profile page, including Artisan Profile picture, store name, images of your studio workspace, and information about your inspiration and production methods.Artisan Store NameThe distinct name of your store for handcrafted products on Amazon. This name should mirror the name of your own website or the name you use at events and shows.Artisan Store URLThe URL for your Artisan Profile page on Amazon.co.uk. A URL will be auto-generated for you. However, you can change it in the Artisan Editor.ASINThe acronym for Amazon Standard Identification Number, a 10-digit alphanumeric number that identifies a product in our catalog. Every product is automatically assigned its own unique ASIN.A-to-Z GuaranteeThe reimbursement available to all customers and applicable to all purchases made through Payments by Amazon.The A-to-Z Guarantee covers orders that never reach the customer or that are materially different to the customer’s expectations. When customers want reimbursement for an order, they file an A-to-z Guarantee claim.
BBrowse StructureThe way Amazon organises products hierarchically so that customers can browse products by categories. The category and sub-category information you enter when listing a product is important to help customers find your products while browsing on Amazon.Buy BoxThe box on the upper right of the product detail page where customers can begin the purchasing process. Customers can review and select from available customization choices and add items to their shopping baskets.
CCraftYour craft will be displayed to customers on your Artisan Profile page and should tell customers your specific areas of expertise.Customer MetricsAs an artisan, you are provided with a report of your overall performance called Customer Metrics. The Customer Metrics report offers insight into how you are doing with respect to customer satisfaction. This report includes performance measures like the percentage of orders that have received negative feedback, an A- to-Z Guarantee claim and service credit card chargebacks. You can access this information anytime in the Reports section of Seller Central.CustomisationArtisans who list products in Handmade at Amazon can configure each item with up to 10 customisations for customers to choose from. You can set up these options as a List of Options, Text Entry or Number Entry.
List of OptionsA list of customisation choices (up to 20) for a specific product. You can provide customers with specific instructions for each customisation option in the list and set different prices for each customisation option.Text EntryA customisation option for a specific product that allows the customer to enter text from the product page. You can provide specific details about how the text will be used on the product and also set character limits.Number EntryA customisation option for a specific product that allows the customer to enter numbers from the product page. You can provide specific details about how the numbers will be used for the product and also set character limits.
FFeedbackCustomers can leave comments on your profile after they have purchased one of your products. Any customer can view your overall feedback score and individual comments on your Artisan Profile page or your Seller at a Glance page. Amazon calculates feedback scores using a 1-to-5 star system and percentages of positive, neutral, and negative ratings. You can view ratings in more detail and respond to feedback using the Feedback Manager tool.
KKeywordsKeywords make it easier for customers to find your products. Choose search keywords that include attributes of the product that are not already in the product title.
PProduction TimeThe number of days (up to 30) that you need to make your product from when the order is received until it is ready to send.This should include any time required to complete customisations.Product PageEach product is displayed on a single page that includes all of the details about the product, including images, reviews, price, and more. This is the page where customers purchase your products and includes information you enter when you list your item.
Product TitleThe title of your product should be short and sweet and only describe the basic information of your product. This will be the title that appears everywhere on Amazon.Profile PictureYou can upload your Artisan Profile Picture through the Artisan Profile Editor. It will be displayed to customers on your product pages and your Artisan Profile page. This can be a picture of yourself or of something that is representative of you, your style, and the products you create, so customers can establish a connection with you.
RReferral FeeEach time a customer chooses to buy your product, they are considered to have been referred by Amazon.co.uk to your company for that purchase. Amazon applies a referral fee that is a percentage of the sales proceeds from your transaction.You can find the applicable percentages on the Selling on Amazon Fee Schedule at the time of your transaction, based on the categorisation of the type of product. These funds are withheld from the settlement of that transaction. For more information, refer to your Amazon Services Business Solutions Agreement.
SSeller at a Glance PageYour Seller at a Glance Page summarises your shipping rates, policies and feedback in one place for your customers to read.You can customise the information that appears there in your Account Settings.Seller CentralSeller Central is the user interface for accessing all tools and information necessary to manage your business on Amazon.co.uk. You can use Seller Central to list your items for sale, fulfill your orders, see your account balance and more. Seller Central also has a Help section in which you can find instructions on how to use tools, information about our programmes, tips on increasing sales and more.SKUThe acronym for Stock-Keeping Unit. A SKU is your unique product identifier. It can be a combination of letters and numbers that is used to track your product and will be automatically generated unless you choose to enter one yourself.Dispatch ConfirmationAfter a customer places an order, you must confirm dispatch on Seller Central. This process includes providing the date you dispatched the order, the delivery or courier service (such as DHL) and method (such as First Class) that you used, and the Tracking ID supplied by the delivery or courier service. This information is automatically provided to the customer.You will not be paid for an order until dispatch has been confirmed. If you fail to confirm a dispatch within 30 days, Amazon will automatically cancel the order and the customer will not be charged.Store Cover ImageYour Store Cover Image will appear at the top of your Artisan Profile page to show customers your workspace or studio. You can also tag your products in this image to market to customers.
STILL, HAVE QUESTIONS?
Use the Contact Us link in your Seller Central account to drop us a line.– The Handmade at Amazon team

REV. 08.30.16 PDF GB
Handmade at amazon Style Guide – Handmade at amazon Style Guide –
[xyz-ips snippet=”download-snippet”]