
Login with Amazon Getting Started Guide for iOS

Login with Amazon: Getting Started Guide for iOS
Copyright © 2016 Amazon.com, Inc., or its affiliates. All rights reserved.Amazon and the Amazon logo are trademarks of Amazon.com, Inc. or its affiliates. All other trademarks not owned by Amazon are the property of their respective owners.
Getting Started for iOS
In this guide we will show you how to add Login with Amazon to your iOS app. After completing this guide you should have a working Login with Amazon button in your app to allow users to log in with their Amazon credentials
Installing Xcode
The Login with Amazon SDK for iOS is provided by Amazon to help you add Login with Amazon to your iOS application. The SDK is intended to be used with the Xcode development environment. The SDK supports apps running on iOS 7.0 and later using ARMv7, ARMv7s, ARM64, i386, andx86_64.
You can install Xcode from the Mac App Store. For more information, see Xcode: What’s New on developer.apple.com.
After Xcode is installed, you can Install the Login with Amazon SDK for iOS and Run the Sample App, as described below.
Install the Login with Amazon SDK for iOS
The Login with Amazon SDK for iOS comes in two packages. The first contains the iOS library and supporting documentation. The second contains a sample application that allows a user to log in and view their profile data.
If you have not yet installed Xcode, see the instructions in the Install Xcode section above.
- Download LoginWithAmazonSDKForiOS.zip and extract the files to a directory on your hard drive.You should see a LoginWithAmazon.framework directory. This contains the Login with Amazon library.At the top level of the zip is a LoginWithAmazon.doc set directory. This contains the API documentation.
- See Install the Login with Amazon Library for instructions on how to add the library to an iOS project.
When the Login with Amazon SDK for iOS is installed, you can Create a New Login with Amazon Project after Registering with Login with Amazon.
Run the Sample App
To run the sample application, open the sample in Xcode.
- Download SampleLoginWithAmazonAppForiOS.zip and copy theSampleLoginWithAmazonAppForiOS directory to your Documents folder.
- Start Xcode. If the Welcome to Xcode dialog pops up, click Open Other. Otherwise, from the main menu, click File and select Open.
- Select the Documents folder, and selectSampleLoginWithAmazonAppForiOS/LoginWithAmazonSample/ LoginWithAmazonSample.xcodeproj. Click Open.
- The sample project should now load. When it is finished, choose Product from the main menu and select Run
Registering with Login with Amazon
Before you can use Login with Amazon on a website or in a mobile app, you must register an application with Login with Amazon. Your Login with Amazon application is the registration that contains basic information about your business, and information about each website or mobile app you create that supports Login with Amazon. This business information is displayed to users each time they use Login with Amazon on your website or mobile app. Users will see the name of your application, your logo, and a link to your privacy policy. These steps demonstrate how to register a Login with Amazon application and add an iOS app to that account.
See the following topics
- Register Your Login with Amazon Application
- Add an iOS App to a Security Profile
- iOS Bundle ID and API Keyso Determine a Bundle Identifier for an iOS Appo Retrieve an iOS API Key
Register Your Login with Amazon Application
- Go to https://login.amazon.com.
- If you have signed up for Login with Amazon before, click App Console. Otherwise, click Sign Up.You will be redirected to Seller Central, which handles application registration for Login with Amazon. If this is your first time using Seller Central, you will be asked to set up a Seller Central account.
- Click Register New Application. The Register Your Application form will appear:
 a. In the Register Your Application form, enter a Name and a Description for your application.The Name is the name displayed on the consent screen when users agree to share information with your application. This name applies to Android, iOS, and website versions of your application.b. Enter a Privacy Notice URL for your application.The Privacy Notice URL is the location of your company’s or application’s privacy policy (for example, http://www.example.com/privacy.html). This link is displayed to users on the consent screen.c. If you want to add a Logo Image for your application, click Browse and locate the applicable image.This logo is displayed on the sign-in and consent screen to represent your business or website. The logo will be shrunk to 50 pixels in height if it is taller than 50 pixels; there is no limitation on the width of the logo.
 - Click Save. Your sample registration should look similar to this:After your basic application settings are saved, you can add settings for specific websites and mobile apps that will use this Login with Amazon account.
 a. In the Register Your Application form, enter a Name and a Description for your application.The Name is the name displayed on the consent screen when users agree to share information with your application. This name applies to Android, iOS, and website versions of your application.b. Enter a Privacy Notice URL for your application.The Privacy Notice URL is the location of your company’s or application’s privacy policy (for example, http://www.example.com/privacy.html). This link is displayed to users on the consent screen.c. If you want to add a Logo Image for your application, click Browse and locate the applicable image.This logo is displayed on the sign-in and consent screen to represent your business or website. The logo will be shrunk to 50 pixels in height if it is taller than 50 pixels; there is no limitation on the width of the logo.
If different versions of your app have different bundle IDs, such as for one or more testing versions and a production version, each version requires its own API Key. From the iOS Settings of your app, click the Add API Key button to create additional keys for your app (one per version).
Add an iOS App to a Security Profile
After your basic application settings are saved, you can add settings for specific websites and mobile apps that will use this Login with Amazon account.
To register an iOS App, you have to specify the Bundle identifier for the app project. Login with Amazon will use the bundle ID to generate an API key. The API key will grant your app access to the Login with Amazon authorization service. Follow these steps to add an iOS app to your account:
- From the Application screen, click iOS Settings. If you already have an iOS app registered, look for the Add API Key button in the iOS Settings section.The iOS Application Details form will appear:
- Enter the Label of your iOS App. This does not have to be the official name of your app. It simply identifies this particular iOS app among the apps and websites registered to your Login with Amazon application.
- Enter your Bundle ID. This must match the bundle identifier of your iOS project. To determine your bundle identifier, open the project in Xcode. Open the properties list for the project (<project>-Info.plist) in the Project Navigator. The Bundle identifier is one of the properties in the list.
- Click Save.

iOS Bundle ID and API Keys
The Bundle identifier is unique to every iOS app. Login with Amazon uses the Bundle ID to construct your API Key. The API Key enables the Login with Amazon authorization service to recognize your app.
Determine a Bundle Identifier for an iOS App
- Open your app project in Xcode.
- Open the Information Property List for the project (<project>-Info.plist) in the Project Navigator.
- Find Bundle identifier in the list of properties.
Retrieve an iOS API Key
After you have registered an iOS version and provided a Bundle ID, you can retrieve the API key from the registration page for your Login with Amazon application. You will need to place that API key into your project’s property list. Until you do, the app will not be authorized to communicate with the Login with Amazon authorization service.
1. Go to https://login.amazon.com.2. Click App Console.3. In the Apps box, click your application.4. Find your iOS app under the iOS Settings section. If you have not already registered an iOS app, see Add an iOS App to a Security Profile.5. Click Generate API Key Value. A popup window will display your API key. To copy the key, click Select All to select the entire key.Note: The API Key Value is based, in part, on the time it is generated. Thus, subsequent API Key Value(s) you generate may differ from the original. You can use any of these API Key Values in your app as they are all valid.6. See Add Your API Key to Your App Property List for instructions on adding the API key to your iOS app
Creating a Login with Amazon Project
In this section, you will learn how to create a new Xcode project for Login with Amazon and configure the project.
See the following topics:
- Create a New Login with Amazon Project
- Install the Login with Amazon Library
- Add Your API Key to Your App Property List
- Add a URL Scheme to Your App Property List
- Add an App Transport Security Exception for Amazon to Your App Property ListNOTE: This new step is currently required when developing on the iOS 9 SDK
- Add a Login with Amazon Button to Your App
Create a New Login with Amazon Project
If you do not yet have an app project for using Login with Amazon, follow the instructions below to create one. If you have an existing app, skip to the Install the Login with Amazon Library section below.
- Launch Xcode.
- If you are presented with a Welcome to Xcode dialog, select Create a New Xcode Project.Otherwise, from the File menu, select New and Project.
- Select the type of project you wish to create and click Next.
- Enter a Product Name and a Company Identifier. Note your Bundle Identifier, and click Next.
- Select a location in which to store your project and click Create.You will now have a new project that you can use to call Login with Amazon.
Install the Login with Amazon Library
If you have not yet downloaded the Login with Amazon SDK for iOS, see Install the Login with Amazon SDK for iOS.
A Login with Amazon project must link the LoginWithAmazon.framework and Security.framework libraries. You will also need to configure the framework search path to find the Login with Amazon headers
- With your project open in Xcode, select the Frameworks folder, click File from the main menu, and then select Add Files to “project”.
- In the dialog, select LoginWithAmazon.framework and clickAdd.If you used the Login with Amazon 1.0 library, delete the login-with-amazon sdk directory and login-with-amazon-sdk.a from the Frameworks folder. Click Edit from the main menu and select Delete.
- Select the name of your project in the Project Navigator.The Project Editor will appear in the editor area of the Xcode workspace.
- Click your project name under Targets, and select Build Phases. Expand Link Binary with Libraries and click the plus sign to add a library.
- In the search box, enter Security.framework. Select Security.framework andclick Add.
- In the search box, enter SafariServices.framework. Select SafariServices.framework and click Add.
- In the search box, enter CoreGraphics.framework. Select CoreGraphics.framework and click Add
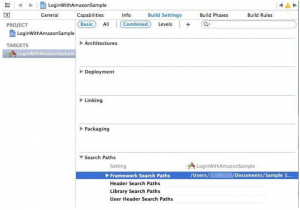
- Select Build Settings. Click All to view all settings.
- Under Search Paths, ensure that the LoginWithAmazon.framework directory is in the Framework Search Paths.For example:If you used the Login with Amazon 1.0 library, you can remove any references to the 1.0 library path in the Header Search Paths or Library Search Paths.
- From the main menu, click Product and select Build. The build should complete successfully.Before building your project, if you used the Login with Amazon 1.0 library, replace #import “AIMobileLib.h”, #import “AIAuthenticationDelegate.h”, or #import “AIError.h” in your source files with #import<LoginWithAmazon/LoginWithAmazon.h>.LoginWithAmazon.h includes all of the Login with Amazon headers at once.
 If you used the Login with Amazon 1.0 library, you can remove any references to the 1.0 library path in the Header Search Paths or Library Search Paths.
Add Your API Key to Your App Property List
When you register your iOS application with Login with Amazon, you are assigned an API key. This is an identifier that the Amazon Mobile Library will use to identify your application to the Login with Amazon authorization service. The Amazon Mobile Library loads this value at runtime from the API Key property value in your application’s Information Property List.
- With your project open, select the Supporting Files folder, then select the <project>-Info.plist file (where <project> is the name of your project). This should open the property list for editing:
- Make sure that none of the entries are selected. Then, from the main menu, click Editor, and Add Item. Enter APIKey and press Enter.
- Double-click under the Value column to add a value. Paste your API Key as the value.

Add a URL Scheme to Your App Property List
When the user logs in, they will be presented with an Amazon login page. In order for your app to receive confirmation of their login, you must add a URL scheme so that the web page can redirect back to your app. The URL scheme must be declared as amzn-<bundleID> (for example, amzncom.example.app). For more information, see Using URL Schemes to Communicate with Apps on developer.apple.com.
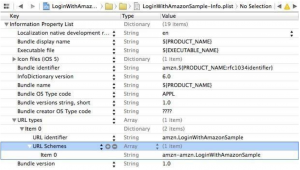
- With your project open, select the Supporting Files folder, then select the <project>-Info.plist file (where <project> is the name of your project). This should open the property list for editing:
- Make sure that none of the entries are selected. Then, from the main menu, click Editor, and Add Item. Enter or select URL types and press Enter.
- Expand URL types to reveal Item 0. Select Item 0 and, from the main menu, click Editor and Add Item. Enter or select URL Identifier and press Enter.
- Select Item 0 under URL Identifier and double-click under the Value column to add a value. The value is your bundle ID. You can find your bundle ID listed as Bundle identifier in the property list.
- Select Item 0 under URL types and, from the main menu, click Editor and Add Item. Enter or select URL Schemes and press Enter.
- Select Item 0 under URL Schemes and double-click under the Value column to add a value. The value is your bundle ID with amzn- prepended (for example, amzn com.example.app). You can find your bundle ID listed as Bundle identifier in the property list.
Add an App Transport Security Exception for Amazon to Your AppProperty List
Starting with iOS 9, Apple enforces App Transport Security (ATS) for secure connections between an app and web services. The endpoint (api.amazon.com) the Login with Amazon SDK interacts with to exchange information doesn’t conform to ATS yet. Add an exception for api.amazon.com to enable a seamless communication between the SDK and the Amazon server.
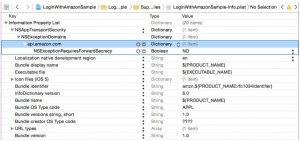
- With your project open, select the Supporting Files folder, then select the <project>-Info.plist file (where <project> is the name of your project). This should open the property list forediting:
- Make sure that none of the entries are Then, from the main menu, click Editor, and Add Item. Enter or select NSAppTransportSecurity and press Enter.
- Expand NSAppTransportSecurity and, from the main menu, click Editor and Add Item. Enter or select NSExceptionDomains and press Enter.
- Expand NSExceptionDomains and, from the main menu, click Editor and Add Item. Enter amazon.com and press Enter.
- Expand amazon.com and, from the main menu, click Editor and Add Item.Enter NSExceptionRequiresForwardSecrecy and press Enter.
- Select NSExceptionRequiresForwardSecrecy and double-click under the Value column to add a Select a Type of Boolean and a Value of NO.
Login with Amazon provides several standard buttons you can use to prompt users to log in from your app. This section gives steps for downloading an official Login with Amazon image and pairing it with an iOS UIButton.
- Add a standard UIButton to your app.For tutorials and information on how to add a button to an app, see Creating and Configuring View Objects and Start Developing iOS Apps Today on developer.apple.com.
- Add the Touch Up Inside event for the button to a method named onLoginButtonClicked. Leave the implementation blank for now. The Creating and Configuring View Objects and Start Developing iOS Apps Today documents on apple.com include steps on adding a button event.
- Choose a button image.Consult our Login with Amazon Style Guidelines for a list of buttons that you can use in your app. Download a copy of the LWA_for_iOS.zip file. Find your preferred button in both the 1x and 2xdirectories and extract them from the zip. Extract the _Pressed version of your button if you want to show the button in a Selected state.
- Add the images to your project.a. In Xcode, with your project loaded, click File from the main menu and select Add Files to “project”.b. In the dialog, select the button image file(s) that you downloaded and click Add.c. The buttons should now be in the project under your project directory. Move them to the Supporting Filesfolder.
- Add the image to your button.To enable the image for your button, you can modify the button attribute or use the setImage:forState method on the UIButton object. Follow these steps to modify the image attribute for your button:a. Open the storyboard for your app.b. Select the button in your storyboard by clicking it or selecting it from the View Controller Scene tree.c. In the Utilities window, open the Attributes Inspector.d. At the top of the Attribute Inspector, set the Type of button to System.e. In the second group of settings, select Default for State Config.f. In the second group of settings, drop down the Image setting.g. Select the Login with Amazon button graphic you added to the project. Do not select the 2x version: it will be loaded automatically on high density display (Retina)devices.h. Set the same image for the Background setting.i. If you want to specify a pressed version of the button, select Selected for State Config, and set the Image to the _Pressed version of your button.j. On the storyboard, adjust the size of your button to accommodate the image, if necessary.
 d. At the top of the Attribute Inspector, set the Type of button to System.e. In the second group of settings, select Default for State Config.f. In the second group of settings, drop down the Image setting.g. Select the Login with Amazon button graphic you added to the project. Do not select the 2x version: it will be loaded automatically on high density display (Retina)devices.h. Set the same image for the Background setting.i. If you want to specify a pressed version of the button, select Selected for State Config, and set the Image to the _Pressed version of your button.j. On the storyboard, adjust the size of your button to accommodate the image, if necessary.
Using the SDK for iOS APIs
In this section, you will add code to your project to sign in a user with Login with Amazon.See the following topics:
- Handle the Login Button and Get Profile Data
- Check for User Login at Startup
- Clear Authorization State and Log Out a User
This section explains how to call the authorizeUserForScopes:delegate: and getProfile:APIs to log in a user and retrieve their profile data. This includes creating an onLoginButtonClicked:listener for your Login with Amazon button.
- Add Login with Amazon to your iOS project. See Install the Login with Amazon Library.
- Import the Login with Amazon API to your source file.To import the Login with Amazon API, add the following #importstatements to your source file:
#import <LoginWithAmazon/LoginWithAmazon.h> - Create the AMZNAuthorizeUserDelegateclass to implementAIAuthenticationDelegate.When authorizeUserForScopes:delegate: completes, it will call the requestDidSucceed: or requestDidFail: method on an object that implements the AIAuthenticationDelegate protocol.
@interface AMZNAuthorizeUserDelegate : NSObject<AIAuthenticationDelegate> @end For more information, see Working with Protocols on developer.apple.com.
- Call authorizeUserForScopes:delegate: in onLoginButtonClicked.If you followed the steps in Add a Login with Amazon Button to Your App, you should have an onLoginButtonClicked:method linked to a Login with Amazon button. In that method, call authorizeUserForScopes:delegate:to prompt the user to log in and authorize your application.This method will enable the user to sign in and consent to the requested information in one of the following ways:1.) Switches to web view in a secure context (if the Amazon Shopping app is installed to the device)2.) Switches to Safari View Controller (on iOS 9 and later)3.) Switches to the system browser (on iOS 8 and earlier)The secure context for the first option is available when the Amazon Shopping app is installed to the device. If the user is already signed in to the Amazon Shopping app, the sign in page is skipped, leading to a Single Sign-On (SSO) experience.
When your application is authorized, it is authorized for one or more data sets known as scopes. The first parameter is an array of scopes that encompass the user data you are requesting from Login with Amazon. The first time a user logs in to your app, they will be presented with a list of the data you are requesting and asked for approval. Login with Amazon currently supports three scopes: profile, which contains the user’s name, email address, and Amazon account id; profile:user_id, which contains only the Amazon account id; and postal_code, which contains the user’s zip/postal code.The second parameter to authorizeUserForScopes:delegate: is an object that implements the AIAuthenticationDelegateprotocol, in this case an instance of the AMZNAuthorizeUserDelegate class.
– (IBAction)onLogInButtonClicked:(id)sender {// Make authorize call to SDK to get a secure access token// for the user.// While making the first call you can specify the minimum basic// scopes needed. // Requesting both scopes for the current user.NSArray *requestScopes =[NSArray arrayWithObjects:@”profile”, @”postal_code”, nil];
AMZNAuthorizeUserDelegate* delegate =[[AMZNAuthorizeUserDelegate alloc] initWithParentController:self];
[AIMobileLib authorizeUserForScopes:requestScopes delegate:delegate];
Add your delegate implementation header to the class callingauthorizeUserForScopes:. For example:
#import “AMZNAuthorizeUserDelegate.h” - Create an AMZNGetProfileDelegate.AMZNGetProfileDelegateis our name for a class that implements theAIAuthenticationDelegateprotocol, and will process the result of the getProfile: call. Like authorizeUserForScopes:delegate:, getProfile: supports the requestDidSucceed: and requestDidFail: protocol methods. requestDidSucceed: receives an APIResult object with profile data in the result property. requestDidFail: receives an AIError object with information on the error in the error property.To create a delegate class from a normal class declaration, importAIAuthenticationDelegate.hand add the protocol to the declaration in your class header file:
#import <LoginWithAmazon/LoginWithAmazon.h>@interface AMZNGetProfileDelegate : NSObject @end - Implement requestDidSucceed:for your AMZNAuthorizeUserDelegate. In requestDidSucceed:, call getProfile: to retrieve the customer profile. getProfile:, like authorizeUserForScopes:delegate:, uses the AIAuthenticationDelegate protocol.
– (void)requestDidSucceed:(APIResult *)apiResult {// Your code after the user authorizes application for// requested scopes. // Load new view controller with user identifying information// as the user is now successfully logged in.
AMZNGetProfileDelegate* delegate =[[[AMZNGetProfileDelegate alloc]initWithParentController:parentViewController] autorelease];[AIMobileLib getProfile:delegate];}
Add your delegate implementation header to the class calling getProfile:. Forexample:
#import “AMZNGetProfileDelegate.h” - Implement requestDidSucceed: for your AMZNGetProfileDelegate.requestDidSucceed:has two main tasks: to retrieve the profile data from the APIResult, and to pass the data to the UI.To retrieve the profile data from the APIResult, access the result property. For a getProfile:response, that property will contain a dictionary of property values for the user profile properties. The profile properties are name, email, and user_id for the profile scope andpostal_code for the postal_code scope.
– (void)requestDidSucceed:(APIResult *)apiResult {// Get profile request succeeded. Unpack the profile information// and pass it to the parent view controller NSString* name = [(NSDictionary*)apiResult.resultobjectForKey:@”name”];NSString* email = [(NSDictionary*)apiResult.resultobjectForKey:@”email”];NSString* user_id = [(NSDictionary*)apiResult.resultobjectForKey:@”user_id”];NSString* postal_code = [(NSDictionary*)apiResult.resultobjectForKey:@”postal_code”];
// Pass data to view controller}
- Implement requestDidFail: for your AMZNGetProfileDelegate.requestDidFail: includes an APIError object containing details about the error. showLogInPageis a hypothetical method that would reset the main view controller to show the Login with Amazon button.
– (void)requestDidFail:(APIError *)errorResponse {// Get Profile request failed for profile scope.// If error code = kAIApplicationNotAuthorized,// allow user to log in again.if(errorResponse.error.code == kAIApplicationNotAuthorized) {// Show authorize user button.[parentViewController showLogInPage];}else {// Handle other errors[[[[UIAlertView alloc] initWithTitle:@”” message:[NSStringstringWithFormat:@”Error occurred with message: %@”,errorResponse.error.message] delegate:nilcancelButtonTitle:@”OK”otherButtonTitles:nil] autorelease] show];}} - Implement requestDidFail:for your AMZNAuthorizeUserDelegate.
– (void)requestDidFail:(APIError *)errorResponse {NSString *message = errorResponse.error.message;// Your code when the authorization fails. [[[[UIAlertView alloc] initWithTitle:@”” message:[NSStringstringWithFormat:@”User authorization failed with message: %@”, errorResponse.error.message] delegate:nilcancelButtonTitle:@”OK”otherButtonTitles:nil] autorelease] show];}
10. Implement application:openURL:sourceApplication:annotation: in the class in your project that handles the UIApplicationDelegate protocol (by default this will be the AppDelegateclass in your project). When the app presents the Amazon login page, and the user completes login, it will redirect to the app using the URL Scheme the app registered earlier. That redirect is passed to application:openURL:sourceApplication:annotation:, which returns YES if the URL was successfully handled. handleOpenURL:sourceApplication: is an SDK library function that will handle Login with Amazon redirect URLs for you. If handleOpenURL:sourceApplication:returns YES, then the URL was handled.
– (BOOL)application:(UIApplication *)applicationopenURL:(NSURL *)urlsourceApplication:(NSString *)sourceApplicationannotation:(id)annotation{// Pass on the url to the SDK to parse authorization code // from the url.BOOL isValidRedirectSignInURL =[AIMobileLib handleOpenURL:urlsourceAppli cation :sour ceApplicati on) ;i f ( !isValidRedirect Si gnlnURL)return NO;// App may a l so want t o handl e url return YES ;} NOTE: This method is deprecated in iOS 9 but should be included in your project to maintain support for users on older platforms. For more information on application:openURL:sourceApplication:annotation:, see UIApplicationDelegate Protocol Reference on developer.apple.com.
Check for User Login at Startup
If a user logs into your app, closes the app, and restarts the app later, the app is still authorized to retrieve data. The user is not logged out automatically. At startup, you can show the user as logged in if your app is still authorized. This section explains how to usegetAccessTokenForScopes:withOverrideParams:delegate: to see if the app is still authorized.
- Create an AMZNGetAccessTokenDelegate class. AMZNGetAccessTokenDelegateimplements the AIAuthenticationDelegate protocol, and will process the result of thegetAccessTokenForScopes:withOverrideParams:delegate: call. AIAuthenticationDelegate contains two methods, requestDidSucceed: and requestDidFail:. requestDidSucceed: receives an APIResult object with token data, while requestDidFail: receives an APIError object with information on the error.
#import <LoginWithAmazon/LoginWithAmazon.h> @interface AMZNGetAccessTokenDelegate :NSObject<AIAuthenticationDelegate>
@end
Add your delegate implementation header to the class callinggetAccessTokenForScopes:withOverrideParams:delegate:. Forexample:
#import “AMZNGetAccessTokenDelegate.h” - On app startup, callgetAccessTokenForScopes:withOverrideParams:delegate: to see if the application is still authorized. getAccessTokenForScopes:withOverrideParams:delegate: retrieves the raw access token that Login with Amazon uses to access a customer profile. If the method succeeds, the app is still authorized and a call to getProfile: should succeed. getAccessTokenForScopes:withOverrideParams:delegate: uses the AIAuthenticationDelegate protocol in the same manner as authorizeUserForScopes:delegate:. Pass the object implementing the protocol as the delegate parameter.
– (void)checkIsUserSignedIn {AMZNGetAccessTokenDelegate* delegate =[[[AMZNGetAccessTokenDelegate alloc]initWithParentController:self] autorelease];NSArray *requestScopes =[NSArray arrayWithObjects:@”profile”, @”postal_code”, nil]; [AIMobileLib getAccessTokenForScopes:requestScopes withOverrideParams:nil delegate:delegate];} - Implement requestDidSucceed: on your AMZNGetAccessTokenDelegate. requestDidSucceed: has one task: to call getProfile:. This example calls getProfile: using the same listener you declared in the previous section (see steps 6-8).
#import “AMZNGetProfileDelegate.h”#import <LoginWithAmazon/LoginWithAmazon.h> – (void)requestDidSucceed:(APIResult *)apiResult {// Your code to use access token goes here.
// Since the application has authorization for our scopes, we can// get the user profile.AMZNGetProfileDelegate* delegate = [[[AMZNGetProfileDelegate alloc] initWithParentController:parentViewController] autorelease];
[AIMobileLib getProfile:delegate];}
- Implement requestDidFail: on your AMZNGetAccessTokenDelegate.requestDidFail: includes an APIError object containing details about the error. If you receive an error, you can reset the main view controller to show the Login with Amazon button.
– (void)requestDidFail:(APIError *)errorResponse {// Your code to handle failed retrieval of access token.// If error code = kAIApplicationNotAuthorized, allow user// to log in again.if(errorResponse.error.code == kAIApplicationNotAuthorized) {// Show Login with Amazon button.}else {// Handle other errors[[[[UIAlertView alloc] initWithTitle:@”” message:[NSStringstringWithFormat:@”Error occurred with message: %@”, errorResponse.error.message] delegate:nilcancelButtonTitle:@”OK” otherButtonTitles:nil]autorelease] show];}}
The clearAuthorizationState: method will clear the user’s authorization data from the AIMobileLib local data store. A user will have to log in again in order for the app to retrieve profile data. Use this method to log out a user, or to troubleshoot login problems in the app.
- Declare an AMZNLogoutDelegate. This is a class that implements theAIAuthenticationDelegateprotocol. For our purposes, we can inherit the class from NSObject:
#import <LoginWithAmazon/LoginWithAmazon.h> @interface AMZNLogoutDelegate NSObject<AIAuthenticationDelegate>
@end
Add your delegate implementation header to the class calling clearAuthorizationState:. For example:
#import “AMZNLogoutDelegate.h” - Call clearAuthorizationState:.When a user has successfully logged in, you may provide a logout mechanism so they can clear their authorization data. Your mechanism might be a hyperlink, or a menu item, but for this scenario the example will create a logoutButtonClickedmethod for a logout button.
– (IBAction)logoutButtonClicked:(id)sender {AMZNLogoutDelegate* delegate = [[[AMZNLogoutDelegate alloc] initWithParentController:self] autorelease]; [AIMobileLib clearAuthorizationState:delegate];}
The only parameter to clearAuthorizationState is an AIAuthenticationDelegate that implements requestDidSucceed: and requestDidFail:.
- Implement requestDidSucceed:. This method will be called when the user’s information is cleared. You should then show them as logged out.
– (void)requestDidSucceed:(APIResult *)apiResult {// Your additional logic after the user authorization// state is cleared.[[[UIAlertView alloc] initWithTitle:@”” message:@”User Logged out.”delegate:nil cancelButtonTitle:@”OK” otherButtonTitles:nil]show];} - Implement requestDidFail:. This method will be called if for some reason the user’s information cannot be cleared from the cache. In that case, you should not show them as logged out.
– (void)requestDidFail:(APIError *)errorResponse {// Your additional logic after the SDK failed to clear// the authorization state. [[[[UIAlertView alloc] initWithTitle:@”” message:[NSStringstringWithFormat:@”User Logout failed with message: %@”,errorResponse.error.message] delegate:nilcancelButtonTitle:@”OK” otherButtonTitles:nil]autorelease] show];}
Test your Integration
Launch your app in an iOS device or simulator and confirm you can log in with your Amazon.com credentials.
Note: When testing on iOS10 simulators, you may see the error message APIKey for the Application is invalid for an authorizeUserForScopes request, or Unknown Error Code for a clearAuthorizationState request. This is a known bug with Apple which occurs when the SDK tries to access the keychain. Until Apple resolves the bug, you can work around it by enabling Keychain Sharing for your app under the Capabilities tab of your app’s target. This bug only impacts simulators. You can test on actual iOS10 devices without using any workaround.
Login with Amazon Getting Started Guide for iOS Version 2.1.2 – Login with Amazon Getting Started Guide for iOS Version 2.1.2 –
[xyz-ips snippet=”download-snippet”]