
AmazonBasics Wall Mount Electric LED
Multicolor 3D Heating Fireplace User Guide

Wall-Mount Electric LED Multicolor 3D Heating Fireplace with Remote Control This product is only suitable for well insulated spaces or occasional use.

1. IMPORTANT SAFETY INSTRUCTIONS
 Read these instructions carefully and retain them for future use. If this product is passed to a third party, then these instructions must be included.
When using electrical appliances, basic safety precautions should always be followed to reduce the risk of fire, electric shock, and/ or injury to persons including the following:
![]() WARNING Risk of fire!
WARNING Risk of fire!
- Keep power cords, drapery, furnishings or other combustibles at least 1 meter from the front of the appliance, and away from the sides or rear.
- In order to avoid overheating, do not cover the heater. Do not place objects in contact with the heater.
![]() WARNING Risk of injury!
WARNING Risk of injury!
- The appliance must not be used if the glass panel is damaged.
![]() CAUTION Risk of fire!
CAUTION Risk of fire!
- In order to avoid a hazard due to the inadvertent resetting of the thermal cut-out, this appliance must not be supplied through an external switching device, such as a timer, or connected to a circuit that is regularly switched on and off by the utility.
![]() CAUTION Risk of burns!
CAUTION Risk of burns!
- Some parts of this product can become very hot and cause burns. Particular attention has to be given where children and vulnerable people are present.
 This symbol indicates that in order to avoid overheating, the appliance should not be covered with clothing or other material.

2. Battery Warnings
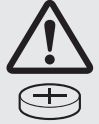
![]() ARNING Riskof ingestion and suffocation! Keep the button cell batteries away from children.
ARNING Riskof ingestion and suffocation! Keep the button cell batteries away from children.
Keep new and used batteries away from children. If you think batteries might have been swallowed or placed inside any part of the body, seek immediate medical attention.
- Exhausted batteries should be immediately removed from product and properly disposed.
- Keep batteries out of the reach of children.
- Do not dispose of batteries in fire.
- Remove batteries from product if it is not to be used for an extended period of time unless it is for emergency purposes.
- If the battery leaks avoid contact with skin and eyes. Rinse affected areas immediately with plenty of clean water, then consult a doctor.
3. Intended Use
- This product is suitable for providing instant heat to warm up a room and also for visual ambiance. It is not intended for use as a primary heat source.
- This product is intended for household use only. It is not intended for commercial use.
- This product must be wall or recessed mounted. IT IS NOT SUITABLE FOR USE AS A FREE STANDING APPLIANCE. Operating the product in any other position could cause a hazard.
- No liability will be accepted for damages resulting from improper use or noncompliance with these instructions.
4. Product Description
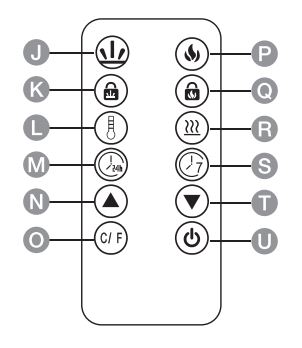
- (A) Display panel
- (B) Logs
- (C) Heating vents
- (D) Display
- (E) Touch controls
- (F) On/off switch
- (G) Power cord with plug
- (H) Wall mounting bracket
- (I ) Inset mounting bracket
- (J) Ember color button / SET-
- (K) Ember lock button
- (L) Temperature button
- (M) Set day/time button
- (N) D Increase button
- (O) Celsius/Fahrenheit button
- (P) Flame color button/ SET/OK
- (Q) Flame lock button
- (R) D Power level button / SET+
- (S) Timer button
- (T) Decrease button
- (U) Standby button
- (V) Display


5. Before First Use
![]() DANGER Risk of suffocation!
DANGER Risk of suffocation!
- Keep any packaging materials away from children – these materials are a potential source of danger, e.g. suffocation.
- Check the product for transport damages.
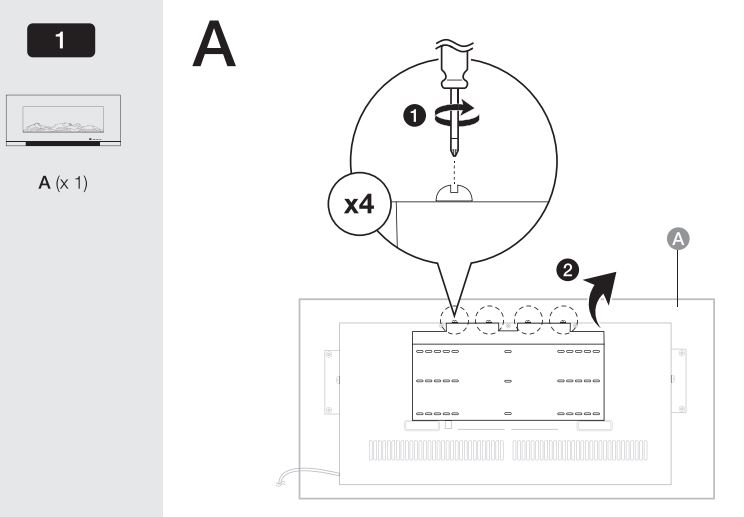
- Remove all packing materials including packaging inside the firebox behind the glass display panel (A) as described in installation B step 1 .
- Before connecting the product to the power supply, check that the power supply voltage and current rating corresponds with the power supply details shown on the product rating label.
- Remove the protective strip on the remote controls battery compartment.
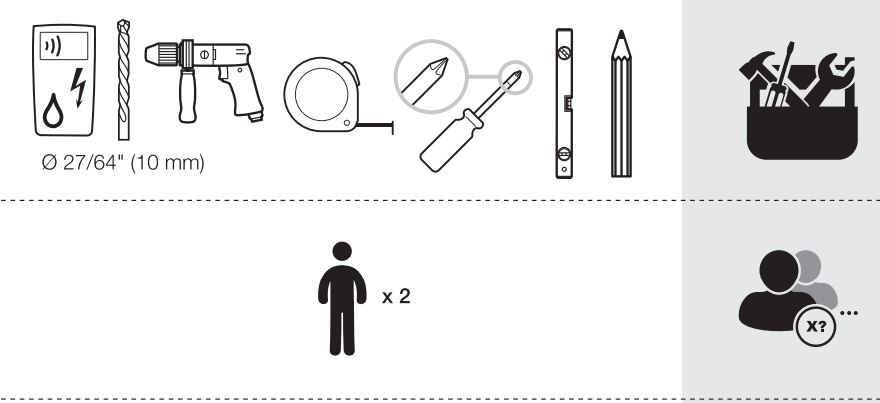
6. Installation tips
![]() WARNING
WARNING
- Failure to install the product as instructed may result in damage to the product and or may expose the user to the risk of fire, electric shock, serious injury or death.
- This product should be installed and maintained only by an experienced adult. If in doubt, consult a professional.
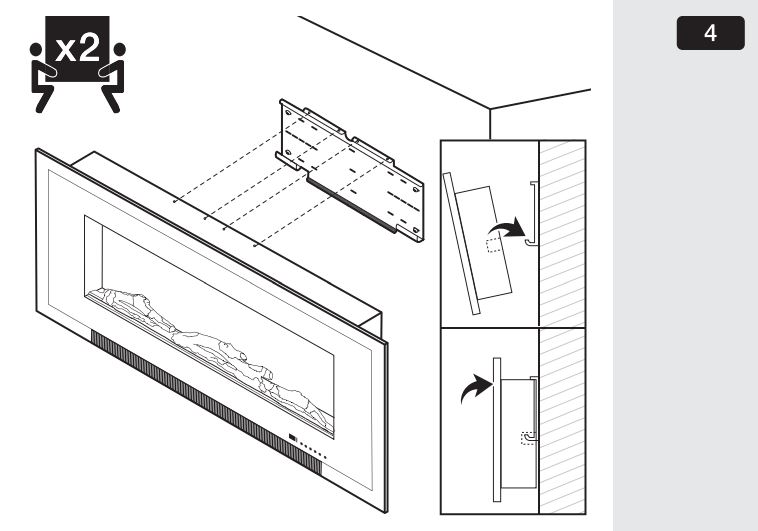
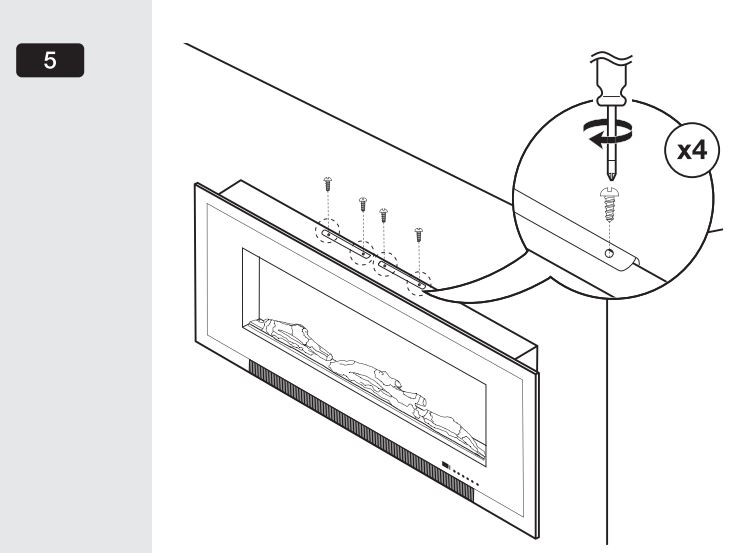
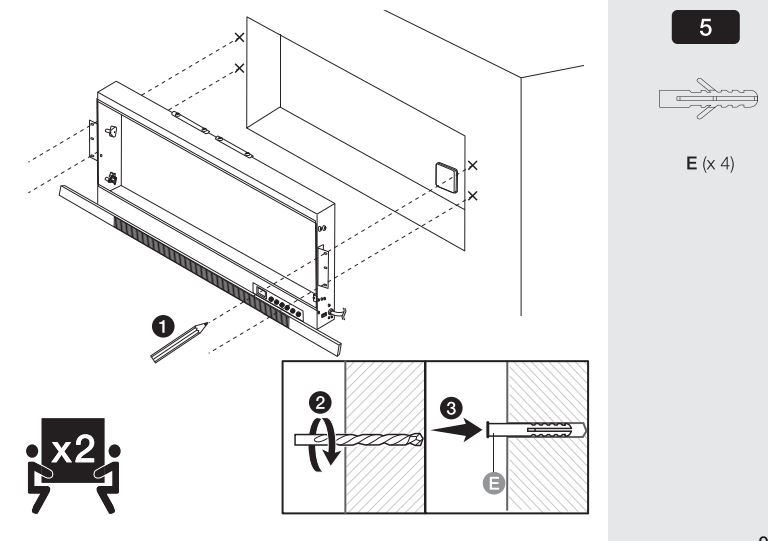
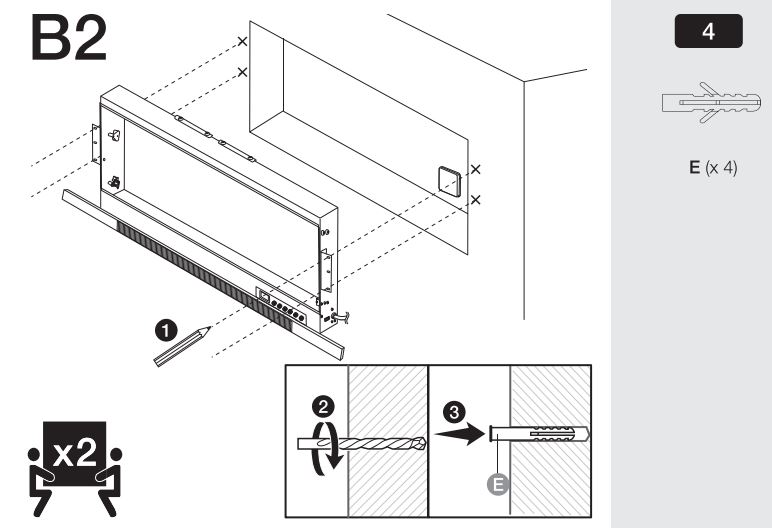
- Before mounting, determine the suitable mounting location. The product must be fixed to a wooden or masonry/concrete wall using fasteners that are appropriate for the mounting surface.
- Do not install on drywalls, wall boards or thin plywood. The mounting surface must be capable of supporting the weight of the product.
- For best results, install the product out of direct sunlight.
- To avoid reconstruction install the product in a proximity of properly grounded socket outlet.
- Do not drill into any pipes or power lines beneath the surface during mounting holes preparation. Use voltage/metal detector.
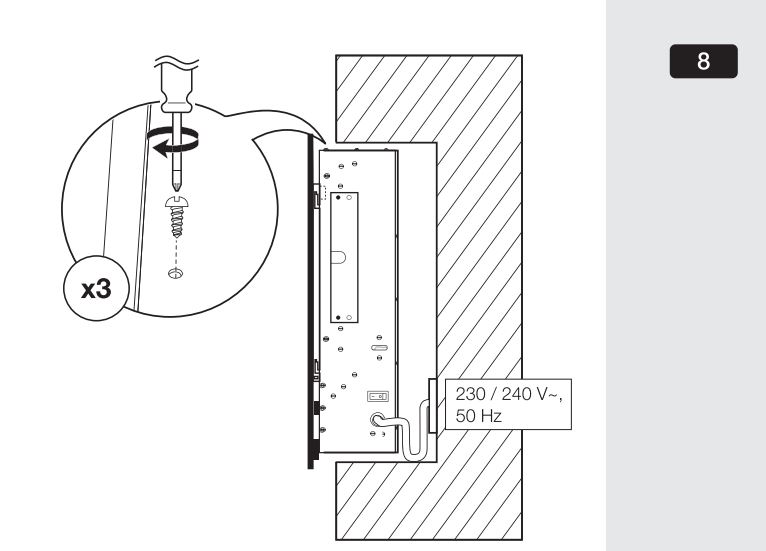
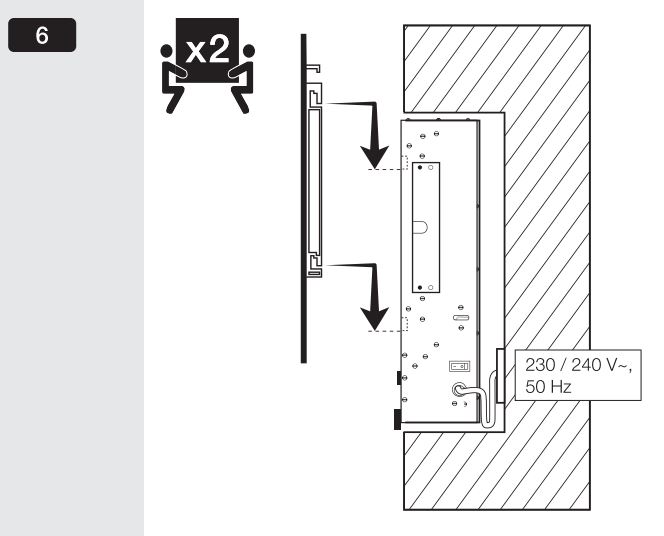
- The wall mounting bracket (H) is attached to the product when delivered. Remove the wall mounting bracket (H) before starting to install.
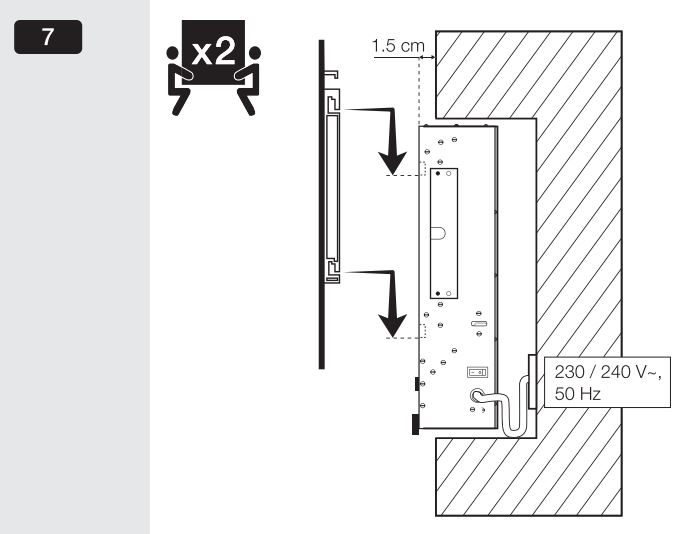
For recessed installation B: The socket outlet must be wired to an accessible 16 Adouble pole switch in order to safely switch the product on/off.
7. Operation
7.1 Switching on/off
- Connect the power cord with plug (G) to a suitable socket outlet.
- Set the power switch (F) to ‘I’ (product on). The product beeps and the standby indicator stays lit. The product is now in standby mode.
- Press the standby button (U) to switch on the product.NOTICE The display goes off approximately 7 seconds after no other button is pressed.
- To switch off the product, press the standby button (U) again.
NOTICE
- Pressing any button on the remote or touch controls once, displays the current room temperature. To select any function, press the same button twice.
- There may be a trace of odor during the first few minutes of use, or after a period of storage. This is normal and quickly disappears.
- If the product is not in use for a long period:
For wall installation A: Set the power switch (F) to ‘0’ and remove the plug (G) from the socket outlet.For recessed installation B: Set the wall switch to off.
7.2 Setting day and time
- Press the set date/time button (M), the days indicator starts flashing.
- Quickly press the increase button (N) or decrease button (T) to select the day, then press the set date/time (M) to confirm. The hours indicator starts flashing.
- Quickly press the increase button (N) or decrease button (T) to select the hours, then press the set date/time (M) to confirm. The minutes indicator starts flashing.
- Quickly press the increase button (N) or decrease button (T) to select the minutes, then press the set date/time (M) to confirm. The day and time is now set.
7.3 Setting temperature
NOTICE The product must be set to low or high power for the heating function to work.
- Press the temperature button (L) repeatedly until the desired temperature has been selected. Alternately, use buttons (N) and (T) to scale up or down the temperature range.
- The temperature range is between 17 – 30 oc (62 – 86 °F).
- When the room reaches the set temperature, the heating function stops automatically.
- If the product detects a drop in temperature, the heating function resumes automatically.
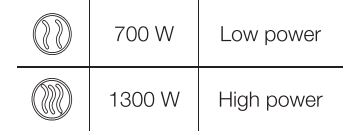
7.4 Changing power level
Press the power level button (R) to cycle through the different settings. The display M show the below symbols to indicate the power level selected.
NOTICE This product is fitted with a temperature limiting control. If the product reaches an unsafe internal temperature of 115 °C, the product automatically switches off. To reset, unplug the product from the socket outlet and wait 5 minutes before plugging it back in and switching on.
7.5 Changing flame color
- Press the flame button (P) repeatedly until the desired color is selected.
- The display M shows the code to indicate the color selected.
- When using F0 mode, press the flame lock button (Q) at anytime to stop the loop. Press the flame lock button (Q) again to resume.
(F1) Orange(F2) Orange and green(F3) Green(F4) Green and blue(F5) Blue(F6) Blue and orange(F7) Blue, orange and green(F8) Blue and red(F9) Red(F0) Loop through all colors
7.6 Changing ember color
- Press the ember button (J) repeatedly until the desired color is selected.
- The display M shows the code to indicate the color selected.
- When using CO mode, press the ember lock button (K) at anytime to stop the loop. Press the ember lock button (K) again to resume.
(C1) Red(C2) Blue(C3) Green(C4) Rose red(C5) Orange(C6) White(C7) Purple(C8) Yellow(C9) Light blue(C0) Loop through all colors
7.7 Setting open window detection function
The product monitors the temperature of the room once it reaches the set temperature. If the room temperature drops by 5°C or more within 10 minutes, the product automatically stops heating to conserve energy.
- Press and hold the SET/OK button (P) on the touch controls to activate this feature. The display shows E1 to indicate function is on.
- Press and hold the SET/OK button (P) on the touch controls, then press the SET- button (J) to deactivate this feature. The display shows E0 to indicate function is off.
E0: Open window detection function offE1: Open window detection function on
7.8 Setting timer
- Press the timer button (S) to activate timer function. The timer symbol displays on the display M and the hours setting starts flashing.
- Press the timer button (S) to skip through the days until you reach the desired day for setting. Each day which does not require timer function should be programmed as 00.00 for ON and OFF time for each period.
- Once the desired day has been selected, press the increase button (N) or decrease button (T) to set the ON hours, press the timer button (S) to continue.
- Press the increase button (N) or decrease button (T) to set the ON minutes, press the timer button (S) to continue.
- Press the increase button (N) or decrease button (T) to set the OFF hours, press the timer button (S) to continue.
- Press the increase button (N) or decrease button (T) to set the OFF minutes, press the timer button (S) to continue.
- Press the timer button (S) on the product’s touch controls to activate timer function. The timer function symbol lights up on the display (D).
NOTICE
- Timer setting can only be done using touch controls (E).
- After setting the first period, the timer moves onto the second period allowing you to set the time again the same way.
- Repeatedly press SET/OK (P) to scroll through the days and periods.
- To clear an operational period, set the ON and OFF times to the same value.
7.9 Changing between Fahrenheit and Celsius
Press the Celsius/Fahrenheit button (0) repeatedly until the desired setting has been selected.
7.10 Changing between logs and crystals
Change the look of the product by removing the installed logs (B) behind the display panel (A).
- Remove the display panel (A) as described in installation B step 1 .
- Continue with the below 2 steps to remove the screws and logs, then place the crystals (C) along the display edge evenly.

8. Changing the Battery
- Remove the battery holder from the remote control.
- Replace the used battery with a new CR2025 3 V battery. The positive pole(+) must bepointing upwards.

9. Cleaning and Maintenance
![]() WARNING Risk of electric shock!
WARNING Risk of electric shock!
- To prevent electric shock:
For wall installation A: Set the power switch (F) to ‘0’ and remove the plug (G) from the socket outlet.For recessed installation B: Set the wall switch to off.
9.1 Cleaning
NOTICE Clean the product regularly to prevent the build-up of hairs dust or lint around the heating vents (C), as this may cause the outlet to become blocked.
- To clean the product, wipe with a soft, slightly moist cloth.
- Never use corrosive detergents, wire brushes, abrasive scourers, metal or sharp utensils to clean the product.
- Do not spray liquids directly onto any surfaces of the product.
9.2 Maintenance
- Any other servicing than mentioned in this manual should be performed by a qualified service personnel.
9.3 Plug fuse replacement (for UK only)
- Use a flat screwdriver to open the fuse compartment cover.
- Remove the fuse and replace with the same type (13 A, BS1362). Refit the cover.
10. Troubleshooting

11 . Disposal
![]() The Waste Electrical and Electronic Equipment (WEEE) Directive aims to minimize the A impact of electrical and electronic goods on the environment, by increasing re-use – and recycling and by reducing the amount of WEEE going to landfill. The symbol on this product or its packaging signifies that this product must be disposed separately from ordinary household wastes at its end of life. Be aware that this is your responsibility to dispose of electronic equipment at recycling centers in order to conserve natural resources. Each country should have its collection centers for electrical and electronic equipment recycling. For information about your recycling drop off area, please contact your related electrical and electronic equipment waste management authority, your local city office, or your household waste disposal service.
The Waste Electrical and Electronic Equipment (WEEE) Directive aims to minimize the A impact of electrical and electronic goods on the environment, by increasing re-use – and recycling and by reducing the amount of WEEE going to landfill. The symbol on this product or its packaging signifies that this product must be disposed separately from ordinary household wastes at its end of life. Be aware that this is your responsibility to dispose of electronic equipment at recycling centers in order to conserve natural resources. Each country should have its collection centers for electrical and electronic equipment recycling. For information about your recycling drop off area, please contact your related electrical and electronic equipment waste management authority, your local city office, or your household waste disposal service.
12. Battery Disposal
![]() Do not dispose of used batteries with your household waste. Take them to an A appropriate disposal/collection site.
Do not dispose of used batteries with your household waste. Take them to an A appropriate disposal/collection site.
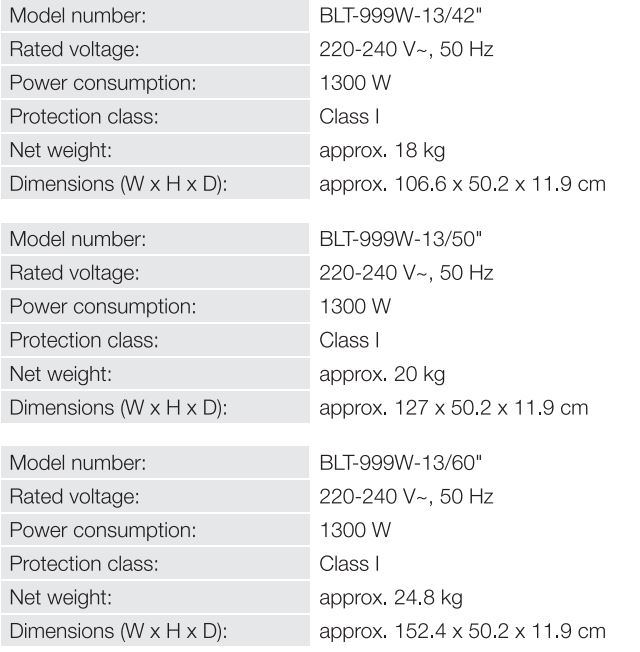
13. Specifications
14. Feedback and Help
Love it? Hate it? Let us know with a customer review.AmazonBasics is committed to delivering customer-driven products that live up to your high standards. We encourage you to write a review sharing your experiences with the product.
![]() amazon.co.uk/review/review-your-purchases#
amazon.co.uk/review/review-your-purchases#
![]() amazon.co.uk/gp/help/customer/contact-us
amazon.co.uk/gp/help/customer/contact-us
15. Energy Efficiency Information

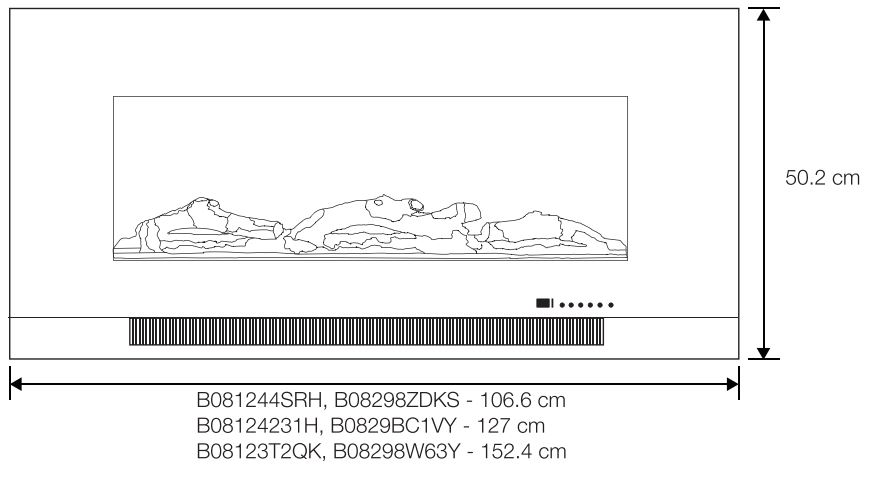
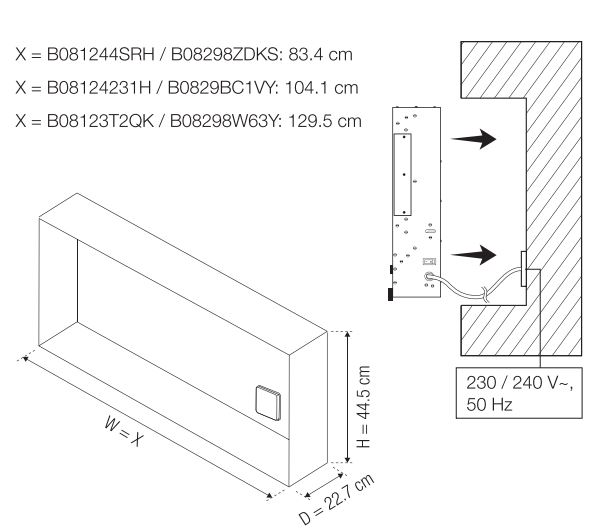
Product Dimensions

Installation Type


NOTICE A dedicated socket outlet must be installed inside the recessed wall opening. Keep at least 10 cm spacing between the back of the product and a socket outlet. The socket outlet must be wired to an accessible 16 A double pole switch. Contact a professional electrician if in doubt. Set the power switch to ‘I’ (product on) before fixing the product into the recessed wall opening.
NOTICE Avoid tension on extremely bent parts of the supply cord after plugging in. Lay out the supply cord properly before placing the product into the wall.


![]()
MADE IN CHINA
![]()
V01-06/20
[xyz-ips snippet=”download-snippet”]