AMCREST HD Webcam User Manual
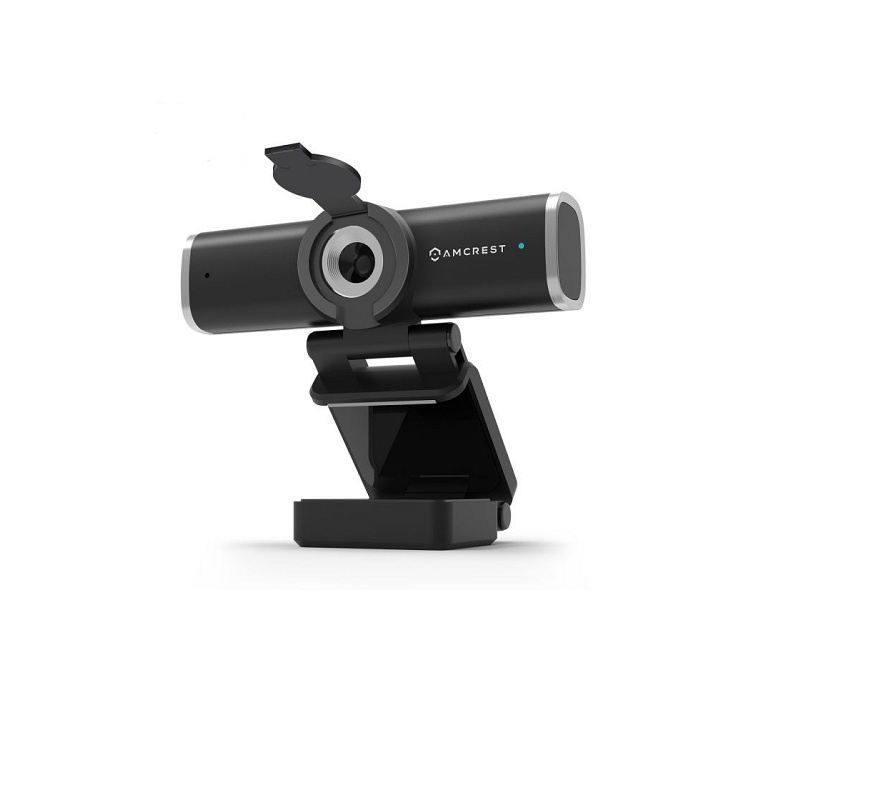
Product Overview
Thank you for purchasing an Amcrest Webcam! This guide is designed to help you setup and better use your Amcrest webcam. If you have questions before you start or just want to learn more about Amcrest, please visit us at: amcrest.com
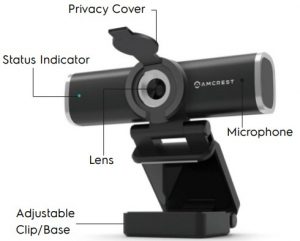
Note: To install the privacy cover, peel the adhesive cover off and align the cover over the center of the lens. Press down on the cover to adhere it to the camera.
Setting Up Your Webcam
- Placing Your WebcamThe web cam has an adjustable clip base which allows the device to be secured to a monitor, or desktop, or tripod.
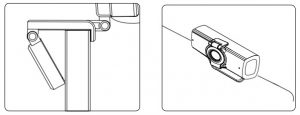
- Placement on a Monitor-Grasp the webcam as displayed in the image before and open the clip base.– Place the opened clip base onto the monitor making sure the foot of the clip base is flush with the back of the monitor.

Placement on a Flat SurfacePlace the camera on a flat surface and use the adjustable clip base to move and adjust the camera according to your preference. Placement on a TripodPlace the 1/4″ 20 tripod screw on the bottom of the adjustable clip base to the male end of the tripod and twist the base allowing it be secured to the tripod.
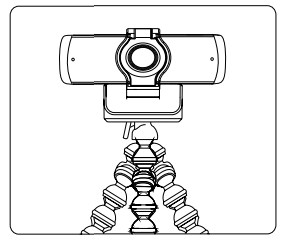
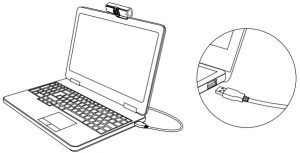
Connecting the Webcam
The webcam is compatible with both Windows and Mac computers. For more information on connecting your webcam, please refer to the information below.
- Connect the webcam’s USB cable to a USB port on your computer. The status indicator on the camera will illuminate indicating the webcam is properly connected.
- Allow any drivers or other software to load and open a video chat or recording software of your choice to open the camera.
FAQ
Q. How do I Improve Audio Quality?Ans. If you are experiencing issues with audio on your webcam, the audio quality can be optimized using third party software such as Equalizer APO. The Equalizer APO software can be optimized as well using the Peace GUI equalizer extension. For more information on how to improve microphone quality, visit: https://amcrest.com/audioQ. Why does the microphone still not work even though it is being recognized by my computer?Ans. This could mean there is communication issue happening between the camera and your computer. This can be resolved by uninstalling and then reinstalling the webcam. On your computer, navigate to Computer Management>Device Manager>Sound, video and game controllers and click to expand the menu to locate the your webcam. Right click and select “Uninstall device”. Once the webcam has been uninstalled, unplug the USB cord from your computer and then plug it back into the USB port. The webcam will automatically install the new driver. Wait about 1 minute and verify if the microphone is working properly. The audio settings can also be adjusted in the settings menu using any third party software.Q. How do I adjust video settings for the webcam?Ans. All video settings and parameters will be controlled by the settings of the third party viewing software or from the local camera software on your computer. Access the webcam settings located in your particular viewing software and configure it according to your specifications. For more information on adjusting video settings,Please visit: https://www.amcrest.com/video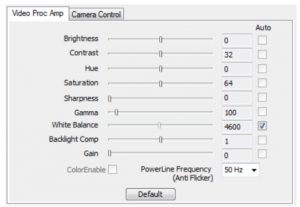 Contact UsHave any questions regarding your webcam?Give us a call toll free: 888-212-7538Email us at: www.amcrest.com/othersupportFor other contact information please visit www.amcrest.com/contacts
Technical Specifications
| Model | AWC195-B |
| Image Sensor | 1/2.7” CMOS |
| Video Resolution | 1920 x 1080p (30fps) |
| Video Format | MJPEG |
| Photo Resolution | 2 Megapixels |
| Focus Mode | Fixed |
| Focus Distance | 0.5m – Infinity |
| Field of View | 90° |
| Minimum Illumination | ≤2 lux |
| Auto White Balance | Yes |
| Microphone | Built-in microphone(Noise Reduction Configuration) |
| System Requirements | Windows 10, Mac OS 10.15 or above, etc. |
| Material | ABS |
| Operating Temp. | 32°F – 113°F (0°C – 45°C) |
| USB Cable Length | 5.9ft |
References
[xyz-ips snippet=”download-snippet”]