AMCREST Wi-Fi Video Doorbell User Guide
Installing the Chime Kit
The Chime Kit allows the doorbell to sync with your home’s existing chime system. If you do not have a chime system, the chime kit is not necessary and you can proceed to the physical installation of your doorbell.
What’s Included?
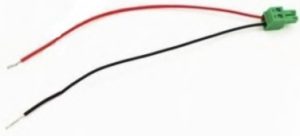
Connect the Wire Harness to the Chime Kit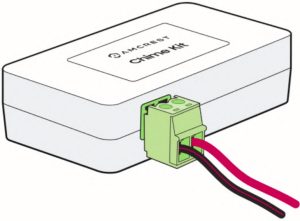
![]() Note: If the wire harness does not come preinstalled with the included wiring. Use a precision screwdriver to open the terminals on top of the connector and insert the wiring into the ports. The red and black wires can be placed in any position inside the connector, and tighten the screws to secure.
Note: If the wire harness does not come preinstalled with the included wiring. Use a precision screwdriver to open the terminals on top of the connector and insert the wiring into the ports. The red and black wires can be placed in any position inside the connector, and tighten the screws to secure.
Turn off the Circuit Breaker for your Doorbell
Since we will be working with electrical wiring, make sure to shut off the power to your doorbell at the electrical breakers of your home to ensure no power is flowing through the internal doorbell system.
Remove the Cover for your Existing Chime.

![]() Note: Your existing chime may look different depending on if you have a digital or mechanical chime.
Note: Your existing chime may look different depending on if you have a digital or mechanical chime.
Locate and Loosen the Screws on Your Existing Chime
![]() Note: Be careful not to detach or remove the existing wiring.
Note: Be careful not to detach or remove the existing wiring.
Connecting the Amcrest Chime Kit
Slide the connecting wires from the Amcrest Chime Kit underneath the screws, then retighten the screws. It doesn’t mattery which wires connect to which terminal.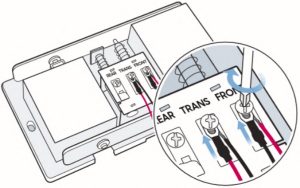
Replace Your Chime Cover
Secure the Amcrest Chime Kit using the included adhesive. If you are using a mechanical chime, ensure any excess wiring is clear of all moving parts.

![]() Note: You will still need to configure the chime in the Amcrest Smart Home app to complete the installation.
Note: You will still need to configure the chime in the Amcrest Smart Home app to complete the installation.
Installing the Wi-Fi Doorbell
Everything you need for the installation of your Amcrest Wi-Fi doorbell is included in the box.
Wi-Fi Doorbell
2 Faceplates
Mounting Bracket
Chime Kit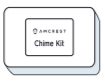
2 Wire Extenders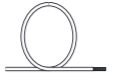
4 Mounting Screws
2 Terminal Screws
Bracket Screw
2 Extra Wires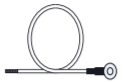
Wire Connector
2 Wire Nuts
4 Wall Anchors
Wire Harness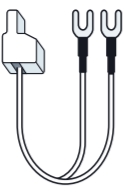
Screwdriver
![]() NOTE A 15/64 masonry drill bit will be required if installingon concrete stucco or brick.
NOTE A 15/64 masonry drill bit will be required if installingon concrete stucco or brick.
Remove the Faceplate and Bracket
APlace your fingers in the indentations on the sides of the doorbell, simultaneously pull away and push the faceplate out.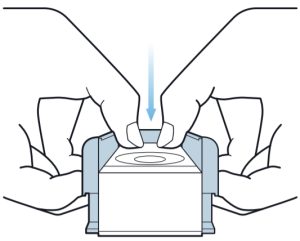
BUse the included Philips head screwdriver to remove the bracket screw from the doorbell.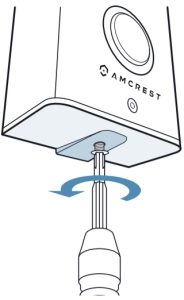
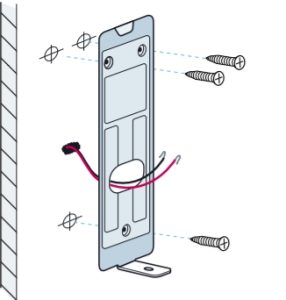
Installing the Mounting Bracket
A Remove your existing doorbell from the wall and disconnect the wires. These are the wires we will be using to install your new Amcrest Wi-Fi Doorbell.

B Place the doorbell bracket to fit your existing doorbell wiring. Then mark the drill holes with a marker.

C For Wood, Drywall or Soft Surfaces: Secure the doorbell bracket to the mounting surface using the included screwdriver and mounting screws.For Concrete, Stucco or Brick: Using your previously marked holes as a guide, drill holes into the mounting surface using a 15/64 masonry drill bit. Then, insert wall anchors and secure the mounting brackets using the included mounting screws.
Connect Doorbell to Existing Wiring

Loosen the terminal screws located on the back of your Wi-Fi Doorbell using the included Phillips head screwdriver. Place your existing doorbell wiring underneath the terminal screws, then re-tighten the terminal screws to secure the wires.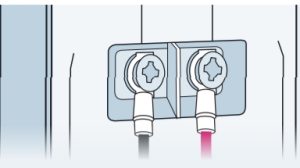
![]() NOTE If your existing doorbell wiring is too short, use the included extra wires and wire nuts to extend your wiring. Remove the terminal screws completely then thread the screws through the extra wire.
NOTE If your existing doorbell wiring is too short, use the included extra wires and wire nuts to extend your wiring. Remove the terminal screws completely then thread the screws through the extra wire.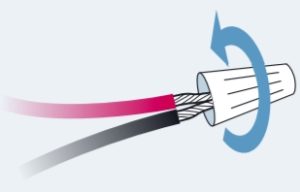
![]() NOTE To attach the wires, align the ends of the two wires, place the wire nut over the exposed wiring and twist the wire nut clockwise to tighten.
NOTE To attach the wires, align the ends of the two wires, place the wire nut over the exposed wiring and twist the wire nut clockwise to tighten.
Mounting the Doorbell
Feed the wiring back into the wall. Then, secure the doorbell to the mounting bracket using the included screwdriver.

![]() NOTE Be sure to secure the the doorbell correctly to the bracket lip, located at the top at the mounting bracket.
NOTE Be sure to secure the the doorbell correctly to the bracket lip, located at the top at the mounting bracket.
Inserting a MicroSD Card (Optional)On the side of the device locate the MicroSD card slot. Raise the MicroSD card flap and insert the MicroSD card, gold pins down. Secure the flap back to the doorbell.
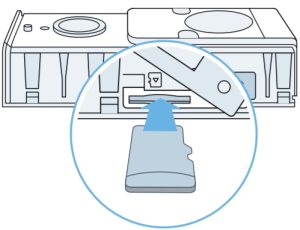
![]() Supports 64GB MicroSD Card (Class 10 or Higher)
Supports 64GB MicroSD Card (Class 10 or Higher)
Step 5: Turn the Breaker Back On
The physical installation is now complete. Turn your breaker back on and the allow the doorbell to power up. It may take the doorbell up to 2 minutes to fully power up.
 Amcrest Smart HomeNow it’s time to setup the Amcrest Smart Home App. To connect your Amcrest Wi-Fi doorbell to your Android or iOS mobile device, download the Amcrest Smart Home app and follow the instructions in the app setup.

Set Up the Doorbell in the Amcrest Smart Home App
The Amcrest Smart Home app connects your Amcrest Wi-Fi doorbell to your Android or iOS mobile device ensuring you are always connected to what matters most.


To get the app, search for “Amcrest Smart Home” in the Google Play or App Store and download.
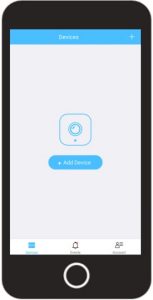
Connecting to the Smart HomeAppOpen the Amcrest Smart Home app and tap on “Register” to register an account. Log in and click on “AddDevice”.
Scan QR Code
Scan the QR Code on the back of the doorbell or manually enter the serial number for the device by tapping “Manually enter S/N”. The serial number can be found on the serial tag on the back of the doorbell or on the side panel of the doorbell box.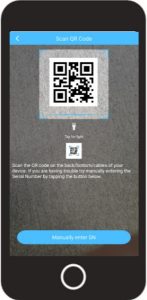
Connect to the Hotspot
Remove the protective plastic casing from the doorbell and press the reset key on the side of the doorbell to enable the hotspot for your device. If there is a blue spinning light on the front of the device, it means that the device hotspot is properly turned on.

Tap “Next” to continue. Tap “Yes” to verify the hotspot has been properly enabled.
Note: iOS users, tap on “Join” to allow the doorbell to join your Wi-Fi network
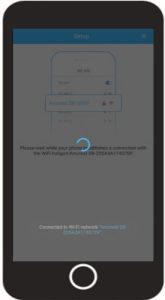
Connecting to the Hotspot
The app will automatically begin to connect ot the Wi-Fi hotspot of your doorbell. Please wait while your mobile device establishes a connection.
Setting a Password for the Doorbell
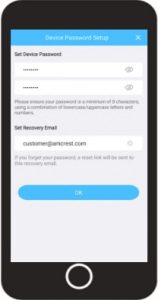
Setting a Password for the Doorbell Once the doorbell has finished connecting to the hotspot the app will display a device password setup menu which allows you to set the password for the doorbell. Type in a password you would like to use and confirm it. Please use a combination of letters, numbers, and symbols between 8 – 32 characters long when setting up a password.
A recovery email address can also be set if you have forgotten your password. A password reset link will be sent to this recovery email address.
Tap “OK” to continue
Choose Your Wi-Fi NetworkSelect your Wi-Fi network from the Wi-Fi network list. Enter the password for your home Wi-Fi network. If you would like to save this password to the app, tap on “Save Password”
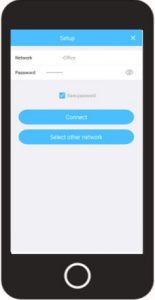
If you have chosen the wrong Wi-Fi network and would like to select another Wi-Fi network for the doorbell to connect with, tap on “Select other network”. Tap “Connect”, to connect the Wi-Fi doorbell to your Wi-Fi network.
Connecting To Your Wi-Fi NetworkThe Wi-Fi doorbell will now begin connecting to the chosen Wi-Fi network. Once connected, the LED indicator on the front of the doorbell will turn solid blue. This may take a few moments but if the LED indicator continues to spin or the device is reporting “Wi-Fi password is incorrect”. Tap on “Start Over” to repeat the process.
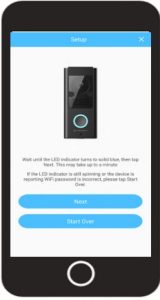
Once the doorbell has been successfully connected to your Wi-Fi network and the indicator LED is solid blue, tap on “Next” to continue.
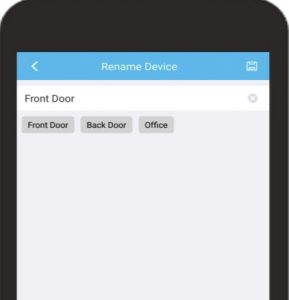
Give Your Doorbell a Name
Rename your doorbell. A few examples are provided such as; Front Door, Back Door, Office, and can be selected if needed. After you have finished naming your device, tap on the save ( ) icon to continue.
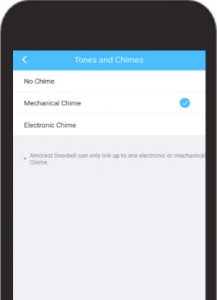
Chime Settings
Amcrest doorbells can only link up to one electronic or one mechanical chime. For more information on linking a chime, refer to “Linking a Chime”.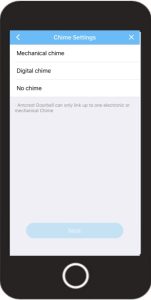
Tap “Next” to continue.
Set the Time and DateSet “Time Zone” to your current time zone and set “DST” (Daylight Savings Time) settings if applicable Tap “Next” to continue.

Note: The Wi-Fi doorbelol is not successfully connected! Tap on “Start Live View” to begin using you device.
Using the Doorbell in the App
The main screen will be your devices menu. This is a menu that will display all connected devices and well as quick access to certain settings for your doorbell.
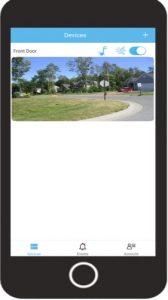
 CHIME Quick access to link a chime.
- MOTION ALERTS Enable to recieve notifications when a movement is detected.
- DEVICES Displays connected devices in the app.
- EVENTS Provides quick access to motion events and alerts.
- ACCOUNT Access to manage account settings and information.Tap on the device you would like to access to view the live view screen.
Getting To Know the App
The live view screen allows you to actively view your doorbell as well as access specific features such as two-way audio and to access cloud or microSD card recordings.
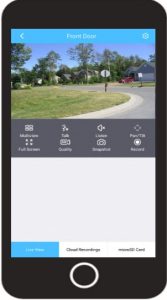
![]() SETTINGSProvides access to settings such as motion detection, doorbell tones,firmware updates, etc.
SETTINGSProvides access to settings such as motion detection, doorbell tones,firmware updates, etc.
![]() MULTIVIEW View multiple devices on one screen.
MULTIVIEW View multiple devices on one screen.
![]() TALK Enables the microphone for two way communication
TALK Enables the microphone for two way communication
![]() LISTEN Enables the speaker for two way communication.
LISTEN Enables the speaker for two way communication.
![]() PAN/TILT Not applicable for WiFi Doorbell devices
PAN/TILT Not applicable for WiFi Doorbell devices
![]() FULL SCREEN View your feed in full screen mode.
FULL SCREEN View your feed in full screen mode.
![]() SD/HD Set the device to standard or high definition resolution.
SD/HD Set the device to standard or high definition resolution.
![]() SNAPSHOT Manually take a photo.
SNAPSHOT Manually take a photo.
![]() RECORD Manually record a video.
RECORD Manually record a video.
Linking A Chime
 This is only necessary if you have an existing chime system and have installed the chime kit. If you do not link the chime to the Amcrest Smart Home app, the doorbell will not link with your chime.To link your doorbell to the chime, open the Amcrest Smart Home app and access your device. Tap on the settings icon ( ) and tap on “Amcrest Chimes”. In the Amcrest Chimes menu, tap on “Link Electronic/Mechanical Chime”.
Note: Amcrest doorbells can only link up to one electronic or mechanical chime.
Answering the Door
When someone is at the door, you can use these features:
- ACCEPT Tap accept to talk to visitors at the door.
- MUTE Mute or unmute the call.
- HANG UP Hang up to end or ignore the call.
Amcrest Smart Home Cloud Recording

This is an optional feature that saves recordings of each event the doorbell captures.
You can access the events from the cloud by registering for aAmcrest Smart Home cloud plan.
Learn more at: amcrest.com/smarthomecloud
MicroSD Card Playback
This is a built in feature that saves recordings of each event the doorbell captures to a microSD card.
You can access the events from the microSD card by tapping on the “MicroSD Card” option located in the live view interface.
Learn more at: amcrest.com/doorbellplayback
Motion Detection Zones
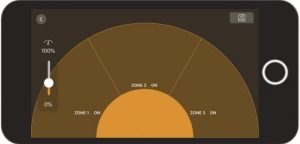
To setup motion alerts you must set up motion zones. These are areas or “zones” that the camera uses to determine when a motion detection is detected and can range from 0 to 100%.
To setup motion detection, tap on the settings (![]() ) icon and tap “Motion Detection”. Select applicable zones, one through three or use the slider to adjust the motion detect percentage. Tap on the save icon (
) icon and tap “Motion Detection”. Select applicable zones, one through three or use the slider to adjust the motion detect percentage. Tap on the save icon (![]() ) to save the motion settings.
) to save the motion settings.
You will need at least one active motion zone to receive event notifications.
Event Notifications
If your phone is off when the doorbell captures a motion event you will receive a push notification on your phone.
If your phone has a passcode, you will need to enter it to veiw the event.
Troubleshooting
The Doorbell is installed But It Will Not Turn On.
Install the Chime Kit
If you have not installed the included chime kit on your exisitng chime system the Amcrest Wi-Fi doorbell will not work properly. For more information on how to setup the Chime Kit, refer to section 1, Installing the Chime Kit.
Low Voltage
The Amcrest Wi-Fi doorbell is designed to work with the majority of standard doorbell systems so it will require at least 16 volts of AC power to turn on. If your doorbell system runs e a lower voltage, or runs on DC power, rather than AC, the doorbell will not work properly.In this case, you may need to have an electrician install a new transformer to bring the power output of the system to at least 16 volts.
I Can’t Find the Amcrest Wi-Fi Doorbell Hotspot on my Device.
If you have pressed the reset button on the side of the doorbell and the hotspot for the device is still not showing on your mobile device, go to the settings in your mobile device and turn off your Wi-Fi connection. Wait about 30 seconds and turn it back on. If the doorbell’s network still fails to show, make sure the doorbell is connected to your exisitng system’s wiring and that it meets the neccessary power requirements of 16 volts AC-30 VA.If none of the above has helped, try one of the following:
- Turn oft the cellular data and Bluetooth on your mobile device and try again. You can turn them back on after the setup process is complete.
- Reset the modem on your Wi-Fi network. Unplug it and wait for about 40 seconds, then plug it back in and continue the setup process.
- Perform a hard factory reset by holding down the reset button on the side of the doorbell for 15 seconds. Wait 30 seconds, then repeat the setup process.
I’m Having Trouble Completing the In-app Setup.
If the setup fails in the Amcrest Smart Home app, the light on the front of the doorbell will indicate the following issues:
![]() A solid LED indicates that the Wi-Fi doorbell is properlyconnected to the Wi-Fi network. If the light on the front is solid no further action needs to be taken and the doorbell is properly added into the app.
A solid LED indicates that the Wi-Fi doorbell is properlyconnected to the Wi-Fi network. If the light on the front is solid no further action needs to be taken and the doorbell is properly added into the app.
![]() A spinning LED indicates the Wi-Fi doorbell is in setup modeand is currently not connected to a network. Please follow theinstallation instructions in the Amcrest Smart Home app tocontinue.
A spinning LED indicates the Wi-Fi doorbell is in setup modeand is currently not connected to a network. Please follow theinstallation instructions in the Amcrest Smart Home app tocontinue.
![]() If there is no LED on the front of the doorbell check that theterminals on the back of your doorbell and make sure they areproperly connected to the wires and that your doorbell systemmeets the necessary power requirements (16 volts AC at 30VA).
If there is no LED on the front of the doorbell check that theterminals on the back of your doorbell and make sure they areproperly connected to the wires and that your doorbell systemmeets the necessary power requirements (16 volts AC at 30VA).
For more information, see “The Doorbell Is Installed But It Will Not Turn On.” in this section.
The Internal Chime Is Not Ringing Correctly
- In the Amcrest Smart Home app, select your Wi-Fi doorbell to access the live view menu.
- Tap on the gear wheel icon () to enter the settings for your doorbell.
- Tap on Link Chime to access the chime menu and select which chime you would like to use.
NOTE If you have selected the right doorbell type and the chime is still not working correctly, please make sure that you have installed the included chime kit.
I’m Having Trouble Completing the In-app Setup.
If the problem still persists, make sure that you have created a percentage higher than one percent when setting motion zones. It is advised to keep motion zones between fifty and one hundred percent.People Can’t Hear Me When I Answer a Call.It you are using the app on a iHnone or 11-’00, open to Me lettings app on your mobile device and navigate to the Amcrest Smart Home app. Tap on this selection and make sure the microphone toggle switch is turned on.If you are using an Android device, go to Settings > Application/Apps > Application Manager > Amcrest Smart Home > Permis-sions Make sure to enable these options to allow voice to come through.If you do not see the microphone option, uninstall and reinstall the Amcrest Smart Home app following these instructions:
iOS Devices
- Go to Setting >General>Storage and iCloud Usage> Manage Storage >Amcrest Smart Homeand tap “Delete App”
- Restart Your Device.
- Reinstall the Amcrest Smart Home app from the App Store. When Prompted to allow microphone, tap on “Allow”.
Android
- Go to Settings > Apps or Application Manager > Amcrest Smart Home and tap “Uninstall”
- Restart your mobile device.
- Reinstall the Amcrest Smart Home app from the Google Play Store. When prompted, allow the app to access the microphone on your mobile device.
For additional help or assistance please visit:
![]() Or give us a call
Or give us a call
Toll Free : 1-888-212-7538USA . 713-893-8956Canada :1-437-888-0177Worldwide : .1-713-893-8956
![]() For a list of all our customer support numbers visit:amcrest.com/contacts www.amcrest.com/contactswww.amcrest.com/support
For a list of all our customer support numbers visit:amcrest.com/contacts www.amcrest.com/contactswww.amcrest.com/support

 report this ad
![]() This device complies with Part 15 of the FCC Rules. Operation is subject to the following two conditions (1) this device may not cause harmful interference, and (2) this device must accept any interference received, including interference that may cause undesired operation.
This device complies with Part 15 of the FCC Rules. Operation is subject to the following two conditions (1) this device may not cause harmful interference, and (2) this device must accept any interference received, including interference that may cause undesired operation.
References
[xyz-ips snippet=”download-snippet”]