AMERICAN AUDIO APX12 GO BT 2-Way 12-inch Battery Powered 200W Active Loudspeaker
GENERAL INFORMATION
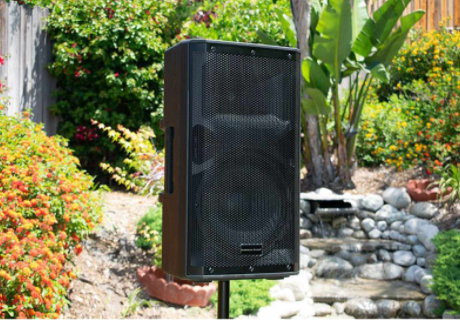
Introduction:Congratulations and thank you for purchasing the American Audio® APX 12 GO BT professional battery powered speaker. This speaker is a representation of American Audio’s continuing commitment to produce the best and highest quality audio products possible at an affordable price. The APX 12 GO BT is a 12-inch active speaker featuring battery power, Bluetooth pairing, flash drive playback, built-in FM radio, and an LCD screen. This speaker’s extremely high efficiency design, low power consumption, and strong output power is ideal for small and mid-size events. The speaker includes a pole mount cup and an integrated trolley and handle. Please read and understand this manual completely before attempting to operate your new speaker system. This booklet contains important information concerning the proper and safe operation of your new speaker.
Customer Support:
American Audio® provides a toll free customer support line, to provide set up help and answer any questions should you encounter problems during your initial set up or operation. You may also visit us on the web at www.adj.com for any comments or suggestions. Service Hours are Monday throughFriday 8:00 a.m. to 4:30 p.m. Pacific Standard Time.Phone: (323) 582-2650E-mail: [email protected]Caution! There are no user serviceable parts inside this speaker. Do not attempt any repairs without being instructed to do so by an authorized American Audio technician. Doing so will void your manufacturer’s warranty. In the unlikely event your speaker may require service, please contact American Audio®.
HANDLING
Electrical Precautions:
- The lightning flash symbol is intended to alert the user to the presence of uninsulated “dangerous voltage” within the product’s enclosure that may be of sufficient magnitude to constitute a risk of electric shock to a person or persons.
- CAUTION: TO REDUCE THE RISK OF ELECTRIC SHOCK, DO NOT REMOVE THE COVER (OR BACK COVER). THERE ARE NO USER SERVICEABLE PARTS INSIDE. REFER SERVICE TO YOUR AUTHORIZED AMERICAN AUDIO SERVICE TECHNICIAN
- The exclamation point symbol is intended to alert the user to the presence of important operating and maintenance (servicing) instructions in the literature accompanying the appliance.
IMPORTANT SAFETY INSTRUCTIONS
READ INSTRUCTIONS – All the safety and operating instructions should be reviewed before operating the product.RETAIN INSTRUCTIONS – The safety and operating instructions should be retained for future reference.HEED WARNINGS – All warnings on the products and in the operating instructions should be adhered to.FOLLOW INSTRUCTIONS – All operating and use instructions should be followed.CLEANING – The product should be cleaned only with a polishing cloth or a soft dry cloth. Never clean with furniture wax, benzine, insecticides, or other volatile liquids since they may corrode the cabinet.ATTACHMENTS – Do not use attachment that have not been recommended by the product manufacturer, as they may cause hazards.WATER AND MOISTURE – Do not use this product near water – for example, near a bath tub, wash bowl, kitchen sink, or laundry tub, in a wet basement, or near a swimming pool, or in any other similar conditions.ACCESSORIES – Do not place this product on an unstable cart, stand, tripod, bracket, or table. The product may fall, causing serious injury to a child or adult, and serious damage to the product. Use only with a cart, stand, tripod, bracket, or table that has been recommended by the manufacturer, or sold with the product. Any mounting of the product should follow the manufacturer’s instructions, and should use a mounting accessory that has been recommended by the manufacturer.CART – A product and cart combination should be moved only with care. Quick stops, excessive force, and uneven surfaces may cause the product and cart combination to overturn.VENTILATION – Slots and openings in the cabinet are provided for ventilation and to ensure reliable operation of the product, and to protect it from overheating, and these openings must not be blocked or covered. The openings should never be blocked by placing the product on a bed, sofa, rug, or other similar surface. This product should not be placed in a built in installation such as a bookcase or rack unless proper ventilation is provided or the manufacturer’s instructions have been adhered to.POWER SOURCES – This product should be operated only from the type of power source indicated on the product label. If you are not sure of the type of power supply available, consult your product dealer or local power company.LOCATION – The appliance should be installed in a stable location.NON-USE PERIODS – The power cord of the appliance should be unplugged from the outlet when left unused for a long period of time.
GROUNDING OR POLARIZATION
- If this product is equipped with a polarized alternating current line plug (a plug having one blade wider than the other), it will fit into the outlet only one way. This is a safety feature. If you are unable to insert the plug fully into the outlet, try reversing the plug. If the plug should still fail to fit, contact you electrician to replace your obsolete outlet. DO NOT DEFEAT THE SAFETY PURPOSE OF THE POLARIZED PLUG.
- If this product is equipped with a three-wire grounding type plug (a plug having a third pin for grounding), it will only fit into a grounding type power outlet. This is a safety feature. If you are unable to insert the plug into the outlet, contact your electrician to replace your obsolete outlet. DO NOT DEFEAT THE SAFETY PURPOSE OF
THE GROUNDING TYPE PLUG.
POWER CORD PROTECTION – Power supply cords should be routed so that they are not likely to be walked on or pinched by items placed upon or against them, paying particular attention to cords at plug, convenience receptables, and the point where they exit from the product.
OUTDOOR ANTENNA GROUNDING – If an outside antenna or cable system is connected to the product, be sure the antenna or cable system is grounded so as to provide some protection against voltage surges and built-up static charges. Article 810 of the National Electrical Code, ANSI/NFP A70, provides information with regard to proper grounding of the mast and supporting structure, grounding of the lead-in wire to an antenna discharge unit, size of grounding conductors, location of antenna-discharge unit, connection to grounding electrodes, and requirements for the grounding electrode. See Figure A to the right for reference.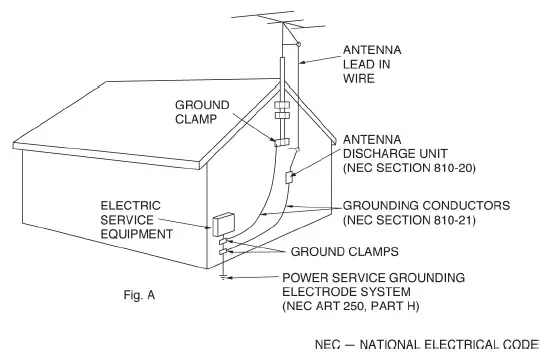
LIGHTNING – For added protection for the product during a lightning storm, or when it is left unattended and unused for long periods of time, unplug it from the wall outlet and disconnect the antenna or cable system. This will prevent damage to the product due to lightning and power line surges.
POWER LINES – An outside antenna system should not be located in the vicinity of overhead power lines or other electric light or power circuits. When installing an outside antenna system, extreme care should be taken to keep from touching such power lines or circuits as contact with them might be fatal.
OVERLOADING – Do not overload wall outlets, extension cords, or integral convenience receptacles, as this can result in a risk of fire or electric shock.
FUSE REPLACEMENT – Ensure that main power is disconnected prior to replacing the fuse. Replace the fuse only with a fuse of the same rating and power, as described on the fuse panel.
OBJECT AND LIQUID ENTRY – Never push objects of any kind into this product through openings, as they may come into contact with dangerous voltage points or short out parts that could result in fire or electric shock. Never spill liquid of any kind of the product.
SERVICING – Do not attempt to service this product yourself, as opening or removing covers may expose you to dangerous voltage or other hazards. Refer all servicing to qualified service personnel.
DAMAGE REQUIRING SERVICE – Unplug this product from the wall outlet and refer servicing to qualified service personnel under the following conditions:
- When the power supply cord or plug is damaged.
- If liquid has been spilled, or objects have fallen into the product.
- If the product has been exposed to rain or water.
- If the product does not operate normally by following the operating instructions. Adjust only those control that are covered by the operating instructions, as an improper adjustment of other controls may result in damage and may require extensive work by a qualified technician to restore the product to normal operation.
- If the product has been dropped or damaged in any way.
- When the product exhibits a distinct change in performance, indicating a need for servicing.
REPLACEMENT PARTS – When replacement parts are required, be sure the service technician has used replacement parts specified by the manufacturer or have the same characteristics as the original part. Unauthorized substitutions may result in fire, electric shock, or other hazards.
SAFETY CHECK – Upon completion of any service or repairs to this product, ask the service technician to perform safety checks to determine that the product is in proper operating condition.
WALL OR CEILING MOUNTING – The product should NOT be mounted to a wall or ceiling.HEAT – The product should be situated away from heat sources such as radiators, heat registers, stoves, or other products (including amplifiers) that produce heat.
UNPACKING
Every APX12 GO BT has been thoroughly tested and has been shipped in perfect operating condition. Carefully check the shipping carton for damage that may have occurred during shipping. If the carton appears to be damaged, carefully inspect your units for any damage and be sure all accessories necessary to operate the system have arrived intact. In the event that damage has been found or parts are missing, please contact our toll free customer support number for further instructions. Please do not return the speaker to your dealer without first contacting customer support.
SAFETY
The APX12 GO BT speaker can easily reproduce sound pressure levels (SPLs) sufficient enough to cause severe and permanent hearing damage. A great degree of care should be taken to protect your ears from prolonged exposure to SPL in excess of 85 dB.
- For adult use only. Keep out of reach of children.
- Be sure all power is turned off before connecting speakers.
- When using the speaker, always make sure the grille is attached.
- Always use a power cord that meets the manufacturer’s exact power specifications.
- Disconnect from main power before making any type of connection.
- To reduce the risk of electrical shock or fire, do not expose this unit to rain or moisture.
- This speaker is intended for indoor use only. Use of this product outdoors voids all warranty coverage.
- Always mount this speaker in a safe and stable manner.
- Power Cord Protection – Power supply cords should be routed so that they are not likely to be walked upon or pinched by items placed upon or against them, paying particular attention to cords at plugs, convenience receptacles, and the point at which they exit from the speaker.
- Heat – The speaker should be situated away from heat sources such as radiators, heat registers, stoves or other mixers (including amplifiers) that produce heat.
- Be sure to save the packing carton in the event that the unit needs to be returned for service.
- Read all documentation before attempting to operate your new device. Please save all your documentation for future reference.
- Do not spill water or other liquids into or onto your speaker.
- Be sure that the local power outlet matches that of the required voltage for your speaker.
- Do not attempt to operate this speaker if the power cord has been frayed or broken. Please route your power cord out of the way of foot traffic.
- Always have the gain controls set to their lowest level during initial power-up to prevent speaker damage.
- Servicing – The user should not attempt to service the speaker beyond what is described in this manual. All other servicing should be referred to qualified service personnel. The speaker should be serviced by qualified personnel when any of the following occurs:
- Objects have fallen onto or liquids have been spilled into the speaker.
- The speaker has been exposed to rain or water.
- The speaker does not appear to operate normally or exhibits a change in performance.
- The terminal/cross-over plate has been damaged.
KEY FEATURES
- LCD Display
- MP3 Playback
- Wireless Pairing with Mobile Phone, Tablet, or Laptop
- FM Tuner
- SD Card Port
- USB Port
- Mini Jack Input (1/8”)
- XLR In/Out for PA or DJ Mixer
- UHF Handheld Microphone
- Remote Control
- Battery Power
- Built-in Wheels and Retractable Handle
INCLUDED ITEMS
- Power Cable (x1)
- UHF Wireless Microphone (x1)
- Remote Control (x1)
PRODUCT REGISTRATION
The APX12 GO BT carries a one year (365 days) limited warranty. Please fill out the enclosed warranty card to validate your purchase. All returned service items, whether under warranty or not, must be freight pre-paid and accompanied by a return authorization (R.A.) number. The R.A. number must be clearly written on the outside of the return package. A brief description of the problem as well as the R.A. number must also be written down on a piece of paper and included in the shipping container. If the unit is under warranty, you must provide a copy of your proof of purchase invoice. You may obtain an R.A. number by contacting customer support at (323) 582-2650. All packages returned to the service department not displaying an R.A. number on the outside of the shipping package will be returned to the shipper unopened. The serial and model number for this unit are located on the rear panel. Please write down the numbers here and retain them for future reference.
CONTROLS AND FEATURES
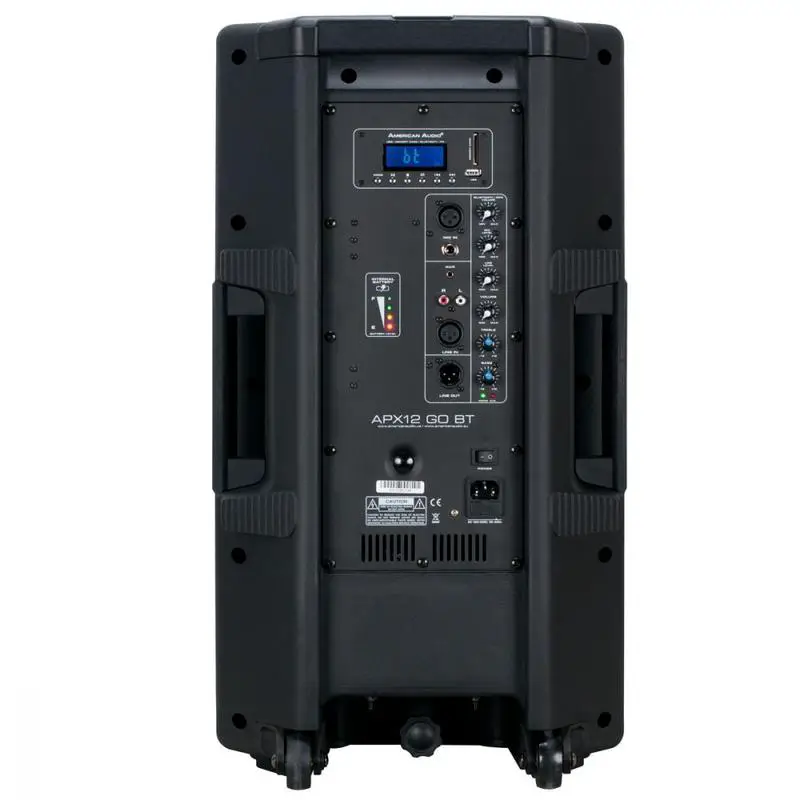
REAR PANEL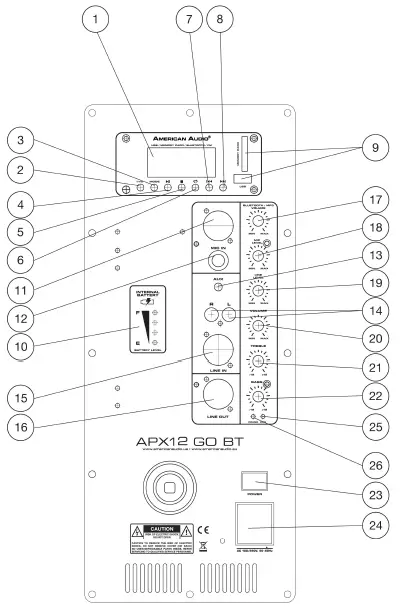
- LCD Screen
- TWS Button
- Mode Button
- Play/Pause Button
- Stop Button
- Repeat Button
- Skip Back Button
- Skip Forward Button
- Flash Drive Slot
- Battery Charge Indicator
- XLR Microphone Input
- MP3 Input
- 1/8” Stereo Mini Jack Input
- Left/Right Line Input
- XLR Line Input
- XLR Line Output
- MP3 / Volume Control
- Mic Input Volume Control
- Line Input Volume Control
- Wireless Mic Vol. Control
- Treble Volume Control
- Bass Volume Control
- Power Switch
- Power Inlet w/ Integrated Fuse
- Power Indicator Light
- Clip Indicator Light
REMOTE CONTROL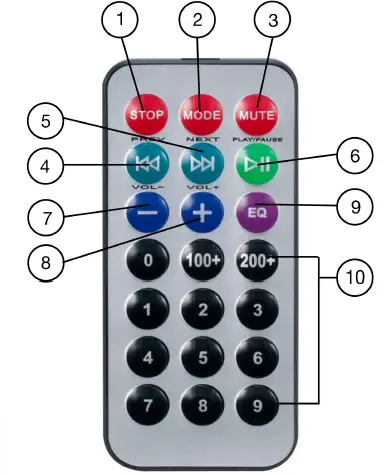
- Stop
- Switch Mode (USB / SD / Bluetooth)
- Mute
- Skip to Previous
- Skip to Next
- Play / Pause
- Decrease Volume
- Increase Volume
- Tone Level Control
- Number Pad
OPERATION
WIRELESS MICROPHONE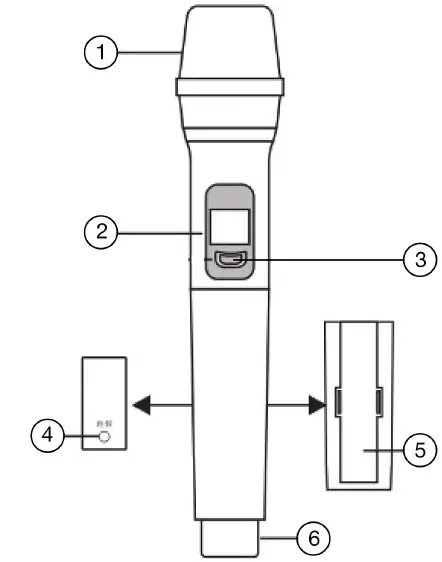
- Microphone Head
- Display Panel
- Power Switch
- Frequency Modulation
- Battery Cover
- End Cap
NOTE: Signal transmitter is housed in the End Cap. In order to minimize risk of signal interference, avoid gripping the microphone by the end cap when not in use.
Connecting the Microphone Wirelessly to Your Speaker:
- Check that the microphone has been fitted with two (2) AA batteries. Switch on both the microphone and the main power switch on the speaker.
- Your wireless microphone and built-in receiver come preset from the factory, but should the need arise to re-pair these devices, press and hold the Frequency Modulation button on the microphone until the Display Panel illuminates and flashes.
- Wireless pairing should now be complete.
WIRELESS MICROPHONE
SAFETY WARNINGS!
- Do not expose to water or liquids of any kind!
- Do not expose to heat or fire!
- Do not use in locations with a high risk of signal interference, such as airports or hospitals!
- Do not disassemble the product! There are no user-serviceable parts contained inside this unit, and attempting any repairs yourself may void the manufacturer’s warranty! Contact an authorized service representative for all repair needs!
- If the product is not working as intended, or displays a noticeable change in performance, please contact an authorized representative for any repair needs!
Accessory Specifications:
| Bandwidth: | 500 MHz |
| Maximum Offset Frequency: | + 25 KHz (comprehensive characteristics) |
| Modulation Method: | FM (frequency modulation) |
| Frequency Response Range: | 50 Hz ~ 15KHz |
| Signal to Noise Ratio: | 72 dB |
| Operation Temperature: | 14°F ~ 122°F (-10°C ~ 50°C) |
| Operating Voltage: | 3V |
| Effective Range: | 65 feet (20 meters) |
WIRELESS PAIRING FOR MOBILE PHONES AND OTHER DEVICES
- Ensure that or wireless pairing is enabled on the wireless device that is being paired to the APX12 GO BT.
- On the device being paired to the APX12 GO BT, select the APX12 GO BT speaker by selecting the device named “APX12 GO BT.”
- The APX12 GO BT will automatically pair wirelessly with your device.
TWS SET UP: This device’s True Wireless Stereo (TWS) capability allows the user to pair the audio source wirelessly to two separate devices and transmit separately to the left and right channels. To set up TWS, follow the directions below:
- Connect both speakers to power, and turn their power switches on.
- Press the MODE button to activate Bluetooth on the speakers. “bt” will be displayed on the screen.
- Press the “TWS Stereo Link” button. The device will chime to indicate that TWS has successfully been enabled.
FM RADIO PROGRAMMING
- Find the row of buttons located below the display screen, and use the MODE button to select FM radio mode.
- Press the Play/Pause button (2nd button from the left) to scan for all available FM radio stations.
- Use the Skip Backward button (2nd button from the right) and the Skip Forward button (rightmost button) to scroll through the stations that were found in Step 2.
Please note: The speaker may not be able to pick up a particular FM radio channel if the signal from the channel is too weak.
POLE MOUNTING
The APX12 GO BT is designed to accommodate a pole-mounted installation.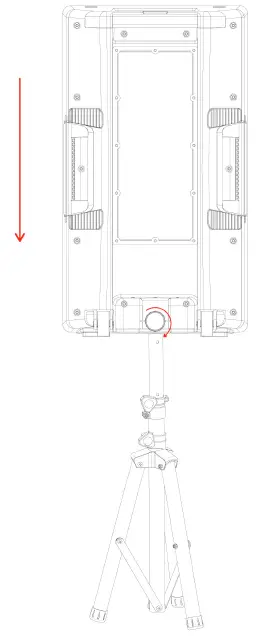
Use the two carry handles mounted located on both side of the rear panel to carefully lift the speaker and lower it onto a compatible mounting device. PRODUCT IS HEAVY! USE GOOD FORM WHEN LIFTING IN ORDER TO PREVENT INJURY! SEEK ASSISTANCE FROM ANOTHER PERSON IF NECESSARY! Make sure that the mounting device inserts fully and securely into the pole mounting slot on the underside of the speaker. Secure the speaker in place by tightening the mounting knob at the bottom of the back side of the speaker.
ENSURE THAT BOTH THE MOUNTING DEVICE AND THE MOUNTING SURFACE ARE STABLE! IF USING A COLLAPSIBLE TRIPOD, ENSURE THAT THE TRIPOD LEGS ARE DEPLOYED TO A STABLE POSITION! NEGLECTING TO DO SO MAY RESULT IN BODILY INJURY AND DAMAGE TO YOUR SPEAKER AND/OR MOUNTING DEVICE!
TECHNICAL SPECIFICATIONS
Speaker:
- 12″ Woofer with 1.5″ Voice Coil
- 1″ High Frequency Driver
- 200 Watts Peak Power
- Class D Amplifiers with 65 Watts RMS
- Freq Response: 40Hz-18KHz
- Sensitivity: 93 +/- 2 dB
Features:
- Battery power up to 8 hours of use
- Battery life indicator
- wireless connectivity
- LCD display
- Plays MP3 files from USB or SD Card inputs
- FM tuner
- Includes retractable carrying handle and wheels
- Tripod mount on the bottom of speaker
Input / Outputs:
- Inputs: XLR, 1/8-inch jack, RCA
- Output: XLR
- Mic Inputs: XLR or ¼-inch
Rear Controls:
- MP3 Volume Control
- Microphone Volume Control
- Line Level Control
- Master Volume Control
- Treble Control
- Bass Control
Wireless Remote Controls:
- Play/Pause
- Volume Control
- EQ Control
- Mute
- Mode
- Previous / Next
Power:
- Switching AC Power Supply: AC115/230V
- Battery: 12V, 700mA
Dimensions / Weight:
- Dimensions
- Length: 16.375” (415mm)
- Width: 14” (355mm)
- Height: 27.5” (700mm)
- Weight: 35 lbs. / 16kg.
Includes:
- Power cord
- One wired UHF microphone
- Wireless remote control
Specifications may be subject to change without advance notice.
DIMENSIONAL DRAWINGS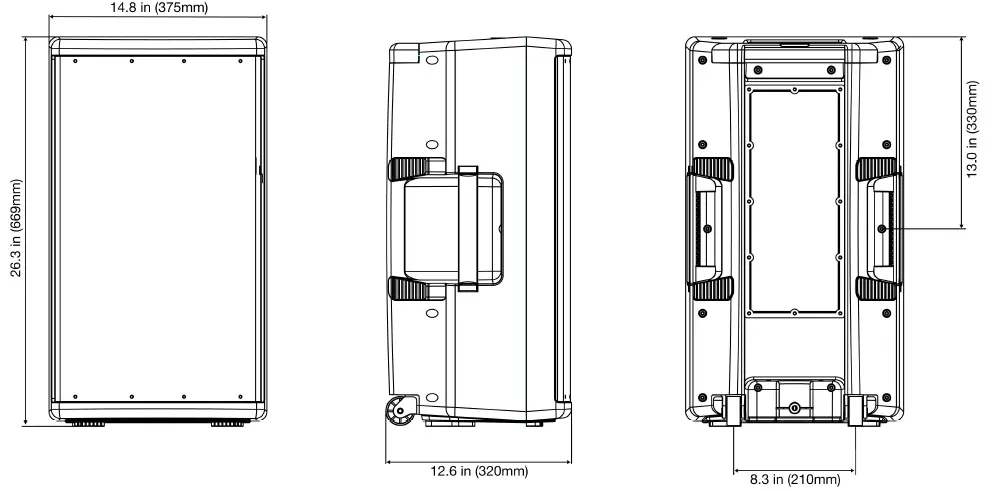
 report this ad
Drawings shown may not be to scale.![]()
References
[xyz-ips snippet=”download-snippet”]