American International Mounting Kit User Manual
VEHICLE APPLICATION
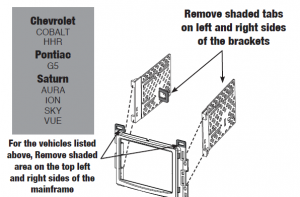
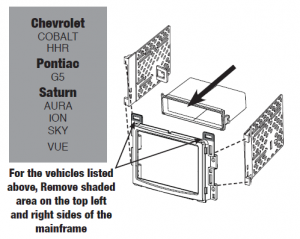
Chevy
2005-10 COBALT2005-06 EQUINOX2006-11 HHR2004-12 MALIBU2004-07 MALIBU MAXX
Pontiac
2007-10 G52005-09 G62006-10 SOLSTICE2006 TORRENT
Saturn
2007-09 AURA2006-07 ION2007-09 SKY2006-07 VUESAAB2007-08 9-7X
DASH DISASSEMBLY
- Carefully unclip the thin side trims from both the left and right side of the radio dash trim bezel.
- Remove the (2) 9/32 screws from below the driverʼs side under-dash panel.
- Unclip and remove the side edge panel from the left side of the dash.
- Remove the (2) 9/32 screws securing the left side of the driverʼs under-dash panel.
- Unclip the wire harness from the side trim of the driverʼs side under-dash paneUsing a panel removal tool, carefully pry downward on the panel at the bottom of the driverʼs side under-dash panel. (There are (3) panel clips).
- Using a panel removal tool, unclip the top edge of the driverʼs side lower dash panel and lower out of the way.
- Lower the glove box door all the way down.
- Remove the single 9/32 screw from the middle of the glove box door latch bar.
- Remove the (4) 9/32 screws securing the glove box dash section to the sub-dash.
- Carefully remove the side panel from the right side of the dash.
- Repeat steps 4 and 5 above for the right side of the dash.
- Unclip and lower the panel below the glove box and remove the single 9/32 screw from the lower left side of the glove box panel, and remove glove box and panel.
- Starting from the bottom of the radio/climate control trim bezel, pull bezel outward to unfasten.
- Disconnect the hazard harness from the radio/climate control bezel and remove bezel.
- Loosen the (2) 9/32 screws securing the climate controls.
- Remove the (4) 9/32 screws securing the radio to the sub-dash.
- Carefully pull radio upward and outward, disconnect the wire harness and antenna lead and remove radio.
DASH DISASSEMBLY
- Carefully pop trim above glove box with a panel removal tool. Remove trim at the top left of dash bezel.
- Remove dash panel with panel removal tool.Note: Dash panel clips are very tight.
- Disconnect wire harness behind dash panel
- Remove (4) 9/32 screws and pull out radio. Unplug wire harness and antenna adapter
DASH DISASSEMBLY
- Starting from the top edge of the power window controls, gently pry back on the window button trim, pull back to remove.
- Remove the (2) 9/32 screws securing the upper top edge of the forward section of the center console.
- Starting from the rear of the forward console shifter trim, carefully pry upward on trim to release trim, pull the console trim, disconnect the window harness and remove console trim.
- Starting from the bottom edge, carefully pull the Radio/Climate control trim bezel forward, disconnect the harnesses attached to the rear of the trim bezel and climate controls, and remove trim bezel.
- Loosen the (4) 9/32 screws securing the climate control module about _ inch (it is not necessary to remove the screws or module) and pull outward.
- Remove the (4) 9/32 screws securing the factory radio to the sub-dash, pull radio forward, disconnect the wire harnesses and antenna lead and remove radio.
DASH DISASSEMBLY
- Carefully pry back and remove trim panel at the rear of the shifter console.
- Remove the rubber mat from around the rear of the shift lever.
- Carefully pry up the rear of the dash trim from around the shift lever and disconnect the window harness at the back edge of the trim.
- Carefully pry dash bezel forward, disconnect the hazard harness and lay the bezel gently out of the way.
- Remove the (4) 9/32 screws securing the factory radio to the sub-dash.
- Carefully pull radio forward, disconnect the wire harness and antenna lead and remove radio.
DASH DISASSEMBLY
- Remove side trim panels from both drivers and passenger side dash with a flat blade screwdriver.
- Remove (2) 9/32 screws on both drivers and passengers side dash.
- Remove (3) 9/32 screws from under steering column panel. Remove and set aside.
- Remove (9) 9/32 screws which hold entire glove box assembly in place. Lower glove box and set aside.
- Gently remove dash assembly from around radio, uncliping 1 plug located between vents. Remove (4) 9/32 bolts securing radio in place.
- Remove (2) 9/32 bolts securing heater control assembly in place. Slide heater control assembly forward and remove factory radio.
DASH DISASSEMBLY
NOTE: OEM amplifier located in rear passenger side trunk, underneath taillight
- Remove the trim around the shift knob.
- Remove panel with storage pocket, and unplug the power-outlet plug.
- Remove the trim panel which goes across from the passenger side to the ignition switch and underneath/around the radio/climate controls. Note: you will need to unsnap the instrument cluster panel to allow trim panel to completely come out.
- Remove the 6 (7mm) screws holding the radio and climate controls together.
- Remove the radio and disconnect all plugs from the radio
DASH DISASSEMBLY
- Remove the trim around the shift-knob.
- Remove entire panel around the cup holders and shift-knob.
- Disconnect the power-outlet plug from panel.
- Starting at the bottom, underneath the climate controls, remove the dash panel surrounding the climate controls and radio (panel includes above 2-vents and storage pocket). Disconnect the hazards light switch and airbag light.
- Remove 4 (7mm) screws holding the radio and disconnect the harnesses from the radio.
DASH DISASSEMBLY
- Remove (by pulling upward) the entire panel (includes window switches) surrounding the shift-knob.
- Disconnect the window switch and power-outlet plug(s).
- Remove 4 (7mm) screws from storage pocket/seat heaters.
- Starting at the bottom, pull panel (containing climate controls) and slowly work your way to the top. This part is all one piece from the bottom of the climate controls to the top of the dash above the radio.
- Disconnect the climate control, hazard and passenger airbag light plug(s).
DASH DISASSEMBLY
- Carefully pry outward and remove the cover place from behind the center console handle on the right side of the console.
- Remove the (2) 10 mm bolts securing the handle.
- Using a fine edge panel removal tool, carefully pry the entire dash trim bezel outward.
- Disconnect all harnesses attached to the rear of the trim bezel.
- Carefully lean the entire trim bezel towards the driver’s side and rest out of the way.
- Remove the (4) screws securing the factory radio to the sub-dash, pull the radio forward, disconnect all harnesses and antenna lead and remove radio.
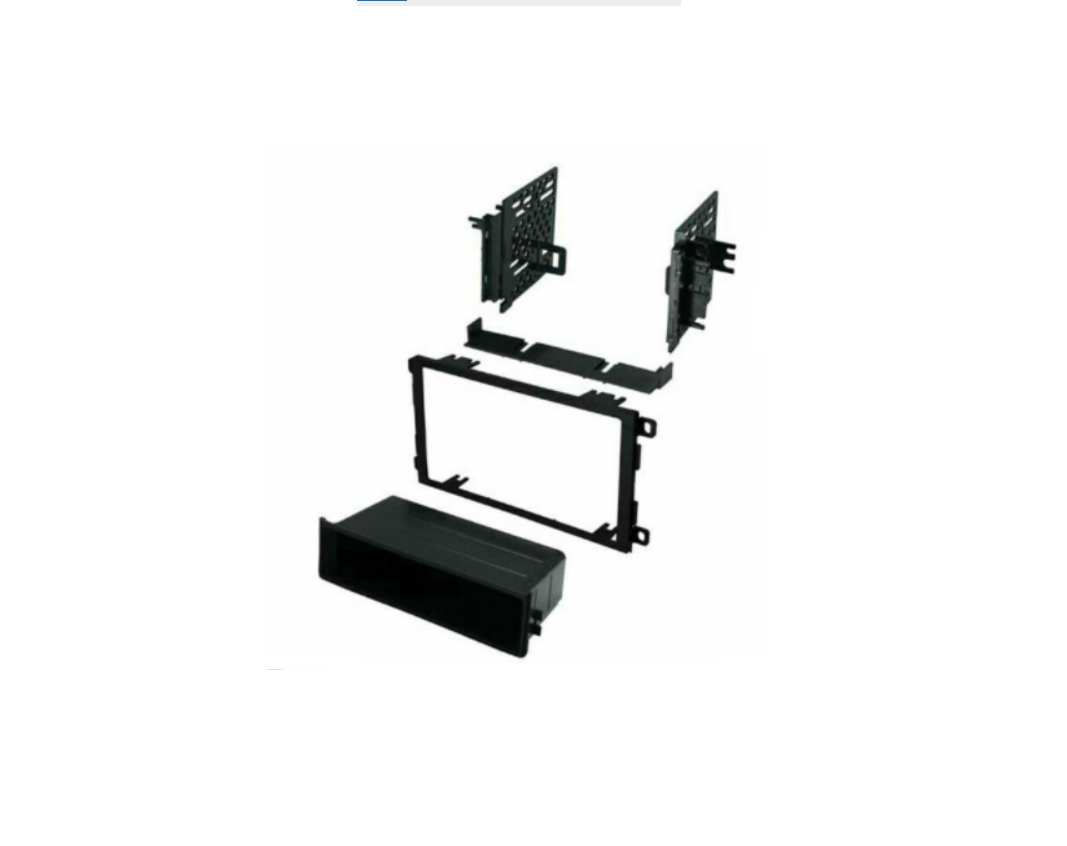
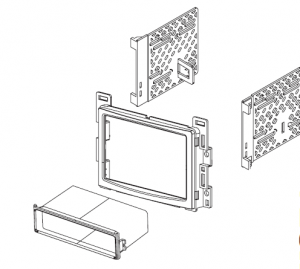
DOUBLE DIN MOUNT INSTALLATION INSTRUCTIONS
- Attach left and right mounting brackets to the kit as shown in Figure B.
- Insert ISO mountable radio between ISO mount brackets and loosely attach to sides of radio using screws provided with radio when possible or screws supplied with kit.
- Slide radio forward or backward for desired look and tighten screws.
- Support the rear of the radio component(s) with back strap (not included) optional.
SINGLE DIN MOUNT INSTALLATION INSTRUCTIONS
- Insert ISO brackets to rear of kit as shown in Figure C
- Insert pocket into lower section of kit from rear & lock into slots of mounting brackets.
- Insert ISO mountable radio between ISO mount brackets and loosely attach to sides of radio using screws provided with radio when possible or screws supplied with kit.
- Slide radio forward or backward for desired look and tighten screws.
- Attach a rear support bracket to the rear of the new radio and adjust as necessary to support the weight of the radio (Optional)
Read More About This Manual & Download PDF:
References
[xyz-ips snippet=”download-snippet”]