
AMOS Robot

AMOS Quickstart Instructions
This guide is intended to allow you to start using the AMOS robot as quickly as possible. It is presented in a step-by-step manner and assumes that the robot is configured in its default “as-shipped” state.
1. Recommended Hardware
- Windows PC computer with the following minimum specifications: (i) at least 20 Gbytes of available hard drive memory for program and data file storage, (ii) at least 8 Gbytes RAM, (iii) i3 or equivalent (or better) processor.
- Optional: For direct connection to the Raspberry Pi 3B+ processor on AMOS, a USB mouse, USB keyboard, and an HDMI video monitor with HDMI cable for connection to the Raspberry Pi 3B+.
- Optional: Ethernet cable for direct connection to the Ethernet port on the Raspberry Pi 3B+ processor board on AMOS.
- Optional: USB hotspot stick for enabling LTE communications on AMOS. For example see: https://www.bell.ca/Mobility/Products/Huawei-E8372-Turbo-Stick .
2. Recommended Software
- Windows 10 operating system.
- PuTTY terminal software for logging in remotely to the Raspberry Pi 3B+ processor on AMOS. (Free download available here: https://putty.org/).
- BoatCaptain desktop software. (Free download from In Nature Robotics available here: https://www.innaturerobotics.com/support).
- Optional: BoatServer software. (Free download from In Nature Robotics available here: https://www.innaturerobotics.com/support).
3. Setup
Note: The following setup instructions assume that AMOS is in its “as-shipped” default state with respect to communications and startup options.
- Turn on AMOS, wait for a short sequence of beeps, followed by about 10 individual beeps at one second intervals, and then 3 or 4 rapid beeps. During these beeps, the propeller will rotate slightly back and forth.
- Open the case of the AMOS Remote and connect the USB cable between the micro-B USB socket on the board to an available standard-A USB socket on the PC.
- If this is the first time that the AMOS Remote has been plugged into the computer, it might take a minute or two for Windows to download the necessary software drivers.
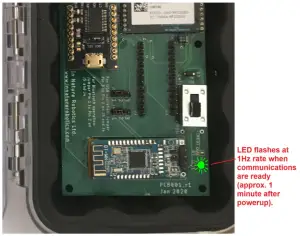
- The green LED on the AMOS Remote board should initially turn on with a steady green color. After it has been on for one minute, it will begin to flash at a 1 Hz rate. Once it begins to flash, it is ready to connect to the AMOS robot.

- Start the BoatCaptain software on the PC (note: an Internet connection is required to download and see map graphics within the software).
- Click the ‘Preferences | Connection’ menu item, make sure that the ‘Direct Link’ radio button is selected in the “Connect to AMOS” popup window, and then make sure that the COM Port in the dropdown window corresponds to the AMOSRemote device. (Note: If you have multiple COM ports on your PC and are unsure whether the listed COM port corresponds to the AMOS Remote, you can take note of which COM ports are listed in the dropdown control, close the “Connect to AMOS” window, unplug the AMOSRemote module from the PC, and then click the ‘Preferences | Connection’ menu item again. The COM Port in the dropdown control that is missing corresponds to the AMOSRemote module. You can then close the window again, plug the AMOSRemote back in (wait for one minute for the LED to begin flashing), click the ‘Connect | Preferences’ menu item again, and select the desired COM port.)
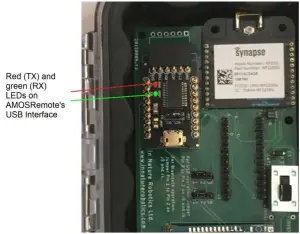
- Once the desired COM port is selected, click the ‘OK’ button. If a valid communications response is received from AMOS, a popup message “Connected to AMOS” should appear. If there is a problem connecting to AMOS for some reason, the popup message “Error, could not connect to AMOS” will appear. In this case, please check the following:1. Communications antennas on AMOS and the AMOSRemote are properly screwed in and the AMOS robot is within adequate range for communications (up to 500 m on flat water with line-of-sight conditions).2. Check the COM port for the AMOSRemote in Windows Device Manager to ensure that all drivers have been installed properly.3. Check the red TX LED indicated below on the AMOSRemote after you click the ‘OK’ button in the “Connect to AMOS” window to ensure that it briefly flashes red, indicating that a request for data has been sent to AMOS. If bytes are received from AMOS, the RX LED (see below) should briefly flash green.
- If AMOS is located outside, it should acquire a valid GPS lock within 5 minutes after being powered on. At this point, once communications are established, the software will continue to request status updates from AMOS every 10 seconds. These updates include the boat GPS location, interior temperature within the main CPU box, battery voltage, and boat heading.
- Verify that the AMOS AirProp is functioning correctly by clicking the up arrow button in the top-right corner of the screen a few times, or by clicking the up arrow key on the computer keyboard a few times. The air propeller should start to turn, and the indicated speed should increment by 1 for each time that the up arrow was pressed. The software is configured to allow a maximum default speed of 7. Then click the left or right arrows a large number of times (10 or 20) in rapid succession to observe that the AirProp is moving properly in one degree increments as the left or right arrow keys are pressed. Clicking the stop button or the space bar stops the rotation of the AirProp and brings it back to the zero degree (forward facing) angle.
- A new AMOS robot is not configured to follow any particular sampling script on startup. A simple sampling script can be created in the BoatCaptain software by zooming and panning the map to the geographic region of interest, and then left-clicking on the points where AMOS is expected to travel and collect sample data. Sample data is collected at each of the vertices along the route. During sampling, the AMOS robot shuts off its propeller(s), pauses for 5 seconds, and then collects data from the configured sensor probes. The types of sample data collected will differ depending on the sensor options purchased, but these can be configured by clicking the ‘Preferences | Sensors’ item from the main menu. By default, the sample data is saved to a comma-delimited text file on AMOS called “sensordata.txt”. The distance of the route that you define, and an estimate of the time required to complete it appear in the top-right corner of the screen. If you make a mistake and wish to remove a point, you can right-click the point to delete it. Once you are satisfied with the defined route, click the ‘Save Course’ button in the top-right portion of the screen. This saves the defined sampling route as a text file in a location on your PC. Once saved, you can send the sampling route to AMOS, as described below.
- To send the sampling route to AMOS, make sure that AMOS has been connected to the computer (see step 6 above). Click the ‘File | Remote AMOS program info’ menu item. Click the ‘Load new script file’ button, and then select the text file that was saved in step 10 above. By default, the script file selected will also be run every time that AMOS is powered up or rebooted. The “Remote Script Settings” window will then indicate the name of your script that is currently running on AMOS.
- The Remote Script Settings window can be closed by clicking the ‘OK’ button. AMOS will control the power and direction of the AirProp to navigate itself over the defined course, pausing for about 5 seconds at each point to acquire sample data. It may also pause intermittently between points to verify and adjust its course. If AMOS remains within radio contact, periodic GPS updates will be registered on the map in the BoatCaptain software as white circles.
- Once the sampling is complete, the data file can be downloaded from AMOS by clicking the `File | Download data file’ menu item. Then the same data file can be opened by clicking on the `File | Open data file’ menu item and selecting the desired parameter to view.


Questions?
Please contact us if you have any questions about the software, hardware or anything else related to our products.
 report this ad
Contact: Murray Lowery-SimpsonEmail: [email protected]Tel: 506-457-8365Address: 116 Ferguson Road, Hanwell, NB, Canada E3E 2E5
References
[xyz-ips snippet=”download-snippet”]