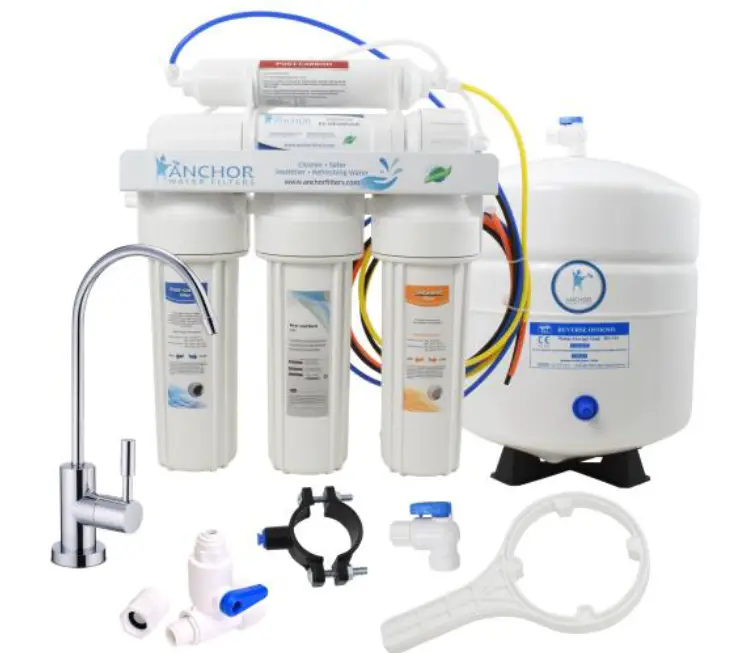
ANCHOR AF-5002 Reverse Osmosis Water Filter System
Cartridge Change Procedure
This RO system contains filters that must be replaced at regular intervals to maintain proper performance. Use only Anchor approved filters. Please see page 7 for the recommended interval for changing the filters. Local conditions may dictate more frequent changes.Use a drip pan to catch any water that may spill when the filter housing is removed.
- Shut off the water supply.
- Turn off the tank ball valve by turning 90 degrees.
- Open RO faucet to drain water left in the tube.
- Follow the procedures below for filters and membrane replacement.
Filter Cartridge Replacement
- Lift the filter housing up 1 inch and slide the housing wrench in. Use one hand to hold the system and the other hand to turn the wrench clockwise to open the housing.Note: If it is too tight to open the housing, try unplugging the fitting or tubing in order to release the air and water pressure inside the housing.
- After opening the housing, remove the used filter and put the new filter into the housing. Make sure the O-ring is in place, and turn the housing counterclockwise to close. Make sure it is tight.
- Repeat previous step on the second and third filter changes.
- Turn on the water supply and make sure there are no leaks.
- Let the water drip from the faucet for about 10 minutes. If the water flow is less than 1 cup (8 oz. or 240 ml) per minute, it may be a signal to replace the RO membrane cartridge (See Membrane replacement procedures on next page).
- If the water flow is OK, turn on the tank ball valve. After 1 minute, turn off the RO faucet and complete the filter change procedures.
RO Membrane Cartridge Replacement
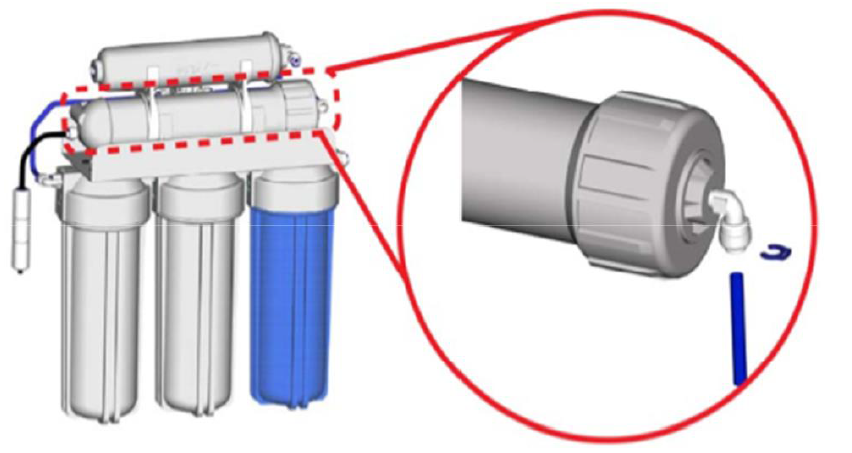
- Disconnect the tubing from the fitting as shown in the diagram below.

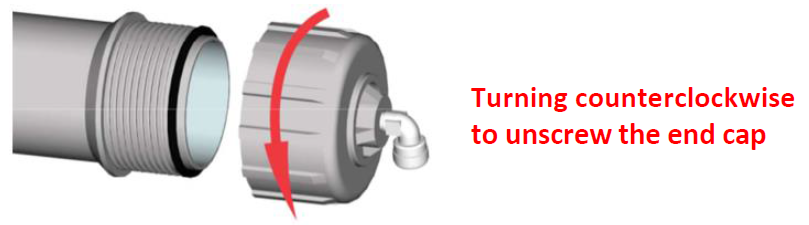
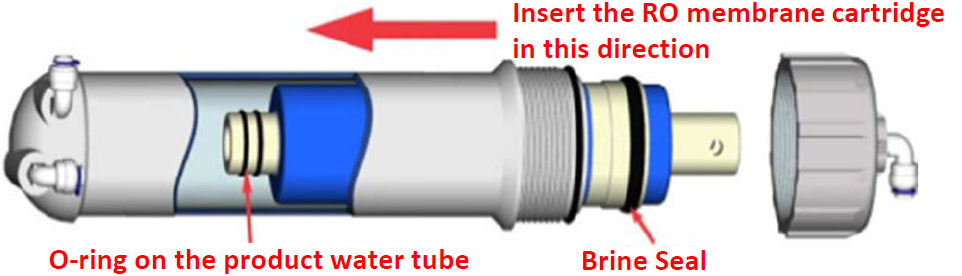
- Remove the membrane housing end cap by turning counter-clockwise as shown in the diagram below. Slide out the used membrane and discard.
- Insert the RO membrane cartridge into the housing as shown in the diagram below. The O-rings on the product water tube of the RO membrane cartridge MUST FULLY SEAT in the membrane housing for proper operation. Also, make sure that the Brine Seal on the membrane seals with no gaps or wrinkles inside the membrane housing. Once the RO membrane cartridge is installed, replace the end cap and reconnect the tubing.
Filter Cleaning Procedures
The following system and tank cleaning procedures are recommended every 12-18 months.
- Shut off the source water supply to the RO system.
- Open the RO faucet and depressurize the RO system and storage tank.
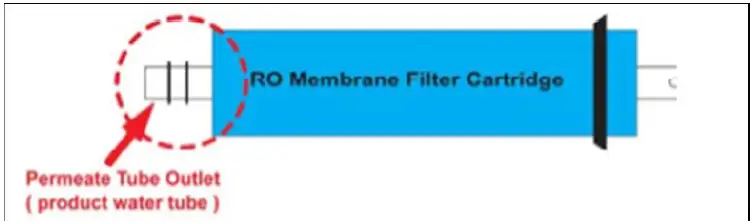
- Remove pre-filter cartridges, post-filter cartridges, and RO membrane. Discard or prepare for cleaning. If the RO membrane element is to be reused, disinfectant solution should be introduced into the permeate tube outlet (see below picture) sufficient to remove bio-film in this vulnerable area before reinserting the membrane into the housing.
- Wash the internal housing areas with warm soapy water using clean brush (do not scratch the surface of the housings). Be sure to clean O- ring grooves thoroughly. Remove the existing O-ring. or prepare for cleaning.
- Rinse off all housing pieces with clean water to remove soap.
- Replace O-rings and lubricate per manufacturer’s instruction.
- Pour recommended amount of disinfectant solution into each of the clean housings and replace housing on the RO system.
- Disconnect RO storage tank from the system.
- RO storage tank cleaning procedure:Recommended items:
- Tank sanitizer feeder or small filter housing with fittings and tubing
- Disinfectant solution
- Pressure gauge and air pump
- The tank should be empty. Check the air pre-charge pressure with an accurate gauge (low pressure type 0-12 lbs.) The average tank pressure should be 6–8 psi (when the tank is empty).
- Fill the tank sanitizer feeder with the recommended disinfectant dosage and connect the feeder to the water supply and RO storage tank.
- Turn on water supply and force water and disinfectant solution into the RO storage tank. The storage tank should feel heavy when filled.
- The disinfectant solution should remain in the tank a minimum of 10 minutes. If the tank has not been sanitized in over a year, leave the solution in for 20 to 30 minutes. Turn off the water-supply valve and the RO storage-tank valve. Disconnect the sanitizer feeder and connect the RO storage tank to the RO unit (the tank ball valve should remain closed).
- Open the feed-water valve and open the RO faucet until water flows freely from the spout. Close the RO faucet. Hold the disinfectant solution in the RO system, including the tubing and faucet, for a minimum of 10 minutes. Open the tank ball valve.
- Shut off the feed-water valve and open the RO faucet. Let water run out until the flow stops at the RO faucet.
- Open the feed-water valve. Let water flow freely from the faucet for three minutes. Shut off the water at the source water supply with RO faucet open.
- When the flow of water has stopped at the RO faucet, remove the filter housing sumps and membrane housing from the RO system. Replace the filters and membrane according to the service life.
- Replace the housings on the RO system. Open the source-water valve and allow the water to flow from the faucet. Because some of the disinfectant may still be in the system, the system should be flushed prior to using the water for human consumption.A maintenance record should be kept for the RO system, including information about the replacement parts, when service was performed, and by whom.
Troubleshooting
Note: Turn off the system before servicing or inspecting
| PROBLEM | CAUSE | SOLUTIONS |
| Milky colored water | Air in system | Air in the system is a normal occurrence with initial startup of the RO system. This milky look will disappear during normal use within 1 to 2 weeks. |
| Noise from faucet | Air gap faucet | Will disappear after system shut down. |
| Location of drain saddle | Relocate the drain to above water trap. | |
| Restriction in drain line | Blockage sometimes caused by debris from garbage disposal or dishwasher | |
| Small amount of water from RO drinking faucet. | System just starting up | Normally it takes 2–3 hours to fill tank. Low water pressure and/or temperature can reduce production rate. |
| Air pressure in the storage tank is low | Add pressure to storage tank. The pressure should be 8–10 psi when the tank is empty. | |
|
Slow production or no water from RO drinking faucet |
Low water pressure | Add a booster pump. |
| Crimps in tubing | Make sure tubing is straight. | |
| Clogged pre-filters | Replace pre-filters. | |
| Fouled membrane | Replace membrane. | |
| Water taste or smell offensive | Post carbon is depleted | Replace post carbon. |
| Fouled Membrane | Replace membrane. | |
| Sanitizer not flushed out | Drain storage tank and refill it overnight. | |
| No drain water | Clogged flow restrictor | Replace flow restrictor. |
| Leaks | Fittings are not tightened | Tighten fittings as necessary. |
| Twisted O-ring | Replace the O-ring. | |
| Misalignment of hole in the drain saddle valve | Realign drain saddle valve. |
Filter Maintenance
This maintenance recommendation is intended for maximum efficiency of RO water production by your system.
- It is OK to store filters for several years.
- To keep the unopened filter sealed, place it into an airtight container, preventing it from absorbing air. This prolongs the shelf life of the carbon filter and avoids any possible odor from the air.
Membrane maintenance
- The dry-packed membrane usually has a two-year shelf life. To prolong the shelf life, keep unopened dry membrane in the refrigerator.
- Once used, run the RO system every day for at least 10–15 minutes (about 1 gallon or 4 liters of drinking water). This helps maintain the membrane performance.
- If you will not be using the RO system for weeks, drain the storage tank completely. Fill the tank and drain it twice before using the RO system again.
Filter Cartridge Replacement Cycle
Below is the approximate life of filter cartridges. Age of filters depends on GPD consumed and quality of feed water.
| Model # | Name | Description | Service Time |
| AF-1001 | Sediment Filter | extracts sediment, rust, insects, and other particles | 3-6 months |
| AF-1014 | GAC Filter | removes chlorine and unpleasant taste and odor | 6 months |
| AF-1000 | Carbon Block
Filter |
reduces taste, odor, color,
SOCs, and VOCs |
6 months |
| AF-1007/8 | RO Membrane | removes 99% contaminants that might be present in water | 2-3 years |
| AF-1010 | Inline Post Carbon Filter | further removes unpleasant taste and odor | 6 months |
| AF-1006 | Alkaline Filter | Adds minerals and balances and maintains the pH level | 1 years |
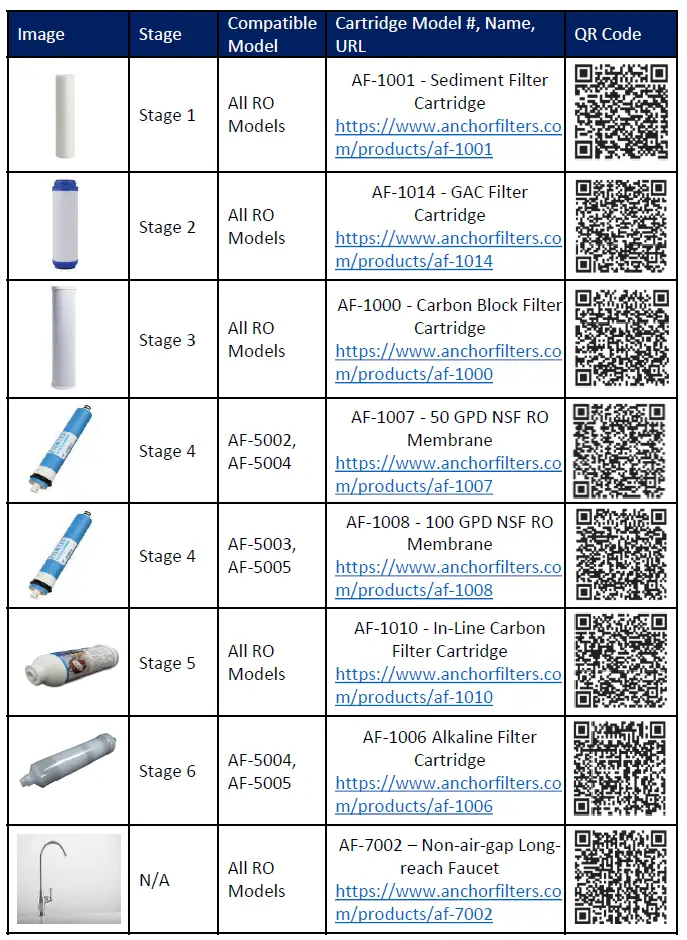
Cartridge/Parts Information
Register Your Product
If you haven’t already registered your RO system, do so now to receive timely reminders for filter replacements & for quick support.
Register here: https://www.anchorfilters.com/product-registration
Technical Support
At Anchor USA, we are always here to help you. With 24-hour access to our company contact web page, you can drop a message or email us directly anytime, and one of our representatives will respond to your query in less than 24-hrs.Web: https://www.anchorfilters.com/contact-usEmail: [email protected]
IMPORTANT!Run only cold water through the unit.Do not use this filter for water that is microbiologically unsafe or of unknown quality.![]()
References
AF-1001 – Sediment Filter Cartridge | Anchor Water Filters
Product Registration | Anchor Water Filters
AF-1014 GAC Cartridge for 10″ Housing – Anchor Water Filters
AF-1006 Alkaline Cartridge | Anchor Water Filter – Anchor Water Filters
AF-1006 Alkaline Cartridge | Anchor Water Filter – Anchor Water Filters
📧[email protected]
AF-1000 – Carbon Block | Anchor Water Filters
Anchor Water Filters – Quality & Affordable
Euro-style Ceramic Disk Long-reach Non-Air Gap NSF Faucet – Brushed Ni – Anchor Water Filters
AF-1010 Post-Carbon Filter | Anchor Water Filter – Anchor Water Filters
Contact us | Anchor Water Filters
Euro-style Ceramic Disk Long-reach Non-Air Gap NSF Faucet – Brushed Ni – Anchor Water Filters
AF-1010 Post-Carbon Filter | Anchor Water Filter – Anchor Water Filters
AF-1001 – Sediment Filter Cartridge | Anchor Water Filters
AF-1014 GAC Cartridge for 10″ Housing – Anchor Water Filters
AF-1014 GAC Cartridge for 10″ Housing – Anchor Water Filters
AF-1006 Alkaline Cartridge | Anchor Water Filter – Anchor Water Filters
AF-1010 Post-Carbon Filter | Anchor Water Filter – Anchor Water Filters
AF-1010 Post-Carbon Filter | Anchor Water Filter – Anchor Water Filters
AF-1001 – Sediment Filter Cartridge | Anchor Water Filters
Euro-style Ceramic Disk Long-reach Non-Air Gap NSF Faucet – Brushed Ni – Anchor Water Filters
AF-1001 – Sediment Filter Cartridge | Anchor Water Filters
Contact us | Anchor Water Filters
Euro-style Ceramic Disk Long-reach Non-Air Gap NSF Faucet – Brushed Ni – Anchor Water Filters
AF-1006 Alkaline Cartridge | Anchor Water Filter – Anchor Water Filters
AF-1000 – Carbon Block | Anchor Water Filters
AF-1014 GAC Cartridge for 10″ Housing – Anchor Water Filters
Anchor Water Filters – Quality & Affordable
Product Registration | Anchor Water Filters
[xyz-ips snippet=”download-snippet”]