
Anderic FD40-H02R/RRTX012 Receiver and Remote Kit User Guide
INTRODUCTION
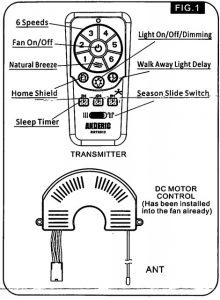
FUNCTIONS
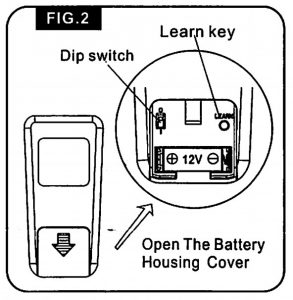 Note:Install the 12-volt battery (not included) to the remote control.
Functions
*Noted: “Tap” in the operation refers to press less thanl sec, and “Press and hold” refers to press more than 1 sec without particular instruction.
- Pairing: The remote control has been paired to this fan at the factory and the dip switch has been switched to “0” inside the battery compartment. If you have more than one remote control in the room, you may need to change the dip switch settings as follows: Slide the dip switch to “1” inside the battery compartment and turn the power to the fan OFF. Then turn the power ON. Within 30 seconds, press the “LEARN” key on the back of the transmitter. Your remote and fan should be synchronized.To verify successful synchronization, the ceiling fan light (if installed) will blink 3 times and remain ON, and the fan will rotate on HIGH speed.
- Season Slide SwitchSlide the toggle switch for summer/winter blade direction per seasonal need.
- Summer setting- slide switch to the left (
 icon) and fan runs counter clockwise rotates clockwis
 - Winter setting- slide switch to the right ( icon) and fan rotates clockwise
- Summer setting- slide switch to the left (
- Fan Speeds: 6 speeds&Natural BreezeTap “1, 2, 3, 4, 5, 6” fan key to switch the fan in corresponding speed: Tap “1” key jn speed 1(Lowest);Tap “2” key !• speed 2;Tap “3” key in speed 3;Tap “4” key |n speed 4;Tap “5” key !n speed5Tap °6″ key in speed 6(Highest).Tap key to enter Natural Breeze mode, It will simulate a natural breeze, as if you were outside.Tap either of /1/2/3/4/5/6“keys, exit natural breeze mode and shift to relative key function.
- Fan On/Off:When fan is on, tap “key: fan turns off.When fan is off, tap “key: fan has memory and turns fan to most recent fan speed.
- Light On/Off/Dimming:Tap light key to turn light on/off. Press and hold for dimming.
- Walk Away Light DelayTap once to enter Walk Away Light Delay mode.When light was on, light on ceiling fan blinks once to confirm activate.When light was off, light is turned on to enter the mode. The light and fan turn off after 1 minute.Oaring Walk Away Light Delay mode, press any other key to cancel function.
- Home ShieldTap Home Shield button , light on ceiling fan blinks two times to confirm Home Shield is active. Fan is off and the light in the A—B—A cycle:A mode: Light randomly turns on for 5-20 minutes. B mode: Light is off for 60 minutes.Oaring Home Shield mode, press any other key to cancel function.
- Sleep Timer:2 hour, 4 hour, 8 hour duration. Turn the fan on at the desired speed.Tap desired timer button once. The fan will turn off automatically after the time has expired. Tap fan °2H” key, the fan turn off after 2 hours.Tap fan “4H” key, theJan turn off after 4 hours. Tap fan “8H” key, the fan turn off after 8 hours.During Sleep Timer mode, Tap” I “key to exit sleep timer mode.Tap Walk Away Light Delay Button or Home Shield Button also exit sleep timer, and shift to relative key function.
- Power Off Memory:When power is off and back again, resume the status of both light and fan before power off, expect for the following situation: 1) It is in sleep timer mode before power off, the fan will be off when power reset. 2) It is in walk away light delay before power off, both the fan and light will be off when power reset.
- BY PASS mode:A If in wrong installation, connecting dimmer in front of this receiver, the receiver will turn to BYPASS mode automatically, which the light just can be ON/OFF only.
INSTALLING THE WALL MOUNT BRACKET
For transmitter placement, locate wall mount in a convenient location Use two screws to install wall mount bracket and slide the small plate into the slot. Then put the transmitter into the bracket.
Trouble shooting
- No flash on transmitter Please check whether battery has installed into the transmitter or battery installed in opposite pole.
- No reaction with transmitter Please refer to E II. 2. Pairing J to re-do the learning process.
For support, go to Anderic.com
Anderice is a registered trademark of Dan’s Electronics Etc., Inc.
[xyz-ips snippet=”download-snippet”]