
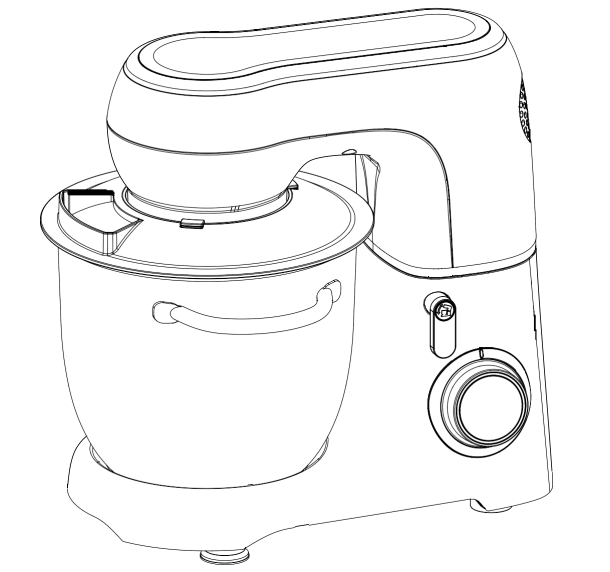
Angel Mini SM-1530 Stand Mixer User Manual
Any questions, please contact us: [email protected]
Keep this manual for future reference and pass it on with the equipment to any future users.
Important Safety Instruction
Read the operating instructions carefully before using electrical appliances, basic safety precautions should always be followed to reduce the risk of fire, electric shock, and/or injury to persons, including the following:
- Read all instructions.
- This appliance is not intended for use by persons with reduced physical, sensory, or mental capabilities, or lack of experience and knowledge unless they are closely supervised and instructed concerning the use of the appliance by a person responsible for their safety.
- This appliance shall not be used by children. Keep the appliance and its cord out of reach of children.
- Close supervision is necessary when any appliance is used near children. Children should be supervised to ensure that they do not play with the appliance.
- To protect against risk of electrical shock, do not put cord, plug, or mixer body in water or other liquid.
- Turn the appliance OFF, then unplug from outlet when not in use, before putting on or taking off parts, and before cleaning. To unplug, grasp the plug and pull from the outlet. Never pull from the power cord.
- Avoid contacting moving parts. Keep hands, hair, and clothing, as well as spatulas and other utensils, away from beaters during operation to reduce the risk of injury to persons and/or damage to the mixer.
- Remove beaters from mixer before washing.
- Do not let cord hang over edge of table or counter or touch hot surfaces, including the stove.
- Do not operate any appliance with a damaged supply cord or plug, or after the appliance malfunctions or has been dropped or damaged in any manner. Supply cord replacement and repairs must be conducted by the manufacturer, its service agent, or similarly qualified persons in order to avoid a hazard. Call the provided customer service number for information on examination, repair, or adjustment.
- The use of attachments not recommended or sold by the appliance manufacturer for use with this model may cause fire, electric shock, or injury.
- Do not use outdoors.
- Do not place on or near a hot gas or electric burner, or in a heated oven.
- Check that the appliance is OFF before the plugging cord into wall outlet. To disconnect, turn the control to OFF; then remove the plug from the wall outlet. To unplug, grasp the plug and pull from the outlet. Never pull from the power cord.
- Do not use the appliance for other than intended purposes.
- CAUTION! In order to avoid a hazard due to inadvertent resetting of the thermal cut-out, this appliance must not be supplied through an external switching device, such as a timer, or connected to a circuit that is regularly switched on and off by the utility.
- Always disconnect the appliance from the supply if it is left unattended and before assembling, disassembling, cleaning, changing accessories that move in use.
- Only operate this machine under supervision.
- Do not interfere with any safety switches. Do not insert anything into the rotating hooks while the machine is working.
- Do not insert the mains plug of the machine into the power socket without having installed all the necessary accessories.
Overview of the Components
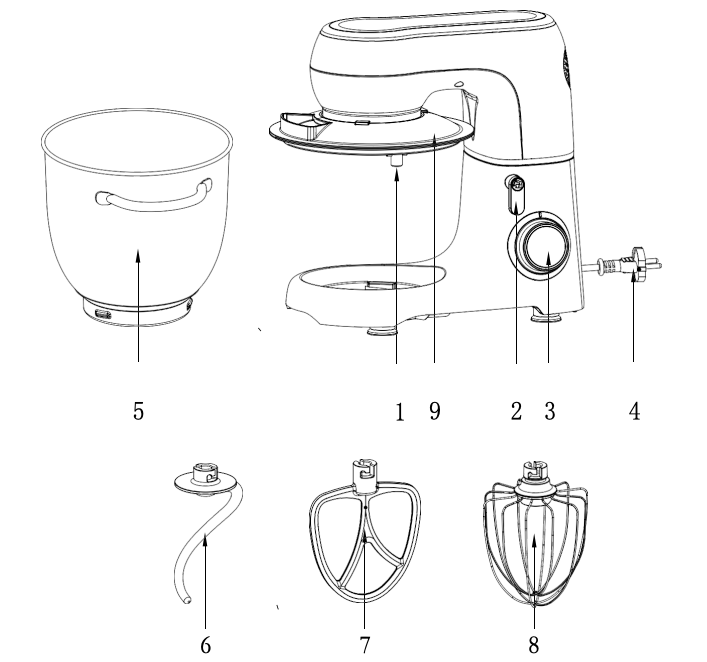
Main Components and Standard Accessories:
- Output shaft
- Rise knob
- Speed knob
- Power Cord
- Mixing bow
- Dough hook
- Beater
- Whisk
- Pot cover
*All product outward appearance, the color take the material object as, the picture only supply the reference.
Using the Mixing Bowl
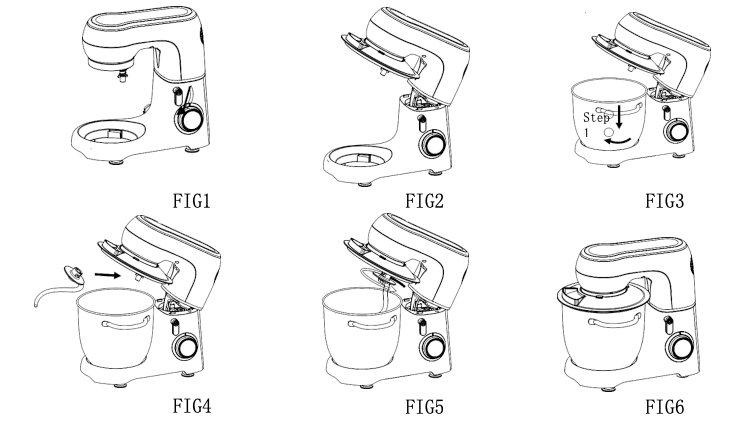
A. In order to lift the arm, clockwise rotation the Rise knob (2) . The arm will now move upwards.(FIG1)B. Place the pot cover into its body. (FIG2)C. Place the mixing bowl into its holding device(Step①) and turn the bowl clockwise until it locks into place(Step②). (FIG3)D. Mount the required utensil(Dough hook or Beater or Whisk)by inserting the top into the output shaft, and turn anti-clockwise until it locks into place. (FIG4&FIG5)E. Now fill in your ingredients.F. Do not overfill the machine – the maximum quantity of ingredients is 1.5kg.G. Lower the arm using the rise knob (2). (FIG6)H. Insert the mains plug into a properly installed 120V safety power socket.I. Switch the machine using the speed knob to a speed between 1 and 10 (corresponding to the mixture).J. For pulse operation (kneading at short intervals), turn the switch to the “PULSE” position. The switch has to be held in this position according to the desired interval length. When the switch is released it returns automatically to the “0” position.K. After kneading/stirring turn the speed knob (3) back to the “0” position as soon as the mixture has formed a ball. Then remove the mains plug.L. Push the rise knob (2) downwards and the arm will be raised.M. The mixture can now be released with the help of a spatula and removed from the mixing bowl.N. The mixing bowl can now be removed.O. Clean the parts as described under “Cleaning” .
*All product outward appearance, the color take the material object as, the picture only supply the reference.
Adjusting the Levels and Using the Dough Hook for not more than 1.5kg of Mixture

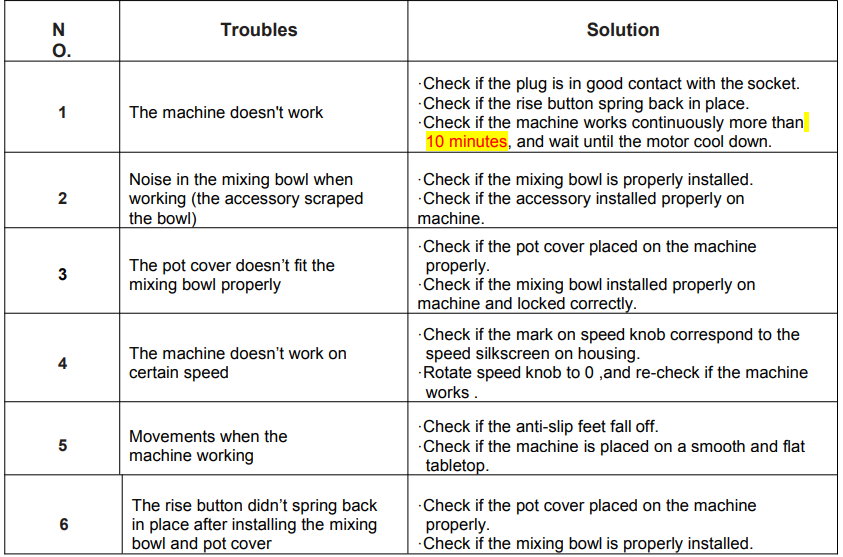
Troubleshooting
*All product outward appearance, the color take the material object as, the picture only supply the reference.
Technical Data
Model: SM-1530
Rated voltage: 120V
Power consumption: 450W
Short operation time: KB=1 min.
Cleaning
- Before cleaning remove the mains lead from the socket.
- Never immerse the housing with motor in water!
- Do not use any sharp or abrasive detergents.
Motor Housing
- Only a damp rinsing cloth should be used to clean the outside of the housing.
CAUTION:
- The components are not suitable for cleaning in a dishwasher. If exposed to heat or caustic cleaners they might become misshapen or discolored.
Mixing Bowl, Mixing Equipment
- Components that have come into contact with food can be cleaned in soapy water.
- Allow the parts to dry thoroughly before reassembling the device.
- Please apply a small quantity of vegetable oil likely to the screens after they have dried.
Disposal

Do not dispose of the device in normal domestic waste.
Dispose of the device over a registered waste disposal firm or through your communal waste disposal facility. Observe the currently valid regulations. In case of doubt, consult your waste disposal facility.
*All product outward appearance, the color take the material object as, the picture only supply the reference.
Suggested Recipes
Sponge Mixture (Basic Recipe), Level 1-6
Ingredients:
200grams soft butter or margarine, 200grams sugar, 1 packet vanilla sugar or 1 bag Citro-Back, 1 pinch of salt, 4 eggs, 400grams wheat flour, 1 packet baking powder, approx. 1/8 litre milk.
Preparation:
Transfer the wheat flour and the remaining ingredients to the mixing bowl, stir with the beater for 3 seconds on speed1, then for approximately 3 minutes on level 3. Grease a tin or cover with baking paper. Fill in the mixture and bake. Before the cake is removed from the oven, test to see if it is done. With a sharp wooden stick pierce the centre of the cake. If no mixture sticks to it, the cake is cooked. Turn the cake on to a cake grid and allow to cool.
Traditional Oven:
Insertion height: 2
Heating: electric oven, top and bottom heat 175-200℃; gas oven:level 3-5 Baking time: 50-60 minutesDepending on taste, this recipe can be changed, for example with 100g raisins or 100g nuts or100g grated chocolate. In fact, the possibilities are endless.
Soft Poppy Seed Rolls, Level 1-5
Ingredients:
570g strong white bread flour 1 sachet active dried yeast (about 2½ tsp) 300ml milk (warmed slightly) 2 eggs (room temperature) 1 tbsp sunflower oil 1½ tsp sugar 2 tsp salt 75g poppy seeds
Preparation:
Mix the milk, eggs, oil, sugar, salt and yeast in a jug or bowl, and leave for 5 minutes. Put the flour and poppy seeds in the bowl, and mix at level 1, gradually adding the liquid, then increase the level to 3, and mix for five minutes. Remove the dough to a floured surface, cut into 8-10 pieces, roll into shape, then put on a grease proof baking sheet. Leave in a warm place till doubled in size. Brush with a little egg or milk, and bake in a preheated oven at 220°C/425°F/gas 7 for 20-25 minutes, till golden brown and hollow sounding on the base.
Basic White Bread, Level 5-10
Ingredients:
600g strong white bread flour 1 sachet active dried yeast (about 2½ tsp) 345ml warm water 1 tbsp sunflower oil or butter 1 tsp sugar 2 tsp salt
Preparation:
Use the mixing instructions for pizza dough, then put the dough in a bowl, cover and leave in a warm place till it’s doubled in size (30-40 minutes). Remove the dough and punch down to remove air. Knead lightly on a floured board, shape it into a loaf, or put it in a tin, cover, and leave in a warm place to rise for another 30 minutes. Bake in a preheated oven at 200°C/400°F/gas 6 for 25-30 minutes, till golden brown and hollow sounding on the bottom.
Pizza dough, Level 1-10
Ingredients
400g plain flour, 250ml warm water, 1/2 tsp sugar, 1sacher active dried yeast (about 2-1/2 tsp), 1-1/2 tsp olive oil and 1 tsp salt.
Preparation:
Put the flour in the bowl. Mix the remaining ingredients in a bowl or jug. Run the mixer at level 1-3 and gradually add the liquid. As the ingredients incorporate, and the dough ball becomes more formed, increase the level to 4-6. Knead for a couple of minutes on this speed, till the dough ball is smooth. Remove from the bowl and split into 2-4 pieces. Roll into pizza bases (circles or rectangles) on a floured surface, then lay them on a baking sheet or pizza tray. Spread the pizza bases with tomato purée and add toppings – mushrooms, ham, olives, sun dried tomatoes, spinach, artichoke, etc. Top with dried herbs, pieces of mozzarella, and a drizzle of olive oil. Bake in a preheated oven at 200°C/400°F/gas 6 for 15-20 minutes, till the toppings are bubbling and golden brown.
Chocolate Cream, Level 8-10
Ingredients:
200ml sweet cream, 150g semi-bitter chocolate coating, 3 eggs, 50-60g sugar, 1 pinch of salt, 1 packet of vanilla sugar, 1 tablespoon cognac or rum, chocolate flakes.
Preparation:
Beat the cream in the mixing bowl with the whisk until stiff. Remove from the bowl and place somewhere to cool. Melt the chocolate coating in accordance with the instructions on the packet or in the microwave at 600W for 3 minutes. In the meantime, beat the eggs, sugar, vanilla sugar, cognac or rum and salt in the mixing bowl with the whisk on speed 2 to form a foam. Add the melted chocolate and stir in evenly on level 8-10. Leave a little of the cream for decoration. Add the remaining cream to the creamy mixture and stir in briefly using the pulse function. Decorate the chocolate cream and serve well cooled.
Italian Herb Bread
Ingredients:
575g strong white bread flour ,1 sachet active dried yeast (about 2½ tsp) ,290ml water 2 tbsp olive oil, 2 tsp sugar 2 tsp salt, 4 tbsp mixed dried herbs
Preparation:
Mix the water, oil, sugar, salt and yeast in a jug or bowl, and leave for 5 minutes. Put the flour and dried herbs in the bowl, and mix at level 1, gradually adding the liquid, then increase the level to 3, and mix for 5 minutes. Put the dough in a bowl, cover and leave in a warm place till doubled in size (20-30 minutes). Put on a floured surface, knead gently to knock out the air, then shape, put on a baking sheet, and leave in the warm till doubled in size.
Bake in a preheated oven at 200°C/400°F/gas 6 for 25 minutes or till golden brown and hollow sounding on the bottom.
Linseed Bread Rolls, Level 1-6
Ingredients:
500-550g wheat flour, 50g linseed, 3/8 litre water, 1 cube of yeast (40g), 100g low-fat curds, well drained, 1 tsp salt. For coating: 2 tbsp of water.
Preparation:
Soak the linseed in 1/8 litre of lukewarm water. Transfer the remaining lukewarm water (1/4 litre) into the mixing bowl, crumble in the yeast, add the curds and mix with the dough hook on level 3. The yeast must be completely dissolved. Put the flour with the soaked linseed and the salt into the mixing bowl. Knead thoroughly on speed1, then switch to speed3 and continue kneading for 3-5 minutes. Cover the mixture and allow to rise in a warm place for 45-60 minutes. Knead thoroughly once more, remove from the bowl and form sixteen rolls. Cover the baking tin with wet baking paper. Place the rolls on this and allow to rise for 15 minutes. Coat with lukewarm water and bake.
Traditional Oven:
Insertion height: 2
Heating: electric oven: top and bottom heat 200-220℃ (preheated for 5 minutes),gas oven level 3-5 Baking time: 30-40 minutes
Coffee & Brandy Ice Cream, Level 8-10
Ingredients:
3 eggs 75g caster sugar, 300ml single cream 2 tbsp instant coffee powder, 300ml double cream 2½ tbsp brandy.
Preparation:
Add the sugar and eggs to the bowl and process at level 10 till smooth in texture. In a saucepan, bring the single cream and coffee just to the boil and stir in the egg and sugar mixture. Put in a heatproof bowl over a simmering pan of water and cook gently, stirring well, till thick enough to coat the back of a spoon. Strain into a bowl and leave to cool. Whip the double cream at level 10 till soft peaks form, then fold into the cold egg and sugar mixture, with the brandy. Pour into a container, cover, and freeze for 2½-3 hours, till partially frozen. Remove, stir well and then freeze again, till the desired texture is achieved.
Basic Meringues, Level 8-10
Ingredients:
4egg whites, 100g caster sugar, 100g icing sugar Combine
Preparation:
Put the egg whites in the bowl and process at level 10 till fairly stiff. Add half the sugar and whisk again till the mixture is smooth, and stiff peaks have formed. Remove the bowl, and lightly fold in the remaining sugar with a metal spoon. Line a baking sheet and spoon or pipe the meringue mixture into ovals. Sprinkle with the remaining sugar A and put on the lowest shelf of a cool oven (120℃/250°F/ gas ½) for 1 ½ hours. Cool on a wire rack. Top with soft fruits, chocolate, and sweetened cream.
[xyz-ips snippet=”download-snippet”]