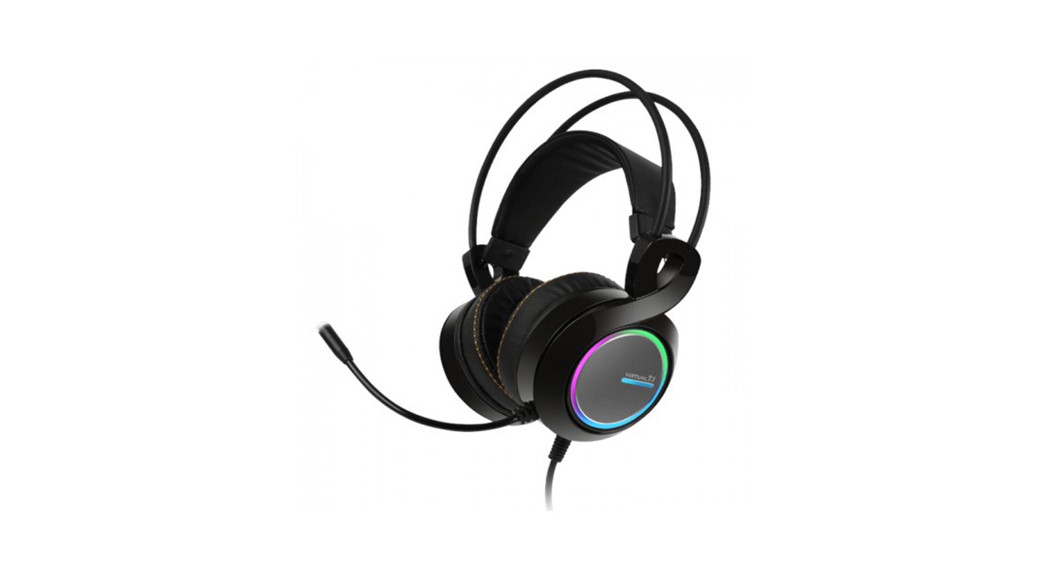

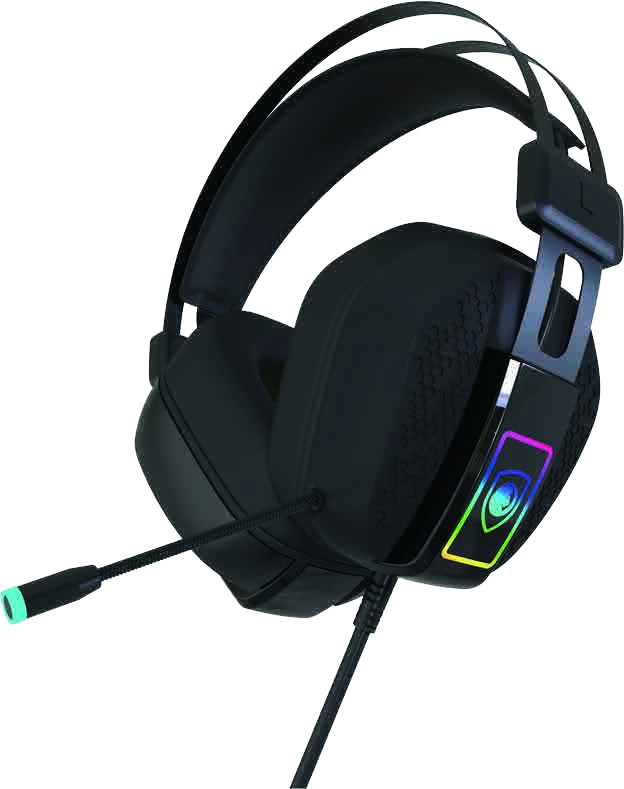
Gaming HeadsetVirtual 7.1 Surround Sound & Vibration
Operation Instructions
 Includes:Gaming HeadsetVirtual 7.1 Setup DiscCompatibility for PC / MACKeycode: 42963271
Safety Warnings
- For traffic safety, do not use earphones while driving or cycling.
- Listening to loud sounds for prolonged periods of time may permanently damage your hearing.
 Before putting on earphones, turn the volume down then put the earphones on and slowly increase the volume until you reach a comfortable listening level.
 Before putting on earphones, turn the volume down then put the earphones on and slowly increase the volume until you reach a comfortable listening level.
Product Overview:
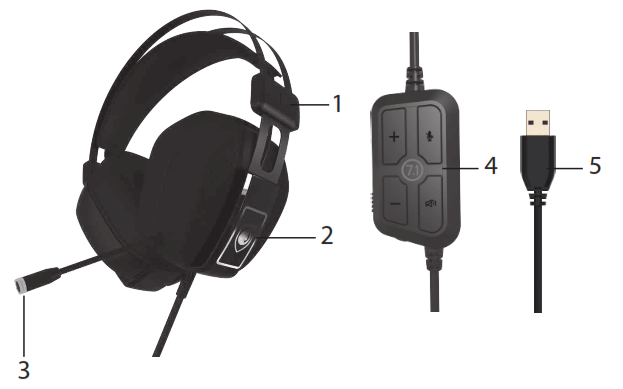
- Gaming Headset
- RGB Light on earpads
- Microphone
- Inline Controller(Virtual 7.1 sound card & Vibration switch)
- USB Cable
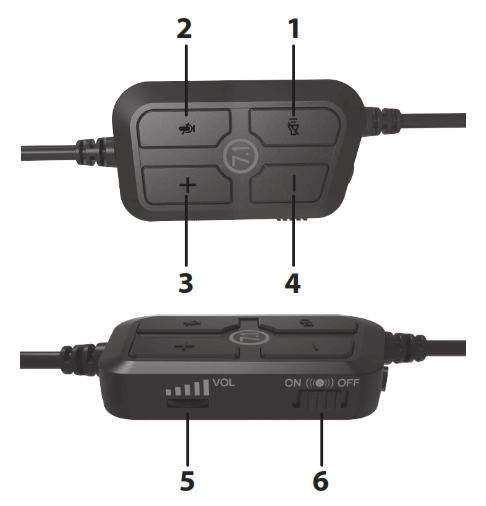
Functions of Inline Controller:
- Speaker Mute
- MIC ON/OFF
- Volume Up ( + )
- Volume Down ( – )
- Volume Control ( +/- )
- Vibration Switch ( ON/OFF )
 Specifications:Model No.: 42963271Driver: 40mmImpedance: 32 OhmSensitivity: 105±3dBFrequency Response: 20Hz – 20kHzUSB Cable Length: 2.2m
Connection Options:
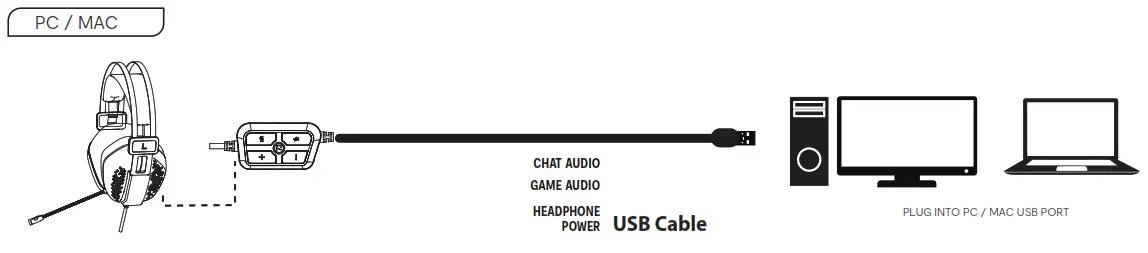
- This headset is suitable for USB audio devices, such as laptops, tablets, etc.
- The required operation system, 32-bit and 64-bit Win 7/Win 8/Win81/Win 10/XP.
- Generally, the cable end or microphone end is designed on the left side, please wear the microphone end or cable end on the left ear.
- Please make sure the volume is at the minimum volume, and adjust the volume botton to get the appropriate volume.
- This gaming headset is built-in vibration unit, high-teach to create a vibration experience.When you need the vibration sound effect, please press the vibration switch ON, and enjoy realistic games.
How to setting the virtual 7.1 surround sound :System Requirements
Operating Systems: Microsoft® Windows® 7 / 8 / 10Hardware: 1 available USB portCD ROM for gaming software installation
Software Installation
- Insert the provided Setup Disc into the computer’s CD ROM.
- It will auto run the setup software, otherwise choose Setup.exe from your CD drive.
- Connect the headphones with Virtual 7.1 sound card.
- Follow the installation instruction to complete the installation.
- Choose Xear Audio Center from the desktop to start the software.
 The software is not available for Windows Vista® & MAC OS.
User Interface

Choose Xear Audio Center from the desktop to start the software. then go to “Setting” options to choose the “Language Select” of your choice.
- Software Information.
- Setting options.
- Minimize the software.
- Close the software.
- Enabled feature will be highlighted.
- Switch between Status and Prole panel.
- Adjust the volume.
- Mute or restore the sound.
- “Show System Tray Icon” option.
- Adjust UI Transparent level.
- “Language Select” option
- “Don’t show startup message” option.
- Save the current setting and exit
- Cancel setting and exit.
- Save the current setting.
User Interface
 Right-click the icon from the system tray will pop up a menu that links to Windows default software.
- Open the headset software.
- Open the default Windows Volume Control.
- Open the default Windows Media Player.
- Open the default Windows Sound Recorder.
- Open the default Windows Multimedia Properties.
- Open the headset software Settings.
- Exit the headset software.
Speaker Setting
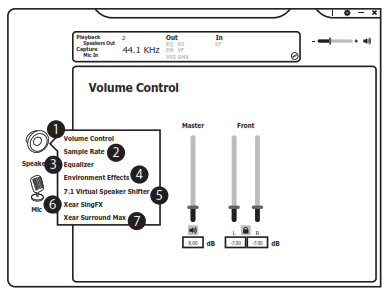 Right-click on
![]() to show a speaker menu.
to show a speaker menu.
- Volume Control
- Sample Rate
- Equalizer
- Environment Effects
- Virtual Speaker Shifter
- Xear SingFX
- Xear Surround Max
1. Volume Control

- Adjust the volume.
- Mute or restore the sound.
- Adjust the left or right front speaker volume individually.
- Lock the left and right speakers to adjust at once.
- Range of volume in dB is between -37.00 and 0.00.
2. Sample Rate
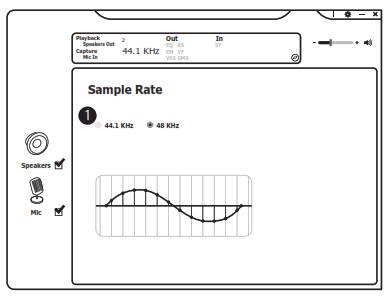
- Choose a different audio sample rate of your choice.
3. Equalizer
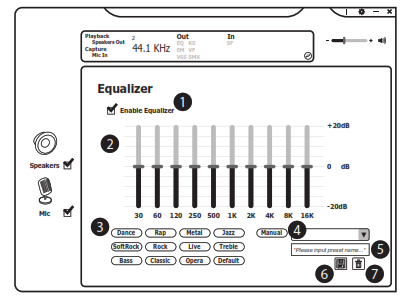
- Enable/Disable Equalizer
- Customize the EQ setting.
- Choose a sound effect mode of your choice.
- Select saved EQ profile.
- Input preset name.
- Save a current EQ setting. 7. Delete a selected setting.
4. Environment Effects

- Enable/Disable Environment Effects.
- Adjust environment effect.
- Adjust room size effect.
5. Virtual Speaker Shifter
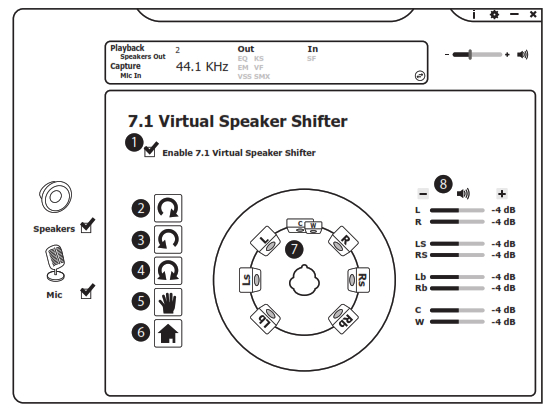 Allows for a personal calibration to fit for your ears, enabling you to configure to your perfect individual setting. 1
- Enable/Disable Virtual Speaker Shifter.
- Rotate Clockwise.
- Rotate Counter Clockwise.
- Manual Rotation.
- Manual Shifting.
- Reset to default hearing.
- Adjust the speaker hearing position.
L: Front LeftR: Front RightLs: Side LeftRs: Side Right Lb: Back LeftRb: Back Rightc: Centerw: Woofer - Adjust dB leveling.
6. Xear SingFX

- Enable/Disable Enable Key Shifting feature and adjust the Pitch level.
- Enable/Disable Enable Vocal Fading feature and adjust the voice fading level.
- Press to return to default setting.
7. Xear Surround Max
 When Xear Surround Max is enabled, contents being played by the front left and right virtual speakers will be cloned to all side and back speakers.Xear Surround Max can be enabled when Speaker Shift or Real Multi-Channel Output setting is turned on.
Mic Setting
Right-click on ![]() to show the microphone menu.
to show the microphone menu.
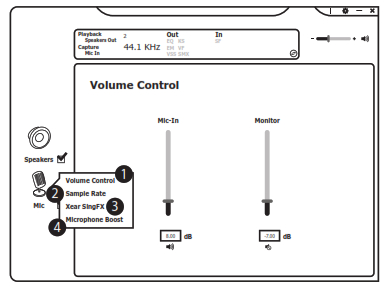
- Volume Control
- Sample Rate
- Xear SingFX
- Microphone Boost
1. Volume Control
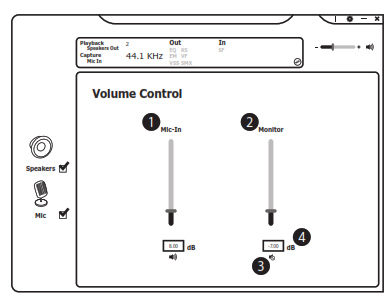
- Adjust the microphone volume.
- Listen to your own voice when using a microphone to speak.
- Mute or restore the microphone.
- The range of volume in dB is between -37.00 and 0.00.
2. Sample Rate
1. Choose a different audio sample rate of your choice.
3. Xear SingFX

- Enable/Disable Microphone Echo feature and adjust the echo level.
- Press to return to default setting.
- Choose a Magic Voice of your choice.
4. Microphone Boost
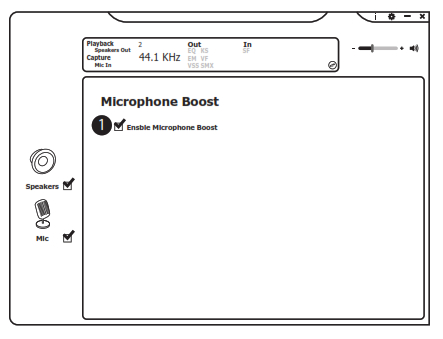
1. Enable Microphone Boost to improve the quality of your audio recordings.
Hints and Tips
Make sure the USB plug is fully plugged into a USB port and the computer is on or try to use a different USB port. If the software is not working properly, uninstall it and then reboot the computer. Re-install the software.
12-month warranty
Thank you for your purchase from Kmart.Kmart Australia Ltd warrants your new product to be free from defects in materials and workmanship for the period stated above, from the date of purchase, provided that the product is used in accordance with the accompanying recommendations or instructions where provided. This warranty is in addition to your rights under the Australian Consumer Law.
Kmart will provide you with your choice of a refund, repair, or exchange (where possible) for this product if it becomes defective within the warranty period. Kmart will bear the reasonable expense of claiming the warranty. This warranty will no longer apply where the defect is a result of alteration, accident, misuse, abuse or neglect. Please retain your receipt as proof of purchase and contact our Customer Service Centre on 1800 124 125 (Australia) or 0800 945 995 (New Zealand) or alternatively, via Customer Help at kmart.com.au for any difficulties with your product. Warranty claims and claims for expenses incurred in returning this product can be addressed to our Customer ServiceCentre at 690 Springvale Rd, Mulgrave Vic 3170.
Our goods come with guarantees that cannot be excluded under the Australian Consumer Law. You are entitled to a replacement or refund for a major failure and compensation for any other reasonably foreseeable loss or damage. You are also entitled to have the goods repaired or replaced if the goods fail to be of acceptable quality and the failure does not amount to a major failure.For New Zealand customers, this warranty is in addition to statutory rights observed under New Zealand legislation.
 report this ad
WARNING
- Do not dispose of units in fire or water.
- Never attempt to disassemble and reassemble. Waste electrical products should not be disposed of with household waste, please recycle where facilities exist. Check with your local authority for recycle advice.
- Keep your device and all accessories out of the reach of children and animals. Small parts may cause choking or serious injury if swallowed.
- Avoid exposing your device to very cold or very hot temperatures (below 0˚C or above 45˚C).
- Extreme temperatures can cause deforming of the device and reduce the charging capacity and life of your device.
- Do not allow your device to get wet—liquids can cause serious damage. Do not handle your device with wet hands.
References
[xyz-ips snippet=”download-snippet”]