![]()
Bluetooth Clock Radio Wireless Charger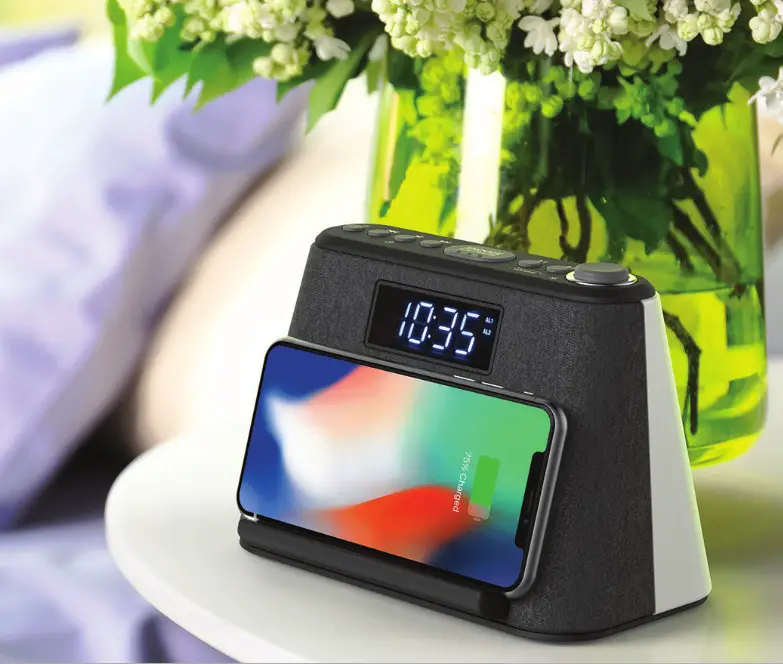
Clock Radio Wireless Charger
Introduction
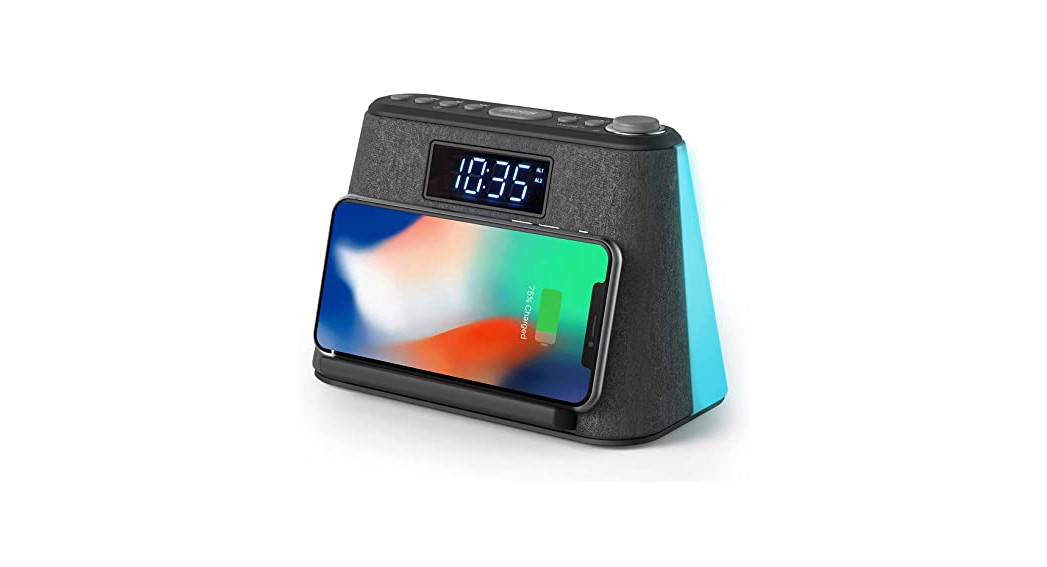
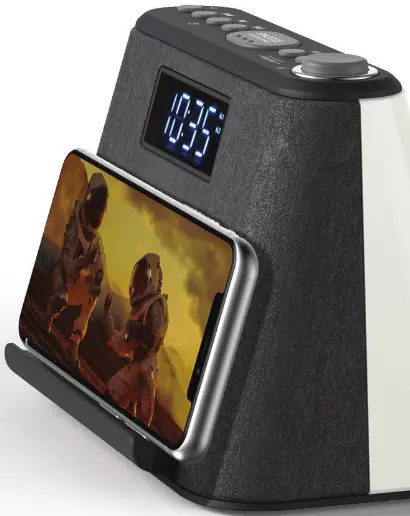
The clock radio wireless charger is an all-in-one bedside accessory that combines a stand for your phone, perfect for watching videos handsfree, with an integral 5W Wireless charger, Bluetooth speaker, FM radio, dual alarm and even a handy nightlight with multiple colour settings.
 Caring for your Alarm clock
 Caring for your Alarm clock
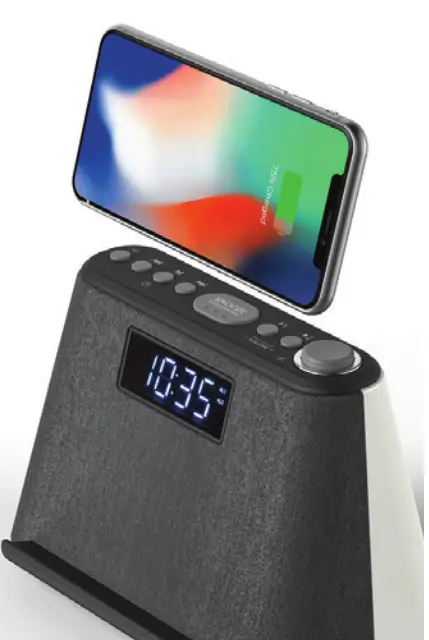
Important Safety Information
Important – Please read these instructions fully before installing or operating your speaker.Keep away from flame sources such as lighted candles.Do not expose to dripping or splashed fluids.The unit should not be exposed to direct sunlight, very high or low temperature, moisture, vibrations, strong magnetic fields, high frequencies and dusty environments.Do not place the unit in enclosed bookcases or racks without proper ventilation. Ventilation should not be impeded by covering the ventilation openings with items, such as newspapers, tablecloths, curtains, etc. Never attempt to insert wires, pins or other such objects into the vents or openings of the unit.Do not disassemble or modify the speaker, there are no user-serviceable parts. If the speaker is damaged in any way or malfunctions do not use it. Consult a qualified service engineer. Do not use abrasives, benzene, thinner or other solvents to clean the surface of the unit. To clean, wipe with clean soft cloth and a mild detergent solution. This product uses batteries and both product and batteries should be disposed of appropriately. Do not dispose of them with household waste at the end of their life cycle; take them to a collection centre for the recycling of electrical, electronic appliances and batteries. Please check with your Local Authority for recycling advice.
 Use only the supplied power adaptor: Manufacturer: Shenzhen Cenwell Technology Co.,Ltd Model no.: CW0503500AU
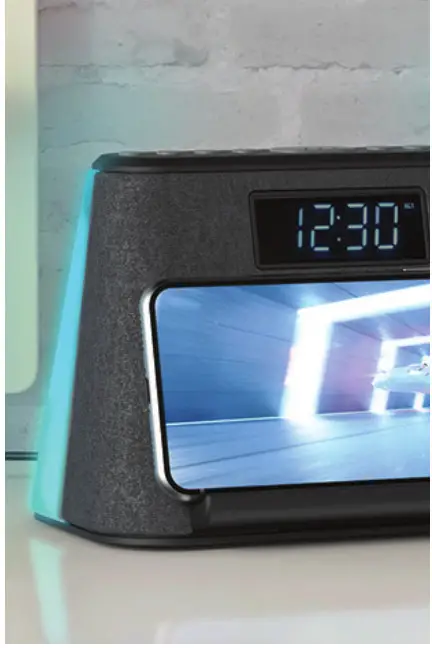
Battery cannot be subjected to high or low extreme temperatures, low air pressure at high altitude during use, storage or transportation. Replacement of a battery with an incorrect type that can result in an explosion or the leakage of flammable liquid or gas. Disposal of a battery into fire or a hot oven, or mechanically crushing or cutting of a battery, that can result in an explosion. Leaving a battery in an extremely high temperature surrounding environment that can result in an explosion or the leakage of flammable liquid or gas. A battery subjected to extremely low air pressure that may result in an explosion or the leakage of flammable liquid or gas. CAUTION. Risk of explosion if the battery is replaced by an incorrect type. The socket-outlet for the power adaptor shall be easily accessible.
Box Contents
1x clock radio wireless charger, 1x 5V3.5A AC/DC power adaptor (CW0503500AU)
Getting to know your alarm clock
Before you get started please read the safety information on pages 2-3.
Top – Control Panel
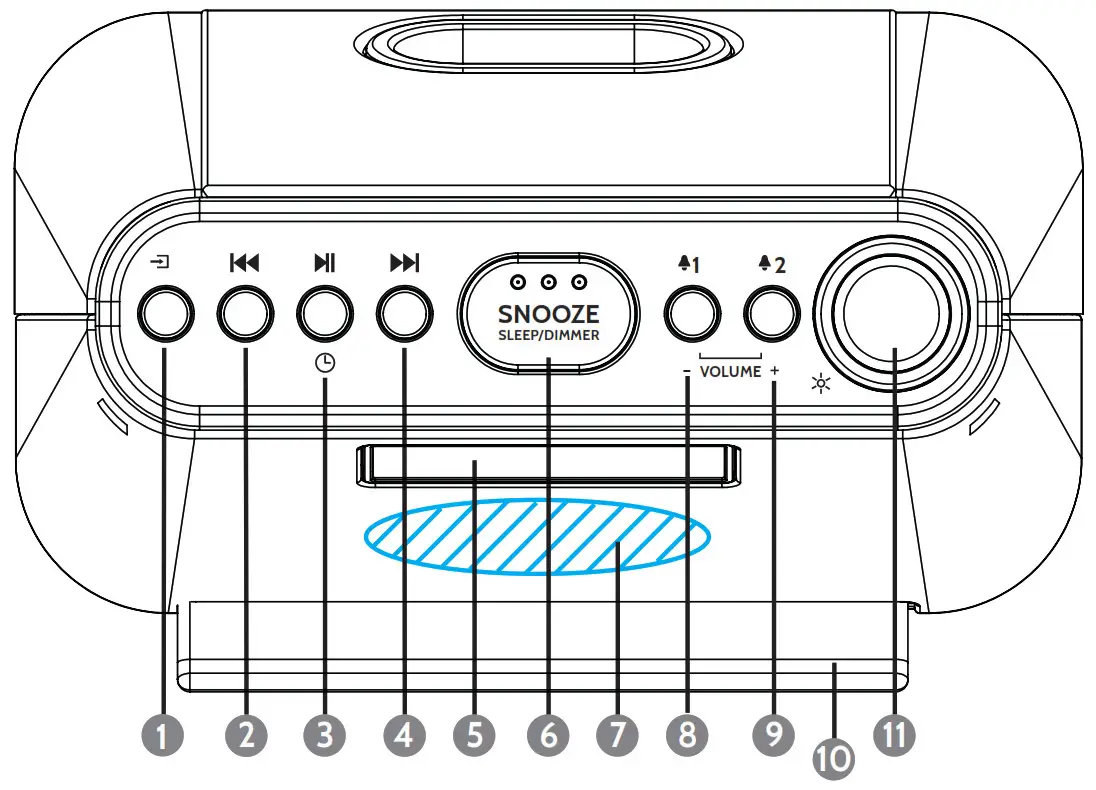
| 1. |
6. Dimmer – short press to adjust brightness |
| 2. |
7. Wireless charging area |
| 3. |
8. |
| 4. |
9. |
| 5. LCD Display | 10. Phone stand |
| 6. Snooze – short press (when alarm is sounding) | 11. |
| 6. Sleep mode – long press to enter -short press to set sleep time |
Back
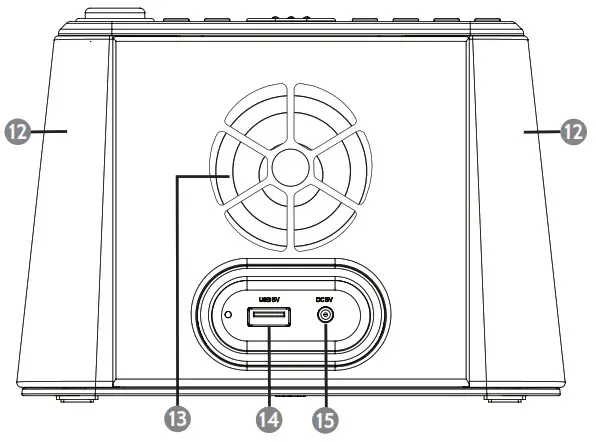
Base
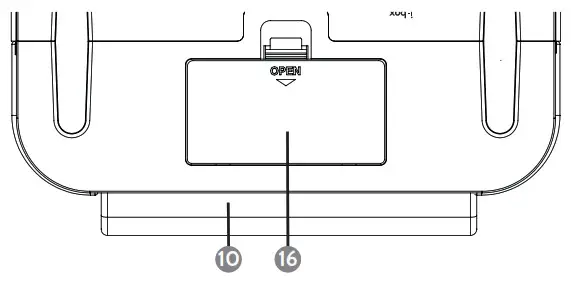
| 10. Phone stand | 14. USB charging port |
| 12. Nightlight | 15. DC adaptor jack |
| 13. Speaker | 16. Back up battery compartment door |
Powering your clock radio wireless charger
The clock radio wireless charger is powered by the AC/DC power adaptor supplied.Plug the adaptor into a mains socket and then connect to the DC power socket (15) on the back of the alarm clock.The radio will switch on automatically in clock/standby mode and the LCD will light up.
Battery backup
In addition to the DC In power supply you can fit 2 x AA batteries (not supplied) in the battery compartment (16) to provide a backup power supply. If the mains supply is disconnected or interrupted the power supply is automatically switched to the backup battery, so that the time and alarm settings are not lost. Please Note: speaker, radio and charging functions will not operate when the clock radio is powered solely by the backup batteries. When fitting the batteries make sure their polarity matches the markings in the battery compartment.
Setting the time
- Plug in the AC/DC power adaptor supplied, the default time 0:00 will appear in the LCD display (5).
- Long press the clock key (3), the LCD will display “24hr” press the (2) or (4) keys to switch between 24hr and 12hr clock setting.
- Then press the clock key (3) again to set the hour use the (2) or (4) keys to change the hour.
- Press the clock key (3) to set the minutes use the (2) or (4) keys to change the minutes.
- Press the clock key (3) again to confirm the time set.To reset the clock, long press the mode key (1) to enter standby mode then follow steps 2-5 above.
Bluetooth pairing
- Press the mode key (1) twice to enter Bluetooth pairing mode. “bt” will appear in the display and also the Bluetooth symbol which will flash.
- Place the device you want to pair with your alarm clock within 1m of it, enter your device’s Bluetooth menu and select “43032969” in the device list. When youralarm and device are paired, you will hear a chime and the Bluetooth symbol which will stop flashing.Once paired with a device the alarm clock will reconnect automatically when switched to Bluetooth mode if the paired device is within range.
Bluetooth play operation
While listening to audio in Bluetooth mode:1. Press Volume +/- keys (8/9) to increase or reduce the volume level.2. Press the![]() Next (4) or
Next (4) or![]() Previous (2) keys to play the next or previous track.3. Press the
Previous (2) keys to play the next or previous track.3. Press the ![]() Pause/Play key (3) to play or pause the track.
Pause/Play key (3) to play or pause the track.
FM radio operation
- Press the Mode key (1) repeatedly until FM and an FM frequency appear in the LCD display.
- Long press the (2) or (4) keys to scan backwards or forwards through the frequencies to the previous or next radio station.
FM presets – storing and recall
To store the station playing to a preset long press the ![]() Play/Pause key (3) a flashing preset number will be displayed, press the
Play/Pause key (3) a flashing preset number will be displayed, press the ![]() (4) or
(4) or ![]() (2) keys to scroll through the 10 preset positions. To store the station playing to the preset position selected and to exit store mode press the
(2) keys to scroll through the 10 preset positions. To store the station playing to the preset position selected and to exit store mode press the ![]() Play/Pause key (3) again.To recall a preset stored station short press the
Play/Pause key (3) again.To recall a preset stored station short press the ![]() Play/Pause key (3) and press the
Play/Pause key (3) and press the![]() (4) or
(4) or![]() (2) keys to scroll through the presets available to the one you want to play.
(2) keys to scroll through the presets available to the one you want to play.
White noise and nature soundtrack mode
This mode allows you to play white noise or a selection of nature soundtracks to help lull you to sleep. You can also use the SLEEP function to switch these sounds off after a set period of time. Soundtracks available are: ![]() 1: White noise soundtrack,
1: White noise soundtrack, ![]() 2: Frog soundtrack,
2: Frog soundtrack, ![]() 3: Flowing water soundtrack and
3: Flowing water soundtrack and ![]() 4: Birdsong soundtrack.
4: Birdsong soundtrack.
- Press the mode key (1) three times to enter this mode. “ 1” will appear in the display and the White Noise soundtrack will play.
- Press (2) or (4) to scroll through the soundtracks available.
- Press Volume +/- keys (8/9) to increase or reduce the soundtrack volume level.
Sleep function
- With audio playing via Bluetooth or the radio playing or with one of the nature soundtracks playing, long press the Sleep key (6) to enter Sleep mode.
- Short press the key (6) repeatedly to scroll through Sleep settings available: 120, 90, 60, 30, 15, 10, 05, OFF. “SLEEP” will appear in the LCD panel.
- When sleep is set long press the key (6) to check the sleep period remaining.
Setting the alarms
You have a choice of two alarms you can set, ideal for couples who need to get up at different times.
- First long press the mode key (1) to enter standby mode, press and hold 1 alarm 1 key (8) for 3 seconds, to start setting the time for alarm 1.
- Press (2) or (4) to change the hour then press 1 alarm 1 key (8) to select.
- Press (2) or (4) to change the minutes then press 1 key (8) to select.
- Press (2) or (4) to scroll through the alarm sound options – FM (Radio), “bP” (Bleep), 1 (White Noise), 2 (Frog Soundtrack),3 (Flowing Water Soundtrack), 4 (Birdsong Soundtrack), press 1 key (8) to select an option and to exit the alarm setting mode.To set alarm 2 repeat steps 1-4 above using the 2 alarm 2 key (9).
Alarm enable/disable
In standby mode, press![]() 1 (8) or
1 (8) or ![]() 2 (9) to enable or disable the alarm
2 (9) to enable or disable the alarm
Snooze & stop alarm
When the alarm sounds, press the![]() Snooze key (6 ) to delay the alarm for 9 minutes. Press any other key to turn the alarm off.
Snooze key (6 ) to delay the alarm for 9 minutes. Press any other key to turn the alarm off.
Wireless charging

If you have a phone with Qi wireless charging capability you can use your alarm clock to charge it. Thanks to the positioning of the charging pad it is easy to watch movies, look at recipes, make video calls and much more while your phone is charging.
- Place your smart phone centrally on the phone stand (10). As shown opposite.
- The wireless charging icon will be displayed in the bottom left of the LCD panel while your phone is charging and the battery charge status can be seen on your phone’s display.
Please Note: Your phone will not charge when the clock is in backup mode (not being powered via the USB socket). Wireless charging may interfere with radio reception and we advise you not to try listening to FM radio while charging.
If problems occur when charging or if charging does not start
- Remove your smartphone from its case if the thickness of the case exceeds 5mm or if it has a metal composition.
- Phones that are capable of wireless charging may need to be placed slightly off centre. The built-in wireless receiver may not be centred inside the phone. This varies by brand/model.
- The charging time varies depending on the charging capacity of the battery and its current residual capacity.
- The components may heat up during the charging process. They will slowly cool down again after the charging process.
WARNING: If the![]() wireless charging icon flashes repeatedly, a foreign metal object has been detacted. You should remove it from the charging area immediately as it can represent a hazard and could cause a fire.
wireless charging icon flashes repeatedly, a foreign metal object has been detacted. You should remove it from the charging area immediately as it can represent a hazard and could cause a fire.
USB Charging
Phones and other devices that don’t have wireless charging capability can be charged using the USB charging port (14) located on the back panel of your alarm clock.
- Connect your phone via a suitable USB charging cable (not supplied) to the USB charging port (14) on the back of the alarm clock.
- The charge state is indicated on your phone/external device as usual. Please Note:• USB Charging may interfere with radio reception and we advise you not to try listening to FM radio while charging.• Please use only one charging method at a time.• Do not attempt to charge your device with wireless charger & USB cable both at the same time.
Nightlight
- Short press the Nighlight key (11) to turn on the LED nightlight panels (12).
- Short Press the Nighlight key (11) repeatedly to scroll through the different colours options available: Cool White, Warm White, Blue, Green, Red, Purple andthe seventh option in which the LED slowly cycles through a spectrum of multiple colours .
- Long Press the Nighlight key (11) to switch the Nightlight OFF.
Dimmer function
- Short press the Snooze/Sleep/Dimmer key (6) repeatedly to select your preferred light level for the LCD panel. There are six levels including off.
Specifications
Alarm clock power Input: 5V3.5ASpeaker Output: 1x 3WWireless Charging Output: Up to 5WUSB Charging Output: 1ABack up battery requirement: 2x 1.5V AA Alkaline batteriesPower Adaptor Input: 100-240V~50/60Hz, 0.8A (CW0503500AU)
12 months warranty
 report this ad
Thank you for your purchase from Kmart.
Kmart Australia Ltd warrants your new product to be free from defects in materials and workmanship for the period stated above, from the date of purchase, provided that the product is used in accordance with accompanying recommendations or instructions where provided. This warranty is in addition to your rights under the Australian Consumer Law.
Kmart will provide you with your choice of a refund, repair or exchange (where possible) for this product if it becomes defective within the warranty period. Kmart will bear the reasonable expense of claiming the warranty. This warranty will no longer apply where the defect is a result of alteration, accident, misuse, abuse or neglect.
Please retain your receipt as proof of purchase and contact our Customer Service Centre on 1800 124 125 (Australia) or 0800 945 995 (New Zealand) or alternatively, via Customer Help at Kmart.com.au for any difficulties with your product. Warranty claims and claims for expense incurred in returning this product can be addressed to our Customer Service Centre at 690 Springvale Rd, Mulgrave Vic 3170.
Our goods come with guarantees that cannot be excluded under the Australian Consumer Law. You are entitled to a replacement or refund for a major failure and compensation for any other reasonably foreseeable loss or damage. You are also entitled to have the goods repaired or replaced if the goods fail to be of acceptable quality and the failure does not amount to a major failure.
For New Zealand customers, this warranty is in addition to statutory rights observed under New Zealand legislation.
References
[xyz-ips snippet=”download-snippet”]