
Anko 4K Digital Action Camera Instruction Manual
Keycode: 42990208
SAFETY INSTRUCTIONS
- Do not leave the camera in high temperature environments (over 35°C), especially in a parked car with the windows closed in summer. High temperatures may shorten the life span of the electronic device, damage the battery or melt plastic parts
- To reduce the risk of damaging components, do not expose this product to dusty, dirty, or sandy areas
- Do not operate in or expose the HD Action Camera to the following condlitions: direct sunlight, air conditioners, heaters or any other extreme temperatures. Avoid violent vibration.
- Never store next to a heat source or in dirty, humid or wet places
- Exposing the HD Action Camera to open flames can cause an explosion
- Do not expose the HD Action Camera to water or other fluids. Use in dry locations only
- Do not operate the product with wet hands. Doing so may cause an electric shock
- Keep the camera clean. To maintain, regularly wipe with a clean, dry, lint free cloth.
- Make sure that the product is installed correctly
- Press the buttons gently. Pressing too hard can damage the product
- Do not subject the HD Action Camera to harsh impacts. Do not drop the HD Action Camera
- Do not attempt to dismantle, modify or repair the unit yourself. Doing so may cause fire, electric shock, or malfunction. Send the camera or any other accessories to a professional service centre for maintenance if and when required
- Do not use a damaged or modified USB cable. Damaged or modified power cords may cause an explosion, fire, or malfunction
- Never short-circuit the battery
- This product is intended for household use only and is not intended for commercial use.
- This camera works with Max voltage 5V, and electric current 1A for USB charging, and it will be damaged if charging is done beyond this max voltage and current
- Keep out of reach of infants, children, or pets. There is a risk of them swallowing small components, and/or their saliva may get into the product, causing an explosion or malfunction
- No responsibility will be taken for damages suffered by the user or third parties as a result of inappropriate handling or use of the product, its accessories or by operational failure. We reserve the right to make changes to this product and its accessories without prior notice
- The ilustrations included in this user manual are for reference only
- The supplier is NOT responsible for the loss of any data/content during operation
- Attention should be drawn to the environmental aspects of battery disposal
- Only use this HD Action Camera in moderate climates
- DO NOT store batteries with hazardous or combustible material; store in a cool, dry, ventilated area away from excessive heat, direct sunlight or fire
- CAUTION: Danger of explosion if battery is incorrectly replaced. Replace ony with the same or equivalent type
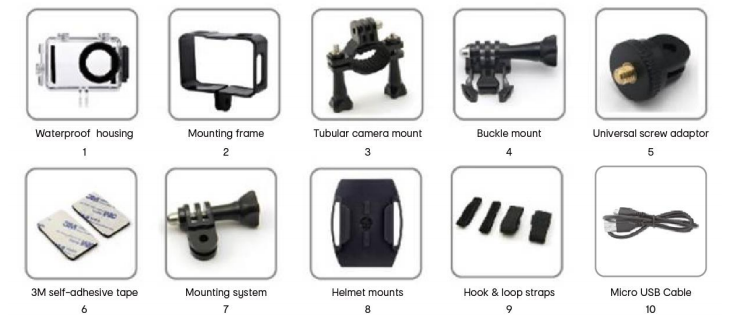
PARTS LIST
Your HD Action Camera has the following accessories
QUICK START GUIDE
- Remove the HD Action Camera from its packaging.
- Insert a MicroSD card (sold separately).
- Insert fully charged battery
- Attach the HD Action Camera to desired mount.
- Turn the HD Action Camera on by short pressing the Power On-Off/ Mode Button
- Select desired mode
- Your camera is now ready for action!
PRODUCT OVERVIEW
Description of function of keys:
> Power/Mode button
Function 1: ON/OFF. long press 2-3 second to turn the camera ON or OFF.
Function 2 – Mode selection. Short pressing the Mode/ Power button switches between 5 modes; video ![]() , photo
, photo ![]() , slow motion
, slow motion ![]() , play back
, play back ![]() , setting function
, setting function ![]() .
.
Shutter button
- In video mode
 , press to start recording, press again to stop recording
 - In Photo Mode , press to take a picture
- In slow motion mode , press to start recording, press again to stop recording
- In playback mode , press to select file you want to playback. (Note- To select file while in Playback mode, use the WiFi button on the side of the Action Camera)
- In setting mode , press to confirm selection (Note- Blue LED indicator light is on when camera power on.)
WiFi button
- In video /photo /slow motion mode , short press button to swap front screen and back screen ,long press this button to active the WiFi function.
- In play back mode /setting mode , short press this button can see the files and choose setting menu.
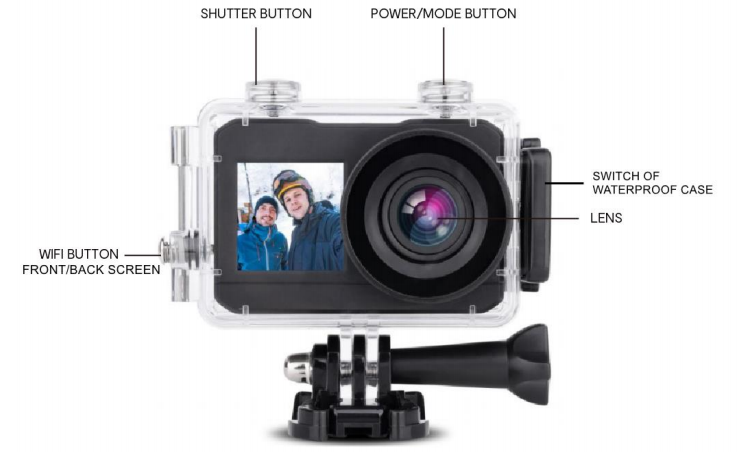
PICTURE OF PRODUCT

- 1.3inch front screen
- lens
- 2.0inch Back screen
- power /mode button
- shutter button
- battery cover
- microphone
- battery place
- Micro SD card slot
- USB slot
- WIFI / screen swap button
SETUP & OPERATION
Charging the batteries
- Plug the Micro USB end of the supplied Micro USB cable into the Micro USB Port of the camera
- Plug the Standard USB end into a USB wall charger.
- The charging indicator red LED light will flashing. When the battery is fully charged the charging indicator light will stay on.
Inserting a MicroSD card
The HD Action Camera does not have any internal memory. A MicroSD card (not included) is required for the HD Action Camera to record footage and capture images.
- While the HD Action Camera is off, insert a MicroSD card into the port on the side of the HD Action Camera and push the card all the way into the port. When correctly inserted and fully inside the body of the HD Action Camera, you will feel a small click. Your HD Action Camera is now ready to record and capture images.( NOTE: Please format your MicroSD card to avoid no enough space.)
- To remove the MicroSD card, push the card in slightly until you hear a click, the card will then pop out from the HD Action Camera for removal.
Powering the HD Action Camera on and off
- Ensure a fully charged battery is inserted into the HD Action Camera
- Turn the camera on by long pressing the Power/ Mode button.
- Press the Power/ Mode button to cycle through Modes as explained below
- To turn the HD Action Camera off, long press the Power/ Mode button for 3 seconds.
MODE SELECTION
There are five different modes available for your HD Action Camera
Video Mode ![]() Records video clipsPhoto Mode
Records video clipsPhoto Mode ![]() Takes photosSlow motion Mode
Takes photosSlow motion Mode ![]() Record video clips with slow motionPlayback Mode
Record video clips with slow motionPlayback Mode ![]() Plays your recorded files and photosSetting Mode
Plays your recorded files and photosSetting Mode ![]() Manage your camera setting.
Manage your camera setting.
Video mode
- Quick press Power/ Mode button until you see the
- To start recording, short press the shutter button,then the blue LED indicator light will flashing.
Video settings
- Press power/mode button to setting mode, press shutter button to access video setting menu
- To cycle through the settings, short press WiFi button.
- To select a setting, short press the shutter button
- To exit a setting, press the power/mode button to go back
- After setting done, press power/mode button to “X”, then press shutter to exit setting mode.
There are 3 Video settings available.
| VIDEO SETUP | FUNCTION |
| Video Resolution | Select the desired video resolution quality. [4K 30FPS]/ [2.7K 30FPS] / [1080P 60FPS] / [1080P 30FPS] / [720P 120FPS]/ [720P 60FPS]/ [720P 30FPS] |
| Recording Sound | record sound in the video, [Choose], [Not choose] |
| Loop Recording | Set the file length time of each video. Files will be overwritten once the card reaches full capacity – unless locked. If loop recording is off, when the memory card is full a ‘Memory Full’ warning will be shown on the screen.[ 2 Min.]/ [ 3 Min.]/ [5 Min.]/[ Off] |
NOTE: Bold options are default
Photo Mode
- Quick press Power/ Mode button until you see the
- To capture an image, short press the Shutter button.
Photo settings
- Press power/mode button to setting mode, press shutter button to access Setting Menu
- Press power/mode button to access photo setting menu .
- To cycle through the settings, short press WiFi button.
- To select a setting, short press the shutter button
- To exit a setting, press the power/mode button to go back
- After setting done, press power/mode button to “X”,then press shutter to exit setting mode.
There are 4 photo settings available.
| PHOTO SETUP | FUNCTION |
| Photo Resolution | Select the desired photo resolution quality [ 16M] / [ 12M]/ [ 8M]/[ 5M]/ [ 2M] |
| Timed | Choose to set a delay [ Off]/ [ 3S]/ [ 5S]/ [ 10S]/[ 20S] |
| Auto | Choose to auto capture photo [ Off]/ [ 3S]/ [ 10S]/[ 15S]/ [ 20S]/ [ 30S] |
| DramaShot | Choose to set a burst photo per second [Off]/[3P/S]/ [5P/S]/ [10P/S] |
Slow motion Mode
- Quick press Power/Mode button until you see
- To start recording, short press the shutter button,then the blue LED indicator light will flashing .
- To stop recording , short press the shutter button.
Slow motion Setting
- Press power/mode button to setting mode, press shutter button to access video setting menu
- To cycle through the settings, short press WiFi button.
- To select a setting, short press the shutter button
- To exit a setting, press the power/mode button to go back
- After setting done, press power/mode button to “X”, then press shutter to exit setting mode.
There are 2 Slow Motion settings available.
| VIDEO SETUP | FUNCTION |
| Time Lapse | Choose to slow play thevideo[Off]/[0.5S]/[1S]/[2S]/[5S]/[10S]/[30S]/[60S] |
| Slow Motion | Select the desired video resolution quality[1080P-1920*1080]/[720P-1280*720] |
Play Back Mode
- Quick press Power/ Mode button until you see the .
- Press the WiFi buttons on the Action Camera to scroll through both video and photo files. They will be listed in the order in which they were taken.
- To play a video file, press the shutter button. A timer will appear on the bottom of the screen as you view the file. When a video is playing, press the shutter button to pause and resume the video. To fast-forward the video, long press WiFi button.Press the Power/Mode button to stop playing the video file and exit playback mode.
- To delete files, press the WiFi button to go to the desired image or video and long press the Shutter button. Then press the WiFi button to to highlight confirmation and press the Shutter Button. When you have selected an option, you will be asked to confirm selection. Select Confirmation to continue with selection or Cancel to cancel selection.
Action Camera General Setting
Quick Press power/mode button until you see ![]() , press shutter button to access setting menu, press power/mode button to enter general setting menu
, press shutter button to access setting menu, press power/mode button to enter general setting menu ![]()
There are 10 action camera general settings available.
| SETUP | FUNCTION |
| Exposure | Set the exposure value manually to compensate for unusual lighting conditions [+3]/[+2]/ [+1] /[0]/ [-1]/[-2]/[-3] |
| White Balance | Set the white balance value manually to compensate for unusual lightingconditions[Auto]/[Sunny]/[Cloudy]/[IncandescentLight]/[Fluorescent Light] |
| WIFI | Choose to open WIFI or close |
| Image Rotation | Choose to rotate photo[Choose], [Not choose] |
| Driving Mode | Choose to enter drving mode[Choose], [Not choose] |
| LightSource Frequency | Switch between 50Hz and 60Hz refresh rate. |
| LED indicator light | Choose to open LED light [Choose], [Not choose] |
| Auto Screen Saver | Saves battery power by automatically turning off your LCD screen after a selected period of time. [10S][20S][30S][Off]] (Note – HD Action Camera will remain on, only the screen will turn off.) |
| Auto Shutdown | Saves battery power by automatically turning off your HD Action Camera after a selected period of time.[1 minute][3 minutes][5 minutes][Off] |
| Time Watermark | Add the date and time to your videos as you take them. [Click], [Not click] |
Action Camera System Setting
Quick Press power/mode button until you see ![]() , press shutter button to access setting menu, press power/mode button to enter system setting menu
, press shutter button to access setting menu, press power/mode button to enter system setting menu ![]()
There are 5 action camera system settings available.
| SETUP | FUNCTION |
| Language | Sets on screen language. Chose from 14 different languages |
| Date -Time | Set the date and time on your Action Camera. Press the Shutter button to advance through each date and time option. When the text on the screen is selected, it is ready to be changed using the WiFi buttons. Once the date and time has been set the HD Action Camera will return to the settings page. |
| Format | This function erases all data from your MicroSD card. Note – Removing the MicroSD card form the HD Action Camera during formatting may damage the card. |
| Reset To Factory Settings | Reverts HD Action Camera back to its original settings |
| Firmware Version | Information screen to show you the software and version on the device. |
App Download
Please do Google Play or Apple App store to download “X-Sport Pro”.Scan bellow QR code also can download the APP.

WIFI Connection
- In video/photo/slow motion mode to long press WiFi button to open WiFi. Camera will show window of the WiFi name and password, WiFi SSID is “anko Action Cam”, WiFi password is “12345678”.
- Search the WiFi name on your smart phone, connect the WiFi name and enter password to connect the WiFi and camera.
APP Operation Guide
- After smart phone successfully connected the camera WiFi, open the app and press connect the camera.
- Select desired mode by click mode selection button
- Set up desired setting
- Press shutter button to take photo or record video
- Click album to check the files.
- Click exit to exit APP.
APP operation screen (Android phone)
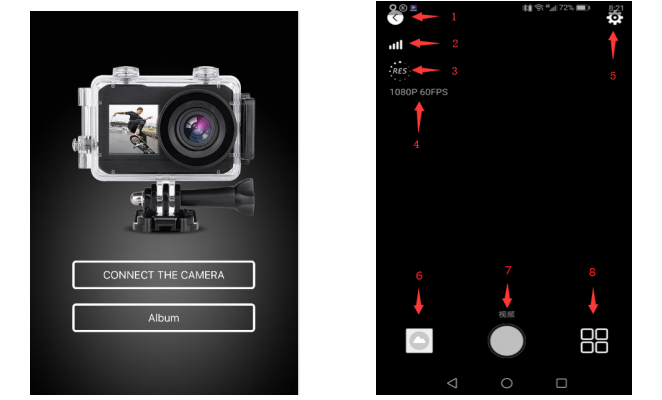
- exit
- WIFI signal
- resolution setting
- current resolution
- camera setting
- photo/video album/ download files to smartphone
- shutter
- mode selection
TRANSFER / SAVE FOOTAGE TO OTHER DEVICES
To transfer files to other devices (e.g. your computer), plug the Micro USB cable into the HD Action Camera and the standard USB end into a computer or laptop. When the HD Action Camera is connected correctly, there will be three options.
- USB mode (This will allow you to transfer files form the HD Action Camera to the connected device i.e. computer)
- PC camera (This will turn your HD Action Camera into a webcam. Please see your computer’ s manual on how to set up an external web camera)
- Charging mode, Connect to power source, can charge the camera.
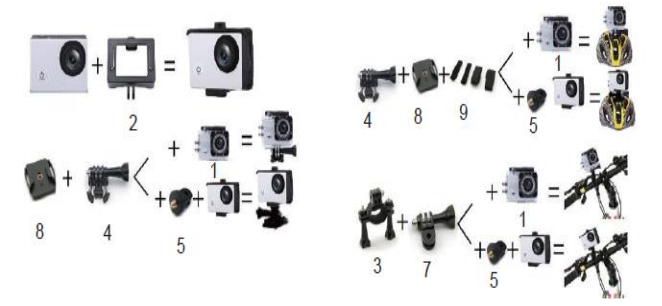
USING THE MOUNTS*
“Images are for lustrative purposes only”
TROUBLE SHOOTING
Q: I press the OK button to take an image but there is no responseA: Wait for the data process to complete and then take your next photo OR delete some photos/ videos from your MicroSD Card, if the memory is full.
Q: Automatically stops when recording. The message”Card Error”appears on the screen when a MicroSD Card is insertedA: Copy and save all footage you want to retain to another device. Then, format your MicroSD Card using the format option (see HD Action Camera Settings for details) and try again OR use a high speed MicroSD Card (class 10). The HD Action Camera is not compatible with MicroSD XC cards.
Q: Can’t take photos or record videoA: Check if the MicroSD card has enough space.
Q: Unclear video footageA: Check if there is any dirt or fingerprints on the lens.Use a clean, dry, lint free cloth to clear the camera lens.
Q: Black image when recording sky or water sceneA: Scenes with a lot of contrast may influence the automatic exposure function of camera. Adjust the exposure settings to compensate.
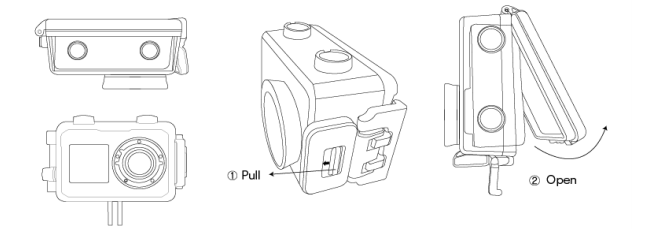
Q: How do I open the waterproof casing?A:
Product Specifications
- 2.0″LCD 320 X 240 + 1.3’’ LCD 240*240
- 120° super-wide-angle lens
- Multiple languages
- Video size: 4K(3840*2160), 2.7K(2688×1520), 1080P(1920*1080), 720P(1280*720)
- Video format: MP4
- Picture resolution: 16m/12M/8M/Other
- Picture format: JPG
- MicroSD cards up to 64GB, Class 10 recommended (MicroSD cards sold separately)
- Built-in microphone & speaker
- Light source frequency: 50Hz/60Hz
- Supports USB 2.0
- Rechargeable 3.7V Lithium battery
[xyz-ips snippet=”download-snippet”]