anko Convector Heater User Manual
PLEASE READ AND SAVE THESE INSTRUCTIONS FOR FUTURE REFERENCE
When using electrical appliances, basic safety precautions should always be followed to reduce the risk of fire, electric shock, and injury to persons, including the following:
- Read all instructions before using the appliance.
- To avoid fire or shock hazard, plug the appliance directly into a 220-240V AC electrical outlet.
- DO NOT use external timer, separate remote control system, and extension cable or external adaptor is not recommended with the appliance.
- The appliance is hot when in use. To avoid burns, DO NOT touch any hot surfaces. Keep combustible materials, such as furniture, pillows, bedding, papers, clothes, and curtains at least 3ft (1.0m) from the front of the heater and keep them away from the sides and rear. WARNING: In order to avoid overheating, DO NOT COVER the heater.WARNING: To reduce the risk of fire, keep textiles, curtains, or any other flammable material a minimum distance of 1m from the air outlet.
- To prevent possible fire, DO NOT block air intakes or exhaust vents in any manner. DO NOT use on soft surfaces, like a bed, high pile carpet, where openings may become blocked.
- DO NOT move the appliance when it is operating. Only move the appliance when it is cool.
- DO NOT run the cord under carpeting. DO NOT cover cord with throw rugs, runners, or the like. Position the cord away from traffic area and where it will not be tipped over.
- Do not abuse or damage the power cord. Fully unwind the cord before use as a coiled cord may overheat. Do not allow the supply cord to touch hot surfaces.
- Discontinue use if plug or outlet becomes hot. This is due to poor electrical contact between the cord plug and the mains power outlet socket. It is recommended that the mains power outlet socket must be replaced by an electrician if plug or outlet is too hot to touch.
- Connect to a suitable mains power socket, corresponding to the electrical ratings on the heater. Do not overload the household mains power circuit.
- This appliance is not intended for use in bathrooms, laundry areas and similar indoor location where this it may come in contact with water. NEVER locate appliance where it may fall into a bathtub or other water container. Do not use this heater in the immediate surroundings of a bath, a shower or a swimming pool.
- Do not immerse any part of this appliance or supply cord in water. Do not use with wet hands or use in any damp conditions.CAUTION: Extreme caution is necessary when the heater is used by, or near children or invalids, and whenever the appliance is left operating and unattended.
- Always unplug the appliance when not in use.
- When unplugging, be sure to pull by the plug and not the cord.
- DO NOT insert or allow foreign objects to enter any ventilation or exhaust vent opening as this may cause an electric shock or fire, or damage the appliance.
- DO NOT operate the appliance with a damaged cord or plug, or after the appliance malfunctions, has been dropped or damaged in any manner.
- If the supply cord is damaged, it must be replaced by a qualified electrical person only in order to avoid a hazard or the heater must be disposed.
- The appliance has hot and sparking parts inside. DO NOT use it in areas where gasoline, paint, or flammable liquids are used or stored.
- Use appliance only for intended household use only as described in this manual. Any other use not recommended by the manufacturer may cause fire, electric shock, or injury to persons. The use of attachments not recommended or sold by the manufacturer cause hazards.
- This appliance is designed for indoors ONLY. DO NOT use outdoors.
- To disconnect the appliance, turn the ON/OFF control switch to “OFF” (Position ‘0’) BEFORE removing the plug from main power outlet.
- Avoid the use of an extension cords, extension cord may overheat and cause a risk of fire.
- DO NOT attempt to service this appliance yourself. Service and repairs to the items must be done by a qualified electrical person only.
- Keep this instruction with the appliance. If the appliance is to be used by a third party, this instruction must be supplied with the item.
- The safety instructions do not by themselves eliminate any danger completely, proper accident prevention measures and common sense must always be used.
- Use of parts or accessories that does not come with the unit may cause danger and injuries.
- This appliance is not intended for use by persons (INCLUDING CHILDREN) with reduced physical, sensory or mental capabilities, or lack of experience and knowledge, unless they have been given supervision or instructions concerning use of the appliance by a person responsible for their safety.
- Children should be supervised to ensure that they do not play with the appliance
- Heater must not be located immediately below a socket-outlet.
- NO liability can be accepted for any damage caused by non-compliance with these instructions or any other improper use or mishandling.
- DO NOT use this heater if there are visible signs of damage to the heater.
- Use this heater on a flat horizontal and stable surface.WARNING: This heater is not equipped with a device to control the room temperature. Do not use this heater in small rooms when they are occupied by persons not capable of leaving the room on their own, unless constant competent supervision is provided.WARNING: Fire risk exists if the heater is covered by or positioned closed to curtains or other combustible materials.CAUTION: In order to avoid a hazard due to inadvertent resetting of the thermal cut-out, this appliance must not be supplied through an external switching device, such as a timer, or connected to a circuit that is regularly switched on and off by the utility.
- CAUTION: The remote control supplied with the product has a button cell battery.• Swallowing may lead to serious injury or death in as little as 2 hours due to chemical burns and potential perforation of the oesophagus.• Dispose of used batteries immediately and safely. Flat batteries if swallowed can still be dangerous.• Examine devices and make sure the battery compartment is correctly secured, e.g. that the screw or other mechanical fastener is tightened. Do not use if compartment is not secure.• If you suspect your child has swallowed or inserted a button cell battery, call the 24hour poisons information centre in AUS on 131126 or in NZ 0800 764 766 or contact your country’s emergency dept.
SAVE THESE INSTRUCTIONS FOR HOUSEHOLD USE ONLY
PRODUCT SPECIFICATION
 PRODUCT SPECIFICATION
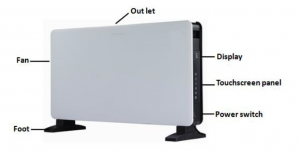
PACKAGE CONTENTS
1. Main Unit1. Instruction Manual2. Moulded Feet8. Screws for foot assembling1. Remote Control
NOTE: Confirm all parts before disposing of carton. Safely dispose of all plastic bags and other packaging components. They may be potentially dangerous to young children.
REMOTE CONTROL AND GENERAL OPERATION
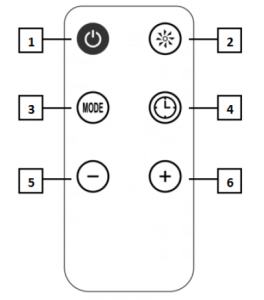
- ON/OFF Button
- Fan system & High Heat Output (2000W)
- Low Heat Output (1000W) / High Heat Output (2000W) / Auto mode / Frost Protection mode
- Timer
- Increase the Temperature and Timer setting
- Decrease the Temperature and Timer setting
DIGITAL SCREEN AND GENERAL OPERATION
Symbol:Function:
 Function:
- Temperature Indicator
- ON/OFF
- Frost Protection
- Auto Mode
- Low Heat Output (1000W)
- High Heat Output (2000W)
- Timer
- Time Indicator
- Switch OFF Time
- Switch ON Time
- Fan system
BATTERY INSTALLATION (REMOTE CONTROL)
– First Time UseRemove (pull) and discard the insulation film as shown in figure on the right.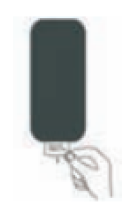 – If the battery is flat, replace it as below:
- Drive out the screw on the rear of the remote control.
- Push and slide out the battery holder as figure 1 below.
- Replace the battery with a new CR2025 button cell battery. The polarity markings are shown on the rear of the Remote Control.
- Close the battery holder.
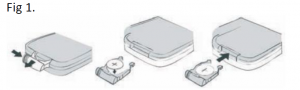 Figure 1
BATTERY PRECAUTIONS
Follow these precautions when using a battery in this device:
- Use only the size and type of battery specified.
- Be sure to follow the correct polarity when installing the battery as indicated in the battery compartment. A reversed battery may cause damage to the device.
- If the battery in the device is consumed or device is not to be used for a long period of time, remove the battery to prevent damage or injury from possible battery leakage.
- Do not try to recharge the battery not intended to be recharged; It can overheat and rupture. (Follow battery manufacturer’s instructions.)
- The battery shall not be exposed to excessive heat such as sunshine, fire or the like.
- Clean the battery contacts and also those of the device prior to battery installation.
WARNING:Do not ingest battery, Chemical Burn Hazard. This product contains a coin/button cell battery. If the coin/button cell battery is swallowed, it can cause severe internal burn in just 2 hours and can lead to death. Keep new and used batteries away from children. If the battery compartment does not close securely, stop using the product and keep it away from children. If you think batteries might have been swallowed or placed inside any part of the body, seek immediate medical attention.

REMOTE CONTROL OPERATING RANGE
- When there is an obstacle between the heater and the transmitter, the heater may not operate.
- When direct sunlight, an incandescent lamp, fluorescent lamp or any other strong light shines on the REMOTE SENSOR of the unit, the operation of remote control may be unstable.
FOOT ASSEMBLY
 FOOT ASSEMBLY
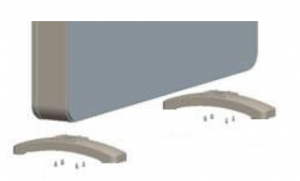
The device must be installed so that airflow is not obstructed.
 The device must be installed so that airflow is not obstructed.
- Carefully turn the unit upside down. Use the Screws to fix the Feet onto the Heater. Take care to ensure that they are located correctly at the bottom ends of the heater side molding.
- Be sure to place the convection heater on a flat surface.
DIGITAL SCREEN AND REMOTE CONTROL OPERATION
THIS APPLIANCE MUST BE EARTHED.
- Ensure the ON/OFF control switch is in the OFF (position ‘0”) position before connecting to mains power.
- Make sure the appliance, including the plug and cord, is not damaged.
- Insert power plug into a wall socket with correct power output, 220-240V 50Hz.
The buttons of touchscreen located on the product correspond to the remote control functions.
The digital screen operation:
1. Connect the appliance to a safety socket, and switch on the POWER SWITCH on the side panel. After a beep sound, the heater enters into standby mode and the screen shows the approx. ambient temperature in the room.
2. Power setting:
2.1 Press the ON/OFF button ![]() the heater goes into “Auto Mode” for heating and icon lights on.Note: Under “Auto Mode”, the default setting temperature is 25°C, the heater will start heating or stop automatically. You cannot set your desired temperature.
the heater goes into “Auto Mode” for heating and icon lights on.Note: Under “Auto Mode”, the default setting temperature is 25°C, the heater will start heating or stop automatically. You cannot set your desired temperature.
2.2. Press the Fan button ![]() and set the temperature higher than the ambient temperature. The heater will work at high heat output (2000W) mode and the Fan system activates. Both
and set the temperature higher than the ambient temperature. The heater will work at high heat output (2000W) mode and the Fan system activates. Both
icons ![]() & light on.
& light on.
2.3 The button ![]() is a multi-function switch. Press the button
is a multi-function switch. Press the button ![]() in turns, the heater can obtain the following functions.
in turns, the heater can obtain the following functions.
– Low Heat Output (1000W)– High Heat Output (2000W)– Auto Mode– Frost Protection Mode
Note: Under “Low Heat Output (1000W) Mode” or “High Heat Output (2000W) Mode”, the Fan system can be activated through pressing the Fan button ![]() again.Note: Under “Frost Protection mode”, the default setting temperature is 7°C and when the room temperature is lower than 7oC, the heater will start heating.
again.Note: Under “Frost Protection mode”, the default setting temperature is 7°C and when the room temperature is lower than 7oC, the heater will start heating.
3. Temperature setting:
The ambient temperature is displayed every time the appliance starts up.The temperature can be set when the appliance is operating. The temperature regulation range is 5oC – 45oC.– Press the button ![]() to set the temperature. The temperature will increase or decrease by 1oC after each press. The setting will be memorized and confirmed after 3 seconds.– When the ambient temperature is higher than the preset temperature, the heater will stop heating.– When the ambient temperature is lower than the preset temperature, the heater will start heating automatically.
to set the temperature. The temperature will increase or decrease by 1oC after each press. The setting will be memorized and confirmed after 3 seconds.– When the ambient temperature is higher than the preset temperature, the heater will stop heating.– When the ambient temperature is lower than the preset temperature, the heater will start heating automatically.
IMPORTANT! After setting, the shown temperature on the display screen is the ambient temperature. The heater will start to function only when the set temperature is higher than the ambient temperature.
4. Timer setting:
A switch ON time or a switch OFF time can be set from 0:30h – 23:30h.4.1 Under ON mode, set one your desired function (e.g. Low Heat Output/ High HeatOutput/ Auto Mode/ Frost Protection Mode), then press ![]() button to enter into TURN ON timer setting. The icon
button to enter into TURN ON timer setting. The icon ![]() will light on. Press buttons
will light on. Press buttons ![]() to select the desiredrange between 00:30 to 23:30 hours. The timer will increase or decrease by 0.5 hour after each press. In the timer setting, the timer symbol
to select the desiredrange between 00:30 to 23:30 hours. The timer will increase or decrease by 0.5 hour after each press. In the timer setting, the timer symbol ![]() will light on and be shown on thedisplay. The setting will be memorized and confirmed after 3 seconds. For example, if you set the timer to 1 hour, the heater will switch ON automatically after 1 hour.Note: You can cancel the TURN ON timer by pressing on/off button
will light on and be shown on thedisplay. The setting will be memorized and confirmed after 3 seconds. For example, if you set the timer to 1 hour, the heater will switch ON automatically after 1 hour.Note: You can cancel the TURN ON timer by pressing on/off button ![]() or by changing thecurrent function setting.
or by changing thecurrent function setting.
4.2. Under ON mode, press ![]() button to enter into TURN OFF timer setting. The icon
button to enter into TURN OFF timer setting. The icon ![]() will light on. Press buttons
will light on. Press buttons ![]() to select the desired range between00:30 to 23:30 hours. The timer will increase or decrease by 0.5 hour after each press. In the timer setting, the timer symbol
to select the desired range between00:30 to 23:30 hours. The timer will increase or decrease by 0.5 hour after each press. In the timer setting, the timer symbol ![]() will light on and show on the display. The setting will bememorized and confirmed after 3 seconds. For example, if you set the timer to 1 hour, the heater will switch OFF automatically after 1hour.Note: You can cancel the TURN OFF timer by pressing on/off button
will light on and show on the display. The setting will bememorized and confirmed after 3 seconds. For example, if you set the timer to 1 hour, the heater will switch OFF automatically after 1hour.Note: You can cancel the TURN OFF timer by pressing on/off button ![]() or by changing the current function setting.
or by changing the current function setting.
5. Child Lock
Press the “+” and “-“ button simultaneously for 5 seconds to activate the child lock function for ON or OFF. The symbol ” ![]() ” will light up or go out on the LED display.Settings can be adjusted again after turning off the child lock function.Note: This function can only be set from the heater, and not by remote control.
” will light up or go out on the LED display.Settings can be adjusted again after turning off the child lock function.Note: This function can only be set from the heater, and not by remote control.
OPERATING SOUND
The appliance emits a beep upon each operation setting.
NOTE: There is a tip-over switch inside the heater. If the heater is knocked over, the power to the heater will shut off automatically.
WARNING! FOR ELECTRICAL SAFETY THIS APPLIANCE MUST BE PLUGGED INTO AN EARTHED ELECTRICAL POWER SOCKET OUTLET! – If you are uncertain,please consult an electrician.
anko Convector Heater User Manual
 anko Convector Heater User Manual
Before cleaning– When not in use or before cleaning, always disconnect the appliance from mains power supply.
Cleaning– Cleaning must be done only when the heater has cooled down completely.– Do not immerse the whole unit in water or other liquid.– Do not use harsh solvents on the unit.– Wipe the exterior of the appliance with a soft damp cloth.– Dry the unit completely with a dry cloth.
IMPORTANT! Check for damage– Always check that the appliance is in good working order, there is no damage visible and all parts are secure.– Check the power supply cord and plug regularly for cuts or damage. If any damage is visible on the product, DO NOT use the heater.
Store in a safe place– When not in use, disassemble and store your appliance and instruction manual in a safe and dry place away from moisture and heat.
NOTE: Always clean and store away your appliance with this instruction manual when not in use.
12 Month Warranty
Thank you for your purchase from Kmart.Kmart Australia Ltd warrants your new product to be free from defects in materials and workmanship for the period stated above, from the date of purchase, provided that the product is used in accordance with accompanying recommendations or instructions where provided. This warranty is in addition to your rights under the Australian Consumer Law.Kmart will provide you with your choice of a refund, repair or exchange (where possible) for this product if it becomes defective within the warranty period. Kmart will bear the reasonable expense of claiming the warranty. This warranty will no longer apply where the defect is a result of alteration, accident, misuse, abuse or neglect.Please retain your receipt as proof of purchase and contact our Customer Service Centre on 1800 124 125 (Australia) or 0800 945 995 (New Zealand) or alternatively, via Customer Help at Kmart.com.au for any difficulties with your product. Warranty claims and claims for expense incurred in returning this product can be addressed to our Customer Service Centre at 690 Springvale Rd, Mulgrave Vic 3170.Our goods come with guarantees that cannot be excluded under the Australian Consumer Law. You are entitled to a replacement or refund for a major failure and compensation for any other reasonably foreseeable loss or damage. You are also entitled to have the goods repaired or replaced if the goods fail to be of acceptable quality and the failure does not amount to a major failure.For New Zealand customers, this warranty is in addition to statutory rights observed under New Zealand legislation.
Read More About This Manual & Download PDF:
[xyz-ips snippet=”download-snippet”]