![]()
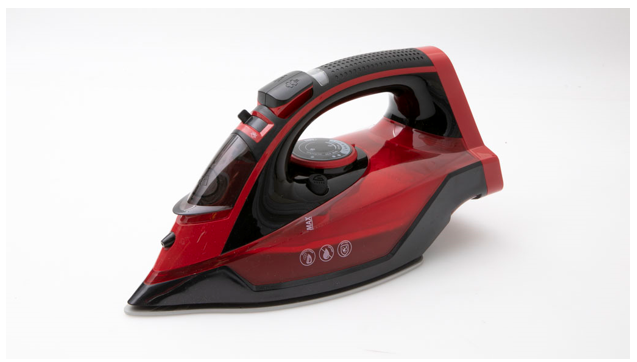
Cordless Steam IronUser Manual

Model: KB-950RVE3
IMPORTANT SAFETY INSTRUCTIONS
Read this user manual carefully before first use and save it for future reference.
- This appliance is not intended for use by persons (including children) with reduced physical, sensory or mental capabilities or lack of experience and knowledge unless they have been given supervision or instructions concerning the use of the appliance by a person responsible for their safety.
- Children should be supervised to ensure that they do not play with the appliance.
- Cleaning and user maintenance shall not be made by children without supervision.
- This product has been designed for domestic use only. In case of any commercial use, inappropriate use or failure to comply with the instructions, the manufacturer is not responsible, and the guarantee will not apply.
- Before connecting your appliance, check if the mains voltage is the same as the voltage indicated on your appliance and that the power outlet has an earth connection. If unsure check with an electrician.
- Before each use ensure that the electric cord or any other parts on the iron is not damaged.
- Keep the iron and its cord out of reach of children when it is connected to mains power or cooling down.
- Never direct the steam towards persons or animals. Never direct the steam jet towards any other electrical or/and electronic appliances.
- The iron is not to be used if it has been dropped, if there are visible signs of damage or if it is leaking water.
- If the appliance shows evidence of damage, malfunction, water leaks or other abnormality, DO NOT use it.
- Always make sure the appliance is switched off, unplugged and cooled down before cleaning.
- IMPORTANT! The iron must not be left unattended while it is connected to mains power and before it has cooled down.
- Do not unplug the appliance by pulling on the cord or on the appliance.
- Never immerse the iron, the stand, the cable or the cord plug in water. Never wash them under a water tap.
- The soleplate of the iron can become extremely hot and may cause burns if touched. Do not allow the supply cord to come in contact with the soleplate.CAUTION! For electrical safety, if the supply cord is damaged, it must be replaced by a qualified electrical person only to avoid a hazard or the product must be disposed of.
- Disconnect from mains power when filling the reservoir in the iron with water.
- The iron must be used and rested on a flat, stable surface.
- Always place and operate the iron on a flat, solid, clean and dry surface. When placing the iron on its stand, ensure that the surface on which the stand is placed is stable.
- For additional protection, this appliance should be connected to a household residual current device (RCD/safety switch) with a rating of no more than 30mA. If unsure consult your electrician for advice.
BEFORE FIRST USE
Unpack the appliance and check if all parts are there and undamaged. Should this not be the case, return the product to Kmart for replacement.The packaging contains:
- One steam iron
- One charging base
- One filler cupClean all parts before first use. See Cleaning and MaintenanceHeat up the iron to its maximum temperature and iron over a piece of damp cloth for several minutes. This will burn off any manufacturing residue from the iron. Smoke and odour may occur for a short period during this process, which is normal.
FEATURES
Your iron has an Anti-Drip system, Anti-Scales system and Auto-Off function.Anti-Drip system: This is to prevent water from escaping from the soleplate when the iron is cold. During use, the anti-drip system may emit a loud ‘clicking’ sound, particularly when heating up or cooling down. This is normal and indicates that the system is functioning correctly. Anti-Scale system: The built-in anti-scale cartridge is designed to reduce the build-up of limescale in the iron which occurs during steam ironing. The anti-scale cartridge is designed to prolong the working life of your iron. The anti-calc cartridge is an integral part of the water tank and does not need to be replaced. Auto-Off function: Automatically switches ‘off’ the steam iron if it has not been moved for a while. Approx. after 8 mins., if the iron is left resting on the stand.
PARTS
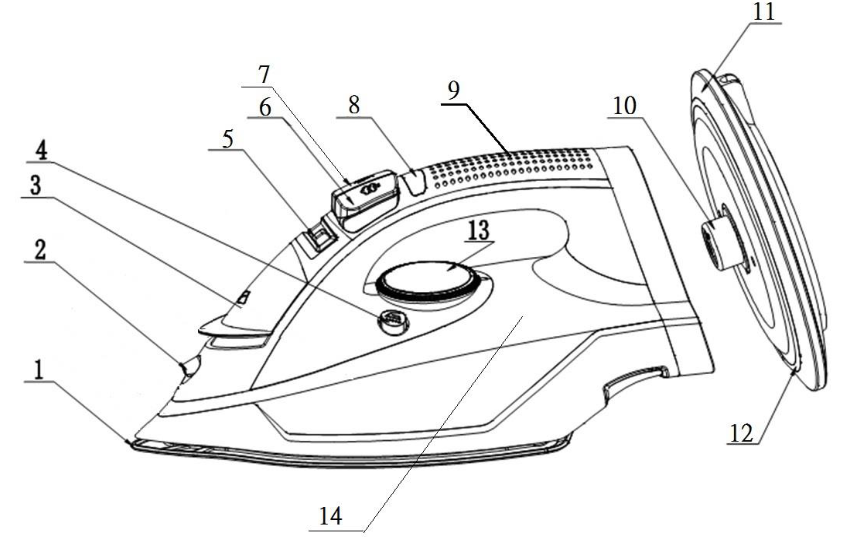
| 1 | Soleplate | 8 | Indicator lamp |
| 2 | Spray nozzle | 9 | Handle |
| 3 | Water Filling inlet | 10 | Connecting coupler |
| 4 | Self-clean button | 11 | Powerbase |
| 5 | Steam control button | 12 | Power indicator |
| 6 | Steam shot button | 13 | Temperature dial |
| 7 | Spray button | 14 | Water tank |
RECOMMENDATION
![]() DO NOT place the steam iron on its heels or flat on the ironing board during rest period. Rest the steam iron on its charging base!
DO NOT place the steam iron on its heels or flat on the ironing board during rest period. Rest the steam iron on its charging base!
OPERATION
Filling the water tank
- Ensure that the iron is cold and not connected to mains power.
- Open the water filling inlet (3) by lifting the cap.
- Hold the iron in a tilted position and fill the tank with plain water, using the filler cup.DO NOT exceed the max level mark on the tank.
- Close the water filling inlet (3) by pressing down the cap until you hear a click. To avoid water spillage, ensure that the water tank is properly closed.
NOTES:To avoid calcium deposits and prolong the life of the iron, we recommend using distilled water in the steam iron.IMPORTANT! To avoid damage or blockage of your steam iron, do not use any scented water or other additives.
Steam Ironing
- Fill the water tank with water.
- Position the iron vertically on its charging base, stand on a suitable flat stable surface.
- Ensure that the steam control (5) is on OFF position

- Connect the plug to a suitable mains power outlet, the BLUE light at the charging base will illuminate.
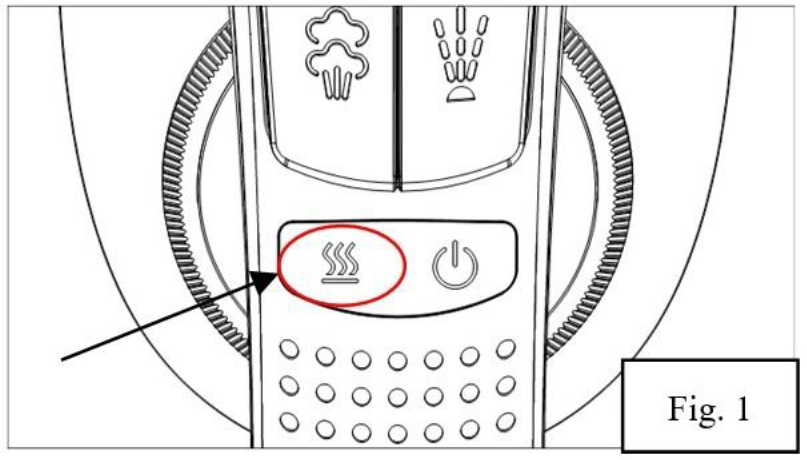
- When the indicator lamp on the steam iron shows RED it indicates that the iron is heating up.
- When the heating symbol illuminates GREEN, the iron is ready to use. (see Fig. 1)
- Turn the temperature dial (13) to a setting within the steam range
- The indicator lamps illuminate RED when the iron is heating up.
- Indicatorilluminates GREEN once the soleplate achieves the desired temperature.
- Turn on the steam control (5) toand begin ironing.
Dry Ironing
- Position the iron vertically on its charging base, stand on a suitable flat stable surface.
- Ensure that the steam control (5) is on OFF position
- Connect the plug to a suitable power outlet.
- The indicator lamps illuminate RED when the iron is heating up.
- Indicatorilluminates GREEN once the soleplate achieves the desired temperature.
- Now dry ironing can begin.
Using the spray button
- Press the spray button (7) a couple of times to moisten the garment. Before spraying makes sure that there is enough water in the water tank.NOTE: Do not spray water on silk.
Using the steam shot button
- Press the steam shot button (6) to instantly provide a powerful burst of steam to eliminate stubborn wrinkles. The steam shot can be activated when the temperature setting is in the steam range.i.e.
- The steam shot button (6) can also be applied when holding the iron in a vertical position. This is useful for removing creases from hung clothes, curtains, etc.ATTENTION: To protect against burns or injury to persons do not iron or steam fabrics while being worn on the body. Do not direct steam towards the body when ironing.
After ironing
- After use, turn the temperature dial (13) to MIN and disconnect the iron from the mains power outlet.
- Let the iron cool down and empty the water tank to prevent the build-up of any residue in the water tank.
CLEANING AND MAINTENANCE
IMPORTANT! Unplug the iron from mains power and allow it to cool down completely before cleaning and storing.
Cleaning
- Clean the upper part of iron with a soft damp cloth. If necessary, use a mild detergent.
- Do not use alcohol, acetone, benzene, scourging cleaning agents, etc., to clean the iron. Do not use hard brushes or metallic objects.
- Remove any deposits on the soleplate with a damp cloth. To avoid scratching the finishing, never use a metallic pad to clean the soleplate, and never place the iron on a rough surface.
- To remove synthetic residue from the soleplate, iron over an old cotton rag in high setting.
- Always store the emptied iron horizontally on a stable surface with a cloth protecting the soleplate.
Self-clean function
The self-cleaning function should be used on a regular basis, depending on usage and the hardness (water quality) of water used.
WARNING: Never pour white vinegar or any liquid cleaners into the water tank!
- Fill the water tank. Refer to OPERATION: Filling the water tank.
- Position the iron vertically on its charging base, stand on a suitable flat stable surface.
- Ensure that the steam control (5) is in OFF position
- Connect the plug to a suitable mains power outlet.
- Set to maximum ironing temperature.
- Once the soleplate temperature is reached, unplug the iron from mains power.
- Hold the iron over a sink, pull and hold the self-clean button (4). Boiling water and steam will now emit from the holes in the soleplate.
- Carefully shake the iron forwards and backwards to allow any scale and other deposits to be expelled with boiling water and steam.
- Release the self-clean button (4) when the water tank is empty.
- Plug the appliance into the mains power socket, set a temperature and leave it in operation for at least two minutes to dry the soleplate.
- Unplug the iron and let the iron cool down fully.
IRONING TIPS
- Before you start ironing, always check whether a label with ironing instructions is attached to the garment.IMPORTANT! Always follow the ironing instructions attached to the garment.
- The iron heats up quicker than it cools down, therefore, you should start ironing the articles first requiring the lowest temperature such as those made of synthetic fibre.
- If the fabric consists of various kinds of fibres, you must always select the lowest ironing temperature to iron the composition of those fibres.
- *Silk and other fabrics that are likely to become shiny should always be ironed on the inner side. To prevent staining do not spray water straight on silk or other delicate fabrics.
- To prevent staining do not spray water straight on silk or other delicate fabrics.
- Velvet and other textures that rapidly become shiny should be ironed in one direction with light pressure applied. Always keep the iron moving at any moment.
- Pure wool fabrics (100% wool) may be ironed with the iron set to the steam position. Preferably set the steam button to the maximum position and use a dry cloth between the garment and the iron for protection.
- Do not touch plastic buttons with a hot iron because they may melt.
- Be careful around zippers and similar items to prevent the soleplate from scratching.
Symbol Fabric Temperature setting Variable steam Steam shot Spray Nylon, silk Wool Cotton, Linen Attention! This symbol indicates: DO NOT IRON! possible not possible

TECHNICAL DATA
Rated voltage: 220-240~ 50-60HzRate power: 2000-2400W
12 Month Warranty
Thank you for your purchase from Kmart.
Kmart Australia Ltd warrants your new product to be free from defects in materials and workmanship for the period stated above, from the date of purchase, provided that the product is used in accordance with accompanying recommendations or instructions where provided. This warranty is in addition to your rights under the Australian Consumer Law.
Kmart will provide you with your choice of a refund, repair or exchange (where possible) for this product if it becomes defective within the warranty period. Kmart will bear the reasonable expense of claiming the warranty. This warranty will no longer apply where the defect is a result of alteration, accident, misuse, abuse or neglect.
Please retain your receipt as proof of purchase and contact our Customer Service Centre on 1800 124 125 (Australia) or 0800 945 995 (New Zealand) or alternatively, via Customer Help at Kmart.com.au for any difficulties with your product. Warranty claims and claims for expenses incurred in returning this product can be addressed to our Customer Service Centre at 690 Springvale Rd, Mulgrave Vic 3170.Our goods come with guarantees that cannot be excluded under the Australian Consumer Law. You are entitled to a replacement or refund for a major failure and compensation for any other reasonably foreseeable loss or damage. You are also entitled to have the goods repaired or replaced if the goods fail to be of acceptable quality and the failure does not amount to a major failure.
For New Zealand customers, this warranty is in addition to statutory rights observed under New Zealand legislation.
[xyz-ips snippet=”download-snippet”]