
anko Electric Coffee Maker User Manual

PLEASE READ AND SAVE THESE INSTRUCTIONS FOR FUTURE REFERENCE
IMPORTANT SAFEGUARDS
When using electrical appliances, basic precautions should always be followed, including the following:
- Read all instructions.
- Make sure that your outlet voltage corresponds to the voltage stated on the rating label found on the coffee maker.
- To protect against fire, electric shock and injury to persons do not immerse cord, plug or unit in water or other liquids.
- Close supervision is necessary when any appliance is used by or near children.
- Unplug from outlet when not in use and before cleaning. Allow to cool before putting on or taking off parts, and before cleaning the appliance.
- If the supply cord is damaged, DO NOT use. For electrical safety, any repairs to the product should only be carried out by a qualified electrical person only or the product must be disposed.
- The use of accessories not recommended by the appliance manufacturer may result in fire, electric shock or injury to persons.
- Do not use outdoors.
- Do not let cord hang over edge of table or counter or touch hot surface.
- Do not place on or near a hot gas or electric burner, or in a heated oven.
- Do not use appliance for other than intended use.
- Only fill the tank with clean cold water. Never fill the tank with mineral water, milk or other liquids.
- To disconnect, remove the cord plug from mains power outlet socket. Always hold the plug never pull from the cord.
- Some parts of the appliance get hot when in use, so do not touch. Use handles or knobs on the product during use.
- Do not leave the appliance on unattended.
- The normal operating temperature and when storing must be above 0.
- Do not leave the appliance exposed to direct sunlight, water or moisture.
- This appliance is not intended for use by persons (including children) with reduced physical, sensory or mental capabilities, or lack of experience and knowledge, unless they have been given supervision or instructions concerning use of the appliance by a person responsible for their safety.
- Children should be supervised to ensure that they do not play with the appliance.
- This appliance has been incorporated with a grounded plug. Please ensure the wall outlet in your house is well earthed. If unsure check with an electrician.
- Do not operate the coffee maker without water in the tank.
- Do not use outdoors or for commercial purposes.
- Never insert fingers into the capsule gate to avoid finger being hurt by the coffee capsule piercing needle or hot liquid.CAUTION: There is extremely hot water in the capsule gate during the brew process. To avoid risk of injury, do not lift the brew handle during brewing process.
- This appliance is intended to be used in household and similar applications such as:
- Staff kitchen areas in shops, offices and other working environments;
- Farm houses;
- By clients in hotels, motels and other residential type environments;
- Bed and breakfast type environments.
SAVE THESE INSTRUCTIONS FOR FUTURE REFERENCE
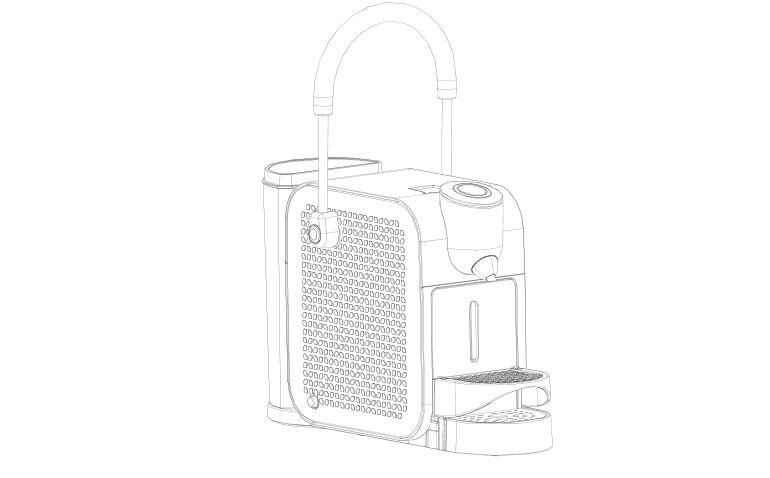
KNOW YOUR ELECTRIC COFFEE MAKER

FIRST TIME USE
Check that all accessories are complete and the unit is not damaged after unpacking. Add drinking water into water tank. Turn down the handle to close the capsule gate. Place a container on the drip tray cover, connect the supply cord plug into a mains power outlet, press the power button and the red indicator will begin to flash. Wait until the indicator light turns green, then press the coffee button and water will dispense from the nozzle. Allow it to flow for 2 minutes, this will flush out the machine. To stop the water flow at any time, press the coffee button again. Then discard the water in the container. Clean all other detachable parts thoroughly with warm water.
NOTE:
- While pressing down the coffee button, the machine may produce a pumping sound, this is normal.
- The sound tells you that water is pumped for brewing coffee. We suggest you to clean the machine as described above before use every time.
USING YOUR ELECTRIC COFFEE MAKER
- Fill the detachable water tank with drinking water.
- Open the capsule gate by lifting the handle up and insert a coffee capsule. Close the capsule gate by pushing down the handle.IMPORATANT! This appliance is only suitable for use with Nespresso original line and Nespresso compatible capsules.
- Connect the supply cord plug into a mains power outlet. Turn ON the power switch and the coffee button indicators will flash red, the appliance starts to preheat. Wait until the indicator turns green. This means the preheating is finished, and you can now brew coffee.IMPORTANT! During brewing, never lift the handle up. This will expel the coffee capsule into the collection tray.
- For small cup of coffee, press the coffee button once, the small cup button indicator will flash green and the coffee starts to brew. Once the desired quantity has been reached, the coffee maker will stop working automatically.
- For large cup of coffee, press the coffee button and hold for 3 seconds, the big cup button indicator will flash green and the coffee starts to brew. Once the desired quantity has been reached, the coffee maker will stop working automatically.NOTE:
- If you want to stop the machine during brewing, press the coffee button again.
- We recommend the best coffee capacity for small cup is 40ml, for big cup is 90ml.
- When brewing coffee, if the coffee button indicator turns red, this means the water temperature is insufficient and you must wait until the coffee button indicator turn to green to start brewing coffee.
- Once you have made coffee, always expel the capsule. Capsules are automatically expelled into the capsule collection tray when the handle is lifted up.IMPORATANT! Never turn the handle up during brewing cycle.
- If you want another fresh cup of coffee, insert a new capsule.
- Empty the capsule collection tray and rinse the unit and tank frequently.
- Always turn the coffee maker OFF and disconnect from mains power when not in use.
NOTE: The appliance will enter sleep mode automatically after 9 minutes if it has not been manually switched OFF at the completion of brewing. You can wake up the appliance by pressing the coffee button. After waking up, the red indicator will flash, you should only brew coffee when the indicator turns to green, otherwise the coffee temperature will be too low.
CLEANING AND MAINTENANCE
Be sure to unplug this appliance before cleaning. To protect against electrical shock, do not immerse the power cord, plug or unit in water or liquid. After each use, always make sure the supply cord plug is first removed from mains power outlet. We recommend that the following is performed on a periodical basis:
- Use a dry cloth to wash the removable water tank.
- Empty the capsule collection tray and rinse it.
- Clean the capsule gate with a dry cloth.
- Use a damp cloth to gently wipe the cup holder grid.
- Clean the machine using a damp cloth, never submerge the machine in water or other liquids.
- Replace all parts and keep for next use.
REMOVING MINERAL DEPOSITS
To keep your coffee maker operating efficiently, you should regularly clean the mineral deposits left by water. The frequency of cleaning will depend on water quality in your area and the frequency of use of the appliance. For this purpose we recommend using a commercially available kettle descaling solution and follow the instructions found on the descaler bottle:
- Fill with water and descaler to the MAX level on the water tank. (for correct mixture refer to the instructions supplied with the descaler solution for details).
- Press the power ON button, the red indicator will flash. Wait until the green indicator light turns ON.
- Position a empty container on the drip tray cover.
- Press the coffee button and allow the liquid to flow for 1 minute. Then stop the flow by press the coffee button again.
- Wait for 20 minutes with the machine turned ON.
- Then press the coffee button until all of the water is emptied from the tank.
- Rinse the tank well and fill with clean water.
- Press the coffee button until all of water is used up.
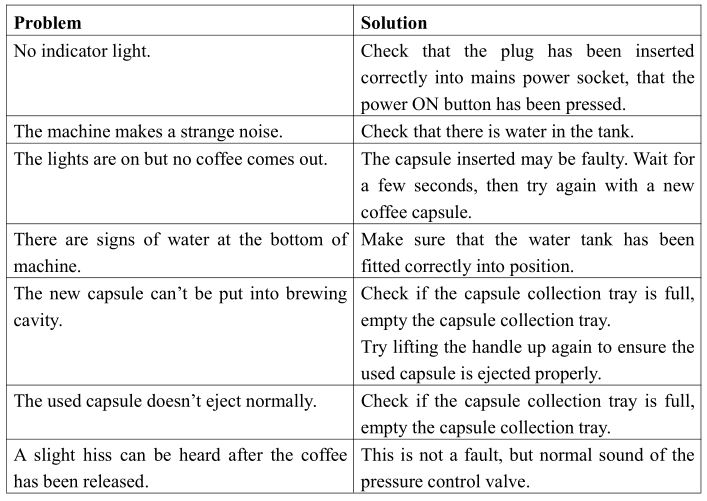
TROUBLE SHOOTING
TECHNICAL DATA
Voltage: 220-240Va.c. 50HzPower: 960 – 1150W
12 MONTH WARRANTY
Thank you for your purchase from Kmart.
Kmart Australia Ltd warrants your new product to be free from defects in materials and workmanship for the period stated above, from the date of purchase, provided that the product is used in accordance with accompanying recommendations or instructions where provided. This warranty is in addition to your rights under the Australian Consumer Law.
Kmart will provide you with your choice of a refund, repair or exchange (where possible) for this product if it becomes defective within the warranty period. Kmart will bear the reasonable expense of claiming the warranty. This warranty will no longer apply where the defect is a result of alteration, accident, misuse, abuse or neglect.
Please retain your receipt as proof of purchase and contact our Customer Service Centre on 1800 124 125 (Australia) or 0800 945 995 (New Zealand) or alternatively, via Customer Help at Kmart.com.au for any difficulties with your product. Warranty claims and claims for expense incurred in returning this product can be addressed to our Customer Service Centre at 690 Springvale Rd, Mulgrave Vic 3170.
Our goods come with guarantees that cannot be excluded under the Australian Consumer Law. You are entitled to a replacement or refund for a major failure and compensation for any other reasonably foreseeable loss or damage. You are also entitled to have the goods repaired or replaced if the goods fail to be of acceptable quality and the failure does not amount to a major failure.
For New Zealand customers, this warranty is in addition to statutory rights observed under New Zealand legislation.
References
[xyz-ips snippet=”download-snippet”]