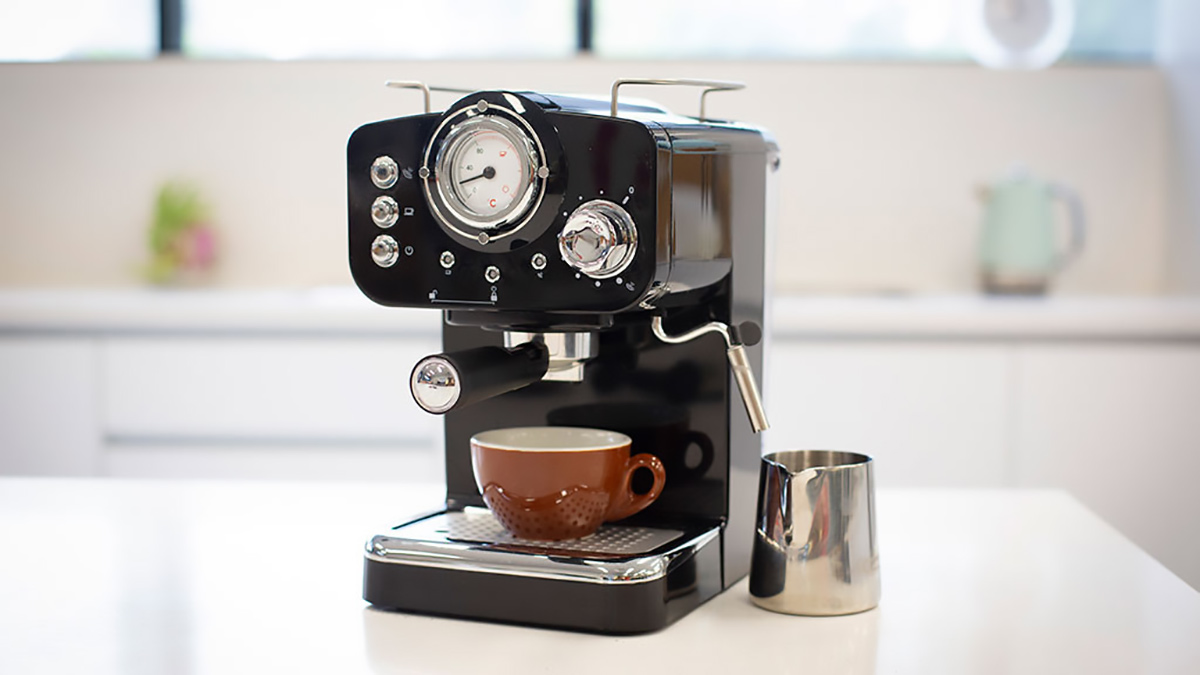
anko Espresso Coffee Maker

IMPORTANT SAFEGUARDS
Before using the electrical appliance, the following basic precautions should always be followed including the following:
- Read all instructions.
- Before using check that the voltage of wall outlet corresponds to rated voltage marked on the rating plate.
- This appliance has been incorporated with a grounded plug. Please ensure the mains power outlet in your house is well earthed. If unsure consult an electrician.
- To protect against fire, electric shock and injury to persons do not immerse main parts of the product, cord, plug, in water or other liquid.
- The appliance must not be immersed.
- Remove the plug from mains power outlet socket before cleaning and when not in use. Allow appliance cool down completely before taking off, attaching components or before cleaning.
- If the supply cord is damaged DO NOT use. Any repairs to the product must be carried out by qualified electrical person only or the product must be disposed.
- The use of accessory attachments not recommended by the appliance manufacturer may result in fire, electric shock or injury to persons.
- Place appliance on a flat surface or table, do not hang the power cord over the edge of table or counter.
- Ensure the power cord do not touch hot surfaces of appliance.
- Do not place the espresso machine on hot surface or near any heat source. i.e. stove.
- To disconnect, remove plug from wall outlet. Always hold the plug. But never pull the cord.
- Do not use appliance for other than intended use and place it in a dry environment.
- Be careful not to get burned by the steam.
- Do not touch the hot surfaces on appliance (such as steam wand, and the steel mesh when boiling). Use handle or knobs.
- Do not let the coffee maker operate without water.
- DO NOT remove the metal funnel while brewing coffee. Please remove the metal funnel to make additional coffee after finish brewing for more than 10 seconds.Caution should also be taken while removing the metal funnel since the metal parts will be hot. Please make sure to hold it by the handle and to use the filter retention clip to dispose the grounds.
- After use, before disconnecting the supply cord plug from mains power outlet socket turn all switches on the appliance to OFF.
- This appliance is not intended for use by persons (including children) with reduced physical, sensory or mental capabilities, or lack of experience and knowledge, unless they have been given supervision or instructions concerning use of the appliance by a person responsible for their safety.
- ELECTRIC SHOCK HAZARD! Children should be supervised to ensure that they do not play with the appliance.
- This appliance is intended to be used in household and similar applications such as:staff kitchen areas in shops, offices and other working environments;farm houses;by clients in hotels, motels and other residential type environments;bed and breakfast type environments.
- Do not use outdoors.
- Espresso machine shall not be placed in a cabinet when in use.
- Cleaning and user maintenance shall not be made by children without adult supervision.
Scalding Hazard!
Hot water/ hot steam escapes from the espresso machine during use. Parts of the espresso machine become very hot. Handle with care to avoid scalding
- Turn the steam controller all the way to the right (0 position) each time before you switch ON the espresso machine. Otherwise, hot water/ hot steam may unintentionally escape from the frother.
- Hold the milk frother only from the black plastic handle. During foaming and after use. DO NOT touch the froth metal tube.
- Use the frother carefully and never direct it towards parts of the body.
- Do not touch the coffee spout during operations and do not reach underneath it.
- Only clean the espresso machine when it is switched OFF and completely cooled down.
- Do not release the filter holder while the machine is running: HOT WATER may spray out.
- Allow the filter holder to cool down completely before changing or inserting brewing filter.
- Please note that hot steam may also escape from the espresso machine after it has been switched OFF.
- Do not overfill the filter holder with ground coffee, otherwise the filter holder cannot be mounted correctly. This may cause hot steam to escape from the side.
KNOW YOUR COFFEE MAKER
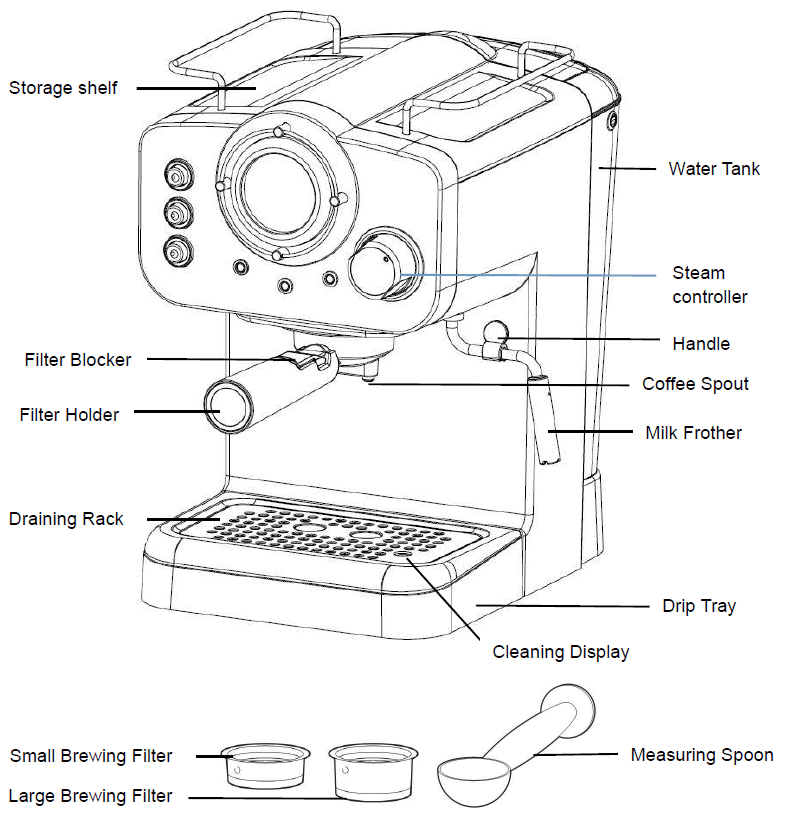
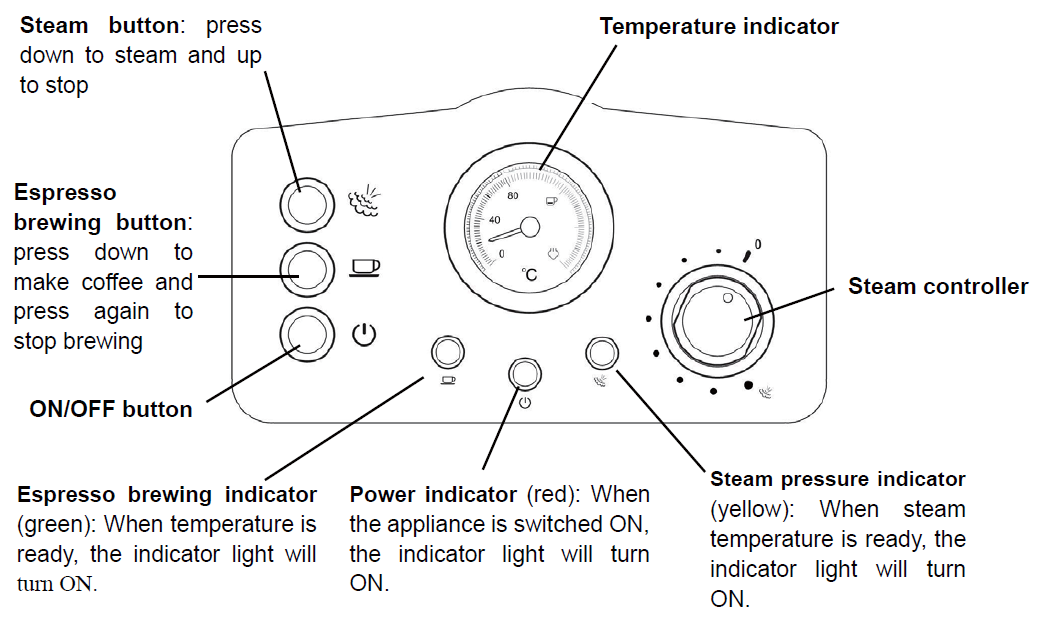
CONTROL PANEL
BEFORE FIRST USE
Prepare the espresso machine
Prior to initial use and after a longer period of disuse of the espresso machine, allow the contents of approx. 2-3 cups of water to run through the machine. This will clean the water circuit and all parts will be heated up for proper operation.During initial use, the water pump will be slightly louder. That is normal. After approx. 30 seconds, when the system has filled with adequate water and the noise will become quieter.
Normal operation
- Ensure that the espresso machine is switched OFF and disconnected from mains power outlet socket.
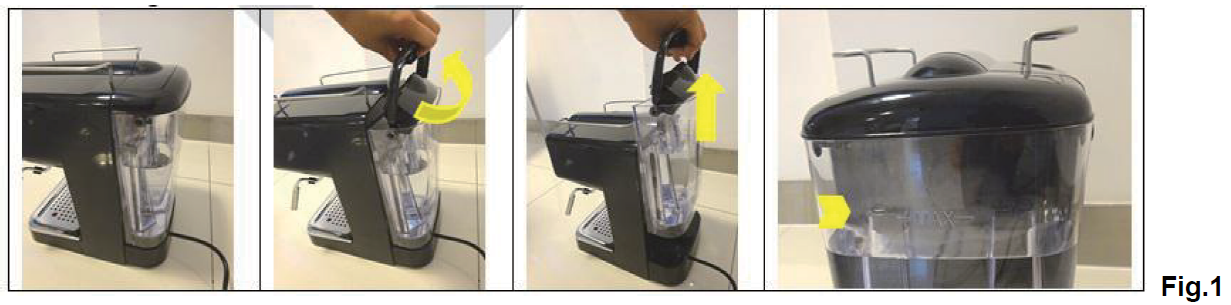
- Unfold the carrying handle on the water tank and remove the water tank upwards (refer to Fig. 1).
- Fill fresh, cold and still water into the tank. DO NOT exceed the maximum filing level mark ‘MAX’.

- Reinsert the water tank in reverse order as described on step 2. Ensure that the tank is seated correctly then fold the carrying handle downwards.
- Insert the small or large brewing filter into the filter holder. DO NOT fill any espresso powder into the brewing filter for the first run-through.
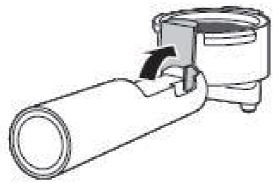
- Fit the filter holder into the espresso machine. Angled the lever towards to the left, then turn the lever to the right until it locks. Release the grip, the filter holder must seat securely in the bracket and point forwards at a 90° angle (refer to Fig.2).
- Place a large cup center it underneath the coffee spout on the filter holder.
- Turn the steam controller all the way to the right (0 position) to close the steam nozzle.
- Insert the supply cord plug into a mains power outlet and press the ON/OFF button. The power indicator will light up Red.
- Afterwards, press the Espresso brewing button immediately. The pump/heating system will now fill with water. As soon as the pump has sucked in sufficient water, cold water will run into the cup.
- Stop the water discharge by pressing the espresso brewing button.
- Wait until the indicator lamp for the espresso brewing indicator lights up Green. You can track the heating-up of the water by referring to the temperature indicator. As soon as the display is in the red range, espresso can be prepared. But it is still crucial to wait until the lamp for the espresso brewing indicator lights up Green.IMPORTANT! The Espresso indicator will only light up if the Steam button is in the OFF position, i.e. not pressed.
- Press the espresso brewing button again and let hot water run through for a total of approx. 60 seconds to flush out the espresso machine.
- If the cup is nearly full, stop the water discharge by pressing on the espresso brewing button again.
- Then, continue the flushing for another approx. 60 seconds.
- When the green lamp goes out during this process, this indicates the system is heating up.
- When the green lamp lights up again, this means the correct temperature has been reached for espresso preparation.

Heating up prior to use (pre-heating)
To prepare a good hot espresso, it is recommended that you heat up the espresso machine prior to each use. Preconditions:
- The water tank is filled sufficiently (above 1/4 tank full).
- The supply cord plug is connected to mains power.
- Insert the small or large brewing filter into the filter holder. Do not fill any espresso powder into the brewing filter yet.
- Insert the filter holder into the espresso machine from underneath. For this, the lever must be angled towards the left (refer to Fig. 2) and then inserted into the expresso machine.
- Slide the lever to the right, as far as it will go. It must be seated securely in the bracket and point forwards at a 90° angle as shown on Fig 2.
- Place a large cup underneath the coffee spout of the filter holder.
- Turn the steam controller all the way to the right (0 position) to close the steam nozzle.
- Press the ON/OFF button. The power indicator will light up red.
- Wait until the lamp for the espresso brewing indicator lights up green. Place a large cup center it underneath the coffee spout on the filter holder.IMPORTANT! The Espresso indicator will only light up if the Steam button is in the OFF position, i.e. not pressed.
- Press the espresso brewing button and let hot water run into a large cup. Before the cup is full, press the espresso brewing button again to stop the process.
- Empty the pre-heated cup. To warm up more cups, you can place these on top of the storage shelf. The cups are kept warm by the operating heat of the machine.When pre-heating is completed you can start with the actual espresso or cappuccino preparation.
Prepare espresso
For a good espresso, in addition to the coffee variety and the degree of grinding of the coffee, the contact pressure in the brewing filter is also crucial. Therefore, always make sure that the espresso filter is clean and does not contain any powder residues.WARNING: Scalding HazardIf you remove the filter holder while dispensing coffee, hot water droplets will spray and water vapor will escape from the espresso machine. You may scald yourself. After preparation, wait for around 10 seconds before removing the filter holder.
- Fold the locking bracket and the carrying handle of the water tank upwards and remove the water tank upwards (refer to Fig. 1).
- Fill fresh, cold and still water into the tank. Please note the maximum filing level MAX mark.
- Reinsert the water tank and fold the locking bracket downwards. Ensure that the water tank audibly locks in. It is recommendable to pre-heat the espresso machine prior to use. Refer to “Heating up prior to use” section.
- Insert the small or large brewing filter into the filter holder:To prepare an espresso, insert the small brewing filter.To prepare two espressos or a double espresso, insert the large brewing filter.
- Fill the filter with espresso powder up to the MAX mark, using the measuring spoon provided.
- Compress the espresso powder using the tamper on the measuring spoon.• Add more espresso powder, if necessary, so that the brewing filter is filled up to the MAX mark.• Compress the espresso powder with the tamper again.• Clean any excess coffee from the rim to ensure proper fit under brew head and avoid leaks.The compressing of the espresso powder is an important process for espresso preparation.• If the espresso power is compressed very tightly, the espresso will run through slowly and there will be more crema.• If the espresso power is not compressed very tightly, the espresso will run through more quickly and there will be less crema.• Insert the filter holder into the espresso machine from underneath. For this, the lever must be angled towards the left (refer to Fig. 2).
- Slide the lever to the right, as far as it will go. It must be seated securely in the bracket and pointforwards at a 90° angle as shown on Fig 2.
- Place one or two pre-heated cup(s) under the coffee spout.
- Wait until the lamp for the espresso brewing indicator lights up green.
- Press the espresso brewing button. The espresso will begin to run into the cup.
- Press the espresso brewing button again, once the cup(s) is (are) filled to the desired quantity (approx. 20 ml).
- The espresso is ready.
After preparing espresso (emptying the brewing filter)
WARNING!The metal parts of the filter holder and the brewing filter used become hot during use. After the last use, wait for at least another 10 minutes before emptying the brewing filter. After use, remove the espresso powder from the filter.
- Remove the filter holder from the machine by turning it to the left, as far as it will go an pull it down gently.
- Empty the espresso filter by turning the filter blocker over with the blocked espresso filter, while pressing your thumb against the filter blocker.
- Preferably knock out the espresso powder into organic waste.
Prepare cappuccino / froth milk
WARNING!Hot splashes may occur when frothing the milk. Always handle the milk frother with care. Ensure that the handle is correctly seated on the milk froth.A classic cappuccino is prepared with one espresso (approx. 20 ml) in one 150 ml cup, which is then filled up with frothed hot milk.
- Put 100ml of cold milk in a larger container, so that it is ready for frothing. Ideally, a frothing container made of stainless steel. Also refer to “Tips for frothing milk” section.
- Prepare one espresso in a larger cup (approx. 150 ml) (refer to “Prepare espresso” section). Then, set the espresso aside first.
- Turn the steam controller all the way to the right (0 position) to close the steam nozzle.
- Turn the milk froth out to the side. Only hold the handle.
- Press the steam button.
- Wait until the indicator lamp for the steam pressure lights up yellow.NOTE: You can track the rising steam pressure by referring to the temperature indicator. But it is still crucial to wait until the lamp for the steam pressure indicator lights up Yellow.
- Hold an empty container underneath the milk froth. Then, turn the steam controller slowly to the left (counter clockwise). Condensation and splashes will come out of the nozzle. This way, the nozzle and the water circuit inside the machine is cleaned.
- Wait for approx. 15 seconds, then close the steam controller again, by turning it all the way to the right, until no more steam comes out of the nozzle. Place the container used aside.
- Pick up the frothing container containing the cold milk and guide the nozzle of the milk froth lightly into the milk. Hold the frothing container at a slight angle.
- Turn the steam controller slowly to the left.
- Move the container up and down slightly, so that the froth is repeatedly immersed in the milk. Hold the tip of the nozzle just under the surface: deep enough, that the milk does not spray in all directions and high enough that a thick froth is created.NOTE: If the yellow temperature lamp goes out, this means the machine is heating up again. You can nevertheless continue using the froth, as long as steam is still flowing out of the nozzle. If the frothing stops, close the steam controller and wait for a moment until the steam pressure indicator lamp lights up again, you can then continue with frothing the milk.
- Once you have created sufficient milk froth, place the container aside briefly and hold the tall, empty cup under the froth.
- Open the steam controller again and allow steam to escape for several seconds, for fast cleaning.IMPORTANT! Make sure to clean the Milk Froth Tube after use.
- Close the steam controller. Press the steam button to switch OFF steam function.
- Swivel the milk frother towards the back again. In doing so, only hold the milk froth on the handle.
- Fill the milk froth into the cup of previously prepared espresso using a spoon for assistance. You can add sugar or sprinkle with cocoa powder, as desired.
- Clean the espresso machine after allowing it cool down for few minutes, so that coffee grounds and milk residues do not dry on (refer to “Cleaning” section).CAUTION: Metal parts particularly remain hot for longer.
- After steam generation, let the espresso machine cool off for 5 minutes before preparing espresso again. Therefore, it is recommended to prepare the espresso first and then the milk froth.
AFTER USE
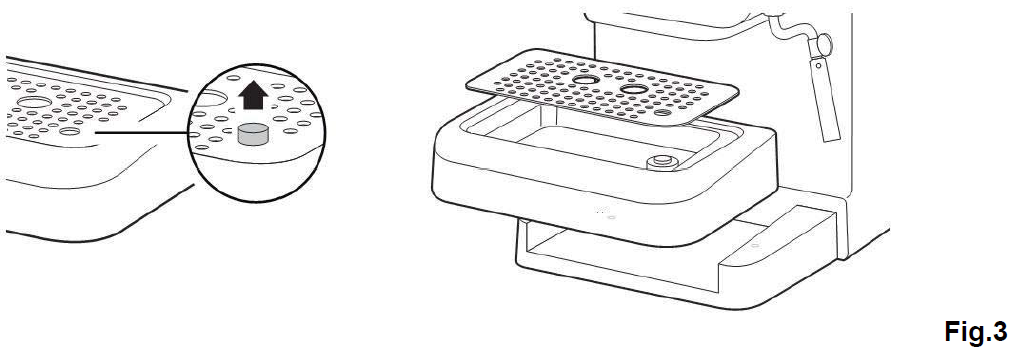
Empty drip tray
The drip tray has a cleaning display (refer to Fig. 3). It is essential to remove and empty the drip tray prior to, or at the point this becomes visible.
Switch off espresso machine
Press the On/Off button. The red power indicator goes out. If no button is pressed, the machine switches off automatically after approx. 30 minutes.
TIPS FOR FROTHING MILK
- Basically, any milk can be frothed (also soya and rice milk). However, some varieties of milk e.g. whole dairy milk, will give better results than others.
- Skimmed milk does not scald as easily as whole milk, but the fat content must not be too low. Therefore, we recommend a milk with a fat content of 1.5 to 3.5 .
- Well-chilled milk can be frothed better than less-chilled milk. Recommended temperature: approx. 7 °C.
- Do not froth milk a second time (risk of scalding).
- Allow the frothed milk to stand for approx. 30 seconds before putting the froth on the espresso. During this time, larger bubbles will burst and milk, which is still liquid, sinks to the bottom. The froth becomes even finer this way.
CLEANING
WARNING!The espresso machine becomes hot during operation. You may burn yourself. Metal parts particularly remain hot for longer. Prior to cleaning, wait until the espresso machine has cooled down completely.
Short-circuit hazard!
Water, which has penetrated the housing, may cause a short-circuit. Never immerse the espresso machine in water or other liquids. Ensure that no water or other liquids enter into the housing.
Risk of damage!
Improper handling of the espresso machine may result in damage. Do not use any aggressive detergents, sharp or metallic cleaning implements, such as knives, hard spatulas and similar. These may damage the surfaces.
- Remove the power plug from the socket.
- Allow the espresso machine to cool off.
Clean brewing filter
Empty the used small/large brewing filter after each use and rinse it out thoroughly with water before refilling it.
Daily cleaning
- Clean the brewing filters and the filter holder thoroughly withwater and then rinse all parts with clear water.
- If the holes in the filter are blocked, clean it with a fine brush.
- Empty the drip dray, rinse it out and let it dry off.
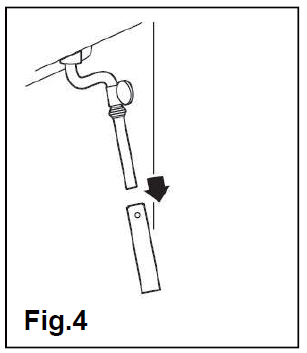
Clean frother tube
WARNING!The metal tube of the frother becomes hot during operation. You may scald yourself. Wait until the frother has cooled down before cleaning.
- Pull off the thicker metal tube by turning slightly downwards (refer to Fig. 4).
- Clean the tube with water and then rinse it with clear water.
- Dry off the tube.
- Clean the handle and the frother with a non-abrasive cloth.
- Slide the tube back on completely.
Clean housing
- Clean the water tank with a cloth or sponge and water on a regular basis.
- Clean the draining rack and the drip tray in water.
- Clean the housing with a slightly damp, non-abrasive cloth.
Descale espresso machine
When using hard, calcium-rich water, lime scale deposits occur sooner than with water containing less calcium. This calcium deposits must be removed on a regular basis. Use a commercially available descaler for coffee machines/kettles. Please follow the instructions provided with the descaler solution.
STORAGE
- Prior to longer storage, clean the espresso machine thoroughly.
- Empty the water tank and the drip tray and let both dry.
- Store the espresso machine in a dry, frost-free and dust-free place.
TROUBLESHOOTING
| Problem | Possible cause | Corrections |
| No function | No power | Insert the power plug into a live socket. |
| Indicator lamp is not lighting up | The steam button is pressed. | Press the steam button to release it. |
| No steam, no coffee flow. | Too little water in the water tank, the pump cannot suck. | Check whether the water tank is filled and correctly attached. |
| No steam. | The steam nozzle on the frother is blocked. | Use a wooden toothpick to remove possible calcium deposits from the holes on the frother. |
| Water is escaping from the side of the filter holder. | Too much ground coffee in the brewing filter, the filter holder cannot be tightened completely. | Remove the filter holder, clean the rim with a small sponge and check the coffee quantity. |
| There are coffee grounds on the gasket of the filter holder rim. | ||
| The brewing filter, the silicone perforated disk or the coffee spout are blocked. | Remove the sieve carrier carefully, because residual pressure may cause water to spray out. Clean all parts. |
| The espresso is not strong enough and not hot enough. | The ground coffee is ground too coarsely. | Use a finer grind of coffee. |
| The ground coffee is not tamped enough. | Use more ground coffee and press the ground coffee down further into the brewing filter with the tamper. | |
| The espresso flows to slowly or not at all. | The holes and rim of the filter holder are blocked. | Let the water flow out of the espresso machine without inserting the filter holder. If the water continues to flow unevenly, descale the espresso machine. |
| The brewing filter is blocked. | Remove the filter holder carefully, because residual pressure may cause water to spray out. Clean the brewing filter. | |
| The ground coffee is ground too finely. | Use a coarser grind of coffee. | |
| Ground coffee tamped too hard. | Use less pressure to tamp the ground coffee into the brewing filter. | |
| The machine calcified. | Descale the machine. |
12 MONTH WARRANTY
Thank you for your purchase from Kmart.Kmart Australia Ltd warrants your new product to be free from defects in materials and workmanship for the period stated above, from the date of purchase, provided that the product is used in accordance with accompanying recommendations or instructions where provided. This warranty is in addition to your rights under the Australian Consumer Law.
Kmart will provide you with your choice of a refund, repair or exchange (where possible) for this product if it becomes defective within the warranty period. Kmart will bear the reasonable expense of claiming the warranty. This warranty will no longer apply where the defect is a result of alteration, accident, misuse, abuse or neglect.
Please retain your receipt as proof of purchase and contact our Customer Service Centre on 1800 124 125 (Australia) or 0800 945 995 (New Zealand) or alternatively, via Customer Help at Kmart.com.au for any difficulties with your product. Warranty claims and claims for expense incurred in returning this product can be addressed to our Customer Service Centre at 690 Springvale Rd, Mulgrave Vic 3170.
Our goods come with guarantees that cannot be excluded under the Australian Consumer Law. You are entitled to a replacement or refund for a major failure and compensation for any other reasonably foreseeable loss or damage. You are also entitled to have the goods repaired or replaced if the goods fail to be of acceptable quality and the failure does not amount to a major failure. For New Zealand customers, this warranty is in addition to statutory rights observed under New Zealand legislation.
![]()
[xyz-ips snippet=”download-snippet”]