Instruction Manual
![]()

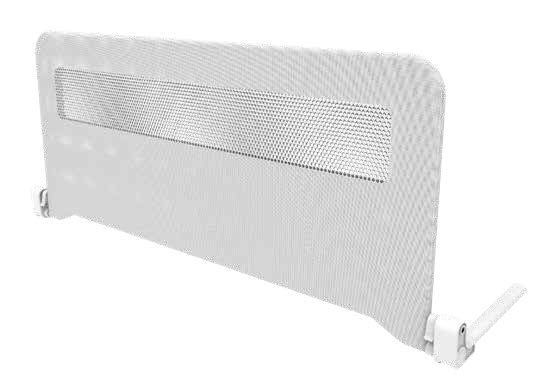
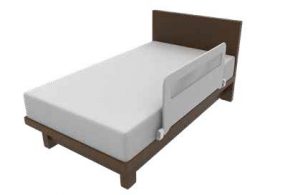
anko Folding Bed Rail

IMPORTANT! READ AND FOLLOW THESE INSTRUCTIONS CAREFULLY AND KEEP FOR FUTURE REFERENCE.
THIS PRODUCT CONFORMS TO BS7972-2001+A1:2009
 WARNINGS
 WARNINGS
WARNING Adult assembly required.
WARNING Read all the instructions before assembly and use of the product.
WARNING Dispose of all packaging materials carefully after assembly.
WARNING Not suitable for use of children under the age of 18 months or when the child is over the age of 5 years.
WARNING Only use the bed rail when the child is able to climb in and out of bed unaided.
WARNING The bed rail should not be used as a substitute for a cot, as it cannot provide the same level of safety as a cot.
WARNING The bed rail should be periodically checked for its general condition with particular reference to the security of any locking mechanism and/or hinges that are used on the product.
WARNING The maximum thickness of mattress for which the bed rail is suitable is 260mm.
WARNING Intended for use with single or children’s mattress only.
WARNING Additional and replacement parts shall be obtained only from the manufacturer.
WARNING The bed rail should not be used on a sleeping surface that is more than 600mm from the floor.
WARNING To prevent risk of strangulation, it is essential to ensure that when the bed guard is fitted into position, there is a gap of at least 250mm between each end of the bed and the corresponding end of the bed guard.
WARNING Care should be taken in unpacking and assembly.
WARNING Fit the bed rail so that its side, when in the locked position or when placed in the fitted position, touches the side of the mattress.
WARNING The bed rail should not be used unless the fittings are in place and securely attached to both the bed and/or the mattress and the bed rail.
WARNING Once fitted into place, the bed rail should be checked to ensure that it is properly fitted and secure.
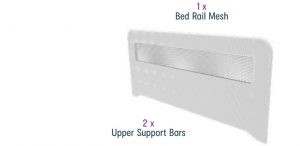
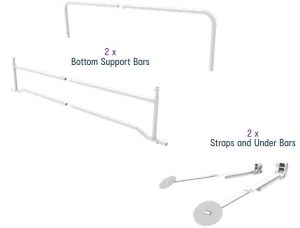
PARTS INCLUDES
INSTALLATION
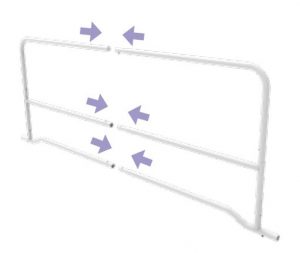
STEP 1: BAR ASSEMBLY
1.Insert Upper Support Bar (left and right) into Bottom Support Bar (left and right). Ensure the spring pin fits securely into the opposing hole so that the two pieces cannot pull apart.
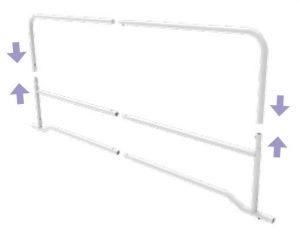
2. With the left and right sides of the bed assembled, connect the two sides. Ensure the spring pin fits securely into the opposing hole so that the bed cannot pull apart.
STEP 2: MESH AND HINGE INSTALLATION
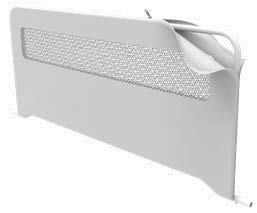
- To install the mesh on the bed rail, slide the mesh over the frame until it reaches the other side and zip it closed to complete the installation.
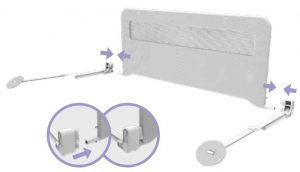
2. Slide the plastic hinge onto the assembled panel. Press the metal spring button to fully inset the tube into the hole in the plastic hinge. The spring button should line up with the access hole in the plastic sleeves on the hinge. The spring button will rebound and lock the tube into place.
STEP 3: POSITIONING THE BED RAIL
1.Set up the bed rail in the locked position and place on the side of the bed you want protected. Place the round plate with the strap on th opposite side of the bed rail and mount to the outer edge of the box spring/frame.
Ensure to adjust the slider to fit snuggly against the base of the bed. Remember to always readjust the slider whenever you reposition the bed rail.
2. Check to make sure the left and right under bar assemblies are parallel to one another, then place mattress on top of the assembly.
WARNING:
To prevent the risk of strangulation, it is essential to ensure that when the bed rail is fitted into position, there is a gap of at least 250mm between each end of the bed and the corresponding end of the bed rail.

OPERATION
USING THE BED RAIL
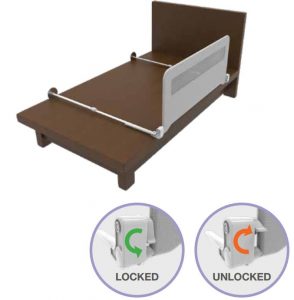
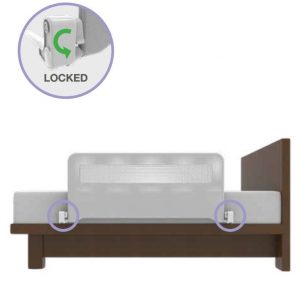
- Set up bed rail: Swing up the panel. Turn the locking tabs and hold them at the unlocked position. Continue to swing until the panel touches the sides of the mattress. Release the locking tabs and the bed rail is locked into UP position.
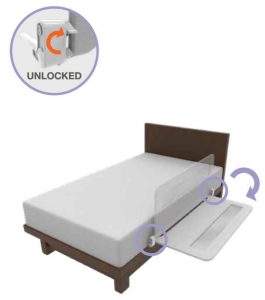
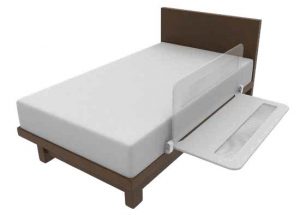
2. Fold down bed rail: With the locking tabs turned to the unlocked position, hold the upper part of the bed rail firmly and swing it down. The bed rail should now be in the DOWN position.
CLEANING INSTRUCTIONS
Simply use a soft damp cloth to wipe materials and dry thoroughly after cleaning. Do not use chemical or abrasive cleaners.
IMAGES/DRAWINGS IN THE MANUAL ARE FOR VISUAL PURPOSES ONLY. ACTUAL PRODUCT MAY \MY SLIGHTLY. THE MANUFACTURER RESERVES THERIGHT TO CHANGE ANY SPECIFICATION OR FEATURE WITHOUT PRIOR NOTICE.
KEYCODE: 42-399-438MADE IN CHINA
@ KMART AUSTRALIA LIMITEDFOR AU I NZ: IMPORTED FOR KMART STORES IN AUSTRALIA AND NEW ZEALAND. KMART AUSTRALIA- 690 SPRING\b\LE ROAD, MULGRAVE, VIC 3170 AUSTRALIA. KMART NEW ZEALAND – REGIONAL OFFICE C/0 KMART “””TOETOE STORE, HUNTERS PLAZA, GREAT SOUTH ROAD, “””TOETOE, AUCKLAND, NEW ZEALAND.
KMART CUSTOMER SERVICEAU: 1800 124125 NZ: 0800 945 995AFTER SALES SUPPORT:AU: 03 9006 0127 NZ: 0800 945 995WWW.CHILDSAFETYHELP.COM.AU
[xyz-ips snippet=”download-snippet”]