anko Food Mixer User Manual
IMPORTANT SAFEGUARDS
Before using the electrical appliance, basic safety precautions should always be followed including the following:
- Read all instructions.
- Make sure that the outlet voltage corresponds to the stated on the rating label of the mixer.
- If the supply cord is damaged, it must be replaced by a qualified electrical person in order to avoid a hazard or the product must be disposed.
- IMPORTANT! Do not leave mixer unattended while it is operating.
- Do not let cord hang over edge of table or counter or hot surface.
- To protect against risk of electrical shock, do not put mixer or power cord in water or other liquid. This may cause personal injury or damage to the product.
- Avoid contacting with moving parts. Keep hands, clothing, as well as spatulas and other utensils away from beaters during operation to reduce the risk of injury to persons,and/or damage to the mixer.
- Close supervision is necessary when your appliance is being used near children or infirm persons.
- This appliance is not intended for used by persons (including children) with reduced physical, sensory or mental capabilities, or lack of experience and knowledge, unlessthey have been given supervision or instruction concerning use of the appliances by a person responsible for their safety.
- Children should be supervised to ensure that they do not play with the appliance.
- Switch OFF the appliance and disconnect from main supply before changing accessories or approaching parts that move in use. Make sure the mixer has stoppedcompletely.
- Do not place the appliance on or near a hot gas or on a heated oven.
- Never pull out beater/dough hook/whisk when the appliance is in operation.
- IMPOTANT! Unplug from mains power outlet while not in use, before putting on or taking off parts, and before cleaning.
- Do not operate the appliance for other than its intended use.
- Do not use outdoors.
- Do not wash any parts / accessories in a dishwasher.
- CAUTION: To avoid a hazard due to inadvertent resetting of the thermal cut-out circuit, this appliance must not be supplied through an external switchingdevice, such as a timer, or connected to a circuit that is regularly switched ON and OFF by the utility.
- Always start mixing using the lowest speed. When the ingredients are mixed into a smooth paste, increase the speed gradually to the recommended speed setting. Refer tothe Speed Setting table in this manual
SAVE THESE INSTRUCTIONS FOR HOUSEHOLD USE ONLY
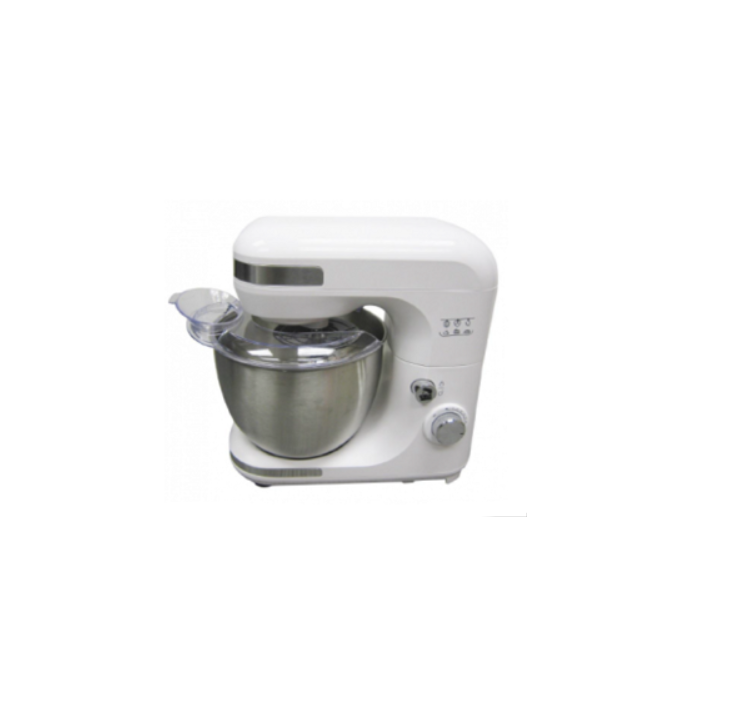
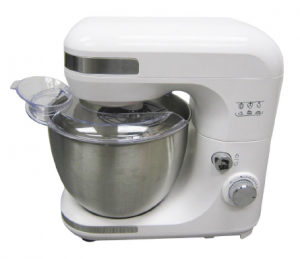
KNOW YOUR MIXERProduct may be subject to change without prior notice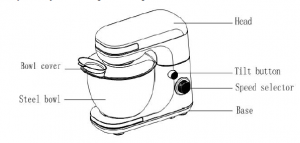
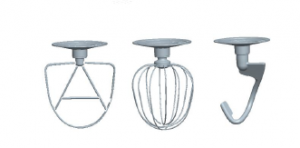 Beater Whisk Dough hook
BEFORE USING MIXER
Before assembling the mixer, be sure the power cord is unplugged from mains power outlet and the speed selector is in the 0 position.
- Press the tilt button, and the head of mixer will automatically release and lock into the tilt position.
- Select the desired attachments, depending on the mixing task to be performed: beater for mixing and beating eggs, dough hook for kneading, and whisk for beatingand frothing egg whites.
- Insert the Beater/ Dough hook/Whisk by pushing it against the head of the mixer and rotate in an anti-clockwise direction until it locks into position.Note: Ensure the beater/dough hook/whisk is fully inserted into the socket, otherwise your mixing results may be affected
- Place the bowl on the base, and then turn the bowl clockwise until it locks into position (see fig.1).
- Lower the head into the bowl by pressing on the tilt button with one hand and holding and pushing down on the head with the other hand. A click sound will be heard when the head has reached and locked in correct position.
- Make sure the bowl cover is in place (see fig.2). Figure 1.Figure 2
 Figure 1
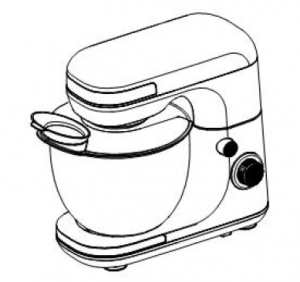 .Figure 2
USING YOUR MIXER FOR MIXING
- Ensure that the speed selector is at the 0 position, and then connect the supply cord plug into a mains power outlet.
- Turn the speed selector to your desired speed setting. Warning: Do not stick knifes, metal spoons, fork and so on into the bowl when operating. Warning: The maximum continuous operation time is 7 minutes. Allow it to rest for at least 20 minutes before using it again. Failure to follow the above instructions willcause electric motor burnout. When kneading yeast dough, a low speed is suggested for first use and then use a higher speed to achieve the best results.Note: During kneading, some flour may be adhered on the inside of the bowl. Remove the bowl cover, and scrape the flour on the inside wall of the bowl using a spatula in order toobtain well kneading results.
- When mixing is completed, turn the speed selector to 0 position and unplug the cord from mains power outlet.
- Press on the tilt button, the head of the mixer will automatically lift and lock into the tilt position.Caution: Before pressing down the tilt button (namely before lifting the head of mixer), make sure the beater/dough hook/whisk is resting on the two sides of the head of mixer. Otherwise, when lifting the head of mixer, the beater/dough hook/whisk will intervene with the mixing bowl. If the beater/dough hook/whisk is resting at the front of the head of mixer, turn on the speed selector again. Let the mixer rotate for a few seconds, then turn off the speed selector to stop the beater or whisk or dough hook on the two sides of the head of mixer.
- If necessary, you can scrape off the excess food particles from the beaters or dough hooks with a plastic spatula.
- Pull out the beater/dough hook/whisk by pressing it against the head of the mixer and rotating in a clockwise direction.Caution: The speed selector switch must be in the 0 position and the power cord plug must be unplugged from mains power outlet before attempting to pull out thebeater/dough hook/whisk from the mixer
Speed settings
Level |
Use |
Suitable for |
| ON – 2 | Dough hook, Beater | – Kneading and mixing of firm dough or firmer ingredients |
| 2 – 3 | Dough hook | – Kneading yeast dough– Kneading thick cake mixture |
| 2 – 4 | Beater | – Mixing thick cake mixture– Mixing butter and flour– Mixing yeast dough |
| 4 – 6 | Beater | – Cake mix– Whisking butter with sugar– Biscuit dough |
| 6 – 7 | Whisk | – Whipped cream– Egg white– Mayonnaise– Whisking butter until fluffy |
CLEANING AND MAINTENANCE
- Unplug the appliance from mains power and wait for it to completely cool down before cleaning.Caution: for electrical safety, the mixer must not be immersed in water or other liquid.
- Wipe the outside surface of the head and base with a dampened cloth and polish with a soft dry cloth.
- Wipe any excess food particles from the power cord.
- Immerse the bowl, beater, dough hook and whisk in warm soapy water for complete cleaning. Then rinse under running water and wipe dry.
- Do not wash any parts / accessories in a dishwasher.
COOKING TIPS
- Refrigerated ingredients, such as butter and eggs, should be at room temperature before mixing begins. Set these ingredients out ahead of time.
- To eliminate the possibility of shells or deteriorated-off eggs in your mixture, break eggs into a separate container first, before adding to the mixture.
- Do not over-beat. Be careful that you only mix/blend mixtures to the recommended requirements in your recipe. Mix dry ingredients until they just combined. Alwaysuse low speeds.
- Keep in mind that climatic conditions, seasonal temperature changes, temperature of ingredients and their texture variation from area to area, all play a part in therequired mixing time and the results achieved.
TECHNICAL SPECIFICATION
Voltage: 220-240Va.c. 50-60Hz Power: 00W
RECIPE
| BreadDough |
Ingredients |
Procedure |
| 750g all-purpose flour 540g water |
|
12 Month Warranty
Thank you for your purchase from Kmart.Kmart Australia Ltd warrants your new product to be free from defects in materials and workmanship for the period stated above, from the date of purchase, provided that theproduct is used in accordance with accompanying recommendations or instructions where provided. This warranty is in addition to your rights under the Australian ConsumerLaw.
Kmart will provide you with your choice of a refund, repair or exchange (where possible) for this product if it becomes defective within the warranty period. Kmart will bear the reasonable expense of claiming the warranty. This warranty will no longer apply where the defect is a result of alteration, accident, misuse, abuse or neglect.
Please retain your receipt as proof of purchase and contact our Customer Service Centre on 1800 124 125 (Australia) or 0800 945 995 (New Zealand) or alternatively, viaCustomer Help at Kmart.com.au for any difficulties with your product. Warranty claims and claims for expense incurred in returning this product can be addressed to ourCustomer Service Centre at 690 Springvale Rd, Mulgrave Vic 3170
Our goods come with guarantees that cannot be excluded under the Australian Consumer Law. You are entitled to a replacement or refund for a major failure and compensation for any other reasonably foreseeable loss or damage. You are also entitled to have the goods repaired or replaced if the goods fail to be of acceptable quality and the failure does not amount to a major failure For New Zealand customers, this warranty is in addition to statutory rights observed under New Zealand legislation.
Read More About This Manual & Download PDF:
[xyz-ips snippet=”download-snippet”]