Instruction Manual
![]()

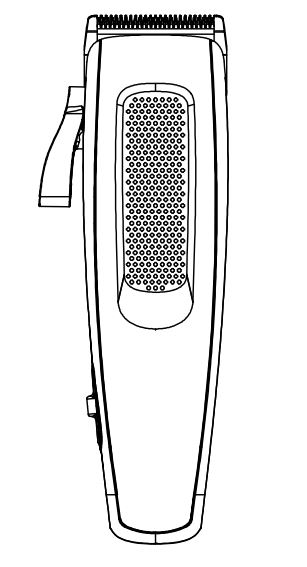
anko Hair Clipper (HC-5300)
SAFETY GUIDE
PLEASE READ CAREFULLY BEFORE USING THIS APPLIANCE
Please follow all the precautions listed below for safety and to reduce the risk of injury or electric shock.
 WARNING: READ ALL INSTRUCTION. FAILURE TO FOLLOW ALL INSTRUCTIONS LISTED BELOW MAY RESULT IN ELECTRIC SHOCK, OR SERIOUS PERSONAL INJURY.
SAVE THIS INSTRUCTION
- Only use the appliance as described in this manual.
- Do not immerse the appliance in water or any other liquid. Warning: Keep the appliance dry and do not use with wet hands.
- Do not allow the appliance to be exposed to rain or moisture during use or storage.
- Unplug this appliance before cleaning it.
- Always check the appliance for damage prior to use. If any damage is observed, do not use the appliance.
- The appliance is intended for indoor use only.
- Always switch the appliance OFF after use.
- This appliance has no user serviceable parts.
- This appliance is for household use only, not designed for commercial use.
- Do not use it outdoors.
- Do not use the appliance if it is not working properly, if it has been dropped or if it has been immersed in any liquid.
- Do not leave the appliance unattended when it is plugged in.
- Before using the appliance, ensure that the clipper blade are securely fitted.
- Do not use the appliance on young children.
- The appliance is not to be used by persons (including children) with reduced physical, sensory or mental capabilities, or lack of experience and knowledge, unless they have been given supervision or instructions concerning use of the appliance by a person responsible for their safety.
- This appliance is not a toy. Children being supervised to ensure that they do notplay with the appliance.
- Use this appliance only for its intended use as described in this manual.
- Use only attachments provided.
- This product contains sharp blades, please take the utmost care in handling and use.
- Do not stretch, twist and curl the cable around the appliance. CAUTION: Electric Shock Hazard. Never operate this appliance if it has a damaged cord or plug, if it is not working properly, if it has been dropped or damaged, or if it has been dropped into water. If the cord is damaged, it must be replaced by the manufacturer, its service agent or similarly qualified persons in order to avoid a hazard.
- Keep the cord away from heated surfaces.
- Keep the appliance and the cord away from the edge of tables or countertops and out of reach of children and persons with reduced physical, sensory or mental capabilities.
- To avoid personal injury, do not use the hair clipper if it has a damaged blade.
- Always make sure blades are aligned properly.
- Do not submerge the appliance, nor make it flow under water-tap.
- Do not use salt water or boiling water when cleaning. Also, do not use cleaning products that are designed for toilets, bathrooms or kitchen appliances.
- Do not use outdoors or operate where aerosol (spray) products are being used, or where oxygen is being administered.
- Do not use extension cord or a voltage converter with this appliance
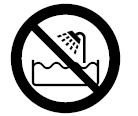 WARNING: Do not use this appliance near bathtubs, showers, basins orother vessels containing water.
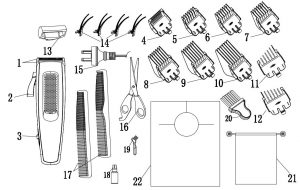
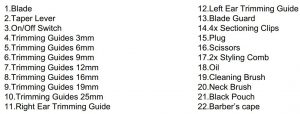
PARTS
BEFORE FIRST USE
We have aligned the blades of hair clipper prior the shipment. However, it is possible that the blades may be bumped out of alignment whilst in transit. Please ensure correct blade alignment before use.
Checking the blade alignment by following below steps:
- Ensure the end to the top blade is closer to the body of hair clipper than the bottom blade.
- The bottom blades should be as closely aligned as possible to the center of the top blade.
- If the blades are not aligned correctly, turn the clipper on for a few moments, then turn off and unplug. Loosen the two screws slightly and manually adjust the bottom blade until it is aligned.Re-tighten the screws.
- Ensure the hair clipper is running smoothly, with a slight vibration, before attempting to cut any hair.
HOW TO USE THE CLIPPER
- Select an appropriate length trimming guide to match the desired length of hair to remain after the cut. The trimming guides are numbered and marked with 3mm, 6mm, 9mm, 12mm, 16mm, 18mm and 25mm.
- Hold comb with teeth up, slide the attachment firmly onto the bottom clipper blade.
- Use the longest comb guide to start trimming. You can always use a closer trimming guide later if you want a closer cut.
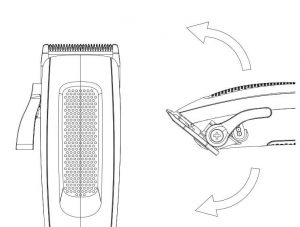
- The hair clipper has a taper lever located at the left side. The lever adds versatility by allowing you to gradually change the closeness of your cut without need for a trimming guide.
- When the lever is in the uppermost position, the blades will give you the closest cut and leave the hair very short. Pushing the lever downward gradually to increase the cutting length.
WARNING:Switch off the device before replacing or changing the attachments
NOTES:The hair to be dressed must be dry.
NOTES:The cutting length may deviate depending on the cutting angle. Please start with a comb attachment with a longer cutting length and then, in the course of cutting process, use shorter cutting lengths step by step.
BEFORE CUTTING HAIR
- Inspect the clipper and make sure there is no excessive oil on the cutting blades prior ot use. Any excessive oil should be wiped off to prevent it from getting on your kin.
- Place the cape around the neck of the person whose hair is being trimmed or cut.
- This person should be seated so that the top of their head is at your eye level.
- Comb the hair as it is normally styled.
- Comb out all knots and tangles.
- Hold the hair clipper in the palm of one hand and with your thumb resting firmly on the top of the hair clipper to give better control.
- Ensure the hair is dry. Hair clippers perform best with dry hair, making it easier to see how much hair is being cut.
HOW TO GIVE A HAIRCUT
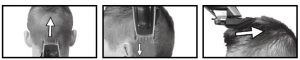
- Start at the back of the head. Hold the clipper lightly against the hair, with the teeth of the guide comb pointing up flat against the head. Slowly lift the clipper up and outward through the hair, cutting only a small amount at a time.
- Repeat around sides and back of head. Make sure the length of the hair is trimmed the same on both sides of the head.
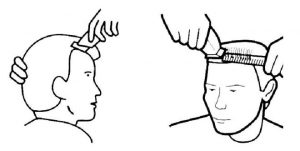
- To cut the top of the head, hold the hair between your fingers and cut a small amount at a time. Cut from the front to back.

- Tapering around ears by using left and right ear trimming guide.
- To trim around the ears and short hairs at the nape, you must remove the trimming guide. Angle the clipper and lightly stoke around each ear to the back of the neck. Be careful not to touch ears o to press too hard.
- Final touch ups can be made with the hair clipper or scissors. Make sure ot check over the entire head for any uneven areas.
SHORT TAPERED STYLES
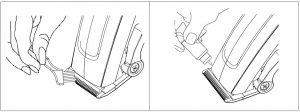
- Start with the longest trimming guide (25mm), cut from the back of the neck to the crown. Hold the attachement comb flat against the head and slowly move the clipper through the hair, as shown.
- Use the same procedure from the lower side to the upper side of the head, as illustrated. Then cut the hair against the direction in which it grows and level with the sides.
- To give a “flat top” look, the hair on top to the head must be cut over the top of a flat com.
- Use closer cutting attachment combs to taper the hair down to the neckline as desire.
CLEANING AND MAINTENANCE
To ensure long lasting performance of your clipper, clean the blades and unit regularly by brushing hair from the clipper and oiling the blades after cleaning.
Turn off your hair clipper, disconnect the supply cord plug from mains power outlet and wait until it is completely cool.
Before cleaning, remove the accessory and make cleaning with the aid of the cleaning brush that was equipped in the product.
The cutting blades should be lightly oiled with the oil provided once every few haircuts.
Clean your hair clipper using a damp cloth and then dry it. After each use, follow the instructions to retire the blades of your hair clipper.
IMPORTANT! This product is not water resistant. Don’t wash it with water or other liquid. Allow to dry completely after cleaning and before storing.
TECHNICAL SPECIFICATIONS
- Model no.: HC-5300
- Voltage: 220-240V~ 50-60Hz
- Wattage: 7W
12 Month Warranty
Thank you for your purchase from Kmart.
Kmart Australia Ltd warrants your new product to be free from defects in materials and workmanship for the period stated above, from the date of purchase, provided that the product is used in accordance with accompanying recommendations or instructions where provided. This warranty is in addition to your rights under the Australian Consumer Law.
Kmart will provide you with your choice of a refund, repair or exchange (where possible) for this product if it becomes defective within the warranty period. Kmart will bear the reasonable expense of claiming the warranty. This warranty will no longer apply where the defect is a result of alteration, accident, misuse, abuse or neglect.
Please retain your receipt as proof of purchase and contact our Customer Service Centre on 1800 124 125 (Australia) or 0800 945 995 (New Zealand) or alternatively, via Customer Help at Kmart.com.au for any difficulties with your product. Warranty claims and claims for expense incurred in returning this product can be addressed to our Customer Service Centre at 690 Springvale Rd, Mulgrave Vic 3170.
Our goods come with guarantees that cannot be excluded under the Australian Consumer Law. You are entitled to a replacement or refund for a major failure and compensation for any other reasonably foreseeable loss or damage. You are also entitled to have the goods repaired or replaced if the goods fail to be of acceptable quality and the failure does not amount to a major failure.
For New Zealand customers, this warranty is in addition to statutory rights observed under New Zealand legislation.
References
[xyz-ips snippet=”download-snippet”]