
anko IM R6 Genius Compact Stroller
The illustrations shown in this manual are for reference only. The manufacturer reserves the right to change any specification or feature without further notice.
IMPORTANT! PLEASE READ CAREFULLY & KEEP FOR FUTURE REFERENCE
This product is designed to comply with Australian and New Zealand standard AS/NZS2088:2013.
WARNING:
RETAIN FOR FUTURE REFERENCE.READ ALL INSTRUCTIONS CAREFULLY BEFORE ASSEMBLY AND USE OF THIS PRAM/STROLLER. ALWAYS FOLLOW THE INSTRUCTIONS.THE CORRECT USE AND MAINTENANCE OF THIS PRODUCT IS ESSENTIAL.
WARNING:TO AVOID INJURY OR DEATH: ALWAYS APPLY THE BRAKES WHENEVER THE PRAM/STROLLER IS STATIONARY.
- FOLLOW THE MANUFACTURER’S INSTRUCTIONS.
- DO NOT LEAVE CHILDREN UNATTENDED.
- SECURE THE CHILD CORRECTLY IN THE HARNESS AT ALL TIMES.
- DO NOT CARRY EXTRA CHILDREN OR BAGS ON THIS PRAM/STROLLER. THE PRAM/STROLLER MAY TIP OVER.
- MAKE SURE CHILDREN ARE CLEAR OF ANY MOVING PARTS IF YOU ADJUST THE PRAM/STROLLER.
- USE THE HARNESS AT ALL TIMES.
- DO NOT USE ANY ACCESSORIES OTHER THAN THOSE APPROVED FOR USE WITH THIS PRAM/STROLLER BY THE MANUFACTURER.
- IT IS UNSAFE TO USE ACCESSORIES NOT APPROVED FOR USE WITH THIS PRAM/STROLLER.
- DO NOT PLACE MORE THAN 4.5 KG IN THE BASKET.
- THE MAXIMUM HEIGHT & WEIGHT OF THE CHILD USING THIS PRODUCT IS NOT TO EXCEED 96CM AND 15KG.
- NEVER LEAVE THE HARNESS BUCKLED WHEN NOT FITTED TO A CHILD IN THE PRAM/STROLLER AS THE HARNESS CAN FORM LOOPS WHICH MAY POSE A STRANGULATION HAZARD.
- THERE IS POTENTIAL FOR FINGERS OR PARTS OF THE BODY TO BE INJURED WHEN THE PRAM/STROLLER IS BEING FOLDED OR UNFOLDED. DUE CARE SHOULD BE EXERCISED.
- TAKE CARE WHEN USING THE PRAM/STROLLER ON STAIRS, ESCALATORS, TRAVELATORS OR OTHER MOVING SURFACES.
- IT IS RECOMMENDED TO REMOVE THE CHILD FROM THE PRAM/STROLLER BEFORE GOING UP OR DOWN STAIRS OR ESCALATORS.
- DO NOT LIFT THE PRAM/STROLLER BY THE ARM BAR AS IT MAY DISENGAGE.
- DO NOT LEAVE THE PRAM/STROLLER OR ITS ACCESSORIES NEAR AN OPEN FIRE OR EXPOSED FLAME.
- USE THE TETHER STRAP TO PREVENT THE PRAM/STROLLER FROM ROLLING AWAY.
- CHECK THAT THE BRAKE IS ENGAGED BEFORE PLACING A CHILD IN THE PRAM/STROLLER.
- ENSURE YOUR CHILD IS SECURED WITH A CORRECTLY ADJUSTED SAFETY HARNESS.
- DO NOT ALLOW CHILDREN TO STAND ON THE SEAT.
WARNING:THE PRAM/STROLLER IS DESIGNED FOR USE ON FLAT OR GENTLY SLOPING SURFACES AND CAN BECOME UNSTABLE ON HIGHER SLOPING OR UNEVEN SURFACES. USERS SHOULD BE AWARE OF THE POSSIBILITY OF THE STROLLER ROLLING AWAY OR TIPPING OVER.
- WITH YOUR HAND THROUGH THE WRIST TETHER STRAP LOOP, PUSH THE PRAM/STROLLER HOLDING BOTH HANDLES.
- THE PRAM/STROLLER CAN BE STEERED IN THE DESIRED DIRECTION – ALLOWING THE FRONT WHEELS TO SWIVEL WILL MAKE THIS EASIER.
- THE FRONT WHEELS MAY WOBBLE OR OSCILLATE WHEN WALKING FAST. LOCKING THE FRONT SWIVEL WHEELS WILL STOP THIS.
- THE PRAM/STROLLER CAN BE TAKEN UP KERBS BY EITHER PRESSING DOWN ON THE HANDLES, RAISING THE FRONT WHEELS AND MOUNTING THE KERB OR TURNING THE PRAM/STROLLER AROUND AND PULLING THE PRAM/STROLLER UP THE KERB.
- CAUTION IS REQUIRED WHEN PUSHING THE PRAM/STROLLER ACROSS STEEP SLOPES OR UNEVEN SURFACES AS THE PRAM/STROLLER MAY BECOME UNSTABLE AND FALL OVER. ALWAYS HOLD THE HANDLES FIRMLY.
- DO NOT RUN WITH THE PRAM/STROLLER.
- WHENEVER YOU STOP, ALWAYS APPLY THE BRAKES BEFORE YOU LEAVE THE PRAM/STROLLER.
- DO NOT HANG BAGS OR GOODS FROM THE HANDLE AS THIS COULD CAUSE THE PRAM/STROLLER TO TIP OVER. USE THE STORAGE BASKET.

WARNING:
- THE UPRIGHT SEATING POSITIONS ARE NOT SUITABLE FOR A CHILD UNDER 6 MONTHS OLD.
- THE LOWEST RECLINE POSITION SHOULD BE USED TO TRANSPORT BABIES. THE BACKREST CAN BE ADJUSTED TO A MORE UPRIGHT POSITION AS THE CHILD GROWS OLDER AND IS ABLE TO SUPPORT ITS HEAD WITHOUT ASSISTANCE.
MANUAL HANDLING TECHNIQUESThe SMART lifting technique; This technique can be used to pick up small light loads from low levels. Size up the Load;
WARNING:
- Assess the load (size, shape and weight).
- Assess whether the load needs to be moved.
- Where is it going to be placed? Check that there are no obstructions.
- Assess whether mechanical or human assistance is required. Move the load as close to the body as possible.
- A load is heavier to lift or carry if it is not close to the body.
- The whole hand should be used to ensure a firm grip. Always bend your knees.
- Maintain balance.
- Keep feet apart and in a comfortable position.
- Minimise lower back bending.
- Bend knees at a large angle as possible but not at a right angle – use a semi squat in preference to a full squat. Raise the load with your legs.
- Achieve the lift smoothly and without jerkiness.
- Maintain the normal curvature of the spine to allow the force of the load to be distributed evenly from the spine to the pelvis. Turn your feet in the direction that you want to move the load.
- Avoid unnecessary bending, twisting and reaching.
- Change direction by turning your feet and not your back.
- To set the load down, squat down, keep your head up and let your legs do the work.
Remember to ‘THINK TALL’ – chest lifted, shoulders relaxed, chin tucked in and head level.
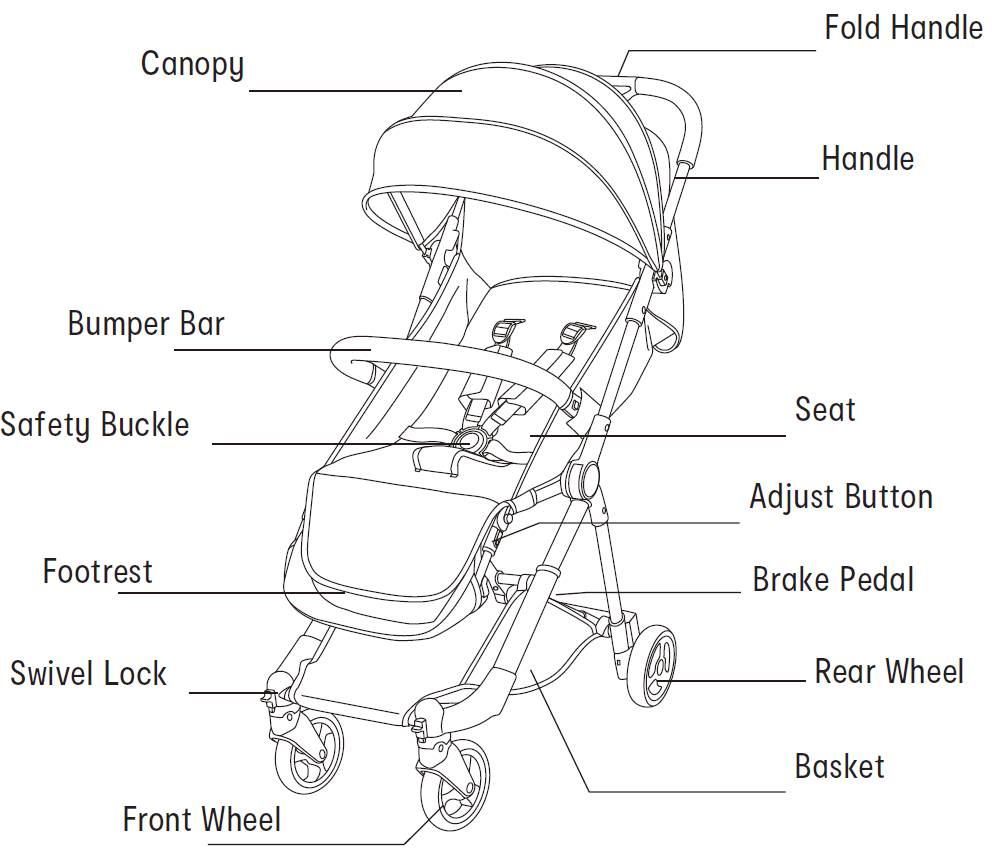
Stroller Components

Assembly of Stroller
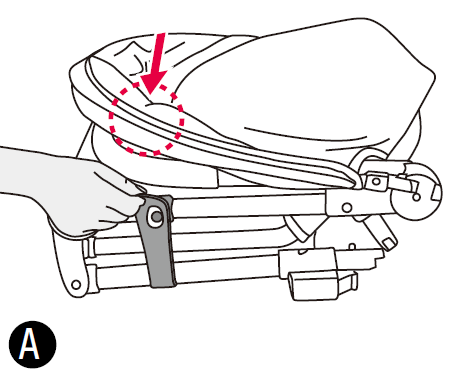
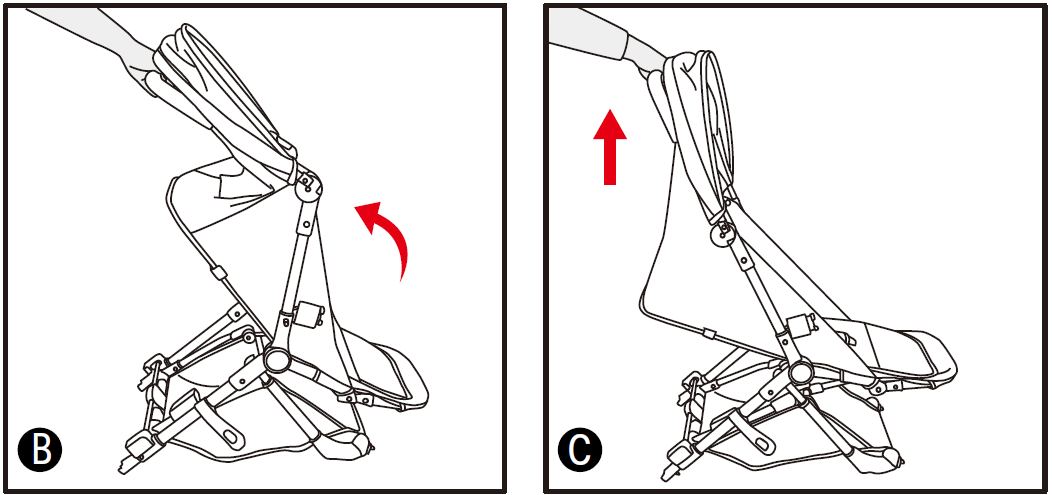
To Open Stroller
- Open storage latch (Fig. A).

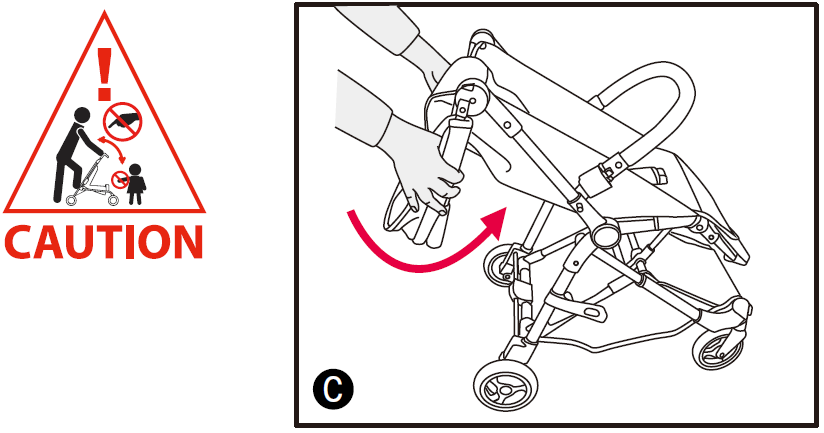
- Lift handle of stroller up (Fig. B & C).
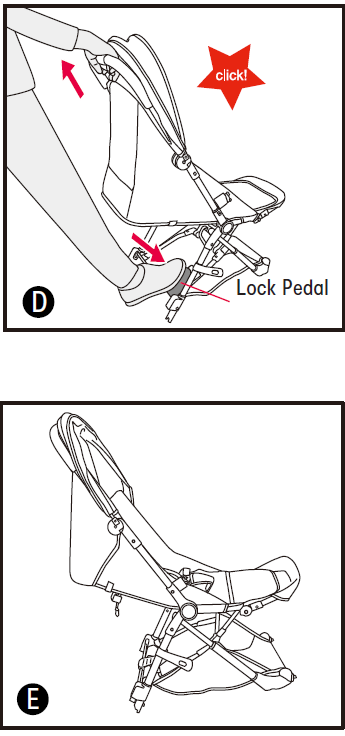
- Place foot on the Grey Lock Pedal then lift handle of stroller up until a ‘click’ is heard (Fig. D).CHECK that the stroller is completely latched open every time you open the stroller and before continuing with the rest of the assembly steps.
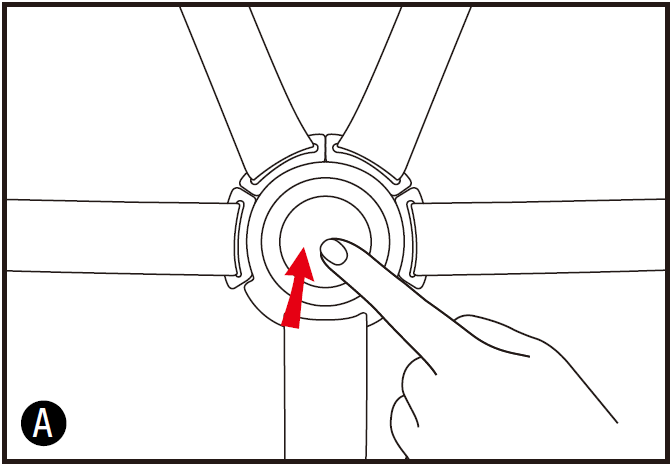
Front WheelsSlide each front wheel assembly onto the mounting post at the front of the stroller (Fig. A). A ‘click’ will be heard. Pull wheel to CHECK and ensure that it is secure.

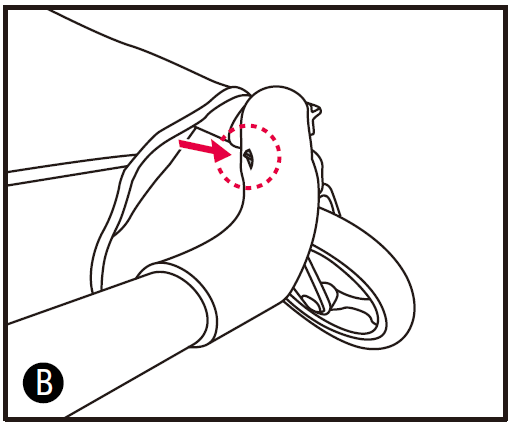
To release wheel for easy transport or storage, push the wheel release tab on the inside of the stroller frame and pull the wheel away from the stroller (Fig. B).
Rear WheelsAttach Rear wheels (L&R) to stroller as (Fig. A). A ‘click’ will he heard. CHECK that the wheel is securely attached by pulling on wheel assembly.

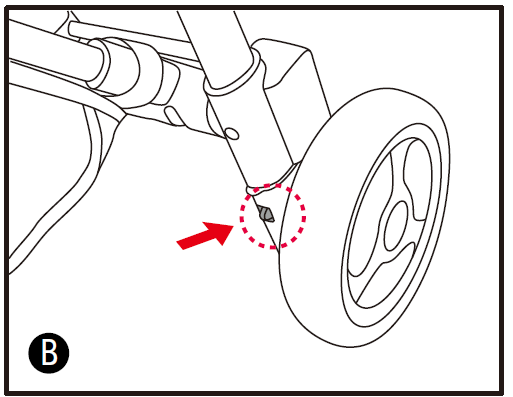
To release wheel for easy transport or storage, remove Rear wheel by pushing button (Fig. B).
To Use Bumper BarOpening / closing the Bumper Bar: Press the bumper into the slots to install. It will click into place (Fig. A).

Press the buttons on two sides of the arm together to release the bumper bar (Fig. B).
WARNING: WHEN A CHILD IS IN THE STROLLER, KEEP THE ARM BAR ATTACHED TO THE FRAME AT ALL TIMES.
Using The BrakesParking and releasing the brake: Using your foot, push the brake lever down to park (Fig. A).

Push the brake lever up to release (Fig. B).
WARNING: ALWAYS APPLY THE BRAKES WHEN THE STROLLER IS STATIONARY.
Swivel WheelPush the swivel lock switch fully down to lock the front wheel. Press the swivel lock switch fully up to allow the wheel to swivel (Fig. A).

Adjusting The BackrestFor upright sitting position: Pull the webbing on both sides outwards to adjust the backrest upright (Fig. A).

For reclined laying position: Pull the buckle downwards for the backrest to recline into laying position (Fig. B).
WARNINGS:
- THE UPRIGHT POSITIONS ARE NOT SUITABLE FOR CHILDREN LESS THAN 6 MONTHS OLD.
- THE LOWEST RECLINE POSITION SHOULD BE USED TO TRANSPORT BABIES. THE BACKREST CAN BE ADJUSTED TO A MORE UPRIGHT POSITION AS THE CHILD GROWS OLDER AND IS ABLE TO SUPPORT ITS HEAD WITHOUT ASSISTANCE.
NOTE: IF THE CHILD IS SITTING IN THE SEAT, SUPPORT THE BACKREST AS IT RECLINES. IF YOU HAVE DIFFICULTY ADJUSTING THE BACKREST, YOU MAY NEED TO REMOVE THE CHILD FROM THE SEAT TO ALLOW YOU TO RAISE OR LOWER THE BACKREST WITH EASE.
Securing Your Child In Harness
WARNING: USE THE HARNESS AT ALL TIMES.When not in use, disconnect straps from the buckle to prevent strangulation.A five point harness is provided to restrain your child. Buckle tongues are separate for added safety. To reconnect buckle tongues and secure the child in the harness carefully, follow the steps below.
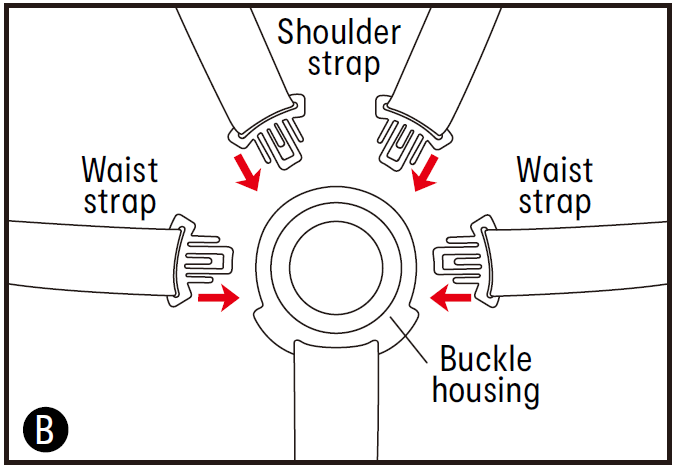
To release the buckle: Squeeze the top button and buckle housing with enough pressure so the buckle tongues can release from the buckle housing (Fig. A).
To connect the harness: Push each Shoulder strap tongue and Waist strap tongue into the buckle housing until the buckle tongues lock into position (Fig B).
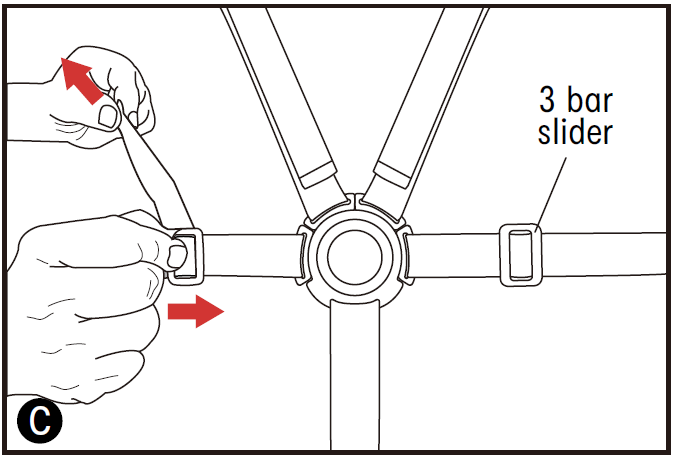
To tighten or loosen the waist straps: Hold and lift the 3 bar slider and then pull the harness strap to adjust to the desired fit. The waist straps need to fit firmly around the child (Fig. C).
Securing Your Child In HarnessTo tighten or loosen the shoulder strap: Hold and lift the slider and then pull the harness strap to adjust to the desired fit. The shoulder straps need to fit firmly around the child (Fig D).

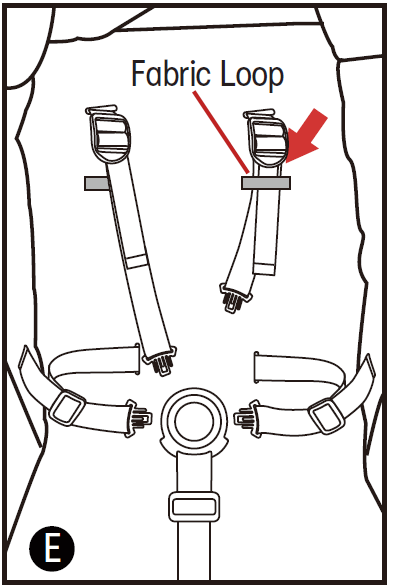
For a bigger child, push the shoulder harness buckle tongue through the fabric loop. This increases shoulder room (Fig. E).
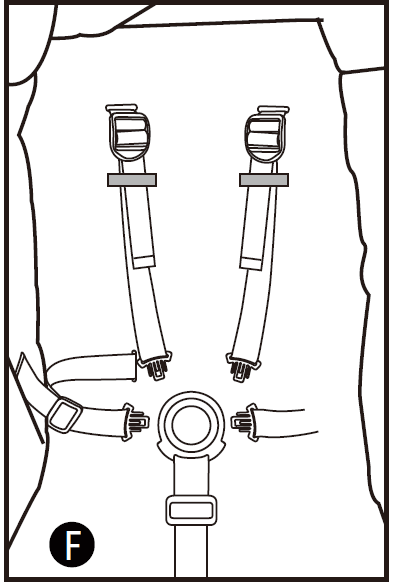
To reposition harness for smaller child, pull the shoulder harness buckle tongue back through the fabric loops (Fig F).
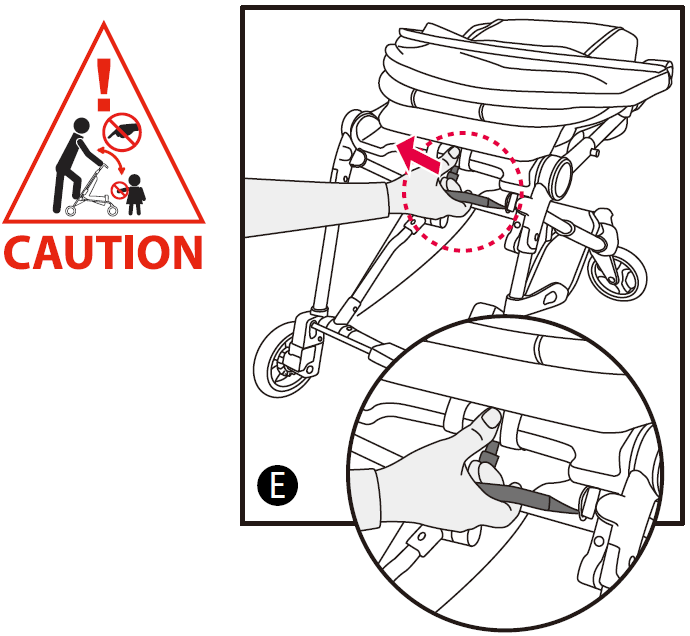
To Fold The StrollerOn the handlebar, squeeze the Side Lock button (1) and then press the Fold Button (2) to enable the handle bar to fold downward (Fig. A & B).

Fold the handlebar downward until it meets the frame (Fig. C).
Hold the handle and frame together on each side and fold forward towards the seat.(Fig. D).

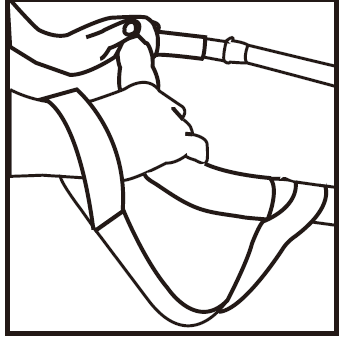
To Fold The StrollerThe Folding Handle is under the seat. Pull up on the “Pull to Fold” folding handle and let the frame collapse. (Fig. E).


CARE AND MAINTENANCE
- To prolong the life of your stroller, keep it clean and do not leave it in direct sunlight or in the car boot for extended periods of time.
- Removable fabric covers and trims may be cleaned using warm water with a household soap or mild detergent. Allow it to dry fully, preferably away from direct sunlight.
- Non removable fabric covers and trims may be spot cleaned using a damp sponge with soap or a mild detergent. Allow it to dry completely before folding or storing away.
- In some climates, the covers and trims may be affected by mould and mildew. To help prevent this occurring, do not fold or store the product if it is damp or wet. Always store the product in a well ventilated area.
- When using your stroller at the beach – completely clean your stroller afterwards to remove the sand and salt from the mechanisms and wheel assembly. Sand and salt will cause premature wear and corrosion.
- If there are compression marks on the tyres – Use a domestic hair dryer to gently warm (DO NOT OVERHEAT) the tyre and the compression marks should slowly disappear.
- Always check parts regularly for tightness of screws, nuts, and other fasteners. Tighten if required. To maintain the safety of your nursery product, seek prompt repairs for bent, torn, worn or broken parts.
Keycode 42824947Item No.: 131/548947
MADE IN CHINA© KMART AUSTRALIA LIMITEDFOR AU / NZ: IMPORTED FOR KMART STORES IN AUSTRALIA AND NEW ZEALAND. KMART AUSTRALIA ˛ 690 SPRINGVALE ROAD, MULGRAVE, VIC 3170 AUSTRALIA.KMART NEW ZEALAND ˛ REGIONAL OFFICE C/O KMART PAPATOETOE STORE, HUNTERS PLAZA, GREAT SOUTH ROAD, PAPATOETOE, AUCKLAND, NEW ZEALAND.
KMART CUSTOMER SERVICEAU: 1800 124 125 NZ: 0800 945 995
AFTER SALES SUPPORT & SPARE PARTS:HUNTER LEISURE P/LTOLL FREE: 1800 632 792 PH: +61 3 9287 9888 EMAIL: [email protected]WEB: www.hunterleisure.com.au/servicespares/
![]()
References
[xyz-ips snippet=”download-snippet”]