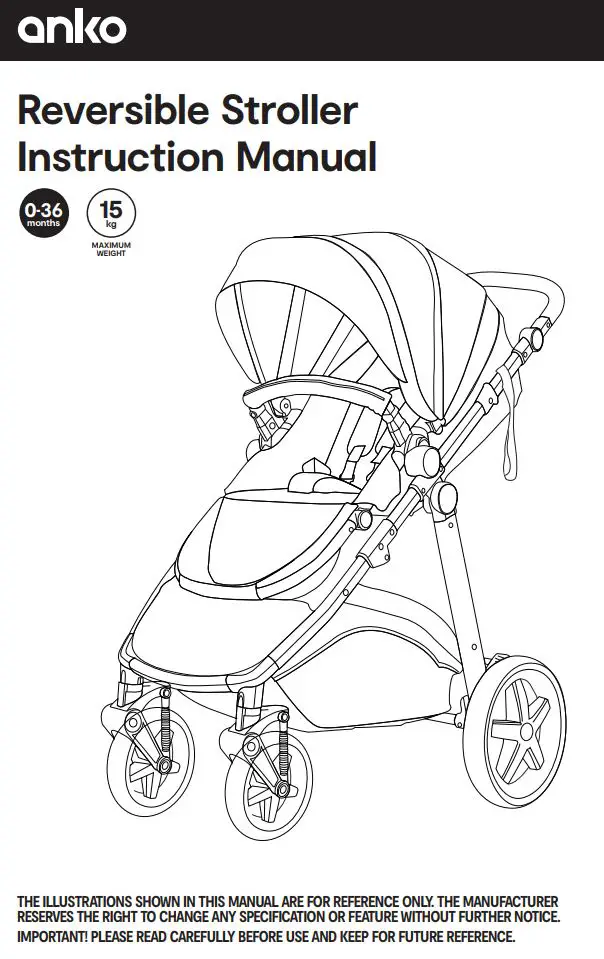
anko M6800 Reversible Stroller Instruction Manual
![]() CAUTION: TO AVOID INJURY OR DEATHRead these instructions carefully before use and keep for future reference. The child may be hurt if you do not follow these instructions.
CAUTION: TO AVOID INJURY OR DEATHRead these instructions carefully before use and keep for future reference. The child may be hurt if you do not follow these instructions.![]() WARNING: FOLLOW THE MANUFACTURER’S INSTRUCTIONS.
WARNING: FOLLOW THE MANUFACTURER’S INSTRUCTIONS.
![]() WARNING: ALWAYS APPLY THE BRAKES WHENEVER THE PRAM/STROLLER IS STATIONARY.
WARNING: ALWAYS APPLY THE BRAKES WHENEVER THE PRAM/STROLLER IS STATIONARY.
![]() WARNING: DO NOT LEAVE THE CHILD UNATTENDED.
WARNING: DO NOT LEAVE THE CHILD UNATTENDED.
![]() WARNING: SECURE THE CHILD IN THE HARNESS AT ALL TIMES.
WARNING: SECURE THE CHILD IN THE HARNESS AT ALL TIMES.
![]() WARNING: DO NOT CARRY EXTRA CHILDREN OR BAGS ON THIS PRAM/STROLLER.
WARNING: DO NOT CARRY EXTRA CHILDREN OR BAGS ON THIS PRAM/STROLLER.
![]() WARNING: ENSURE CHILDREN ARE CLEAR OF ANY MOVING PARTS IF YOU ADJUST THE PRAM/STROLLER. OTHERWISE THEY MAY BE INJURED.
WARNING: ENSURE CHILDREN ARE CLEAR OF ANY MOVING PARTS IF YOU ADJUST THE PRAM/STROLLER. OTHERWISE THEY MAY BE INJURED.
![]() WARNING: USE THE HARNESS AT ALL TIMES.
WARNING: USE THE HARNESS AT ALL TIMES.
![]() WARNING: USE THE TETHER STRAP TO STOP THE PRAM/STROLLER ROLLING AWAY.
WARNING: USE THE TETHER STRAP TO STOP THE PRAM/STROLLER ROLLING AWAY.
![]() WARNING: NEVER LEAVE PRAM/STROLLER NEAR AN OPEN FIRE OR EXPOSED FLAME.
WARNING: NEVER LEAVE PRAM/STROLLER NEAR AN OPEN FIRE OR EXPOSED FLAME.
![]() WARNING: IT IS UNSAFE TO USE ACCESSORIES OTHER THAN THOSE APPROVED BY THE MANUFACTURER.
WARNING: IT IS UNSAFE TO USE ACCESSORIES OTHER THAN THOSE APPROVED BY THE MANUFACTURER.
- Always fit and use the tether strap when the stroller is in use.
- When using the stroller, always ensure your hand is positioned in and around the tether strap. The strap is a compulsory safety feature which must be used at all times. It is for the safety and benefit of your child.
- The correct use and maintenance of this stroller is essential.
- Ensure that all clamps and buckles are securely fixed and in place before use.
- When in the stroller, your child must always wear the safety harness, correctly fitted and adjusted, at all times.
- Never leave the harness buckles when not fitted to a child in the stroller because the harness can form loops which may pose a strangulation hazard.
- The maximum weight of the child for which this stroller is intended is 15kg.
- The stroller will become unstable if the manufacturer’s recommended load is exceeded.
- Use the stroller on flat or gently sloping surfaces. It may be unstable on higher sloping and uneven surfaces – be aware of the possibility of the stroller tipping over.
- Care should be taken if the stroller is used on stairs or escalators.
- Care must be taken when folding and unfolding the product to prevent finger entrapment.
- The stroller is not suitable for running or skating.
- Any goods carried in the basket are not to exceed 2 kg.
- Do not leave your child exposed to the sun. The canopy or hood on this product will not give your child total protection from the harmful rays of the sun.
- Take care when unpacking and during assembly.
- Dispose of all packing materials carefully after assembly.
- Never substitute parts.
- It is unsafe to use accessories other than those approved by the vehicle manufacturer.
- The pram/stroller not be used near an open fire or exposed flame.
- The brakes must always be applied when the pram/stroller is not moving.
Components
Please check if you have all the parts listed below before starting assemblyCHECK THAT YOU HAVE ALL THE PARTS FOR THIS MODEL BEFORE ASSEMBLING THE PRAM/STROLLER.
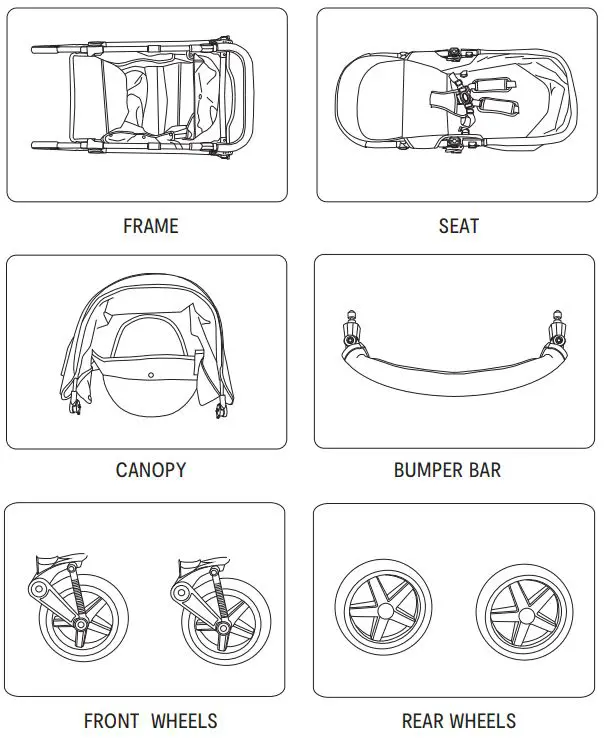
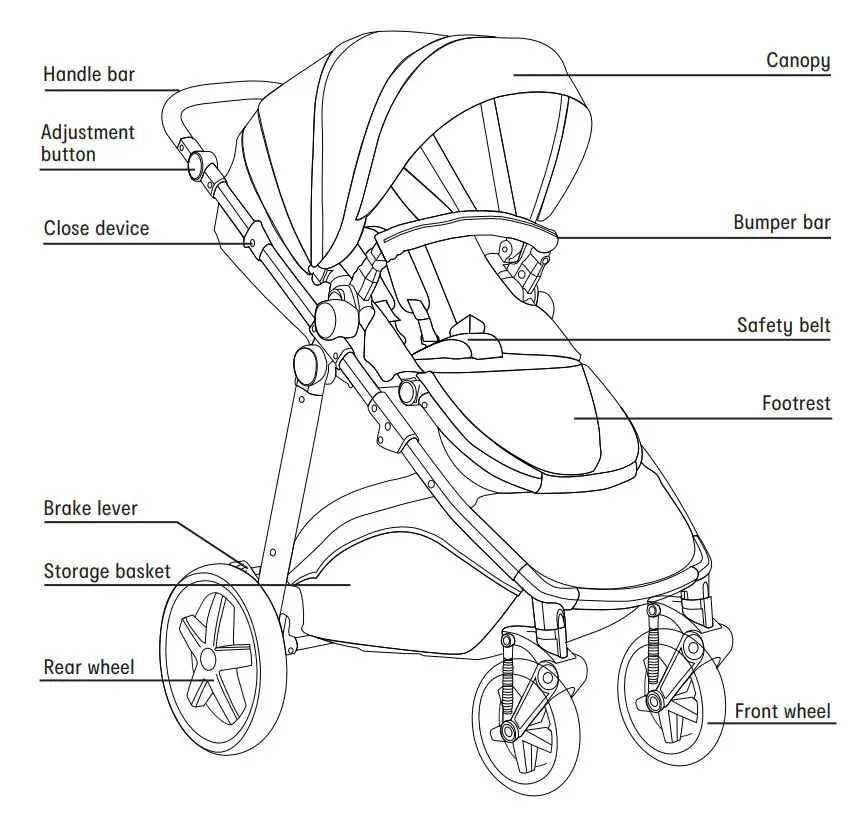
Name of parts
Assembly Instructions
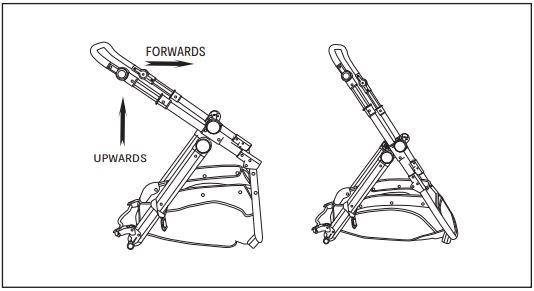
Step 1SET UP THE FRAMERemove the stroller frame from the box. Pull the handle bar in an upwards and forwards motion. It is fully extended when a click is heard. Note: It is necessary to check all parts before assembly to ensure there are no defects, loose screws, sharp edges, etc. Do not use if any parts are broken or damaged.
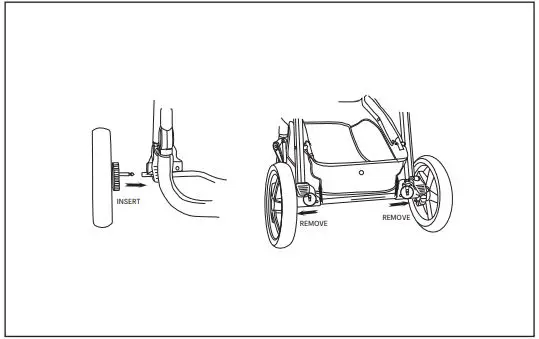
Step 2FRONT WHEEL INSTALLATIONInsert each of the front wheel pins into the center of the socket until a click is heard.NOTE: Give the wheels a firm tug to ensure they are securely attached. To remove, push release button on the side of the wheel socket and pull wheel from socket.
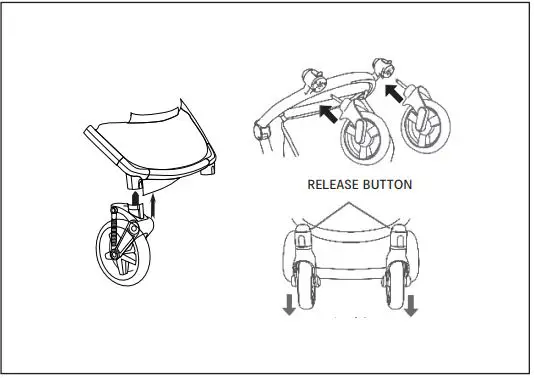
Step 3REAR WHEEL INSTALLATIONInsert each of the rear wheel pins into the center of the socket until a click is heard.
NOTE: Pull on the rear wheel to ensure that it is securely attached to the stroller.To remove, push release button and pull wheel from socket.
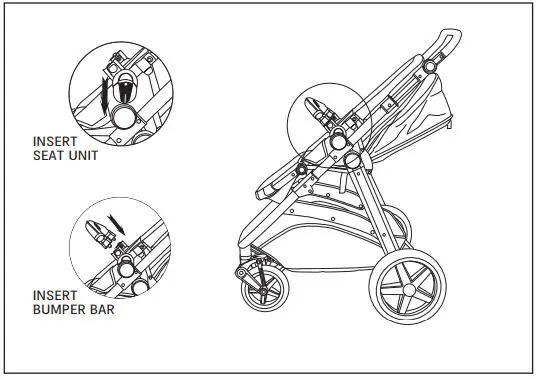
Step 4ATTACHING THE SEATAlign the seat unit with the anchors on the side of the stroller frame and push them together until they click securely.Attach the bumper bar by aligning anchors with the slots on the seat. Push until it clicks into place. Note: The bumper bar must be securely attached before using this product.
Insert the canopy clips into the slot located on each side of the seat. Push forward on the front edge of the canopy while holding the rear of canopy in place.
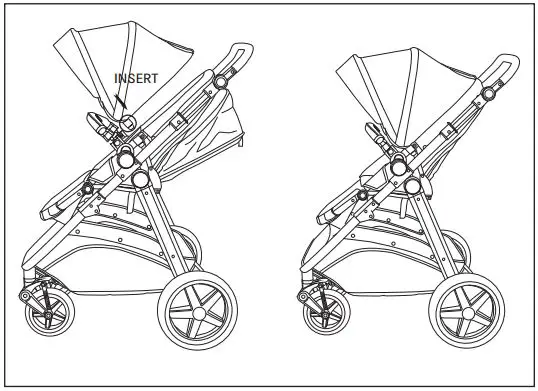
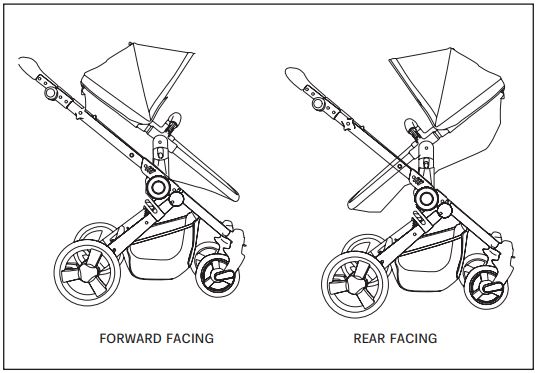
The seat unit can face in either direction, forward or rear facing.
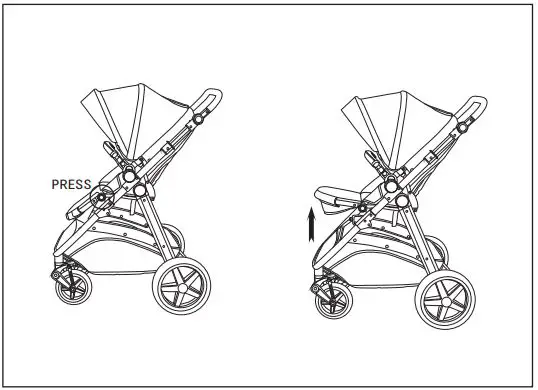
Step 5BACKREST ADJUSTMENTThe seat unit can be adjusted into upright, half-reclined and reclined positions. Lift and rotate the recline lever on the rear of the seat unit to adjust the position of the backrest.Reclined position: Make sure both footrest and backrest are unlocked and extend the seat surround fully.
Step 6FOOTREST ADJUSTMENTPress the buttons located on both sides of the footrest to adjust the position up or down.Adjust the foot pedal to the desired position.
ADJUSTABLE HANDLE HEIGHT To adjust the handle, press the release buttons to move it up or down into a comfortable position for the user.Note: Make sure the handle clicks into place before using.
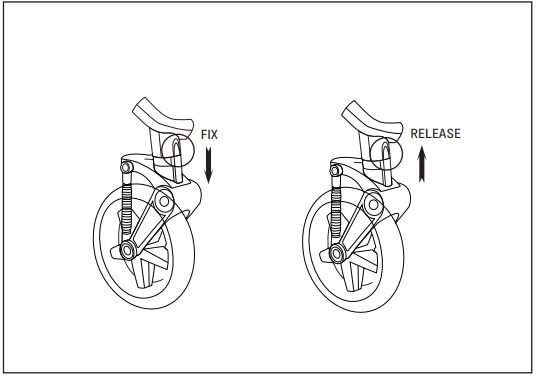
Step 7FRONT WHEEL LOCKThe front wheels are equipped with a swivel locking device. Push the button on each wheel down to fix the locks and push upwards to disengage the locks.
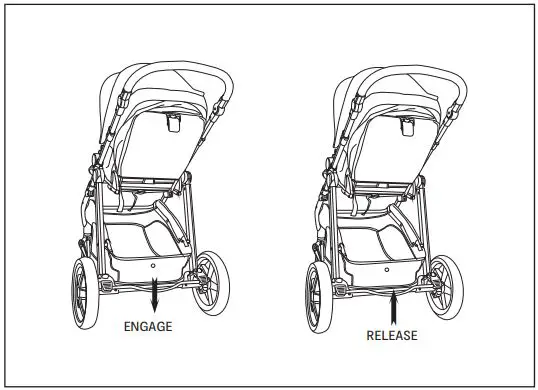
Step 8BRAKE OPERATIONTo engage brakes, apply downward pressure to brake lever located on the rear axle. You may need to push the stroller back and forth to engage the brakes.Check that the stroller will not move once the brakes are properly applied.To release, gently lift up on the brake lever.
TO USE SAFETY HARNESSInsert the shoulder strap buckle 1 into the buckle housing of center hub. Repeat on the other side 2 Insert the completed waist buckle 3+4 into the buckle housing. Ensure all the buckles are in place and securely engaged. To release buckles, press center button on buckle housing.
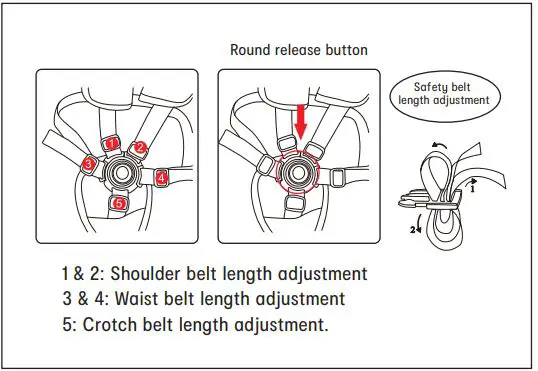
The shoulder straps of the 5-point harness have 2 attachment positions. Select the position that places the shoulder straps level with, or below the top of the child’s shoulders. To adjust harness height unhook the shoulder straps from the crotch buckle. Feed the shoulder straps through the harness spread slots. You can access these slots from the rear of the seat, underneath the fabric. Feed shoulder straps through the appropriate slots and reattach the shoulder straps to the crotch buckle.
TO FOLD PRAM/STROLLER
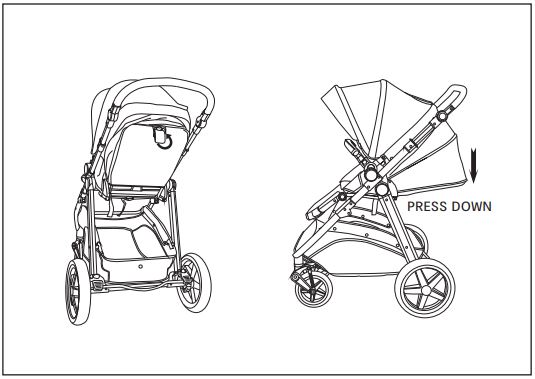
Close the canopy before folding. Then pull the stroller backwards several inches to adjust the front wheels to front.
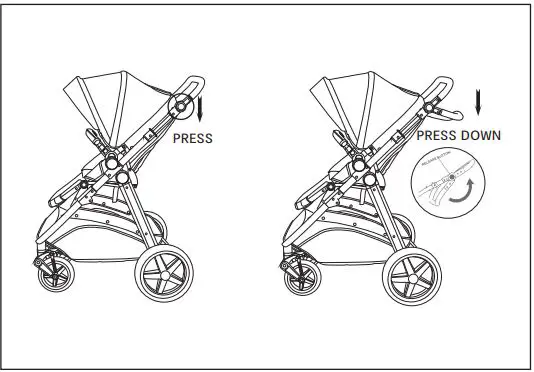
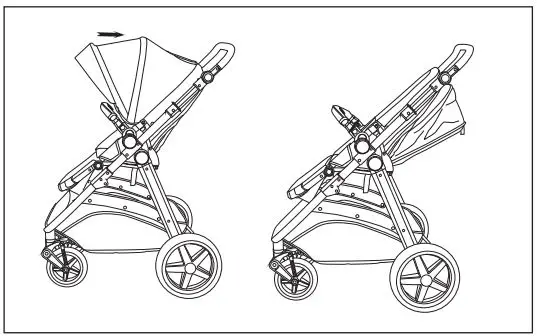 Fold the stroller by pulling both release triggers and press handle towards the floor. Ensure the front wheels lie flat.
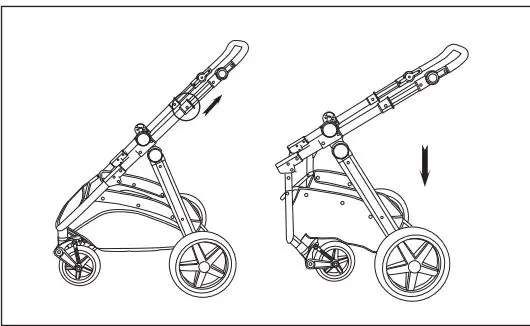 Secure the stroller in the folded position by locking the fold strap, located on the right side of the stroller through the rear frame. Note: The stroller can not be folded in the parent facing position.
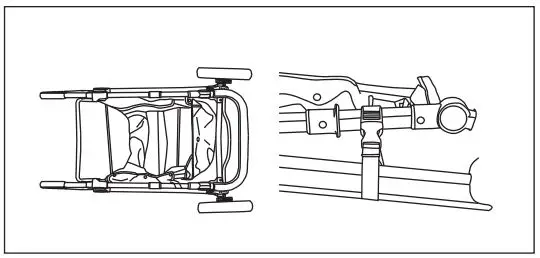
Care and Maintenance
GeneralThis stroller was designed and manufactured with quality materials and craftsmanship. Always use the safety harness.Always check your stroller. Lubricate moving parts regularly, especially the wheels, and the lower parts of the chassis that tend to collect dirt.
Inspect regularly for:
- Worn parts, torn materials or stitching.
- Loose screws, bent or broken frame parts.
- Broken, damaged or missing parts.
Should any of the above be evident, do not use. Any additional replacement parts should only be obtained from the manufacturer or distributor.
Care and Maintenance:Seat/ Basket/ Canopy: Wipe clean with damp cloth. It is not recommended to expose to salt water. Rinse with fresh water immediately.
Do not fold or store the product while wet and never store in a damp environment as this can cause mildew to form. Allow to dry thoroughly after washing and before storage.
 report this ad
Made in ChinaKeycode 42967736FOR AU / NZ: IMPORTED FOR KMART STORES IN AUSTRALIA AND NEW ZEALAND.
[xyz-ips snippet=”download-snippet”]