
anko Mini Dehumidifier EPI608J
User Manual

Note: The specifications and/or components of this appliance are subject to change without prior notice
Model No.: EPI608JRev 2
Safety Instructions
When using electrical appliances, basic safety precautions should always be followed, including the following:
- Carefully read this instruction manual before using appliance.

- Keep appliance out of reach of young children.
- This appliance is not intended for use by persons (including children) with reduced physical, sensory or mental capabilities, or lack of experience and knowledge, unless they have been given supervision or instruction concerning use of the appliance by a person responsible for their safety.
- Children should be supervised to ensure that they do not play with the appliance.
- Ensure children and babies do not play with plastic bags or any packaging materials.
- Do Not disassemble the appliance. There are no user serviceable parts inside.
- VERY IMPORTANT:Ensure that appliance does not get wet (water splashes etc.). Do not use appliance with wet hands.
- Do not immerse appliance in water or other liquids or use near sinks, baths or showers.
- This appliance is not intended for use in bathrooms or laundry rooms, or any other areas where the appliance may get wet or splashed with water or liquids.
- Always operate the appliance from a power source of the same voltage, frequency and rating as indicated on the product identification plate.
- Position the power supply lead properly so that they will not be walked on or pinched by items placed on or against them.
- Use appliance only for its intended use. Appliance is intended for household use only and not for commercial or industrial use.
- Do not use appliance if it has been dropped or any part of appliance (including cord or plug) has been damaged. Take appliance to your nearest authorised service centre or qualified dealer for inspection or repair.
- If the supply cord is damaged, it must be replaced by the manufacturer, its service agent or similarly qualified persons in order to avoid a hazard.
- Use only accessories supplied with the product. The use of accessories not intended for use with this appliance may cause injuries to the user or damage to the appliance.
- Do not install the unit on other appliances, on uneven surfaces or where it could be subject to: heat sources (e.g. radiators or stoves), direct sunlight, excessive dust or mechanical vibrations.
- Appliance should not be used outdoors, placed near a hot gas or electrical burner or placed in a heated oven.
- Do not install near any heat sources such as radiators, heat registers, stoves, or other apparatus that produce heat.
- Do not operate appliance underneath or near flammable or combustible materials (e.g., curtains). Keep at least 300mm clearance around sides, back, front and top.
- Unplug this apparatus during lightning storms or when unused for long periods of time.
- Do not block any ventilation openings.
- Unplug the appliance before filling or cleaning.
- Any repairs to the product must be carried out by qualified electrical person only or the product must be disposed of. There are no user serviceable parts in this appliance.
- If this appliance is used by a third party, please supply the instruction manual with it.
- Do not misuse the cord. Never carry the appliance by the cord or pull to disconnect it from the outlet. Instead, grasp the plug and pull to disconnect.
- Do not insert or allow foreign objects to enter the grille openings as this may cause damage to the appliance and/or injury to the user.
- Be sure the unit is placed on stable surface when operating.
- Turn off and unplug the unit before moving. Move the unit slowly and carefully.
- Turn off, unplug and empty the water from the unit if you are not going to use it for a long time.
- No liability can be accepted for any damage caused by non-compliance with these instructions or any other improper use or mishandling of appliance.
Additional Safety Instructions
WARNING
![]() Only use the Power Supply which was supplied with this appliance.
Only use the Power Supply which was supplied with this appliance.
Model No. GQ48-120500-E3, 100–240V~ 50/60Hz 1.5A Max, Output: 12.0V 5A
If using an extension cord:
- The technical specifications of the extension cord must match or exceed the technical specifications of this appliance.
- Do not allow the cord to hang over the edge of the work surface or to come into contact with stoves or other hot surfaces.
- If the cord or plugs are worn or damaged, do not use.
- Unplug from the power socket by grasping the plug body – Do Not pull on the cord.
Read and Save These Instructions
Features
- For use in small rooms only.
- Cooling created by Thermo-electric Peltier module (no compressor).
- Coloured LED Indictor Lights.
- Easy operation, automatically switches off when the tank is full.
- Silent operation.
- Compact size, light and portable.
- DC 12V adaptor for power supply.
- Removable Water Collection Tank.
Components
![]()
Preparation
- Before using the Dehumidifier, please set up as follow:
- Fully unravel the power supply cords.
- Plug the small (low voltage side) plug into the back of the dehumidifier and push in hard as shown.

- Fit the Lid to the Water Collection Tank and slide into the back of the unit.
Note: Unless the water collection tank lid is fitted to the water collection tank, and that the water collection tank is fitted correctly to the unit, the appliance will not turn on.
Operation
Important: Refer to the Section “Preparation” prior to Operation.
- Plug the Power Supply into the Power Point and switch on.
ON / OFF
- Located at the back of the appliance, just below the carry handle is the On / Off switch.
- Switch to the On “-“ Position and the unit will start to work.
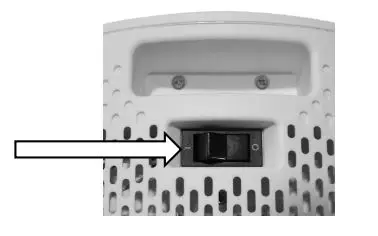
Note: Switch is shown in the Off “O” position.
This will be indicated by the Indictor light on the front of the unit illuminating Green.
Note: If the water tank is full of water, the indicator light will illuminate Red and the appliance will no longer function until the tank is emptied.
To turn the unit off, switch the On / Off switch to the “O” off position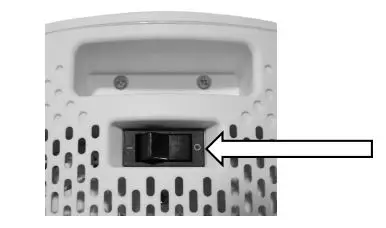
Water Collection Tank Full
Note: The Water Level Window in the front of the unit is for easy viewing of the water level in the collection tank.
- When the water level reaches close to the top, it is time to empty the tank, or, if you allow the water collection tank to fill up, the water level switch will activate preventing the unit from producing more water, and the indicator light on the front of the unit will illuminate Red.
- To empty the Water Collection Tank, first switch of the unit at the back, then switch off and unplug the power supply from the power point.
- Grasp the Water collection tank handle and slide straight out, taking care not to spill the water.

- Take to your sink and pour out, then refit the tank.
Care and Cleaning
- Turn off and unplug the unit from mains power prior to cleaning.
Water Collection Tank
- Remove the Water Collection Tank and lid, and wash in clean luke warm soapy water and rinse thoroughly.
- Allow to fully dry prior to reusing.
- Do Not place in a Dishwasher.
Main Unit
IMPORTANT: Never spray with liquids or submerge the unit in water or any other liquid.
Do Not use flammable liquids, chemicals, abrasive creams, steel wool or scouring pads for cleaning.
- Wipe the unit over with a damp (not wet) cloth with fresh clean luke warm water and mild detergent.
- Wipe over again to remove any detergent residue and thoroughly dry prior to reusing.
- Do not let the power socket in the back get wet or splashed. Ensure the socket is perfectly dry before inserting the power supply plug.
- If the Vent holes are dusty, you can use a vacuum cleaner with a “non rotating” brush attachment to gently vacuum the dust away.
Important: Do Not poke any objects into the vent holes
Storage
- Switch off and unplug the unit from mains power and from the back of the unit.
- Ensure all water is removed from the water tank and is perfectly dry.
- Coil the power supply cord loosely and place next to the unit.
- Store in a dry well-ventilated area.
Specification
Warranty Against Defect
12 Month Warranty
Thank you for your purchase from Kmart.
Kmart Australia Ltd warrants your new product to be free from defects in materials and workmanship for the period stated above,from the date of purchase, provided that the product is used in accordance with accompanying recommendations or instructionswhere provided. This warranty is in addition to your rights under the Australian Consumer Law.
Kmart will provide you with your choice of a refund, repair or exchange (where possible) for this product if it becomes defective within the warranty period. Kmart will bear the reasonable expense of claiming the warranty. This warranty will no longer apply where the defect is a result of alteration, accident, misuse, abuse or neglect.
Our goods come with guarantees that cannot be excluded under the Australian Consumer Law. You are entitled to a replacement orrefund for a major failure and compensation for any other reasonably foreseeable loss or damage. You are also entitled to have the goodsrepaired or replaced if the goods fail to be of acceptable quality and the failure does not amount to a major failure.
For New Zealand customers, this warranty is in addition to statutory rights observed under New Zealand legislation.
report this adIMPORTANT!For all technical queries or difficulties in operating the product and for spare parts, contact H.E. Group customer service 1300 105 888 (Australia) and 09 8870 447 (New Zealand).
References
[xyz-ips snippet=”download-snippet”]