
![]()
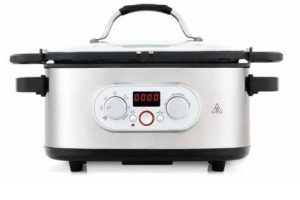
Multi CookerKY-509User Manual
PLEASE READ AND SAVE THESE INSTRUCTIONS FOR FUTURE REFERENCE
1
IMPORTANT SAFEGUARDS
![]() When using electrical appliances, basic safety precautions should always be followed including the following:
When using electrical appliances, basic safety precautions should always be followed including the following:
- READ ALL INSTRUCTIONS.
- Do not use appliance for other than intended use.
- This appliance is intended to be used in household and similar applications such as:-staff kitchen areas in shops, offices and other working environments;-farmhouses;-by clients in hotels, motels and other residential type environments;-bed and breakfast type environments.
- Only use this appliance indoors.
- The manufacturer assumes no liability for possible damages that may have been caused by incorrect usage or mishandling of the appliance.
- The input voltage of the appliance is AC220-240V~50/60Hz. Please confirm it before using the appliance.
- For addition protection, this appliance should be connected to a household residual current device (safety switch) with a rating of no more than 30mA. If unsure consult your electrician for advice.
- Warning! Avoid spillage on the connector
- Warning! Misuse may cause potential injury.
- Warning! The heating element surface is subject to residual heat after use.
- Always position the appliance in such a way that the plug is easily accessible and can be pulled in case of emergency.
- This appliance is not intended for use by persons (including children) with reduced physical, sensory or mental capabilities, or lack of experience and knowledge, unless they have been given supervision or instructions concerning use of the appliance by a person responsible for their safety.
- Children should be supervised to ensure that they do not play with the appliance.
- Keep the unit clear of walls, curtains and other heat sensitive materials (leave a minimum distance of 20cm). Do not place unit under shelving or flammable materials when in use.
- Always follow the maximum and minimum quantities of oil stated in the instructions and recipes.
- When using as deep fryer, NEVER overfill the cooking pot above the Max level mark or less than MIN level. Fill oil before connecting to a power outlet.IMPORTANT! Extreme caution must be used when the appliance is used with hot oil. Always allow the appliance to cool down completely before removing the oil. Never pour oil out of the deep fryer when either the unit or oil is hot. Allow both the unit and contents to cool completely before removing oil.
- When deep frying, ensure no water comes in contact with hot oil as this will cause spattering.
- When deep frying, ensure that the cooking pot is completely dry before adding any oil. CAUTION: When deep frying, NEVER lean over the deep fryer when lifting the lid. Excess trapped steam created during the cooking process will be released when the lid is opened.
- DO NOT add extra oil when deep frying, as splashing may occur.
- Keep this appliance away from all hot surfaces. Do not place it on hot plates such as gas and electric stoves etc.
- Do not expose the appliance to direct sunlight.
2
22. Always place and operate the appliance on a flat, solid, clean and dry surface.23. Never block the ventilation openings at the bottom of the appliance.24. If the supply cord is damaged it must be replaced by qualified electrical person only to avoid a hazard or the product must be disposed of.25. Do not use the appliance if it is damaged. To avoid hazards, defective components must be replaced by qualified electrical person only.26. Do not attempt to dismantle and repair the appliance by yourself.27. Do not insert any foreign objects into the housing.28. Danger of electric shock! Do not immerse the appliance, power cord or power plug in water or in other liquids.29. Never operate this appliance with wet hands or when standing on a wet floor.30. Only use original accessories supplied with the product. The use of accessories other than those supplied with the product can result in fire, electric shock or injury.31.Use the inner pot only with this appliance. It is not suitable for any other use.32. Always disconnect from mains power before cleaning and when it is not in use.33. Ensure that the appliance and all parts are dry, before connecting it to mains power and before attaching the accessories.34. Makes sure that there is no danger that the cord could be accidentally pulled or that someone could tip over it when the device is in use.35. Never touch the supply cord plug with wet or damp hands.36. Keep the power cord away from hot surfaces, open flames and sharp edges.37. Always pull from the plug, not the power cord when disconnecting the appliance from a power outlet.38. The appliance is not intended to be operated by means of an external timer or separate remote-control system.39. All attachments must be properly installed prior to switching ON the appliance.IMPORTANT! Allow hot oil to cool prior to removal or cleaning the appliance.40. CAUTION: To prevent damage to the appliance do not use alkaline cleaning agents when cleaning, use a soft cloth and a mild detergent.41.Unless when using the sauté function, never operate this appliance without the lid, sieve, gasket and valves properly in place.42. Do not cover the valve during use.43. Danger of burns! Do not touch hot parts (especially the lid) of the appliance. Only touch handles or buttons and use oven gloves/mitts.44. Switch all functions OFF, disconnect from mains power and allow the appliance to cool down before assembling or disassembling parts and before cleaning.45. Do not leave the appliance unattended when in use.46. Do not move the appliance while it is in use.47. Do not use the lid handle to carry the pot. Only use the pot handles.IMPORTANT! Danger of burns! Never exceed the maximum level mark in the inner pot. Some food expands in volume during cooking. If you are boiling food such as rice and dried vegetables, do not fill the inner pot to more than 2/3rds.48. Try to avoid boiling food that foams and clogs the sieve and valves, such as apple sauce, pearl barley, oats and laver. If you prepare such food in the appliance, only fill the inner pot to half and always let the pot cool down very slowly to release the pressure.49. Never operate this appliance when empty.50. Never operate this appliance with hot oil for deep-frying.
3
51. WARNING! Do not overfill the cooking pot beyond “MAX” level as boiling liquids may overflow and cause personal injury or damage to the appliance or cooking area.52. WARNING! The heating element surface is subjected to residual heat after use.
![]() CAUTION: Hot surfaces. Please do not touch the surface while in use.The temperature of accessible surface may be high when the appliance is operating.
CAUTION: Hot surfaces. Please do not touch the surface while in use.The temperature of accessible surface may be high when the appliance is operating.
FOR HOUSEHOLD USE ONLYSAVE THESE INSTRUCTIONS
Multi-function Cooking Pot
The cooking pot of KY-509 is suitable for searing on gas or induction cooktops.Before applying on different cooktop, please read below care instructions.
When using on General CooktopUse low to medium heat to ensure the most efficient performance of your cookware.Lower temperatures will also assist in retaining your foods natural moisture and flavours.High heat should only be used for searing over very short periods of time.ALWAYS USE a heat source smaller than the diameter of the cookware base. This will ensure you are getting the most efficient cooking performance from your cookware.Never leave an empty cookware item on a hot burner or element.Avoid leaving your cookware on a burner or element unattended for long periods of time.Never leave empty cookware on a hot burner or allow cookware to boil dry.Always allow your cookware to cool down before washing/ cleaning it.Always use potholders when handling hot cookware.Do not use cookware under a broiler, over a campfire, in a microwave oven or on a gas grill.Do not heat or leave empty cookware on a hot burning for more than 3 minutes.Always place hot cookware on heat-resistant surface such as a wooden cutting board.
When using on induction Cooktop.Take care that the base of the cooking pot is perfectly clean to avoid anything getting trapped between the pan and the cooktop or scratching the surface of the cooktop.Induction is a very rapid heat transfer source. Do not overheat or rapidly heat up empty pots or pans as excessive heat can damage the cookware or cooktop.A buzzing sound may occur when the heat setting is high. This is due to a technicality and does not indicate a fault either in the hob or in the cookware.Always dry the base of the cooking pot before cooking, otherwise the pot may stick to the hob.
4
PARTS
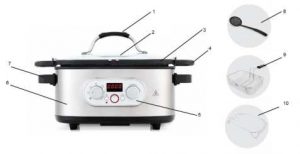
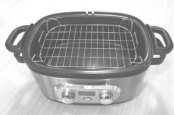
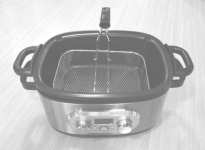
1 Lid handle 6 Main unit2 Glass Lid 7 Main unit handle3 Cooking pot 8 Slotted spoon4 Cooking pot handle 9 Frying basket5 Control panel 10 Steam rack
CONTROL PANEL

1 Digital display 4 Start/Stop button2 Function dial 5 Set time/ temp. button3 Keep warm button 6 Adjustment dial
DIGITAL DISPLAY
5

FUNCTIONS
FUNCTION DIALThe function dial allows you to select different cooking functions on the multi cooker.
KEEP WARMPress the KEEP WARM button to activate keep warm function from standby mode, then press START/STOP button to start keep warm.If you want to cancel the keep warm function, press STOP/START button again.The multi cooker can keep the cooked food warm up to 12 hours. However, for the best flavors, the maximum keep warm time should not be longer than 6 hours.
START/STOPPress START/ STOP to start or cancel any cooking function
SET TIME/ TEMP.Use the SET TIME/ TEMP button to change the cooking temperature and time on the multi cooker.
- Select a cooking function, a letter “T” will show on display. Use the adjustment dial to change the cooking time.
- Press SET TIME/ TEMP button once more, “°C” will show on digital display. Use the adjustment dial to change the cooking temperature.
NOTE: The time and temperature cannot be adjusted for RICE function.
ADJUSTMENT DIALUse the adjustment dial to increase/ decrease the cooking time and temperature.
COOKING TIMES & TEMPERATURES
Refer to the table below for the default cooking time in each cooking mode:
| Timer (H/Min) | Temperature (°C) | Note | |||||
| Default Time | Time Adjustment | Increment | Default Temperature | Temperature adjustment | Increment | Lid position | |
| Slow cook | 8Hr | 15min – 12Hr | 15min | 90 | 85-95 | 5 | Closed |
| Steam | 30min | 1min – 1Hr | 1min | — | Nil | Nil | Closed |
| Stew | 1Hr | 15min – 6Hr | 15min | 100 | 90-100 | 5 | Closed |
| Oven/ Bake | 30min | 5min – 6Hr | 5min | 180 | 150-200 | 10 | Closed |
| Brown Sauté | 1min | 1min – 1Hr | 1min | 200 | 170-200 | 10 | Open |
| Rice | — | Nil | Nil | — | Nil | Nil | Closed |
| Deep Fryer | 30min | 1min – 1Hr | 1min | 180 | 150-190 | 10 | Open |
| Keep warm | 15min | 15min-12Hr | 15min | — | Nil | Nil | Closed |
Note: You can only adjust the cooking time within the adjustable range for each cooking mode.
6
When the cooker is being programmed or any program is in effect, press START/STOP to cancel the program and take the cooker to standby mode.
BEFORE FIRST USE
- Remove all parts of the multi cooker form the packaging.
- Wash the inner pot and lid with warm water and mild detergent.
- Completely dry the inner pot before placing into the main unit.
- Please the multi cooker on a flat, level surface.
OPERATION
- Select cooking function.
- Set desired cooking time and temperature.
- Press START/STOP to begin cooking.
- To turn off the unit at any time during cooking, press START/STOP button again.NOTE: The unit is hot. Always use handles during and after cooking, and always lift the lid away from you.
![]() CAUTION: RISK OF SCALDING!Never place your hand on the lid during cooking
CAUTION: RISK OF SCALDING!Never place your hand on the lid during cooking
![]()
- Do not touch the heating element when the product is plugged or after cooking.
- Do not carry the cooker during use or immediately after cooking.
CHANGE COOKING SETTINGSSwitching functions during cooking is not preferred.To change cooking setting, press “START/STOP” button to stop the program, then turn the function dial to the desired new cooking function. The unit will adjust to the default settings of your selection. Set your desired time and temperature as needed.Press START/STOP button to begin cooking in new setting.
COOKING MODE
Slow cook
- Fill cooking pot with ingredients and cover with lid.
- Turn the function dial to SLOW COOK. Default temperature setting is MEDIUM 90°C.
- Turn the adjustment dial to set desired cooking time.
- Press SET TIME/TEMP button to select desired cooking temperature: High-95°C, Medium-90°C or Low-85°C.
- Press START/STOP button to begin cooking. Selected cook time setting will be displayed.
- When the program ends, the unit will turn off automatically.
Steam
7
- Place no more than 2/3 of water in the cooking pot.
- Place the steam rack on cooking pot and close the lid.Ensure water level is below the rack.
- Turn the function dial to STEAM, adjust the cooking time if necessary, then press START/STOP button to start preheating.
- When steaming temperature is reached, the unit will begin counting down the cooking time.
- Carefully lift lid away from you and place food on steam rack. Start in the middle. Be sure to cover the lid again.
- When cooking time is completed, the unit will beep 3 times and turn off automatically.
- Carefully remove food from cooking pot with spoon, fork or tongs.
- To turn off the unit before cook time ends, press START/STOP button.NOTE: If all the water has boiled away, the unit will shut off by over-heat protection. Be sure to add enough water for the desired steaming task.
Stew/ Oven/ Bake
- Fill cooking pot with ingredients and cover with lid.
- Turn the dial to desired cooking mode.
- Set desired cooking time and temperature if necessary.
- Press START/STOP button to start preheating.
- When set temperature is reached, the unit will begin counting down the cooking time.
- When the program ends, the display will show “END”; the unit will beep 3 times and turn off automatically.
Brown Sauté
- Turn function dial to Brown Sauté function with the lid opened.
- Adjust cooking time and temperature if necessary. Press START/STOP button to start preheating.
- When set temperature is reached the unit will begin counting down the cooking time.
- Add oil or butter to the cooking pot and allow the cooker to heat for approximate 3-6 minutes.
- Add ingredients to be sautéed/ browned to the inner cooking pot. Using a long-handled wooden or heat safe spoon, stir ingredients until sautéed/ browned to desired level.
- When cooking time is completed, the display will show “END”; the unit will beep 3 times and turn off automatically
- Press the START/STOP button before time is up, to manually turn the appliance OFF.
- If adding white rice or brown rice, follow instruction of “RICE COOKING” below.
![]() CAUTION!
CAUTION!
Do not use the provided serving spatula to sauté. It is not intended to be used in contact with high temperatures. Use a long-handled wooden or heat-safe spoon to stir food while sautéing.
Rice Cooking
- Before cooking, rinse your rice in the inner pot until the water is clear. For softer rice, soak in water for 10-20 minutes before cook.
- Put the rinsed rice well distributed around the inner pot. Fill it with water to the corresponding water level. See below table.
- Turn the function dial to Rice, then press START/STOP button to start rice cooking.
- When the rice cooking has ended, the Rice program will switch to Keep Warm mode automatically.
- Stir the rice and then leave it in the rice cooker for a few minutes longer in order to get perfect rice with separated grains.
- Press START/STOP button to end the program before taking off the cooking pot.
8
COOKING GUIDE FOR WHITE RICE
UNCOOKED RICE : RICE WEIGHT (approx.) : WATER : WATER VOLUME
2 Cups : 380g : 3 Cups : 615ml3 Cups : 570g : 4.5 Cups : 925ml4 Cups : 760g : 5.5 Cups : 1130ml5 Cups : 950g : 6.5 Cups : 1335ml6 Cups : 1140g : 7 Cups : 1435ml7 Cups : 1330g : 8 Cups : 1640ml
Note: 1 cup of rice approx. 190g and 1 cup of water approx. 205ml.
9
Deep Fryer
IMPORTANT! Use only standard brand of vegetable shortening or cooking oil when using the deep fryer function. Frying food in butter, margarine, olive oil or animal fat is not recommended due to lower smoking temperatures.
CAUTION: NEVER LEAVE THE UNIT UNATTENDED DURING USE.
- Pour oil into the cooking pot up to the MAX line. Never go over the MAX mark as this may allow the oil overflow when food is added.
- Turn the function dial to DEEP FRYER, adjust the cooking time and temperature if necessary, then press START/STOP button to start preheating.
- Place the food in frying basket.
IMPORTANT! BEFORE FRYING, REMOVE EXCESS MOISTURE FROM FOOD BY BLOTTING WITH KITCHEN PAPER OR SIMILAR. MOIST FOODS CAUSE EXCESS FOAMING AND OIL SPATTER.
CAUTION: TO AVOID SCALDING FROM HOT OIL, DO NOT ADD WET OR FROZEN FOOD INTO COOKING OIL. EVEN SMALL AMOUNT OF WATER OR MOISTURE TRAPPED IN FROZEN FOOD MAY CAUSE THE OIL TO SPATTER.
- Use caution when deep frying flour tortillas. Flour tortillas contain air bubbles. During deep frying, oil can then become trapped within these bubbles and, if not properly drained these bubbles can burst and cause burns. Therefore, after deep frying tortillas, carefully raise them out of the cooking oil and allow oil to drain from the tortillas for at least 30 seconds.
4. When frying temperature is reached the timer will begin counting down the cooking time.5. Carefully lift lid away from you and lower the frying basket into the oil.6. When cooking time is completed, the display will show “END”; the unit will beep 3 times and turn off automatically.7. Carefully remove the basket from cooking pot.8. To turn off the unit before cook time ends, press START/STOP button.
10
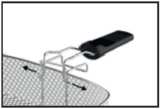
Fitting handle to frying basket
1. Squeezing the handle wires to pass through the ring, then insert the ends of handle wires through the two holes in the basket
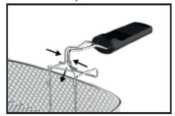
2. Carefully lower the handle to reach two holes on basket. Twist handle left and right to ensure it locks securely into place.
CLEANING
- Unplug the appliance and let it cool down before cleaning.
- Clean the cooker after every use.
- Remove the inner pot. Wash it in warm soapy water with a non-abrasive sponge. Rinse and dry thoroughly. Replace it into the base unit after cleaning.
- Clean the lid with detergent and rinse with fresh water. Wipe all parts dry with a soft cloth. Wipe the housing with a moistened cloth. Ensure that no water can enter the housing. Wipe the housing dry with a soft cloth.CAUTION: To prevent damage to the appliance do not use alkaline cleaning agents when cleaning, use a soft cloth and a mild detergent.
STORAGE
- Always unplug the removable power cord and allow the unit to cool down before storage.
- Place the accessories (i.e. frying basket, steam rack and slotted spoons) inside the inner pot.
- Always store the Multi Cooker in an upright position.
- Do not place anything on top of the Multi cooker.
TECHNICAL DATA
MODLE POWER SUPPLY POWERKY-509 220-240V 50-60Hz 1300W
11
12 Month Warranty
Thank you for your purchase from Kmart.
Kmart Australia Ltd warrants your new product to be free from defects in materials and workmanship for the period stated above, from the date of purchase, provided that the product is used in accordance with accompanying recommendations or instructions where provided. This warranty is in addition to your rights under the Australian Consumer Law.
Kmart will provide you with your choice of a refund, repair or exchange (where possible) for this product if it becomes defective within the warranty period. Kmart will bear the reasonable expense of claiming the warranty. This warranty will no longer apply where the defect is a result of alteration, accident, misuse, abuse or neglect.
Please retain your receipt as proof of purchase and contact our Customer Service Centre on 1800 124 125 (Australia) or 0800 945 995 (New Zealand) or alternatively, via Customer Help at Kmart.com.au for any difficulties with your product. Warranty claims and claims for expense incurred in returning this product can be addressed to our Customer Service Centre at 690 Springvale Rd, Mulgrave Vic 3170.
Our goods come with guarantees that cannot be excluded under the Australian Consumer Law. You are entitled to a replacement or refund for a major failure and compensation for any other reasonably foreseeable loss or damage. You are also entitled to have the goods repaired or replaced if the goods fail to be of acceptable quality and the failure does not amount to a major failure.
For New Zealand customers, this warranty is in addition to statutory rights observed under New Zealand legislation.
12
anko Multi Cooker User Manual – anko Multi Cooker User Manual –
[xyz-ips snippet=”download-snippet”]