![]()
Rattan Wooden COtInstruction Manual
The photos and illustrations shown in this instruction manual are generic. The manufacturer reserves the right to change any specification or feature without prior notice.IMPORTANT: I(EEP FOR FUTURE REFERENCE. READ CAREFULLY.
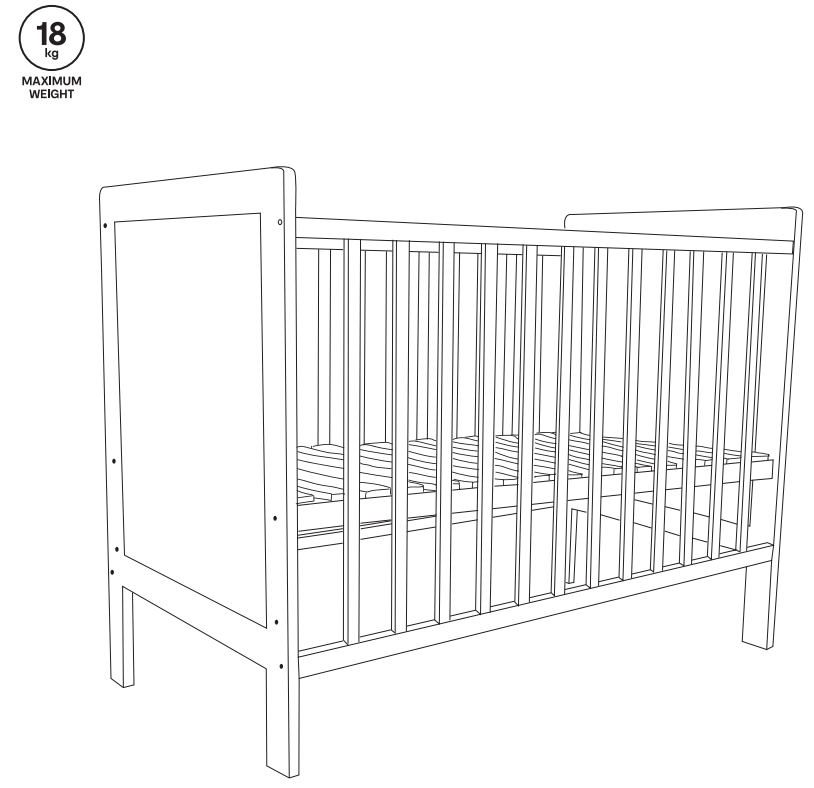
 WARNING!– ADULT ASSEMBLY REQUIRED.– DUE TO THE PRESENCE OF SMALL PARTS DURING ASSEMBLY, KEEP OUT OF REACH OF CHILDREN UNTIL ASSEMBLY IS COMPLETE.– TO PREVENT FALLS, THE MATTRESS BASE OF THIS COT SHOULD BE ADJUSTED TO THE LOWEST POSITION BEFORE THE CHILD CAN SIT UP UNAIDED.– RECOMMENDED MATTRESS SIZE: 690mm WIDE x 1300mm LONG AND NO MORE THAN 150mm THICK.– FOLLOW THE MANUFACTURER’S ASSEMBLY INSTRUCTIONS TO ENSURE THE SAFETY FEATURES OF THE COT ARE NOT COMPROMISED.This cot has been manufactured for one child only, with a maximum weight of 18kg.When the mattress base is assembled in the lower position, ensure the higher cot base holes are covered tightly with the filling bolts supplied. This is to prevent finger entrapment, swallowing, and inhalation hazards.ENSURE the cot is placed at a reasonable distance from curtains, blinds, heaters, and power points.ENSURE the cot is completely assembled and check that all parts are securely tightened before placing the child into the cot.ENSURE medication, string, elastic, small toys or small items such as money etc.are always kept out of the child’s reach when in the cot.DO NOT over-tighten bolts/screws.ENSURE that the child is clear of any moving parts when adjusting the cot. For warranty purposes, keep your sales receipt to provide proof of purchase.RECOMMENDED MATTRESS SIZE (SOLD SEPARATELY):THIS COT HAS BEEN MANUFACTURED FOR USE WITH A MATTRESS WHICH MEASURES 690mm WIDE x 1300mm LONG AND NO MORE THAN 150mm THICK.The width and length are specified because it is important that the gaps between the mattress and the sides and ends of the cot will not exceed 40mm when the mattress is pushed to one side or end, and 20mm when the mattress is centered in the cot.This is to minimize the danger of a child’s limb becoming caught in the gap. The thickness of the mattress has been specified to ensure that the depth of the cot is greater than 500mm with the mattress base in the lower position and is greater than 300mm with the mattress base in the upper position to minimize the risk of a child climbing or falling out of the cot.CARE AND MAINTENANCE:
- To ensure the long-lasting use of your cot, wipe it down with a damp cloth and use a mild soap solution if necessary.
- Do not use abrasive cleaners.
- Always store product in a clean dry place.
- Always check parts regularly for tightness of screws, nuts, and other fasteners – tighten or replace if required.
- To maintain the safety of your cot, seek prompt repairs for bent, torn, worn, or broken parts.
- Use only those parts and accessories approved and supplied by the manufacturer.
Read these instructions carefully before use and keep them for future reference. The child may be hurt if you do not follow these instructions.
Supplied loose in box

- It is advisable that two people assemble the cot in the room which is to be used.
- As small parts are involved in assembly, children should be kept clear of the assembly area.
- Dispose of all packaging materials immediately after the cot is assembled.
- Identify all parts and components.
- Clear an area of the floor for assembly and place a sheet on the floor to ensure the cot is not scratched during assembly.
WARNING
DO NOT OVERTIGHTEN BOLTS. OVER TIGHTENING BOLTS CAN CAUSE PANELS TO CRACK.
To assemble Cot
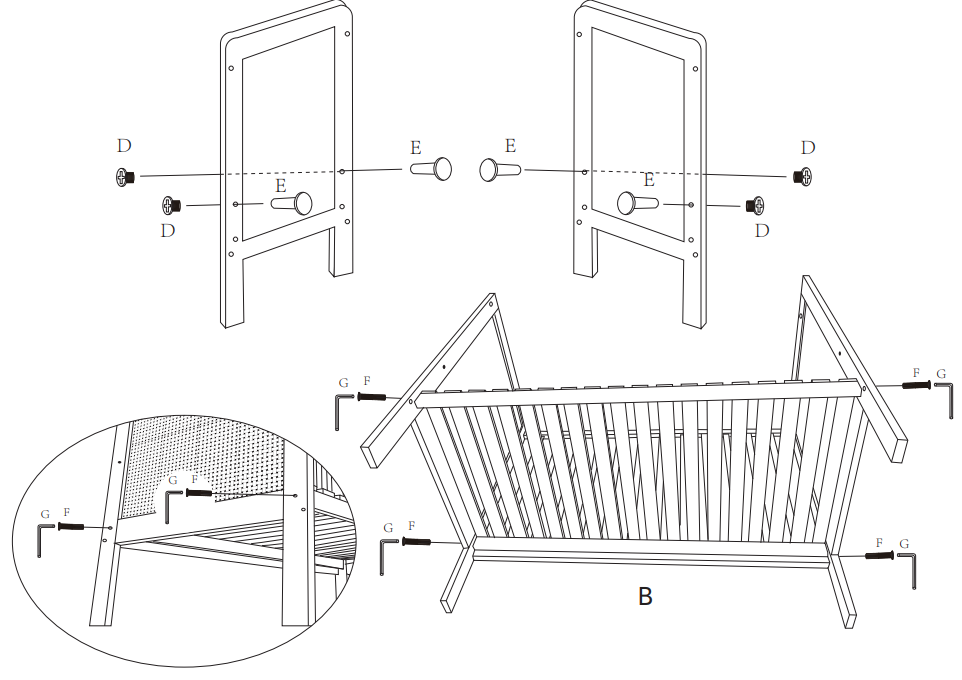
STEP 1When the mattress base sits in a high position, fit the filler bolts and nuts (parts D and E) to the lower mattress base mounting holes to prevent possible finger entrapment.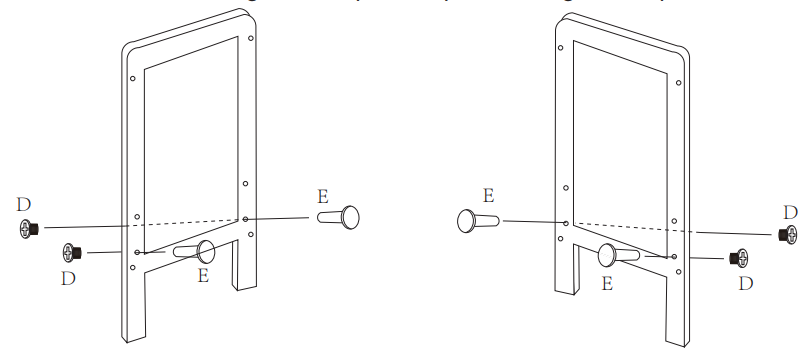
STEP 2Attach both Rattan Panels (A) to one Side Panel (C).
 STEP 3Carefully lay the cot down on the Side Panel, slide the Mattress Base (B) between the Rattan Panels. Secure the Mattress base.
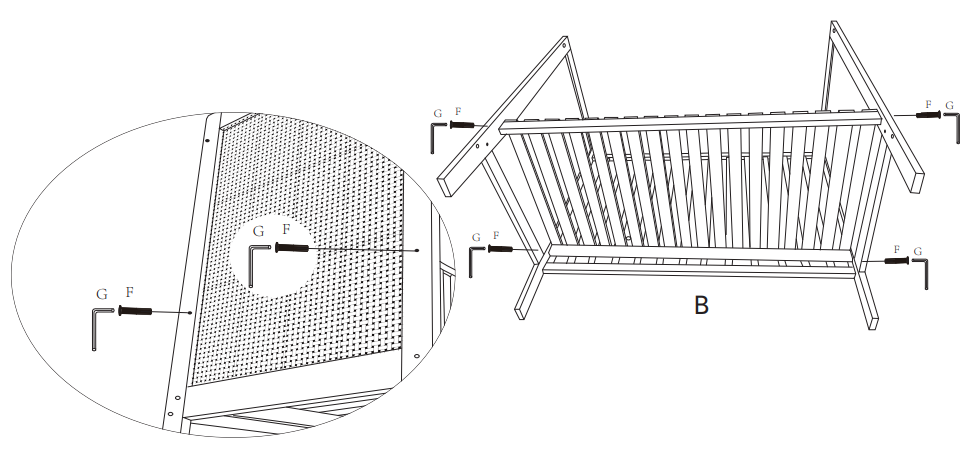
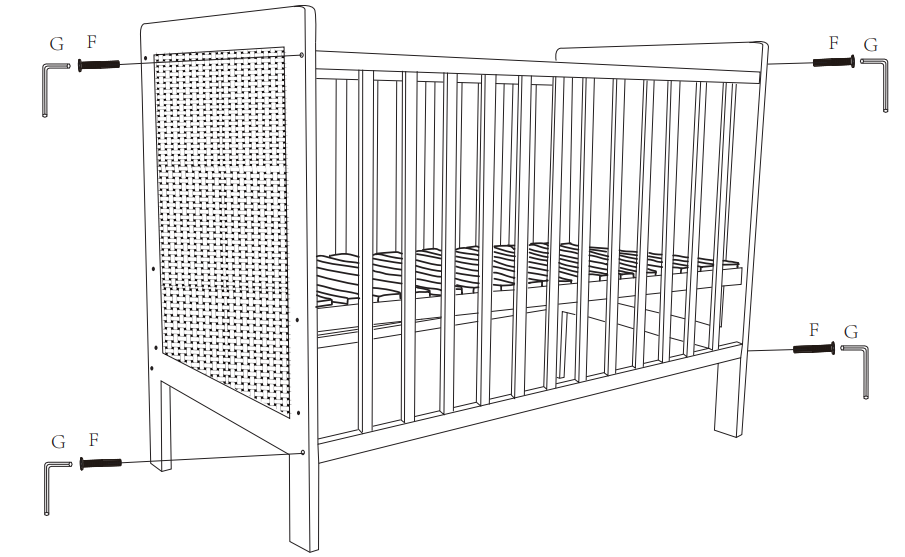
STEP 4Carefully stand the cot upright. Attach the remaining Side Panel between the Rattan Panels.Tighten all bolts until firm. Do not overtighten bolts. Over tightening, bolts can cause panels to crack!
When Mattress Base sits in low position.Refit the filler bolts and nuts (parts D and E) to the upper mattress base mounting holes to prevent possible finger entrapment. Then repeat step 2 to step 4 with the mattress base secure in low position.
Mattress Base Heights
Mattress Base in High PositionThis base height is set for when your baby is young and can not sit up unaided.

Mattress Base in Low PositionThis base height is set for an active baby who can sit up unaided.

KEYCODE: 43-039-531MADE IN CHINA© KMART AUSTRALIA LIMITED FOR AU / NZ: IMPORTED FOR KMART STORES IN AUSTRALIA AND NEW ZEALAND. KMART AUSTRALIA – 690 SPRINGVALE ROAD, MULGRAVE, VIC 3170 AUSTRALIA. KMART NEW ZEALAND – REGIONAL OFFICE CIO KMART PAPATOETOE STORE, HUNTERS PLAZA, GREAT SOUTH ROAD, PAPATOETOE, AUCKLAND, NEW ZEALAND.
[xyz-ips snippet=”download-snippet”]