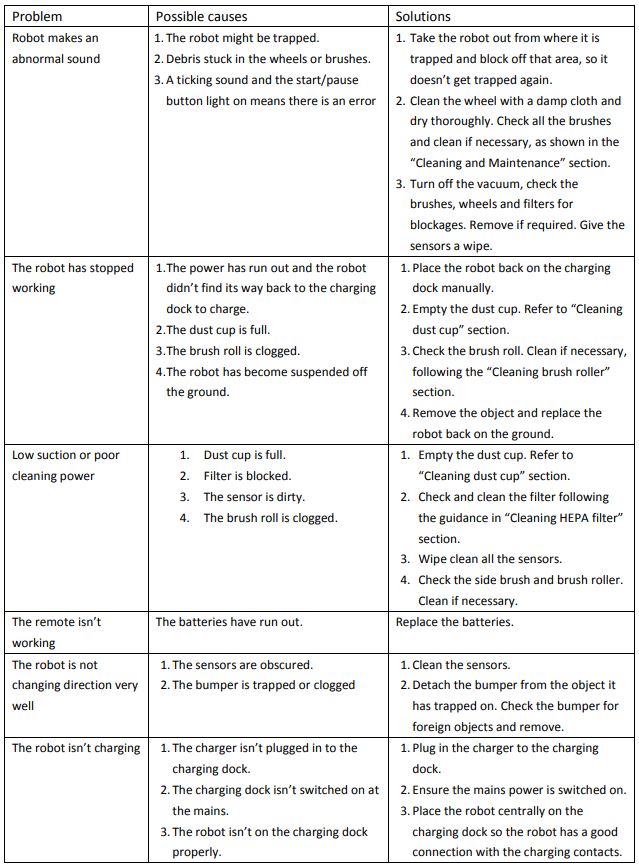
anko Robotic Vacuum Cleaner
IMPORTANT SAFEGUARDSFOR HOUSEHOLD USE ONLY.This appliance should only be used for domestic cleaning, and must only be used indoors, as described in this user guide.
- Always switch off and remove the charger from the socket before cleaning the appliance or any maintenance task.
- This appliance is not intended for use by persons (including children) with reduced physical, sensory or mental capabilities, or lack of experience and knowledge unless they have been given supervision or instruction concerning the use of the appliances by a person responsible for their safety.
- Children should be supervised to ensure that they do not play with the appliance.
- If the power cord is damaged, it must be replaced by a qualified electrician in order to avoid a hazard or the appliance must be disposed of.
- Keep hands, feet, loose clothing, and hair away from rotating brush.
- Use only the original charger supplied with the appliance.
- Check that your supply voltage is the same as that stated on the charger.
- When charging the appliance, the power switch must be off.
- Never charge the batteries in temperatures above 37°C or below 0°C.
- It is normal for the charger to become warm to the touch when charging.
- Use only attachments provided.
- Static electricity: some carpets can cause a small build-up of static electricity. Any static discharge is not hazardous to health.
- To prevent damage: Do not suck up liquids or ash!
- Do not use your appliance out of doors or on any wet surface or for wet pick up.
- Do not spray with or pick up flammable liquids, cleaning fluids, aerosols, or their vapors.
- Do not continue to use your appliance or charger if it appears faulty.
- Do not leave the appliance unattended when in use.
- Never use the appliance without the filters in place!
- Check the filters are inserted correctly!
- Do empty the Dust Bin regularly for optimal operation of the vacuum.
- Do not replace the batteries with non-rechargeable batteries.
- The vacuum must use only with provided battery charger:YLS0241A-A165060.
![]() WARNING: Do not recharge non-rechargeable batteries.
WARNING: Do not recharge non-rechargeable batteries.
![]() WARNING: Before charging the product, please make sure your hands are dry.
WARNING: Before charging the product, please make sure your hands are dry.![]() WARNING: Please don’t touch the rolling brush with your hands when the machine is in function.
WARNING: Please don’t touch the rolling brush with your hands when the machine is in function.![]() WARNING: Please use the charger we supplied with the appliance. Other chargers may cause electrical failure and/or fire.
WARNING: Please use the charger we supplied with the appliance. Other chargers may cause electrical failure and/or fire.
End of Product Life Battery DisposalIf the cleaner is to be disposed of, the batteries should be removed. The battery is to be disposed of safely. Used batteries should be taken to a recycling station and not disposed of with household waste. To remove the batteries, please proceed according to the following inspections:
IMPORTANT! Always fully discharge the batteries before removal and ensure the charger is unplugged.
- Run the vacuum cleaner until it stops fully discharge the batteries.
- Remove the ergonomic handle and the screw in the main body to open the cleaner.
- Remove the motor battery housing and disconnect the cables.
- Remove the batteries from the housing.
Note: Contact your local council waste disposal service for proper disposal facilities available for your area.
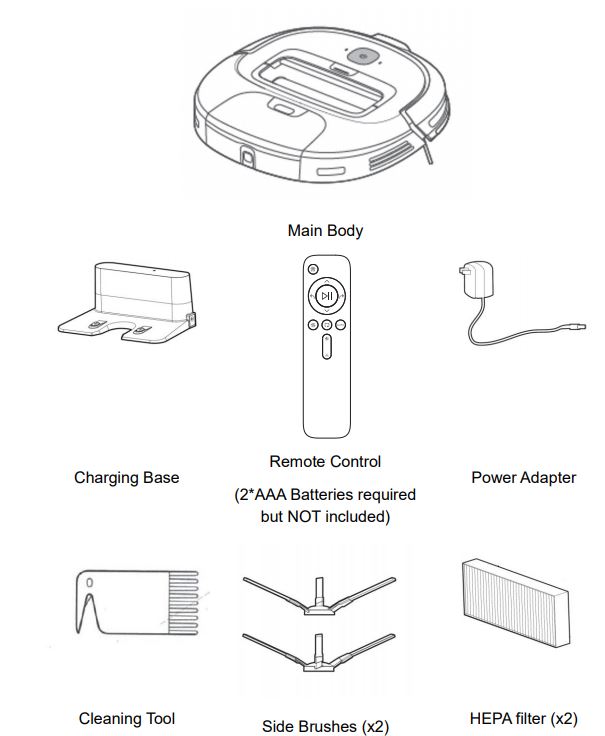
IN THE BOX
IMPORTANT TIPS BEFORE USE
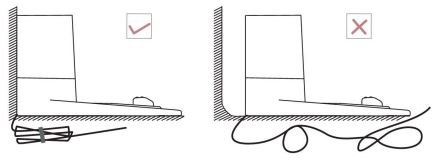
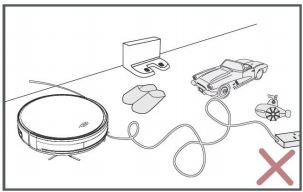 Remove power cords and small objects from the floor that may become entangled with a vacuum cleaner
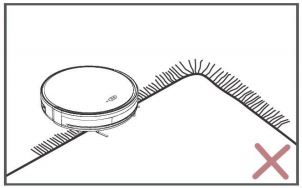 Remove carpet or any floor covering with fringe, they may become entangled with a vacuum cleaner.
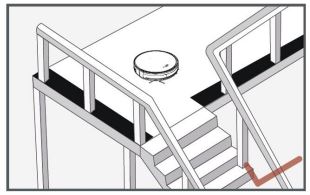 Anti-drop sensors prevent the vacuum cleaner from tumbling down starts and steep drops. They may work less effectively if they are dirty or used on reflective/ very dark-colored floors. It is recommended that physical barriers are used to block off areas where the vacuum cleaner may fall
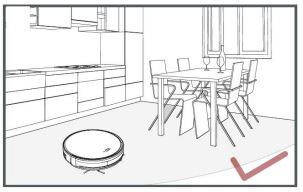 Please make sure all furniture is properly organized so that the vacuum cleaner is able to clean well without becoming stuck.
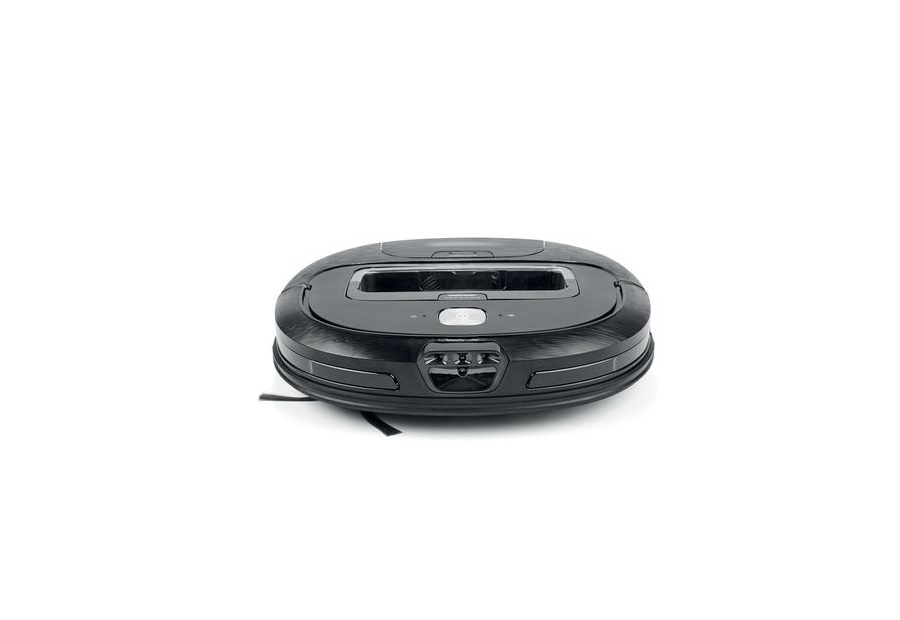
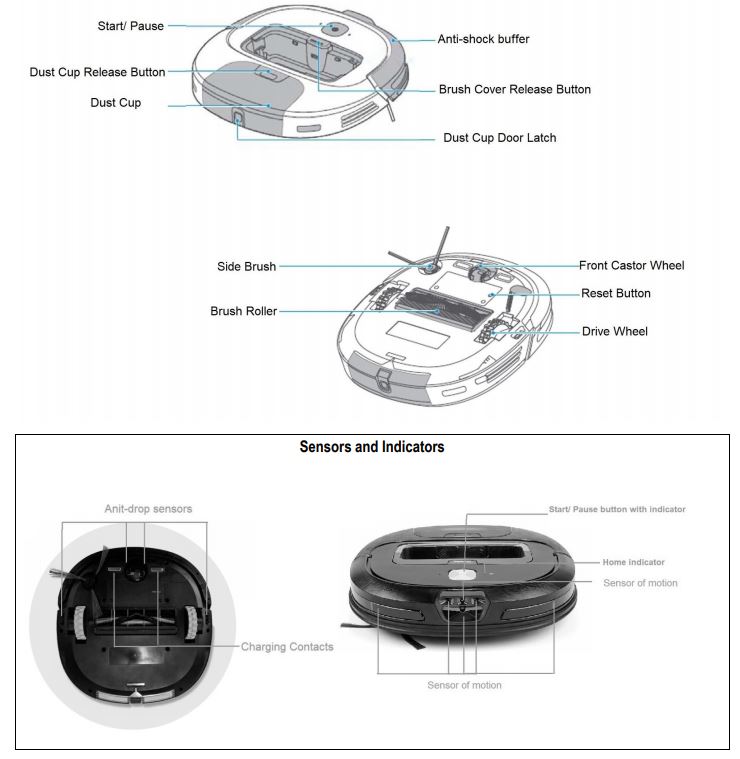
GET TO KNOW YOUR ROBOTIC VACUUM
PREPARATION
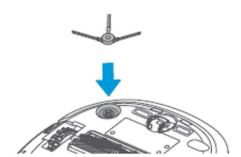
- Install the side brush before use.

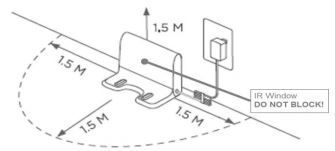
- Place the Charging Base on a hard, level surface and against a wall
- Do not place any objects within 1.5m of the charging base, and do not place any mirrors or other reflective objects within this range. NOTE: If the IR signal emission window is blocked, the robot will be unable to locate the charging dock.
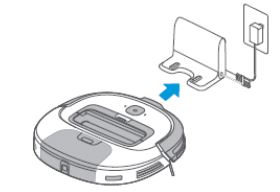
- Place the vacuum cleaner on top of the charging base and align the charging contacts. The indicator flashes, which means the device is undercharging. When fully charged the indicator stays steady ON.
GETTING START
Remote Control
Functions
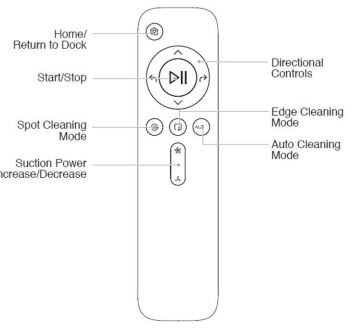 Functions
Home Button
Press![]() on the remote control to return the vacuum cleaner to the Charging Base.
on the remote control to return the vacuum cleaner to the Charging Base.
Start/ Pause ButtonPress once to start the vacuum cleaner. Press again to pause the operation.
Direction ButtonUnder the standby mode, press these buttons to turn left or right. Press the backward button, Vacuum will rotate 180 degrees. Release button to return to standby mode. Press the forward button, Vacuum continues forward. Release button to standby mode.
Cleaning Mode ButtonThere 3-cleaning modes available: Spot Cleaning, Edge Cleaning, and Auto Cleaning mode. Before switch mode, press the “Pause” button to stop operation temporarily, then select another Cleaning Mode Button.
Suction Increase/ Decrease ButtonUnder `Auto Cleaning” mode, you can adjust the suction power by pressing the Suction Increase/ Decrease button on the remote control
Note: Remote control require 2x AAA batteries (not included)
To install the batteries, first remove the battery cover on the remote control by sliding the battery cover back. Install the batteries in correct polarity inside the battery compartment matching the polarity shown and then refit the battery compartment cover securely.
Battery type: “1.5V 2x AAA”. Alkaline batteries recommended.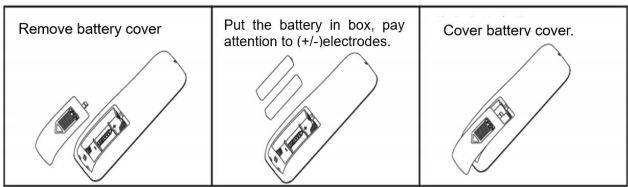
To prevent overheating DO NOT mix new and old batteries in the remote control. To prevent corrosion, remove the batteries if the remote control is not used for a long period of time.
OPERATION
- Before first use, charge the vacuum cleaner for 12 hours.
- When Start/Pause indicator glows with steady white light, it indicates the device is fully charged. Short press button on device or press vacuum will start auto cleaning. button on the remote control,
- To change cleaning mode, press to pause the operation, then press desired cleaning mode button to restart cleaning.
- To turn the vacuum cleaner off, initially pause the cleaning then press and hold the button on the device for 4 seconds. The charge Home indicator will flash red four times and the robot vacuum will shut down.
Cleaning mode
Spot Cleaning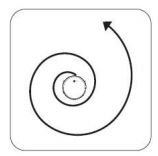 The vacuum intensively cleans a specific area in a spiral pattern, useful if there is a concentrated area of dust or debris. When in the Spot Cleaning mode, the vacuum will stop cleaning after 1 minute.
Edge Cleaning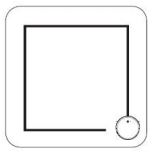 The vacuum cleaner reduces its speed when it detects a wall and then follows the wall to ensure the edge is cleaned thoroughly.
Auto Cleaning The vacuum cleaning will perform cleaning according to your home environment.No fixed direction set but will clean the whole room.
- The vacuum cleaner will automatically end the cleaning session when the battery level is too low. The home indicator flashes RED and the vacuum will begin to maneuver back to the charging base.
- You may manually drive the vacuum back to the charging base by pressing a button. The home indicator stays RED until the vacuum parks in the charging dock successfully.Note: If the vacuum is unable to find the charging base, please help it back home manually.
CAUTION! Too low a charge is impossible to start cleaning, always put the vacuum cleaner on the charger base for charging when not in use.
CLEANING AND MAINTENANCE
Cleaning Brush Roller (weekly cleaning recommended)
- Press Brush Cover Release Button and take out the cover, then take out the brush roller
- Clean hair tangled on the brush roller, by using the cleaning tool provided
- Replace the Brush Roller and the cover.
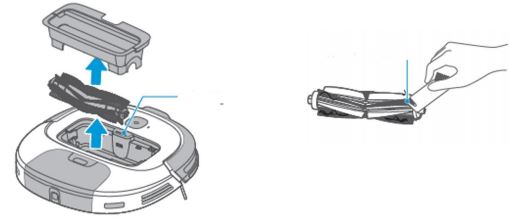
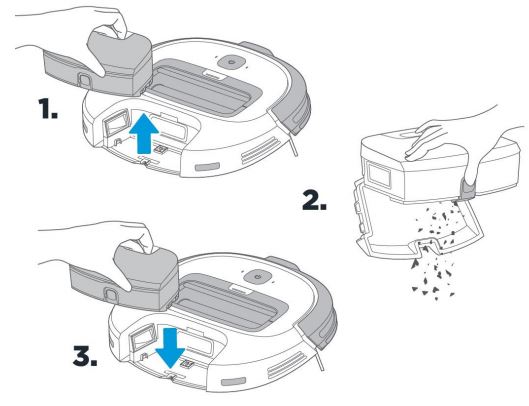
Cleaning Dust Cup (weekly cleaning recommended)
- Press the Dust Cup Release button and take out the dust cup.
- Unclip the dust cup latch and swing the bottom cover open.
- Take the dust cap to the rubbish bin, tip the dirt and debris into the rubbish bin. The small brush provided can be used to help clean the dust cup.
- Close the Dust Cup cover and return it back to the vacuum cleaner
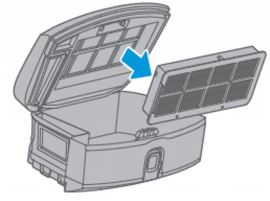
Cleaning HEPA filter (weekly cleaning recommended)
- After taking out the dust cup, pull open the top cover, a HEPA filter can be found on the top cover.
- Remove the HEPA filter, tip the side latch and pull straight out.
- Tap the filter on the side of the rubbish bin to dislodge the dirt and dust. Use the brush provided to remove the small particles or use a normal vacuum cleaner with a hose attachment to suck the dirt and dust out.
- Refit the HEPA filter to the dust cap, the filter can be placed in one way only.
- Close the Dust Cup lid and return it back to the vacuum cleaner.Cleaning side brush (monthly cleaning recommended)
- Pull to remove the side brush.
- Clean hair tangled and remove small particles by using the clean brush provided.
- Place the side brush back in the vacuum cleaner.Cleaning Robot Sensors
- Keep the sensors clean by wiping them with a dry cloth or brush them using the cleaning tool provided.
- Keep the window on the Shock Buffer clean as there are sensors located behind.
- Wipe the window with a damp cloth and dry with a dry cloth.Cleaning the Wheels
- Should the driver wheels or front castor wheel become tangled with debris, hair, etc., clean away before continuing use?Cleaning main body and charging base
- The charging contacts on the Robot and Charging Base must be kept clean to ensure proper chargers.
- To clean, switch off and unplug the power supply from the wall outlet.
- Use a dry cloth, wipe the contacts until they are clean and shiny.
 Cleaning side brush (monthly cleaning recommended)
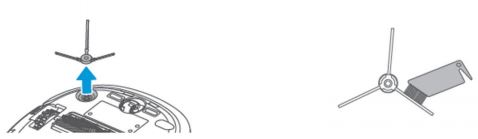 Cleaning Robot Sensors
TROUBLESHOOTING
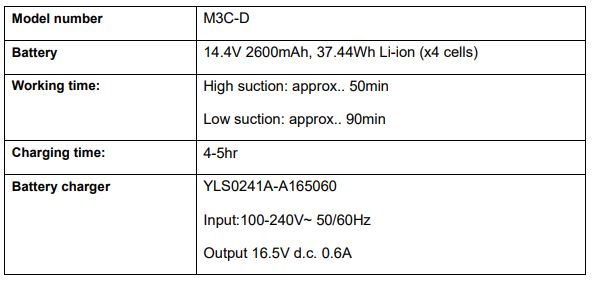
SPECIFICATION
12 MONTH WARRANTYThank you for your purchase from Kmart.
Kmart Australia Ltd warrants your new product to be free from defects in materials and workmanship for the period stated above, from the date of purchase, provided that the product is used in accordance with accompanying recommendations or instructions where provided. This warranty is in addition to your rights under the Australian Consumer Law.
Kmart will provide you with your choice of a refund, repair, or exchange (where possible) for this product if it becomes defective within the warranty period. Kmart will bear the reasonable expense of claiming the warranty. This warranty will no longer apply where the defect is a result of alteration, accident, misuse, abuse, or neglect.
Please retain your receipt as proof of purchase and contact our Customer Service Centre on 1800 124 125 (Australia) or 0800 945 995 (New Zealand) or alternatively, via Customer Help at Kmart.com.au for any difficulties with your product. Warranty claims and claims for expense incurred in returning this product can be addressed to our Customer Service Centre at 690 Springvale Rd, Mulgrave Vic 3170.
Our goods come with guarantees that cannot be excluded under the Australian Consumer Law. You are entitled to a replacement or refund for a major failure and compensation for any other reasonably foreseeable loss or damage. You are also entitled to have the goods repaired or replaced if the goods fail to be of acceptable quality and the failure does not amount to a major failure.
For New Zealand customers, this warranty is in addition to statutory rights observed under New Zealand legislation.
[xyz-ips snippet=”download-snippet”]