![]()
Slow CookerWJ-5500E-SAAUser Manual
PLEASE READ AND SAVE THESEINSTRUCTIONS FOR FUTURE REFERENCE
IMPORTANT SAFEGUARDS
![]() When using electrical appliances, basic safety precautions should always be followed including the following:
When using electrical appliances, basic safety precautions should always be followed including the following:
- READ ALL INSTRUCTIONS.
- Do not touch hot surfaces. Use handles or knobs.
- To protect against electrical shock, do not immerse cord, plugs or appliance in water or other liquid.
- This appliance is not intended for use by persons (including children) with reduced physical, sensory or mental capabilities, or lack of experience and knowledge unless they have been given supervision or instructions concerning use of the appliance by a person responsible for their safety.
- Children should be supervised to ensure that they do not play with the appliance.
- Unplug from mains power outlet when not in use and before cleaning. Allow to cool before putting on or taking off parts.
- If the supply cord is damaged, it must be replaced by qualified electrical person in order to avoid a hazard or the product must be disposed.
- The use of accessory attachments not recommended by the appliance manufacturer may cause injuries.
- Do not use outdoors.
- Do not let cord hang over edge of table or counter or touch hot surfaces.
- Do not place on or near a hot gas or electric burner, or in a heated oven.
- Extreme caution must be used when moving an appliance containing hot oil or other hot liquids.CAUTION: To protect against damage or electric shock, do not cook in the base unit. Cook only in the ceramic pot provided.CAUTION: To prevent damage to the appliance, do not use alkaline cleaning agents when cleaning, use a soft cloth and a mild detergent.
- To disconnect, turn all 3 OFF/LOW/HIGH/KEEP WARM control dials to OFF, then remove plug from wall outlet.
- Do not use appliance for other than intended use.
- Avoid sudden temperature changes, such as adding refrigerated foods into the ceramic pot.
- Do not use the ceramic pot or the glass lid if chipped, cracked, or severely scratched.
- This appliance is intended to be used in household only. It should not be used for commercial purpose.
- The ceramic pot is designed for use with this appliance only. It must never be used on a cook top asit will crack and can cause burns if hot liquid or food inside. Do not use if the ceramic pot is cracked or damaged.
- Avoid sudden temperature changes by adding refrigerated foods into heated pot as the pot will crack.
 Caution, hot surface. Care must be taken. The surfaces are liable to get hot during use.
- WARNING: Do not overfill the cooking pot beyond the “MAX” level as boiling liquids may overflow and cause personal injury or damage to the appliance or cooking area.
- WARNING: The heating element surface is subject to residual heat after use.
- WARNING: Never attempt to remove or touch the ceramic cooking pot during operation. Always use oven gloves when removing the glass lid and ceramic cooking pot.
- WARNING: Potential injury from misuse.
FOR HOUSEHOLD USE ONLY SAVE THESE INSTRUCTIONS
ADDITIONAL IMPORTANT SAFEGUARDS
CAUTION, HOT SURFACES: This appliance generates heat and hot steam during use. Proper precautions must be taken to prevent the risk of burns, fire, injury, or damage to property.
- A person who has not read and understood all operating and safety instructions is not qualified to operate this appliance. All users of this appliance must read and understand the Instruction Manual before operating or cleaning this appliance.
- If this appliance falls or accidentally becomes immersed in water, unplug it from the wall outlet immediately. Do not reach into the water!
- When using this appliance, provide adequate air space above and on all sides for air circulation. Do not operate this appliance while it is touching or near curtains, wall coverings, clothing, dishtowels or other flammable materials.
- If this appliance begins to malfunction during use, immediately turn OFF/LOW/HIGH/WARM control dial to OFF, then remove the supply cord plug from mains power outlet.
- The cord to this appliance should be plugged into a 220-240V AC electrical wall outlet.
- Do not use this appliance in an unstable surface.
- Never use it on any stoneware liner on a gas or electric cooktop or on an open flame.
- Lift off lid carefully to avoid scalding and allow water to drip into the inner pot.
NOTES ON THE CORD
The provided short power-supply cord (or detachable power-supply cord) should be used to reduce the risk resulting from becoming entangled in or tripping over a longer cord. Do not use an extension cord with this product.
PLASTICIZER WARNING
IMPORTANT! To prevent Plasticizers from migrating to the finish of the countertop or table top or other furniture, placeNON-PLASTIC coasters or placemats between the appliance and the finish of the countertop or tabletop. Failure to do so may cause the finish to darken; permanent blemishes may occur or stains can appear on the counter or tabletop.
ELECTRIC POWER
If the electrical circuit is overloaded with other appliances, your appliance may not operate properly. It should be operated on a separate electrical circuit from other high powered appliances.
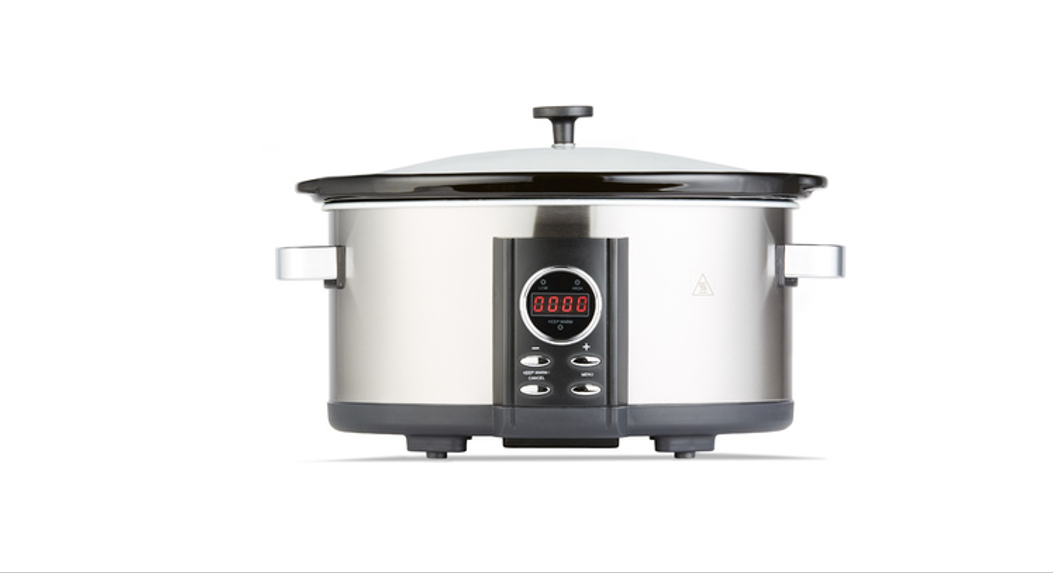
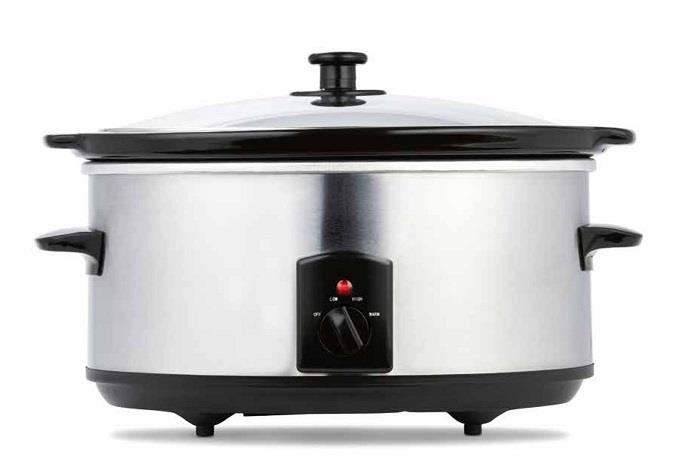
GETTING TO KNOW YOUR SLOW COOKER
Product may vary slightly from illustration
- Glass lid
- Inner ceramic pot
- Slow cooker handle
- Slow cooker with power cord
- Temperature control knob
- Cooking element
- MAX level mark
- Lid knob
INTRODUCTION TO SLOW COOKING
When it comes to serving up piping hot delicacies for a special occasion party, celebration, or other sponsored event, the Slow Cooker is ideal to offer guests an array of warm party favorites. This slow cooking serving offers a size of 5L to cook and serve.
BEFORE USING FOR THE FIRST TIME
- Carefully unpack your Slow Cooker. Remove all packaging and materials.
- It is necessary to operate the Slow Cooker one time before placing food in the ceramic pot. Fill the ceramic pot with tap Water (Do not fill more than the MAX. level mark). Cover the ceramic pot with the glass lid.
- Connect the supply cord plug into a 220-240V AC electrical power outlet.
- Turn control dial to the HIGH position and allow to heat for approximately 20 minutes. You will notice a slight odour; this is normal and should disappear after few minutes of use.
- Turn control dial to OFF position and allow it to cool for 20 minutes.
- Wearing oven mitts, grasp each of the liner handles carefully to lift and remove ceramic pot from the base unit; pour out the water from the stoneware liner.
- Rinse the ceramic pot in cold water, dry thoroughly, and replace inside the base unit.
CERAMIC POT – CARE INSTRUCTIONS
Like any ceramic, the ceramic pot may crack or break if not handled properly. To prevent damage, handle with care! WARNING: Failure to follow these instructions can cause breakage which resulting in injury or property damage.
- ALWAYS USE POTHOLDERS OR OVEN MITTS WHEN HANDLING THE HOT CERAMIC POT.
- DO NOT place the hot ceramic pot on a counter/bench top. Use the base unit to serve. Keep the ceramic pot in the base unit until fully cooled.
- DO NOT place/use the ceramic pot on any range top burner, under a broiler, microwave browning element, or in a toaster oven.
- DO NOT strike utensils against rim of the ceramic pot to dislodge food.
- DO NOT use the ceramic pot to make popcorn, caramelize sugar, or make candy. This will damage/crack the ceramic pot.
- DO NOT use abrasive cleaners, scouring pads, or any object that will scratch the ceramic pot liner or accessories.
- DO NOT use or repair any liner or lid that are chipped, cracked, or broken.
- DO NOT use the ceramic pot for reheating food or for general food storage.
- Always place food into the ceramic pot at room temperature; then place the pot into the base unit before turning it ON.
- NEVER heat the ceramic pot when empty.
OPERATING INSTRUCTIONS
CAUTION: Handle with care, the ceramic pot will be hot after cooking. When the ceramic pot is filled and positioned in the base unit, the Slow Cooker is heavy. If the unit needs to be moved to a final serving position after cooking, use oven mitts, remove the filled cooking pot carefully from the base unit. Move the empty base unit to its final serving position.Then transfer the ceramic pot to position in the base unit.
- Prepare recipe according to instructions.
- Place food into the ceramic pot and cover it with the glass lid. DO NOT FILL ABOVE THE MAX. LEVEL MARK ONTHE CERAMIC POT. For best results, the Slow Cooker should be at least half filled. When cooking soups or stews, allow a 2-inch space between the food and the top of the cooking pot, so ingredients can come to a simmer.NOTE: When cooking meat and vegetable combinations, place the vegetables in the bottom of the ceramic pot first. Then add the meat and other ingredients.NOTE: When cooking on HIGH, check cooking progress periodically, as some soups may come to boil. Remember that frequent lifting of the lid during cooking delays the cook time.WARNING: The ceramic pot CANNOT stand the shock of sudden temperature changes. If the pot is hot, DO NOT add cold food. Before cooking frozen food, add some warm water.
- Connect the supply cord plug into a 220-240V AC electrical power outlet.
- Turn the appropriate control dial to select temperature setting: LOW or HIGH.
- Cook according to recipe instructions.
- When cooking time is complete, turn the control dial to WARM to keep cooked food warm for serving.
- To serve, using oven mitts, carefully remove the glass lid by grasping the lid knob and lifting the lid slightly away from your body. This will allow the steam to escape before removing the lid. Allow a few seconds for all steam to escape.
- Allow the Slow Cooker to cool completely before cleaning, see Care & Cleaning Instructions.
- When the appliance is turned OFF and unplugged, the Slow Cooker base unit and ceramic pot will remain hot for some time after use; allow the appliance to cool completely before cleaning or storing.
HINTS FOR SLOW COOKING
- Less tender, cheaper cuts of meat are better candidates for slow cooking than more expensive cuts.
- Meats will not brown during the slow cooking process. Browning fatty meats will reduce the amount of fat and help to preserve color while adding richer flavor. Heat a small amount of oil in a skillet and brown meats prior to putting into the ceramic pot.
- Whole herbs and spices flavor better in slow cooking than crushed or ground.
- When cooking in a Slow Cooker, remember that liquids do not boil away like they do in conventional cooking. Reduce the amount of liquid in any recipe that is not designed for a Slow Cooker. The exceptions to this rule would be rice and soups. Remember, liquids can always be added at a later time if necessary. If a recipe results in too much liquid at the end of the cooking time, remove the cover and re-program the Slow Cooker to continue to cook HIGH for 1 hour. Check every 15 minutes until the amount of liquid is reduced. Turn the control dial to OFF when the desired consistency is achieved.
- Most recipes that call for uncooked meat and vegetables require about 6 to 8 hours on a LOW-temperature setting.
- The higher the fat content, the less liquid needed. If cooking meat with a high fat content, use thick onion slices under it so that the meat will not sit and cook in the fat. If necessary, use a slice of bread, a spoon, or a straining spoon to skim off excess fat from top of foods before serving.
- Foods cut into uniform pieces will cook faster and more evenly than foods left whole such as roast or poultry.
- Always use a meat thermometer to determine if meats have been cooked to proper temperature.
- Root vegetables such as carrots, potatoes, turnips, and beets require longer cooking time than many meats. Place them on the bottom of the Slow Cooker and cover with liquid. Check to see they are fork-tender when meat temperature is reached. Remove meat and continue cooking vegetables if necessary.
- Add fresh dairy products (milk) sour cream or yogurt prior to serving. Evaporated milk or condensed creamed soups may be added at the start of cooking.
- Rice, noodles, and pasta are not recommended for long cooking periods. Cook them separately and then add to the
- Slow Cooker during the last 30 minutes of cooking.Cooking times:LOW setting – 6 to 8 hoursHIGH setting – 4 to 6 hours
USER MAINTENANCE INSTRUCTIONS
This appliance requires little maintenance. It contains no user-serviceable parts. Do not try to repair it yourself. Any servicing requiring disassembly other than cleaning must be performed by a qualified appliance repair technician only or the appliance must be disposed.
CARE&CLEANING INSTRUCTIONS
CAUTION: NEVER IMMERSE BASE UNIT OR CORD IN WATER OR OTHER LIQUID.
- Always unplug and allow to cool down completely before cleaning.
- The ceramic pot and tempered glass lid can be used in a dishwasher. To avoid damage, put the ceramic pot and glass lid in the dishwasher rack so that it will not hit other items during cleaning. To clean by hand, wash the ceramic pot and glass lid in warm, soapy water.
- Avoid sudden, extreme temperature changes. For example, do not place the hot ceramic pot into cold water or onto a wet surface.
- Avoid hitting the ceramic pot and glass lid against hard surfaces. CAUTION: Do not use the ceramic pot or the glass lid if chipped, cracked, or severely scratched.
- If food sticks to the ceramic pot liner, fill it with warm soapy water and allow to soak before cleaning. A paste of baking soda may be used with a plastic scouring pad.
- To remove water spots or mineral deposits, wipe ceramic pot with distilled white vinegar. For difficult stains, pour a small amount into the pot and allow to soak. Rinse and dry thoroughly.
- Wipe interior and exterior of the base unit with a soft, slightly damp cloth or sponge. Never use abrasive cleansers or scouring pads to clean the base unit, as they may damage the surfaces.
STORING INSTRUCTIONS
- Be sure all parts are clean and dry before storing.
- Store Slow Cooker with the ceramic pot inside the base unit.
- To protect the glass lid, it may be wrapped in a soft cloth and placed upside down over the ceramic pot.
- Store the assembled unit in the original box in a clean, dry place.
- Never store the Slow Cooker while it is hot or wet.
- Never wrap the cord tightly around the appliance; keep it loosely coiled.
TECHNICAL DATA
Model No.: WJ-5500E-SAAVoltage: 220-240V~ 50-60HzPower: 260W
RECIPES
NOTE: When slow cooking is on HIGH setting, it is very much like a covered pot on the stove top.Foods will cook on HIGH in about half the time required for LOW cooking. Additional liquid may be required as foods do boil on HIGH setting.
Lemon Roasted Chicken
1.3 to 1.8 kg chicken60g onion, chopped25g butterjuice of 1 lemon10g fresh parsley4g salt4g thyme4g paprika
Rinse the chicken well and pat dry; remove any excess fat.Place the onion in the cavity of the chicken and rub the skin with the butter.Place the chicken in the slow cooker.Squeeze the lemon juice over the chicken and sprinkle with the remaining seasonings.Cover and cook on Low for 10 hours or on High for 6 hours.
SPICY PORK & POTATO STEW
1kg pork shoulder roast, trimmed and chopped into 1-in. cubes13g bacon drippings (may substitute vegetable oil)20g small red potatoes250g onions, chopped3 fresh poblano peppers, seeded, chopped2 fresh jalapeno peppers, minced (remove seeds and ribs for less heat)6 cloves garlic, minced2 dried bay leaves0.88kg cups chicken broth1 (0.4kg) can stewed tomatoes, Mexican15g chili powder45g Saizon® Mexican Seasoning5g dried oregano, crushed2g cayenne pepper, more or less to taste50g chopped fresh parsleyAdd drippings to a large, heavy skillet over high heat.Brown the meat in 2 batches, then transfer to a brown paper bag to drain the fat.Cut potatoes in half. Arrange potatoes, onions, peppers in bottom of the ceramic pot.Place meat over vegetables.In a separate bowl, combine the remaining ingredients and mix well.Pour mixture over the meat.Cover and cook on LOW for 8 to 10 hours or HIGH for 4 to 5 hours.Remove bay leaves before serving.
Butternut Squash Soup
250g onion, finely chopped1 (1.3kg) butternut squash, peeled and cubed1kg chicken broth0.38kg cups apple sauce5g salt1g ground white pepper1g ground nutmeg1g ground cloves1g curry powder1g ground coriander1g tsp. cinnamon
In a large skillet, cook the onions until transparent, then place the onions in the slow cooker.Add the squash, chicken broth, applesauce, salt, pepper, nutmeg, cloves, curry powder, coriander and cinnamon.Cover; cook on Low for 4 to 6 hours (or until squash is tender)If desired, in a food processor, process in small batches until smooth.Return soup to the slow cooker. Cook on Low for an additional 2 to 4 hours.
Vegetable Curry
4 potatoes, peeled and diced1 onion, chopped1 red pepper, chopped2 carrots, diced2 large tomatoes, chopped1 (170g) can tomato paste180g water8g curry powder8g cumin seeds2g carlic powder2g salt450g cauliflower florets1 (280g) Package frozen peas, thawed
Place the potatoes, onion, pepper, carrots and tomatoes in the slow cooker.Stir in the tomato paste, water, curry powder, cumin seeds, garlic powder, and salt.Mix well and add the cauliflower florets.Cover; cook on Low for 8 to 9 hours or on High for 4 to 5 hours.Stir in peas just before serving.
12 Month Warranty
Thank you for your purchase from Kmart.Kmart Australia Ltd warrants your new product to be free from defects in materials and workmanship for the period stated above, from the date of purchase, provided that the product is used in accordance with accompanying recommendations or instructions where provided. This warranty is in addition to your rights under the Australian Consumer Law.
Kmart will provide you with your choice of a refund, repair, or exchange (where possible) for this product if it becomes defective within the warranty period. Kmart will bear the reasonable expense of claiming the warranty.This warranty will no longer apply where the defect is a result of alteration, accident, misuse, abuse, or neglect.
Please retain your receipt as proof of purchase and contact our Customer Service Centre on 1800 124 125 (Australia) or 0800 945 995 (New Zealand) or alternatively, via Customer Help at Kmart.com.au for any difficulties with your product. Warranty claims and claims for expense incurred in returning this product can be addressed to our Customer Service Centre at 690 Springvale Rd, Mulgrave Vic 3170.
Our goods come with guarantees that cannot be excluded under the Australian Consumer Law. You are entitled to a replacement or refund for a major failure and compensation for any other reasonably foreseeable loss or damage. You are also entitled to have the goods repaired or replaced if the goods fail to be of acceptable quality and the failure does not amount to a major failure.
For New Zealand customers, this warranty is in addition to statutory rights observed under New Zealand legislation.
[xyz-ips snippet=”download-snippet”]