![]()
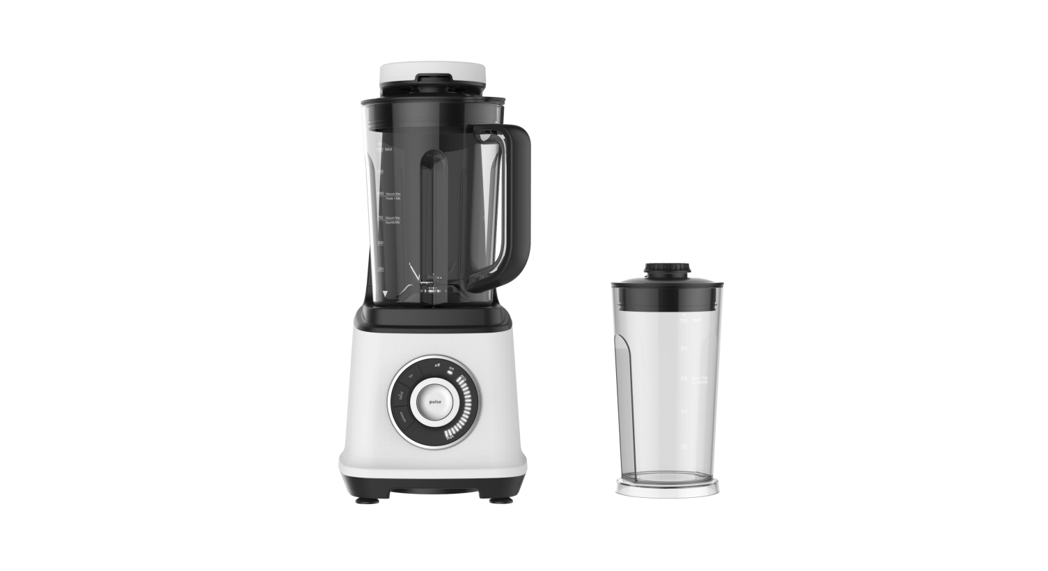
Vacuum Blender404201User Manual
 |
 |
PLEASE READ AND SAVE THESEINSTRUCTIONS FOR FUTURE REFERENCE
IMPORTANT SAFEGUARDS
PLEASE READ AND SAVE THIS INSTRUCTION
When using the electrical appliance, the following basic safety precautions should always be followed:
- Read all instructions carefully and retain this manual for future reference.
- Remove all packaging and any labels from the appliance before use.
- The blades in the blender are very sharp. Handle carefully.
- Keep hands and utensils out of the blender jar while blending or away from the blades to reduce the risk of severe injury and/or damage to the vacuum blender.
- Before removing the Blending Jar, switch OFF the appliance first and wait until the blades have completely stopped moving.
- Do not operate any appliance with a damaged cord or plug, or after the appliance malfunctions, or is dropped or damaged in any manner.
- CAUTION: Do not leave your vacuum blender unattended whilst it is operating.
- Do not let the cord hang over the edge of tables, counters, or touch hot surfaces.
- Only use attachments that are recommended or supplied with the product.
- Do not use the appliance outdoors.
- Do not use the appliance if any of the parts are damaged.
- When cleaning, do not submerge the Main Body (with electrical parts) in water or other liquid; instead use a soft, wet cloth to wipe down the appliance. The vacuum blender Main Body is NOT dishwasher safe.
- To protect against the risk of electrical shock, do not put a cord, plug, or appliance in or near water or other liquids.
- Do not use the appliance if any of the parts are damaged.
- If the supply cord is damaged. DO NOT use. For electrical safety, any repairs to the product should only be carried out by a qualified electrical person only or the product must be disposed.
- Keep appliances away from children when in use.
- IMPORTANT! Unplug the appliance from mains power when not in use, during assembly, during disassembly, and before cleaning.
- Avoid contact with moving parts.
- Do not place the appliance on or near a hot gas plate, hot electric burner, or in a heated oven.
- Please do not place hot ingredients with a temperature higher than 40℃ into the Blending Jar.
- Do not overfill the Blending Jar past the MAX line. Do not operate the appliance without ingredients.
- Make sure your electricity rating is the same as the rating label shown on the appliance.
- This appliance is not intended for use by persons (including children) with reduced physical, sensory, or mental capabilities, or lack of experience and knowledge unless they are provided with supervision and instructions concerning the use of the appliance by a person responsible for their safety.
- Children should be supervised to ensure that they do not play with the appliance.
- To reduce the risk of electric shock, the plug should only be connected to a proper main power outlet.
- Care is needed when handling cutting blades, especially when removing the blade from the jar, emptying the jar, and during cleaning.
- CAUTION: In order to avoid a hazard due to inadvertent resetting of the thermal cut-out, this appliance must not be supplied through an external switching device, such as a timer, or connected to a circuit that is regularly switched on and off by the utility.
- Be careful if hot liquid is poured into the food processor or blender as it can be ejected out of the appliance due to a sudden steaming.
- This appliance is intended to be used in household and similar applications such as:– staff kitchen areas in shops, offices, and other working environments;– farmhouses;– by clients in hotels, motels, and other residential-type environments.– bed and breakfast type environments.
- Always disconnect the blender from supply if it is left unattended and before assembling, disassembling, or cleaning.
Note: The appliance is incorporated with a self-resetting thermal motor protection circuit to protect the motor from overheating. If the motor shuts OFF while in use, unplug the unit from the main power outlet. Remove the lending jar from the motor unit and free the blade of any obstructions. Allow the unit to cool down for at least 1 hour. After then, connect the supply cord plug it back into mains power for normal operation.
SAVE THESE INSTRUCTIONS FOR HOUSEHOLD USE ONLY
PARTS AND FEATURES
 |
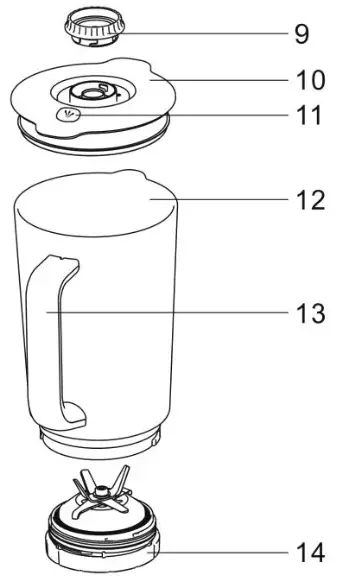 |
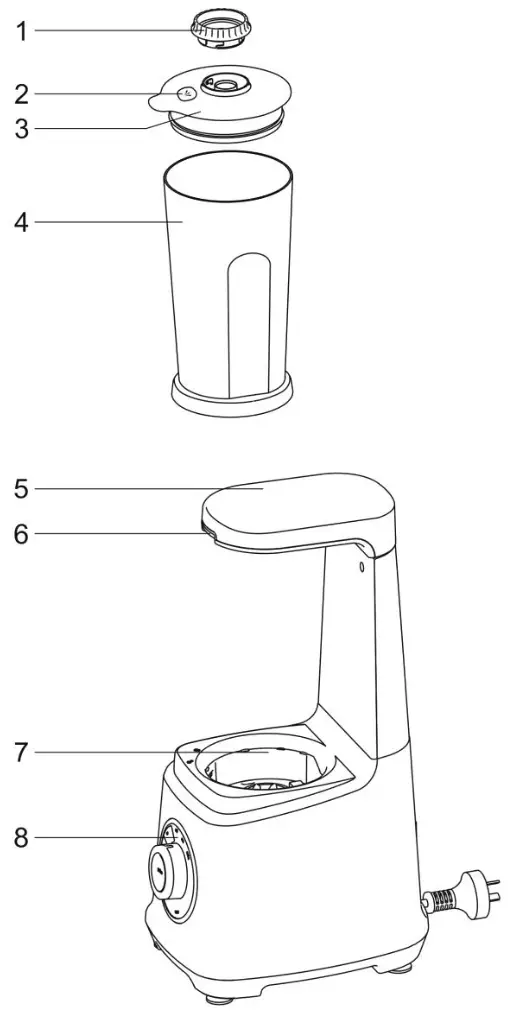
| 1. Storage Jar Filter Cap2. Air Release Button for Storage Jar3. Storage Jar Lid4. Storage Jar5. Upper Cover6. Filter Cap Lock/Release paddle7. Main Body | 8. Control Panel (refer to control panel featuresbelow)9. Blending Jar Filter Cap10. Blending Jar Lid11. Air Release Button for Blending Jar12. Blending Jar13. Blending Jar Handle14. Blade Assembly |
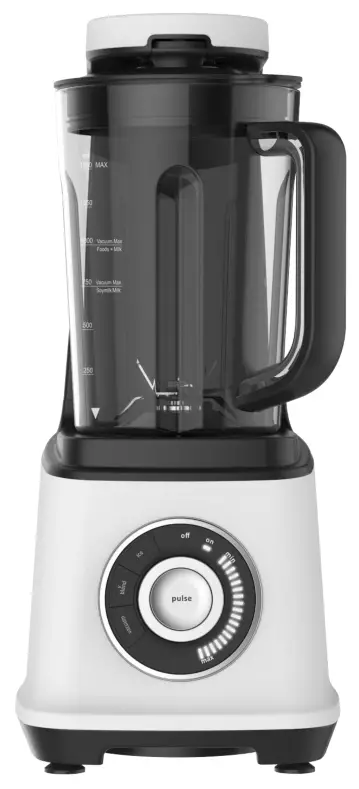
Control Panel Features:
 Ice buttonThe blender will start crushing ice cubes when pressed.
V Blend button (vacuum +blending)The blender will function sequentially when this button is pressed (Vacuum first and then blending).
Vacuum buttonThe air inside the container will be sucked out when this button is pressed.
Off To switches the blender OFF.OnTo switch the blender ON.Speed Control Dial for BlendingBlending speed can be controlled from min to max by rotating the dial clockwise.Min. is the lowest speed.Max-Highest speed
Pulse ButtonHighest speed, as long as you press this button.
Blending Jar
The Blending Jar is for vacuuming and blending ingredients. It is assembled and ready for use. However, you may disassemble the Blending Jar for cleaning. The Blending Jar can be used in the dishwasher for cleaning.NOTE: The Blending Jar cannot be used for vacuum storage. It is for Vacuum + Blending only.
Storage Jar
The Storage Jar is not meant for blending ingredients, it is for storing and re-vacuuming your previously blended beverage. The Vacuum Storage Jar can be used in the dishwasher for cleaning.
BEFORE USING IT FOR THE FIRST TIMEBefore using the appliance and accessories for the first time, thoroughly clean and dry all parts. This will remove any residue from the manufacturing process. Refer to cleaning and maintenance instructions on page 10.
USING YOUR VACUUM BLENDER
WARNING! To prevent scalding, DO NOT process boiling liquids or hot ingredients in the blender. Allow hot ingredients to cool down below 40ºC before placing them in the blender.
Assembly & Use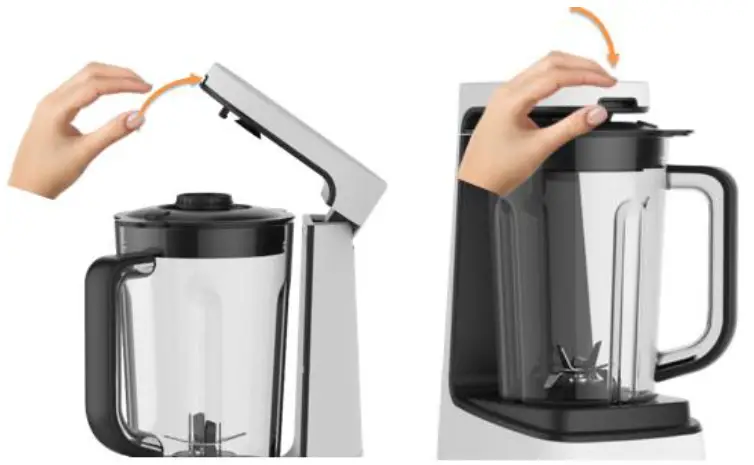
1. Place the appliance on a stable and level non-slip surface. Unwind the power cord and open the upper cover by pulling up the Filter Cap Release Paddle.2. Add the ingredients to the blending jar, fit the blending jar lid with the lid spout to align in place. Check the Filter Cap is installed and locked in place.
3. Install the blending jar or storage jar into the main body. Align ▼ on the blending jar to the ![]() on the Main body base. Rotate the blending jar clockwise to lock in place, align the mark ▼ pointing to
on the Main body base. Rotate the blending jar clockwise to lock in place, align the mark ▼ pointing to ![]() .
.
4. Press down the Upper Cover and make sure the Filter cap lock/release paddle hooks the vacuum valve of the lid so that the switch on the cap can be activated. You will hear a click sound once it is placed and closed correctly.5. Connect the supply cord into a mains power outlet socket. Turn the rotary selector to ON, the appliance will enter the standby mode with program indicator lights (on, ice, v-blend, the vacuum will light up) to indicate that the appliance is ready for use. You can then choose the preferred functions.
Using the functions
Ice:The ice function on the blender is programmed to crush the ice. Use ice cubes approx. 2cm x 2cm x 2cm in size, remove the blending jar lid, and place the ice cubes not more than 200g into the jar. Press the “ice” button to start the ice-crushing function.
NOTE: for best results add a bit of water when crushing ice.
Please note:– During this function, the motor works for 1 minute for the entire cycle.– Pressing the ICE button again or setting the rotary switch to OFF will cancel this function.– When the program is finished, you will hear 1 beep and all 4 indicator lights will be ON. – Pull up the Filter Cap Lock/Release Paddle to open the Upper Cover and rotate the blending jar anticlockwise to remove from the jar from the base.– Do not blend dry ingredients (for example peppercorn or star anise).– Do not blend without any contents in the blending jar. This can damage the electric motor in the blender.
V BlendPress the “v blend” button, the vacuum blender will vacuum first and then blend for 1 minute before stopping.
Please note:– When the vacuum level of the jar reaches to the standard preset value, the vacuum pump will stop automatically. You will hear 1 beep sound and then it will automatically enter into the blending procedure. After 1minute of blending, the blender will stop automatically and go into the standby mode and all 4 indicator lights will be on.– Set the rotary program to OFF, pull up the Filter Cap Lock/Release Paddle to open the Upper Cover, and rotate the blending jar anticlockwise to remove the jar from the base.– When removing the jar lid, press the air release button on the top of the jar lid to release the suction pressure (until no airflow sound). This will allow sufficient air into the jar allowing easy removal of the jar lid.
CAUTION:
- Please make sure the jar lid is placed correctly with the sealing ring covering the jar spout. Otherwise, it may lead to air leakage.
- If there is an air leakage problem like not sealing properly, the preset vacuum level would not reach. In this case, there will be all indicator lights flashing and the warning buzzer will activate. Ensure the blade assembly with sealing ring is screwed tightly into the jar bottom opening and the lid is properly placed and sealed before proceeding.
- If the jar is not placed and locked onto the base correctly, or the blade assembly is not screwed in place, the blender will not function. Make sure the jar and blade assembly are locked in place correctly.
- Do not blend dry ingredients (for example pepper, beans, corn, or star anise)
Vacuum
The vacuum function on the blender is programmed to vacuum ingredients in either the Blending Jar or Storage Jar. This function is only for vacuuming. Press the “vacuum” button, the vacuum pump draws the air out of the container until the preset vacuum level is reached. At the end of the vacuum process, the machine will beep once, and all 4 indicator lights will be ON.
Please note:– When the vacuum level in the jar reaches to the standard preset value, the vacuum pump will stop automatically, and the machine will go into standby mode.– Set the rotary program to OFF, pull up the Filter Cap Lock/Release Paddle to open the Upper Cover, and rotate the blending jar anticlockwise to remove it from the base.– When removing the jar lid, press the air release button on the top of the jar lid to release the suction pressure (until no airflow sound). This will allow sufficient air into the jar allowing easy removal of the jar lid.
CAUTION:
1. Please make sure the jar lid is placed correctly with the sealing ring covering the jar spout. Otherwise, it may lead to air leakage.2. If there is an air leakage problem like not sealing properly, the preset vacuum level would not reach. In this case, there will be all indicator lights flashing and the warning buzzer will activate. Ensure the lid is properly placed and sealed before proceeding.
PulseIn this program, the blender works at the highest speed as long as the button is held pressed. At the same time, all the speed status display lights will light up until the pulse button is released from being pressed. To remove the jar, pull up the Filter Cap Lock/Release Paddle to open the Upper Cover and rotate the blending jar anticlockwise to remove it from the base.Note: If the Pulse button is pressed for more than 25 seconds, the machine will enter to standby mode automatically.Note: Do not blend dry ingredients (for example pepper, beans, corn, or star anise)
Min-Max (Speed Control Dial for Blending)IMPORTANT! The maximum operating time per cycle must not exceed 2 minutes 30 seconds. Allow a minimum of 5 minutes of rest time between two consecutive cycles to prevent damage to the electric motor. The appliance must rest for at least 1 hour after 10 cycles.
This program is for continuous adjustment of the blending speed. Min means the motor works at the lowest speed. Max means motor works at the highest speed.
Turn the rotary selector to ON, the appliance will enter the standby mode with the program indicator lights (on, ice, v-blend, the vacuum will light up) to indicate that the appliance is ready for use.
Rotate the rotary selector clockwise to the required speed level. The higher the speed, the more speed status display lights will be lit. The maximum working time is 2 minutes and 30 seconds. To remove the jar, pull up the Filter Cap Lock/Release Paddle to open the Upper Cover and rotate the blending jar anticlockwise to remove it from the base.
Please note:– If there is no function selected or disconnecting the blender from mains power, the vacuum blender will enter sleep mode and all indicator lights will go off. During sleep mode, pressing any function button will wake the blender and go into standby mode.– When the blender is not in use, turn the rotary selector to OFF, disconnect the blender from mains power. Always keep the blender in a clean and dry environment after use and when storing.– Do not blend dry ingredients (for example pepper, beans, corn, or star anise)
TIPS & TRICKS
- Do not add liquids or foods above 40℃.
- Do not blend tough or hard foods without adding sufficient liquid.
- Do not blend dry ingredients (for example pepper, beans, corn, or star anise)
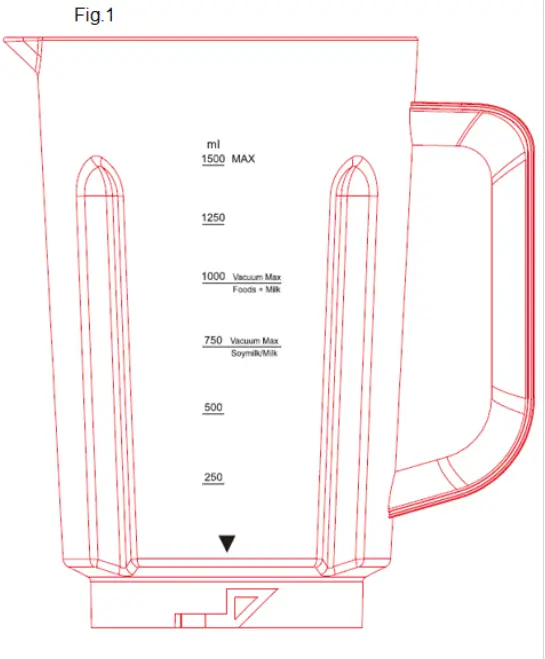
- Do not put more than 1500ml (ref fig. 1) of liquid in the blending jar, especially when blending at a high speed.
- Do not put more than 1000ml in the blending jar when you vacuum the ingredients with both mixed food and milk that tend to foam. Do not put more than 750ml in the jar when using a vacuum for milk or soymilk that tends to foam. If the bubbles/foam expands beyond the Vacuum Max indicator mark, stop the vacuum process immediately.
- For better flavor, it is recommended to vacuum first and then blend the ingredients. Or use the “V Blend” auto program directly. Blending first and then proceeding to vacuum does not provide the best results and may cause blockage in the vacuum system.
- When using the min-max speed dial control switch at Min speed for blending ingredients, the blade might get stuck if you add too much or hard food. If this happensrotate the speed control switch clockwise to increase the blending speed from low to high.
- Always make sure the lid is properly closed and assembled on the jar before you switch on the appliance.
- Make sure the vacuum lid is completely dry before use.
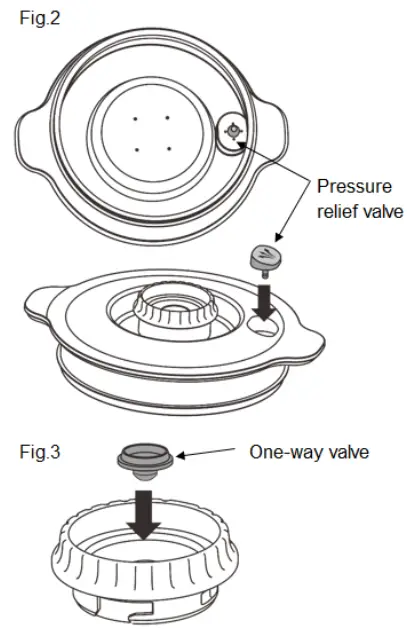
- To ensure the quality of vacuum pumping, make sure that the pressure relief valve (Fig.2), filter cap, and one-way valve (Fig.3) are free of impurities or water before use.
- To ensure the quality of vacuum pumping, make sure the blade assembly is tightly in place before use.
IMPORTANT! Always turn the knob to ON and then press the desired function button for allfunctions.
CLEANING & MAINTENANCE
The appliance and the individual parts must be thoroughly cleaned after each use.
- Unplug the appliance from mains power before cleaning.
- The blades on this appliance are very sharp. Do not touch the blades while cleaning the appliance in order to avoid injury.
- Do not use abrasive cleaning products or detergents to clean your vacuum blender.
- DO NOT submerge the Main Body in any liquid or water. Simply wipe down the Main Body with a dry or damp cloth.
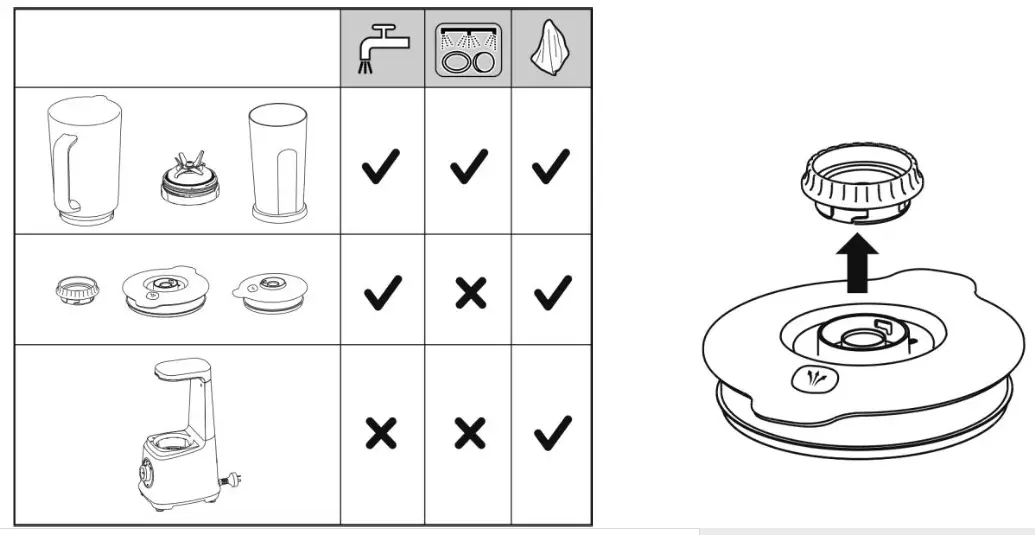
- Follow the below cleaning chart for the vacuum blender parts when cleaning.
IMPORTANT! Do not immerse the Jar Lid assembly into the dishwasher or water, this may allow water to be sucked into the vacuum system and damage the appliance.When cleaning the Jar lid assembly, take off the Filter Cap from the Jar Lid and clean it separately with flowing water. After cleaning the Lid and Filter Cap, dry it thoroughly before assembling them again for next use.
- Store the appliance in a dry and cool location.
TECHNICAL SPECIFICATION
Voltage: 220-240V~ 50-60Hz Power: 800W
RECIPES
Yogurt cherry with red bell pepper (serves 2 person)– 200ml Water– 200ml Yoghurt– 1pc Red bell pepper (stalk and seeds removed)– 24pcs Cherry (seed removed frozen)– 1pc Blood orange (peeled)– 1pc Lime (peel removed) Directions:– Add all ingredients into the blending jar.– Fit the lid and put the jar into the main unit, locking it in place. Close the Upper Cover and press right down until you hear a “click” sound.– Press the V blend button. The automatic program applies a vacuum to the blending jar and blends all ingredients automatically.– The automatic program ends automatically after preparation. Pour the finished smoothie into the glasses and serve.
Strawberry red cabbage with carrot and coconut
Serves 2 persons– 400ml Coconut milk– 150g Red cabbage– 1pc Carrot– 20pcs Strawberry (crown removed,- 1pc Lime (peel removed) Directions:– Add all ingredients into the blending jar.– Fit the lid and put the jar into the main unit, locking it in place. Close the Upper Cover and press right down until you hear a “click” sound.– Press the V blend button. The automatic program applies a vacuum to the blending jar and blends all ingredients automatically.– The automatic program ends automatically after preparation. Pour the finished smoothie into the glasses and serve.
Papaya-mango with lemon
Serves 2 persons– 200ml Water– 200ml Ice cubes– 1pc blood orange– 0.5pc Papaya (peel and seeds removed)– 1pc Mango (peeled and seed removed)– 1pc Yellow apple (core removed)– 1pc Lemon (peel removed) Directions:
– Peel the remove the seeds for the papaya, mango and cut them into small cubes. Remove the core from the apple and cut it into small cubes.– Add all ingredients into the blending jar.– Fit the lid and put the jar into the main unit, locking it in place. Close the Upper Cover and press right down until you hear a “click” sound.– Press the V blend button. The automatic program applies a vacuum to the blending jar and blends all ingredients automatically.– The automatic program ends automatically after preparation. Pour the finished smoothie into the glasses and serve.
12 MONTH WARRANTY
 report this ad
Thank you for your purchase from Kmart.
Kmart Australia Ltd warrants your new product to be free from defects in materials and workmanship for the period stated above, from the date of purchase, provided that the product is used in accordance with accompanying recommendations or instructions where provided. This warranty is in addition to your rights under the Australian Consumer Law.
Kmart will provide you with your choice of a refund, repair, or exchange (where possible) for this product if it becomes defective within the warranty period. Kmart will bear the reasonable expense of claiming the warranty. This warranty will no longer apply where the defect is a result of alteration, accident, misuse, abuse, or neglect.
Please retain your receipt as proof of purchase and contact our Customer Service Centre on 1800 124 125 (Australia) or 0800 945 995 (New Zealand) or alternatively, via Customer Help at Kmart.com.au for any difficulties with your product. Warranty claims and claims for expenses incurred in returning this product can be addressed to our Customer Service Centre at 690 Springvale Rd, Mulgrave Vic 3170.
Our goods come with guarantees that cannot be excluded under the Australian Consumer Law. You are entitled to a replacement or refund for a major failure and compensation for any other reasonably foreseeable loss or damage. You are also entitled to have the goods repaired or replaced if the goods fail to be of acceptable quality and the failure does not amount to a major failure.
For New Zealand customers, this warranty is in addition to statutory rights observed under New Zealand legislation.
[xyz-ips snippet=”download-snippet”]