![]()
Vacuum Cleaner with UV LampFor Household Use OnlyModel No.: VC-C001Rev 3

Note: The specifications and/or components of this appliance are subject to change without prior notice.If any Accessories should fail during use, please call 1300 105 888 (Australia) or 09 8870 447 (New Zealand) for an immediate replacement. This will save you from returning the product to the store.If we can assist you in any other way, please feel free to contact us
Warnings
Before using this appliance, read and follow all warnings and instructions in this manual, even if you are familiar with this product.This appliance is not intended for use by persons (including children) with reduced physical, sensory or mental capabilities, or lack of experience and knowledge unless they have been given supervision or instruction concerning the use of the appliance by a person responsible for their safety.Children should be supervised to ensure that they do not play with the appliance.
Safety Directions
 Please read this instruction manual carefully before first use. It is advisable to keep this instruction manual for future reference.
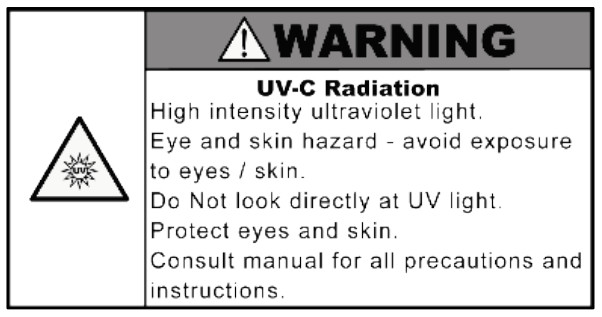
 WARNING
– This appliance contains a UV-C emitter.
– Unintended use of the appliance or damage to the housing may result in the escape of dangerous UV-C radiation. UV-C radiation may, even in little doses,cause harm to the eyes and skin.– DO NOT for any reason look at or touch the UV-C lamp when activated.– Reflected germicidal ultraviolet rays are harmful to the eyes and the skin of both humans and animals.– DO NOT try to vacuum animals, humans or plants with this appliance.– Appliances that are obviously damaged must not be operated.– The UV-C emitter (UV Lamp) is not replaceable.– Disconnect the appliance from the power supply before carrying out any maintenance.– NEVER put a hand, or any other body part under the appliance while it is in use.– Caution as the UV Lamp will remain hot for a short period after use.– Caution The vacuum cleaner handle contains electrical connections. The handle is not a serviceable part.DO NOT vacuum water, wet objects, liquids, ashes, hot coals, cigarette butts, matches or any hot, smoking or burning objects, etc.
DO NOT pick up flammable or combustible materials (i.e., lighter fluid, petrol, kerosene, etc.) or use in the presence of explosive liquids or vapour.DO NOT pick up toxic material (i.e., chlorine bleach, ammonia, drain cleaner, etc.)DO NOT vacuum Toner (for a laser printer, copy machines etc.) as there is a risk of fire and explosion.DO NOT vacuum plaster dust, cement dust, etc. as the filter will block very quickly.DO NOT store or use the appliance near high-temperature areas.DO NOT run over the power cord with the vacuum cleaner.DO NOT use the vacuum cleaner if it is blocked. Turn off, unplug and clear all blockages before continuing.DO NOT use the vacuum cleaner with a blocked filter. Clean filter before continuing. (refer to User Maintenance section).DO NOT use the vacuum cleaner if the appliance malfunctions, abnormal noise, smell, smoke, is dropped or damaged in any manner or any breakage is found during operation. For electrical safety, any repairs to the product must be performed by a qualified electrical person only, or the product must be disposed of.DO NOT misuse the power cord. Never pull the appliance by the power cord or pull to disconnect it from the outlet. Instead, grasp the plug body and pull to disconnect.DO NOT use the vacuum cleaner to pick up large objects, hard or sharp objects such as glass, nails, screws, coins, etc. that are likely to cause damage.DO NOT use a damaged power cord or plug.If the supply cord is damaged, it must be replaced by the manufacturer, its service agent or similarly qualified persons in order to avoid a hazard.DO NOT use vacuum cleaner if it has been dropped, damaged, left outdoors, or dropped into liquid (water etc.)DO NOT handle vacuum cleaners with wet hands.DO NOT put any objects into openings.DO NOT use with any openings blocked and do not restrict airflow.DO NOT use without the filter in place.DO NOT attempt to modify this product in any way.DO empty the Dust Canister regularly for optimal operation of the vacuum.DO keep hair, loose clothing, fingers, feet and body parts away from openings or moving parts.DO disconnect the vacuum cleaner from the power supply when not in use.DO use only on dry surfaces.DO use only as described in this manual. Use only the manufacturer’s recommended attachments.DO Keep the power cord away from heated surfaces.DO Keep all openings free of dust, lint, hair, and anything that may reduce airflow.DO keep your work area well lit.DO store your appliance indoors in a cool dry area.DO ensure children and babies cannot play with plastic bags or any packaging materials.DO operate the vacuum cleaner from a power source of the same voltage, frequency and rating as indicated on the product identification plate.
Important: Prior to cleaning or other maintenance, the appliance must be disconnected from the supply mains.
WARNING
DO NOT tamper with, or try to bypass the Safety switches which are built into the three wheels on the head.
The Safety switches are to turn off the UV-C Lamp should the vacuum cleaner be tilted over too far, or lifted off the surface exposing yourself or bystanders to the harmful UVC light.
ALWAYS check the safety lamp wheels are free from objects/lint or anything else that may affect their up and down operation BEFORE turning the unit on.
ONLY for domestic use. Industrial or commercial use invalidates the warranty.
If for any reason you do look directly into the UV light or touch the UV tube and experience any discomfort, contact your GP or hospital immediately for advice.
Read and Save These Instructions
Transporting your Vacuum
To move your vacuum cleaner from room to room, unplug the unit and carry using the carry handle.Never pull or carry the vacuum cleaner by its power cord.
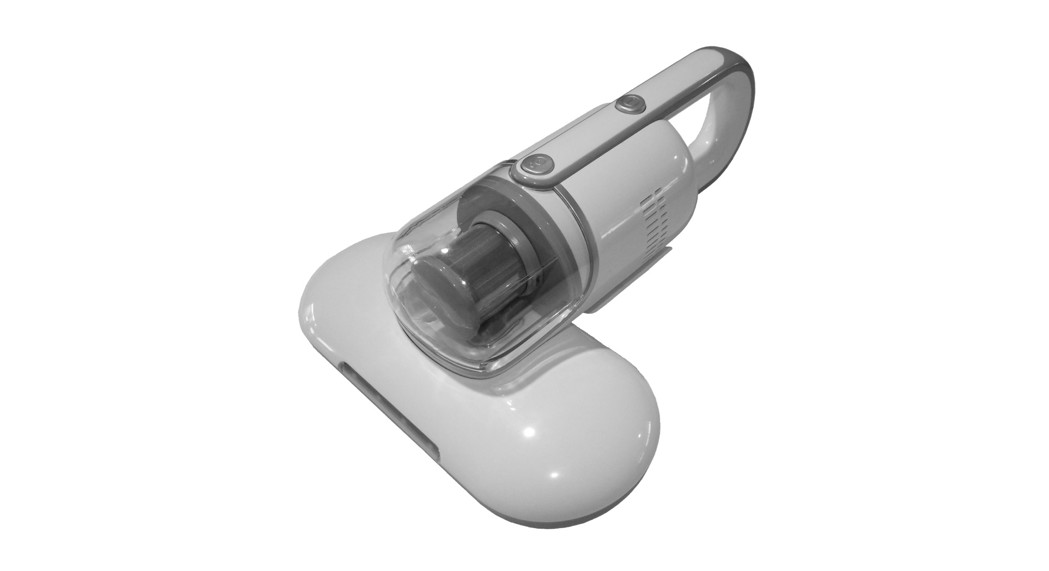
Components

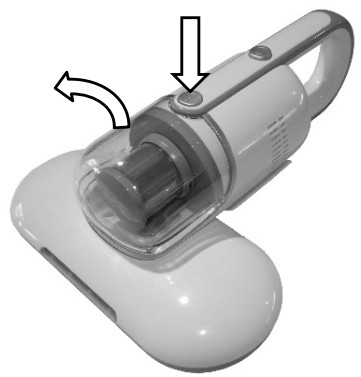
| 1 | On / Off Button | 6 | Head |
| 2 | Handle | 7 | LED Headlights |
| 3 | Rear Wheel | 8 | Dust Canister |
| 4 | Power Cord and Plug | 9 | Filters (inside) Dust Canister |
| 5 | Cleaning brush | 10 | Dust Canister Release Button |
Components cont.
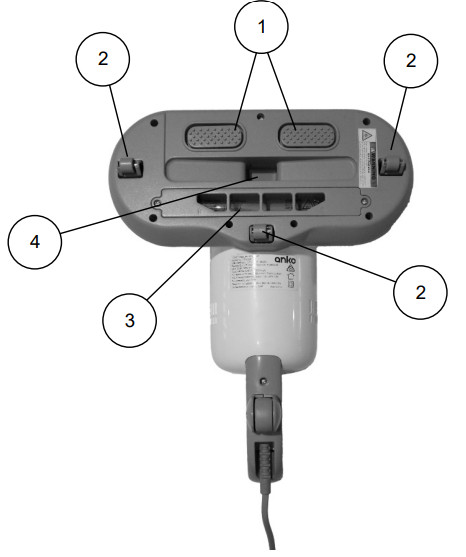
| 1 | Vibratory Pads | 3 | UV-C Emitter (light tube) |
| 2 | UV Lamp Safety Switches i Wheels | 4 | Suction Hole |
Note: The specifications and/or components of this appliance are subject to change without prior notice
Product Features
- Sterilising function of the UV-C lamp targets up to 99.9% of all bacteria.
- An ideal device to remove bacteria from your mattress and eliminate mites from your home.
- Perfect for cleaning and treatment of the fabric of your sofa, curtains, rugs and mats.
- Can be used for thorough cleaning of cat and dog baskets.
- Ideal for allergy sufferers.
- There are two vibratory pads underneath the head which agitate the surface being cleaned for better dust and mite extraction.
Using the UV Vacuum Cleaner
NOTE: The UV lamp and LED headlights will only turn on when all three UV safety switches (wheels) underneath the head are in full downward pressurecontact with the surface to be cleaned.
If the LED headlights are not on, then the UV light will not be on.You may also be able to see a faint blue colour glow emitting from underneath the vacuum cleaner head when in use.
On / Off
To use the Vacuum Cleaner, press and release the On / Off button on top of the handle to start the vacuum cleaner.
NOTE: The UV lamp and LED headlights will only turn on when all three UV safety switches (wheels) underneath the head are in full downward pressurecontact with the surface to be cleaned.
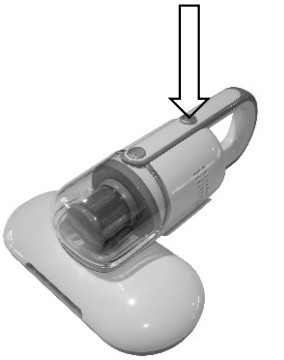 To turn off, press and release the On / Off button again.
Vacuuming / Sterilising.
In order that the UV lamp to be fully effective against dust mites and bacteria, it is important that the area is exposed to the UV-C light for adequate time.Please adhere to the following guidelines:
- It is best to start in one corner of the mattress.
- Press the unit flat against the cleaning surface.Note: The UV lamp and LED headlights will only turn on when all three UV safety switches (wheels) underneath the head are in full downward pressure contact with the surface to be cleaned. The weight of the vacuum cleaner is enough to do this.
- Ensure that the unit is moved in a smooth and steady motion.

- Ensure that every part of the mattress is covered.
- With double beds, it is advised to clean one side at a time.
- Move the UV vacuum cleaner at a speed less than 20 seconds per meter and repeat 3 times.
- It is advisable to clean both sides of the mattress, if possible.
- We suggest a similar method for bedding such as duvets and pillows.
- For older and used mattresses, it is best to clean on a daily basis for the first 7 days and then once a month thereafter.
- For new mattresses, it will be sufficient to clean once a month only.
- If cleaning rugs, mats, etc. follow the same method.

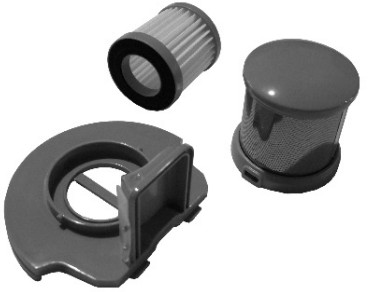
Dust Canister / Filters
For Allergy sufferers: when emptying any vacuum cleaner, it is difficult to avoid exposure to dust.To minimize this risk of exposure please ensure that you encase the dust canister in a large bag to empty it and close the bag as tightly as possible around the canister.
Important: Prior to cleaning or other maintenance, the appliance must be disconnected from the supply mains.
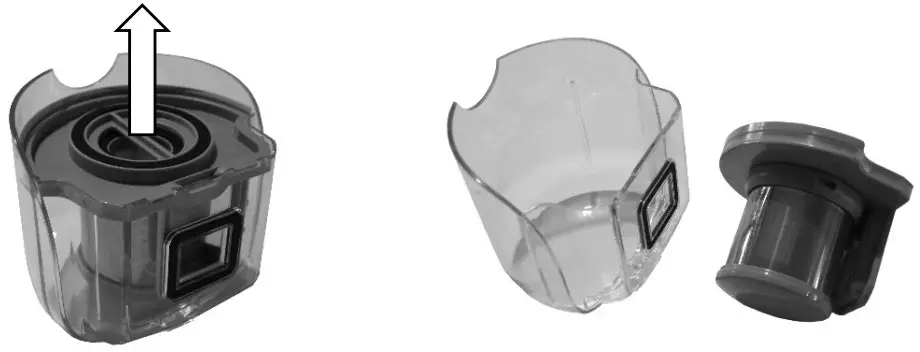
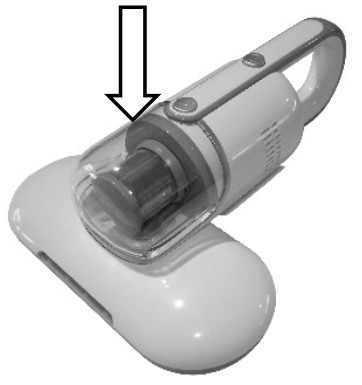
Remove the canister and close the bag as tightly and quickly as possible and dispose of this immediately.It is advisable to wear disposable clothes and a face mask while emptying the cleaner.If at all possible, ask a non-allergy sufferer to empty the dust canister for you when required.It is important that the dust canister is emptied and the filter cleaned regularly.If the filters are not cleaned regularly, the performance and function will lose their effectiveness.It is best to empty the dust canister and clean the filters after each use.To empty the dust canister, detach it from the vacuum cleaner body first.To remove the dust canister, press the release button, and at the same time, lift the dust canister up and away.
 Take the dust canister to a dustbin.
Whilst holding over the dust bin, remove the inner filter assembly by grasping the finger bar and pull straight up and away.
Tip out the contents of the dust canister into the rubbish bin and gently tap the filter assembly on the inside of the bin to dislodge the dust.
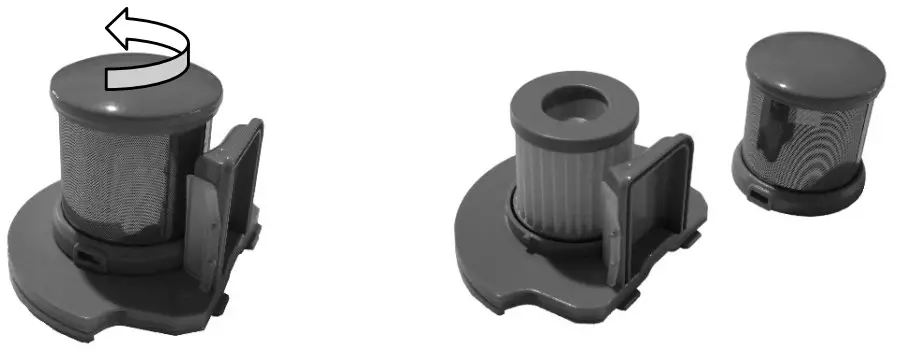
Note: At the same time, you will need to clean the filter inside the StainlessSteel Filter.
To access the inner filter, grasp the top of the Stainless-Steel filter and while holding the bottom of the assembly tight, rotate the Stainless-Steel filter anticlockwise to unlock it.Lift the Stainless-Steel filter up and away. (refer to the “Cleaning” section for how o clean)
To remove the inner filter, simply grasp it and lift it away. (refer to “Cleaning” section for how to clean)
Gently tap the edge of the filter on the inside of the bin to dislodge any dust and debris.To refit the filters, just reverse the order of disassembly.Note: if the white inner filter is damaged or worn out, replace it with a new one.Important: Ensure the black seal of the inner filter is facing down.
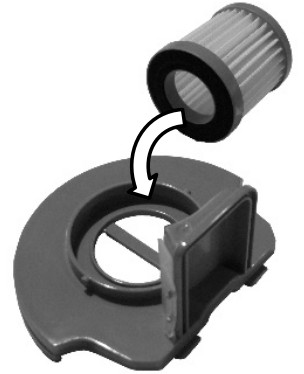
Incorrect fitment of this part will prevent the vacuum cleaner from picking up the dust, and you may damage the components.Place the filter assembly back into the dust canister and then refit it to the vacuum cleaner.Place the dust canister into the recess and push it down until it locks in place.
User Maintenance
NOTE: To maximize the performance of your vacuum cleaner, you should clean the filters regularly.Important: Prior to cleaning or other maintenance, the appliance must be disconnected from the supply mains.If the filters are broken or worn, replace them before continuing to use the vacuum.New filters can be purchased from our Customer Service department. You can call our customer service number: 1300 105 888 (Australia) and 09 8870 447(New Zealand), or via email [email protected]
Cleaning the FiltersImportant Note – The Filters must be cleaned regularly for the best suction performance and to prevent overheating and damage to your vacuum cleaner.Cleaning is best done at the same time when emptying the dust canister after you have finish vacuuming for the day.NOTE: Never use the vacuum cleaner with a wet or damp filter or without the filters fitted.Using a wet or damp filter will damage the filter, may cause serious damage to the vacuum cleaner, and will void your warranty.Only wash the white filter if it is very dirty, otherwise, just tap the edge of the filter on the inside of your bin to dislodge any dust and debris, and use thesmall brush supplied to help remove the dust and debris.Wash the Stainless-Steel filter and White filter (if needed) in warm mild soapy water, rinse in clean fresh cold water and let completely dry.DO NOT scrub the white filter or place either filter in a dishwasher.DO NOT use a hairdryer to dry the filters.The dust canister can also be washed at the same.
Cleaning the Vacuum Cleaner BodyDo not clean the vacuum cleaner and components using petrol or any other flammable liquid or solvents, etc.Clean only the outside of the vacuum cleaner.Use only a moist cloth and mild detergent for cleaning the vacuum cleaner and components.After cleaning, wipe off the moisture with a dry cloth.Do Not place any parts in a dishwasher.Do Not immerse in any Liquid.
UV Lamp
Please note that the UV Lamp is not replaceable. Should the UV Lamp be broken, or stops functioning, either dispose of the product as per your local council requirements or if still in warranty, return it to your local store.
CAUTION: Take extreme care if the glass tube is broken as it is extremely sharp and also the inside of the glass is coated in poisonous substances.
If the UV Lamp has broken, first ensure the unit is switched off and unplugged from the PowerPoint.Sweep up the large pieces and dispose of them carefully.Use a regular vacuum cleaner to pick up all the remaining glass slivers etc.
Storage
When finished using the vacuum cleaner, empty the dust canister and clean the filters.If you have washed the filters, allow all components to fully dry before storing them away.It is advised to store in a cool dry place in its original packaging so as to avoid any possibility of the fragile UV Lamp being broken.Do Not wind the power cord around the vacuum cleaner as this will damage the power cord over time and become a safety hazard.Simply loop the power cord loosely and place it next to the vacuum cleaner.
Troubleshooting
| Unit won’t turn on | Check PowerPoint to ensure power is supplied.Test PowerPoint with a table lamp or some other appliance. |
| Headlights / UV Lamp will not turn on but the motor is running | The unit must be placed down on the surface being cleaned.There are three safety switches built into the wheels underneath the head, and unless these wheels have been activated by the weight of the appliance, the Headlights and UV Lamp will not turn on.This is a safety feature to prevent the user from looking directly into the UV Light which will damage eyes and skin.If one wheel is not firmly down on the surface, the Headlights and UV Lamp will turn off. All three wheels must be firmly in contact with the surface and downward pressure applied.DO NOT tamper with these safety devices. |
| Noisy operation | Clean the Filters and empty the Dust Canister |
| Check for partial blockages and unblock. | |
| Suction Not Strong Over-heating / Stopping | Clean the Filters and empty the Dust Canister. Check for blockages and unblock |
| Over-heating / Stopping | Clean the Filters, empty the Dust Canister, check for blockages and unblock then allow it to cool for approximately 1 hour before trying to restart. |
| Static Shock | In some rare instances, some users may feel an electric discharge when touching or using the vacuum cleaner during or after use This is a well-known phenomenon of Static Electricity |
| discharge that happens mostly when the user vacuums synthetic fiber or other synthetic surfaces. It can also be more prevalent in dry and cool environments. Although the feeling of Static Electricity can be unpleasant for the user it is not dangerous and is not a fault of the vacuum cleaner. If this static discharge is a problem for the user the user could try wearing insulating footwear during vacuuming (i.e. rubber or leather soles) or increase the humidity/heat level in the surrounding environment or both. |
Warranty Against Defect
12 Month Warranty
Thank you for your purchase from Kmart.
Kmart Australia Ltd warrants your new product to be free from defects in materials and workmanship for the period stated above, from the date of purchase, provided that the product is used in accordance with accompanying recommendations or instructions where provided. This warranty is in addition to your rights under the Australian Consumer Law.Kmart will provide you with your choice of a refund, repair or exchange (where possible) for this product if it becomes defective within the warranty period. Kmart will bear the reasonable expense of claiming the warranty. This warranty will no longer apply where the defect is a result of alteration, accident, misuse, abuse or neglect.Please retain your receipt as proof of purchase and contact our Customer Service Centre 1800 124 125 (Australia) or 0800 945 995 (New Zealand) or alternatively, via Customer Help at Kmart.com.au for any difficulties with your product. Warranty claims and claims for expenses incurred in returning this product can be addressed to our Customer Service Centre at 690 Springvale Rd, Mulgrave Vic 3170.Our goods come with guarantees that cannot be excluded under the Australian Consumer Law. You are entitled to a replacement or refund for a major failure and compensation for any other reasonably foreseeable loss or damage. You are also entitled to have the goods repaired or replaced if the goods fail to be of acceptable quality and the failure does not amount to a major failure.For New Zealand customers, this warranty is in addition to statutory rights observed under New Zealand legislation.IMPORTANT!For all technical queries or difficulties in operating the product and for spare parts, contact H.E. Group customer service 1300 105 888 (Australia) and 09 8870 447 (New Zealand).
[xyz-ips snippet=”download-snippet”]