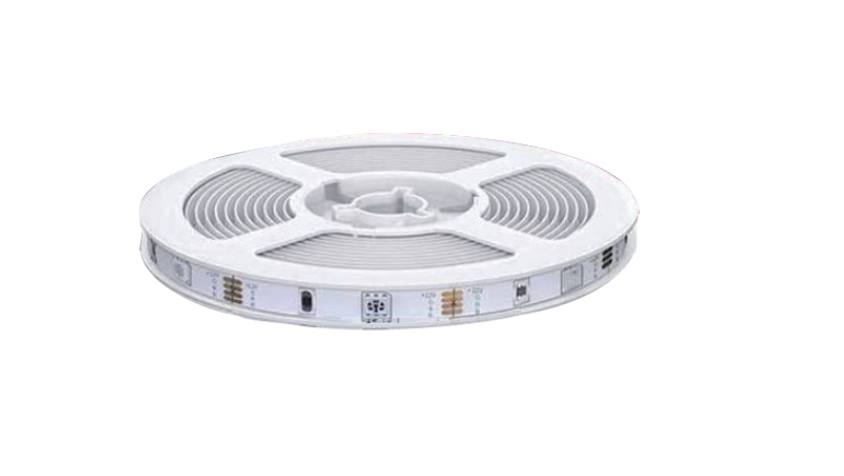
anko WiFi LED Light
Smart LED Light User Guide
Before using this smart light, please take a minute to know how it works.The smart light can work with both Amazon Alexa and Google Assistant. But the light after being installed will need to be paired with an app called ‘Tuya Smart’ first, and then the Tuya Smart App will need to be bound with either Amazon Alexa or Google Assistant to activate the voice control function.
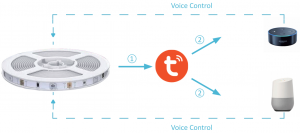
Therefore, this user guide consists of three parts. Part one is fundamental set up, while part two and three are alternatives. If you use Amazon Alexa for voice control, please follow instructions on part one and two. If you use Google Assistant for voice control, please skip part two, follow the instructions on part one and three.
Specification
| Keycode |
42997863 |
| Input |
10W; 5V,2A |
| Color |
RGB |
| Dimension |
3meter strip length, 1.8-meter cable length |
| Controlled by |
WIFI |
WARNING:
- The external flexible cable or cord of this luminaire cannot be replaced; if the cord is damaged, the luminaire shall be destroyed.
- The light source of this luminaire is not replaceable; when the light source reaches its end of life the whole luminaire shall be replaced.
- In door use only.
- To satisfy RF exposure requirement, a separation distance of 20cm or more should be maintained between this device and persons during device operation.
- To ensure compliance, operation at closer than this distance is not recommended. The antenna used for this transmitter must not be co-located in conjunction with any other antenna or transmitter.
Part One – How to pair the light to Tuya Smart App?
Step A: Tuya Smart app installationPlease choose either way below to download and install the app.
- Scan below QR code

- Search keyword ‘Tuya Smart’ in Apple Store or Google Play.

Step B: Create an account on Tuya Smart and login.Note: Please keep your account and password in mind for Alexa or Google Assistant App pairing later.
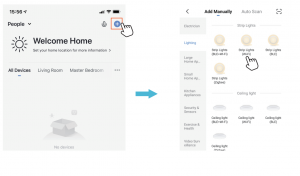
Step C: Add the light to Tuya Smart App
- Tap’+’ button on top right corner to add device, then tap ‘lighting devices’ to enter next page.
- WiFi ConnectionMake sure your smart phone is connected to your home 2.4Ghz WiFi network before set up the LED strip light.Please refer to your home WiFi router setup to connect to the 2.4Ghz WiFi network.5Ghz WiFi network is not supported.
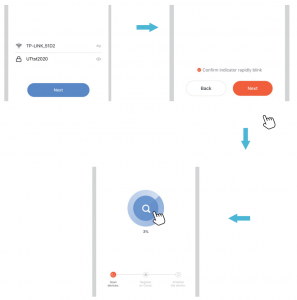
There are 2 startup methods for the strip:
- Press button on adaptor for 5 seconds till the strip enter into fast flashing mode.
- Plug and unplug adaptor 3 times (on-off-on-off-on) till the strip enter into fast flashing mode.Confirm the Light is in fast flashing Mode, then tap ‘confirm’ button toproceed. If you need help, tap, view help for more details.Enter your WiFi password, tap ‘ok’ button and wait till it is successfullyconnected.
Step D: Give a name to the light.
- A simple name is recommended for easier voice recognition with Alexa or Google Assistant.
- The name given to the light will be the same for voice control on Alexa or Google Assistant. For example, the light is named ‘smart light’ on this user guide
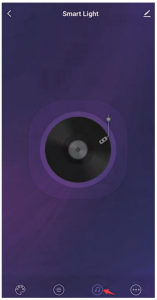
Step E: The named light will be shown on the app homepage. Now you can control the light (turn on/off, change colors, adjust brightness etc. ) with Tuya Smart on the setting page. Turn on or off the light by tapping the light icon.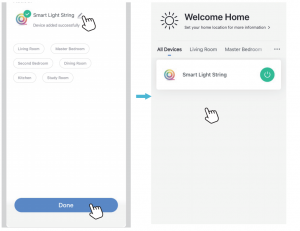
Note: To control the light with Amazon Alexa, please read Part Two.
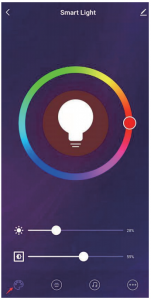
How To Control The Smart Light Strip By Tuya Smart App
- Turn On/Off the light DIY editing color
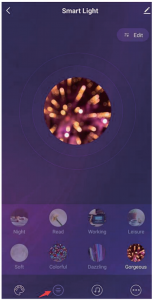
- Choose usage scenario
- Color will changing with the music beats
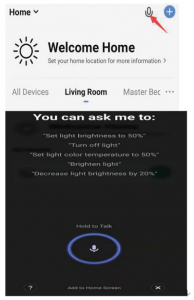
- Control the light by send command via microphone
Part Two – How to control the light with Amazon Alexa?
Please make sure that your Alexa app is connected to Echo, and both work well under your WiFi network.
Step A: Log in your Alexa App, tap top left corner, and tap ‘Skills’.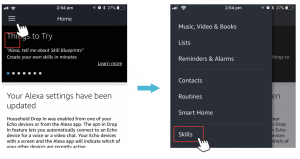
Step B: Type ‘Tuya Smart’, find ‘Tuya Smart’ from the search result and tap it to enable the skill.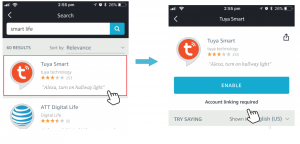
Step C: Enter your Tuya Smart App account and password. Tap ‘Link Now’, then tap ‘Authorize’ on the next page to bind Smart Life account to Alexa.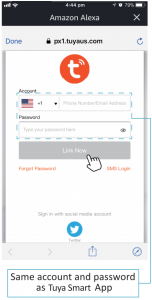
Step D: When your Tuya Smart account is bound to Alexa, tap ‘DISCOVER’ to detect the light.
Step E: When the named light is paired to Alexa from Tuya Smart, it will show on the device page (see the ‘smart light’ example).
Step F: Now you can control the light with Alexa App on the setting page. To turn on or off the light, simply tap the light icon.
Step G: You can also voice control the light with Alexa by giving these commands: “Alexa, turn on ‘device name’ “, “Alexa, set ‘device name’ to ‘color\’”, “Alexa, set ‘device name’ to ‘number\’”. Device name is the one you give to the light. The light is named ‘smart light’ in this user guide. For example, “Alexa, turn on ‘smart light\’”, “Alexa, set ‘smart light’ to ‘blue\’” etc.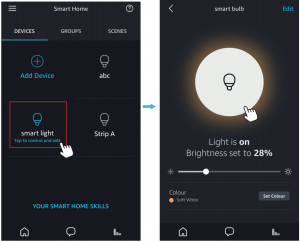
Part Three – How to control the light with Google Assistant?
Step A: Login Google Assistant App, tap ‘Home Control’ on the left side bar page.
Step B : Tap’+’ button on the bottom right to enter next page.
Step C: Find ‘Tuya Smart’ from side bar list.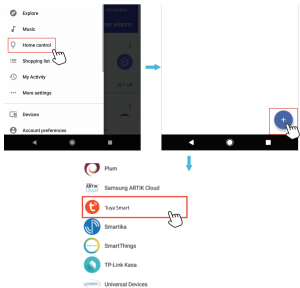
Step D: Enter your Tuya Smart App account and password to bind TuyaSmart account to Google Assistant.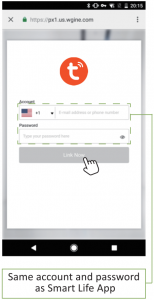 Step E: Y:ou will find the named light shows. on the Home Control page. Now you ,can control the light on Google Assistant App, or voice control it by giving these commands: “ok Google, turn on ‘device name’ -ok Google, set device name to ‘color’ ok Google, set device number to ‘number’Device name is the, one you give to the light. The light is named ‘smart light’ in this user guide. For example, “ok Google, turn on ‘smart light\’”, “ok Google, set ‘smart ‘light’ to ‘blue” etc.
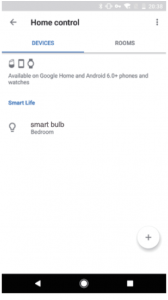
Month Warranty
Thank you for your purchase from Kmart.
Kmart Australia Ltd warrants your new product to be free from defects in materials and workmanship for the period stated above, from the date of purchase, provided that the product is used in accordance with accompanying recommendations or instructions where provided.This warranty is in addition to your rights under the Australian Consumer Law.
Kmart will provide you with your choice of a refund, repair or exchange (where possible) for this product if it becomes defective . within the warranty period. Kmart will bear the reasonable expense of claiming the warranty. This warranty will no longer apply where the defect is a result of alteration, accident, misuse, abuse or neglect. Please retain your receipt as proof of purchase and contact our Customer Service Centre on 1800 124 125 (Australia) or 0800 945 995 (New Zealand) or alternatively, via Customer Help at Kmart.com.au for any difficulties with your product. Warranty claims and claims for expense incurred in returning this product can be addressed to our Customer Service Centre at 690 Springvale Rd, Mulgrave Vic 3170.
Our goods come with guarantees that cannot be excluded under the Australian Consumer Law. You are entitled to a replacement or refund for a major failure and compensation for any other reasonably foreseeable loss or damage. You are also entitled to have the goods repaired or replaced if the goods fail to be of acceptable quality and the failure does not amount to a major failure.For New Zealand customers, this warranty is in addition to statutory rights observed under New Zealand legislation.
[xyz-ips snippet=”download-snippet”]