![]()
30cm bench fanQUICK START GUIDE
Please refer to the Instruction Manual for more details and images of the assembly procedure.
ASSEMBLE SAFETY GRILLE AND FAN BLADE
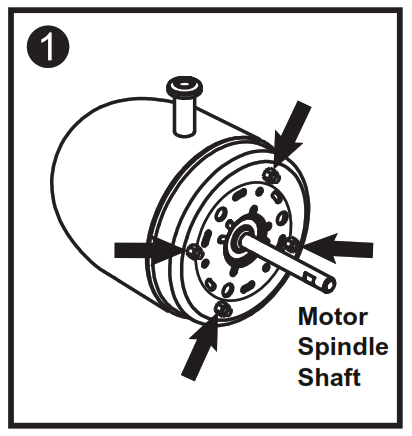
Remove the protective plastic sleeve from the motor spindle shaft and the 4 Screws as identified
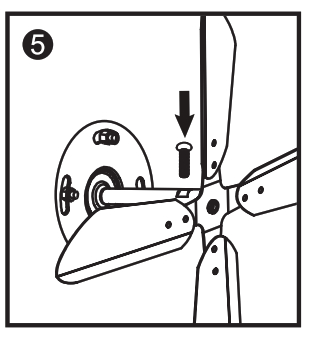
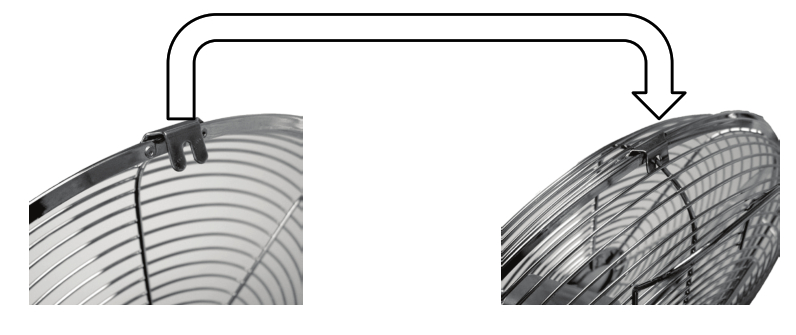
Fit the Back Safety Grille into position and refit the 4 Screws and tighten. (*Note: The handle on the back of thegrille should be at the top)
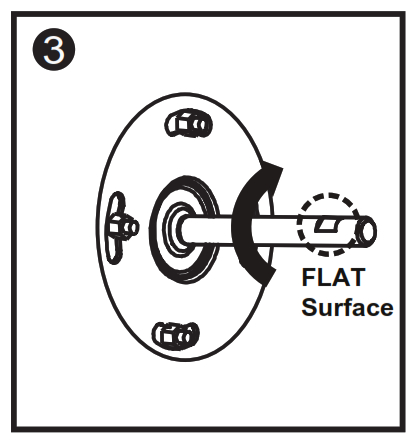
Rotate the motor spindle until the “FLAT” surface is facing up.
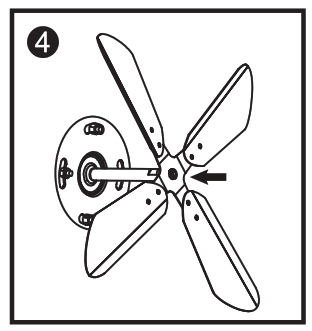
Slide and push the Fan Blade onto the spindle. Push on until the end of the fan blade hole is aligned with the end of the spindle.
 Then fix and tighten the screw. (Note: Ensure the screw is lined up with the “FLAT”.)
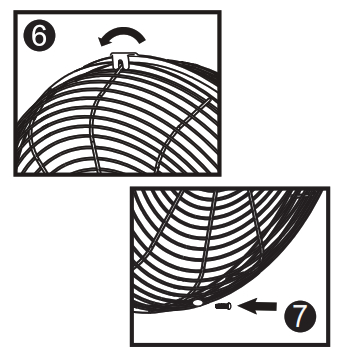
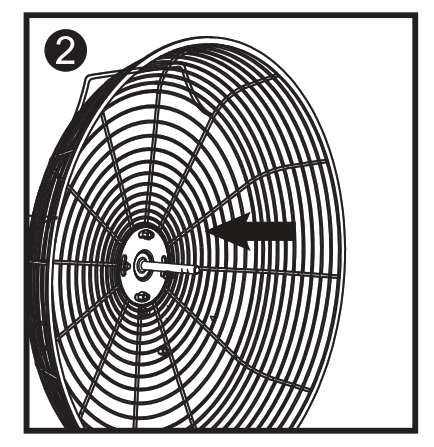
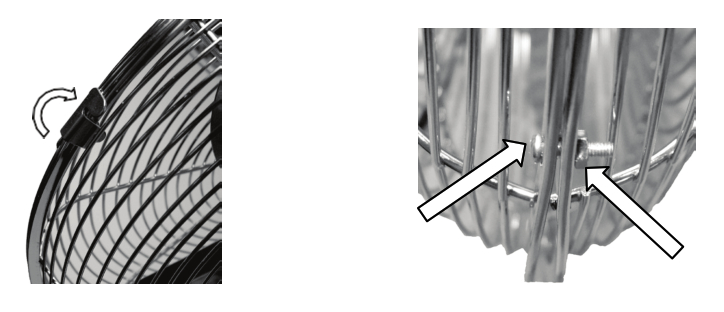
Place the Front Safety Grille into position and secure it by closing the clips over the outer rim.Using the Small Nut and Bolt, fasten the two grilles together.
If you are missing a part or having trouble when assembling the fan, please feel free to call our friendly customer service team on our toll-free number: 1300 105 888 or via email [email protected]. We will be glad to assist you.
30cm Bench Fan User Manual
Model No.: YS-1201GD BK (Black)Rev 1Note: The specifications and/or components of this appliance are subject to change without prior notice.
Safety Instructions
When using electrical appliances, basic safety precautions should always be followed, including the following:
- Carefully read this instruction manual before using appliance.

- Ensure that the fan is switched off from the supply mains before removing the guard
- Keep appliance out of reach of young children.
- This appliance is not intended for use by persons (including children) with reduced physical, sensory or mental capabilities, or lack of experience and knowledge, unless they have been given supervision or instruction concerning use of the appliance by a person responsible for their safety.
- Children should be supervised to ensure that they do not play with the appliance.
- Ensure children and babies do not play with plastic bags or any packaging materials.
- Do Not disassemble the appliance. There are no user-serviceable parts inside.
- VERY IMPORTANT:Ensure that the appliance does not get wet (water splashes etc.). Do not use appliances with wet hands. Do not immerse appliances in water or other liquids or use near sinks, baths or showers.
- Always operate the appliance from a power source of the same voltage, frequency and rating as indicated on the product identification plate.
- Position the power supply lead properly so that they will not be walked on or pinched by items placed on or against them.
- Use appliance only for its intended use. The appliance is intended for household use only and not for commercial or industrial use.
- Do not use the appliance if it has been dropped or any part of the appliance (including cord or plug) has been damaged.
- If the supply cord is damaged, it must be replaced by the manufacturer, its service agent or similarly qualified persons in order to avoid a hazard.
- The use of accessories not intended for use with this appliance may cause injuries to the user or damage to the appliance.
- Do not install the unit on other appliances, on uneven surfaces or where it could be subject to: heat sources (e.g. radiators or stoves), direct sunlight, excessive dust or mechanical vibrations.
-
Appliance should not be used outdoors, placed near a hot gas or electrical burner or placed in a heated oven.
- Do not install near any heat sources such as radiators, heat registers, stoves, or other apparatus that produce heat.
- Do not operate appliances underneath or near flammable or combustible materials (e.curtains). Keep at least 300mm clearance around sides, back, front and top.
- Unplug this appliance during lightning storms or when unused for long periods of time
- Do not block any ventilation openings.
- Turn off and unplug before cleaning or storing.
- Any type of servicing, apart from ordinary cleaning, must be carried out by a qualified electrical person only. There are no user-serviceable parts in this appliance.
- If this appliance is used by a third party, please supply the instruction manual with it.
- Do not misuse the cord. Never carry the appliance by the cord or pull to disconnect it from the outlet. Instead, grasp the plug and pull to disconnect.
- Do not insert or allow foreign objects to enter the grille openings as this may cause damage to the appliance and/or injury to the user.
-
No liability can be accepted for any damage caused by non-compliance with these instructions or any other improper use or mishandling of the appliance.

Additional Safety Instructions
If using an extension cord:
- The technical specifications of the extension cord must match or exceed the technical specifications of this appliance.
- Do not allow the cord to hang over the edge of the work surface or to come into contact with stoves or other hot surfaces.
- If the cord or plugs are worn or damaged, do not use.
- Unplug from the power socket by grasping the plug body – Do Not pull on the cord.
Read and Save These Instructions
Components
| A | Grille Decoration | L | Motor Housing |
| B | Front Grille | M | Neck |
| C | Locking Clip | N | Post |
| D | Fan Blade | O | Base |
| E | Fan Blade Locking Screw | P | Tilt Range Screw |
| F | Rear Grille Screws | Q | Base to Post Screw |
| G | Rear Grille | R | Tilt Adjustment Knob |
| H | Carry Handle | S | Tilt Range Knob |
| I | Motor Spindle | T | Tilt Adjustment Bolt |
| J | On / Off / Speed Knob | U | Grille Securing Bolt |
| K | Oscillating Knob | V | Grille Securing Nut |
Assembly
Your Fan has been boxed partially unassembled to minimise packaging waste.Each part is designed to fit together and be disassembled easily for cleaning or storage.
3.1 Safety Grille and Fan BladeTo assemble the safety grille and blade assembly, take the motor assembly and remove the 4 screws as identified.
 Fit the rear safety grille into position (with the handle on the back of the grille at the top) and refit the 4 screws and tighten.Remove the protective plastic sleeve from the motor spindle shaft and discard it.Next, rotate the motor spindle until the “flat” surface is facing up.Slide the fan blade onto the spindle ensuring the screw is lined up with the “flat” surface on the spindle as shown.Push on until the end of the spindle is flush with the end of the fan blade hole, then tighten the screw.
Open up all locking clips on the sides of the rear safety grille.
Place the safety grille into position by lining up the slot in the location plate over the top of the rear grill and over the wire-spoke as shown and push down.
 Secure the grille by closing the clips over the outer rim.Then using the small nut and bolt, fasten the two grilles together.
Instructions for Use
Remove the cable tie and unravel the cords before operation.
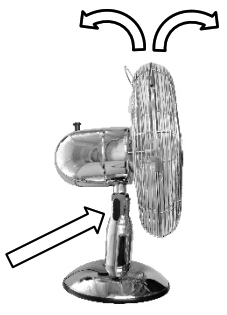
4.1 Head TiltThe fan and motor assembly Can be tilted up and down to your desired angle.To adjust the tilt angle, undo the adjustment knob, tilt the head to the desired angle and then re-tighten the knob.

4.2 Fan On / Off / Speed
Rotate the knob to position I for a low speed, II for a medium speed and III for a high speed.Rotate the knob to position 0 to switch the Fan off.
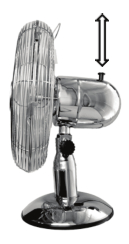
4.3 OscillationPress the clutch knob down to activate the oscillating function. The fan head will swing from side to side whilst blowing air.To stop oscillation, allow the Fan head to move into the desired position and then pull the clutch knob up.
Care and Cleaning
- Ensure that the fan is switched off from the supply mains before removing the guard.
- Turn off and unplug the unit prior to cleaning.
- Clean the motor housing and body assembly with a clean, damp cloth and wipe dry.
- Never spray with liquids or submerge the Fan in water or any other liquid.
- Do not use flammable liquids, chemicals, abrasive creams, steel wool or scouring pads for cleaning.
Storage
Switch off and unplug the fan.Coil the cable loosely. Do not kink or pull the cable tight. Store your fan in a cool, dry location
Warranty Against Defect
12 Month WarrantyThank you for your purchase from Kmart.
Kmart Australia Ltd warrants your new product to be free from defects in materials and workmanship for the period stated above, from the date of purchase, provided that the product is used in accordance with accompanying recommendations or instructions where provided. This warranty is in addition to your rights under the Australian Consumer Law.
Kmart will provide you with your choice of a refund, repair or exchange (where possible) for this product if it becomes defective within the warranty period. Kmart will bear the reasonable expense of claiming the warranty. This warranty will no longer apply where the defect is a result of alteration, accident, misuse, abuse or neglect.
Please retain your receipt as proof of purchase and contact our Customer Service Centre 1800 124 125 (Australia) or 0800 945 995 (New Zealand) or alternatively, via Customer Help at Kmart.com.au for any difficulties with your product. Warranty claims and claims for expenses incurred in returning this product can be addressed to our Customer Service Centre at 690 Springvale Rd, Mulgrave Vic 3170.
Our goods come with guarantees that cannot be excluded under the Australian Consumer Law. You are entitled to a replacement or refund for a major failure and compensation for any other reasonably foreseeable loss or damage. You are also entitled to have the goods repaired or replaced if the goods fail to be of acceptable quality and the failure does not amount to a major failure.
For New Zealand customers, this warranty is in addition to statutory rights observed under New Zealand legislation.
IMPORTANT!For all technical queries or difficulties in operating the product and for spare parts, contact H.E. Group customer service 1300 105 888 (Australia) and 09 8870 447 (New Zealand).
[xyz-ips snippet=”download-snippet”]